

 Thanks: 0
 Likes: 0
 Needs Pictures: 0
 Picture(s) thanks: 0
Results 1 to 11 of 11
Thread: Bonsai table - WIP
-
13th July 2012, 04:20 PM #1
 Intermediate Member


- Join Date
- Jun 2012
- Location
- Brazil
- Age
- 43
- Posts
- 27
 Bonsai table - WIP
I have a couple of friends who asked me to make some bonsai tables. I did make two tables for tests but I wanted to make a better table, with chinese inspirations. In the link below is a bonsai table that I have already made: http://i228.photobucket.com/albums/e...BH/foto194.jpg
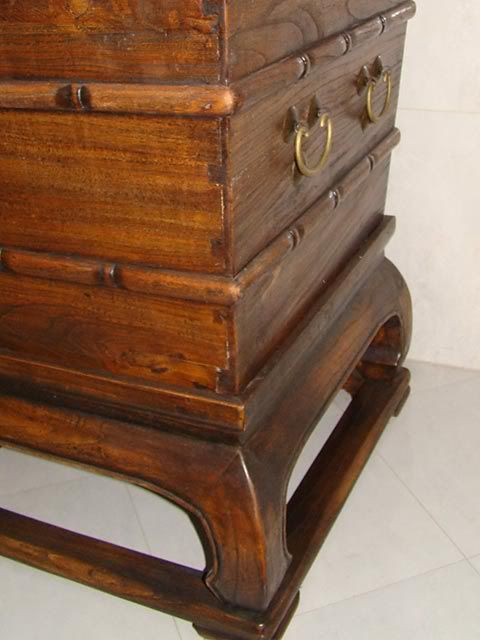
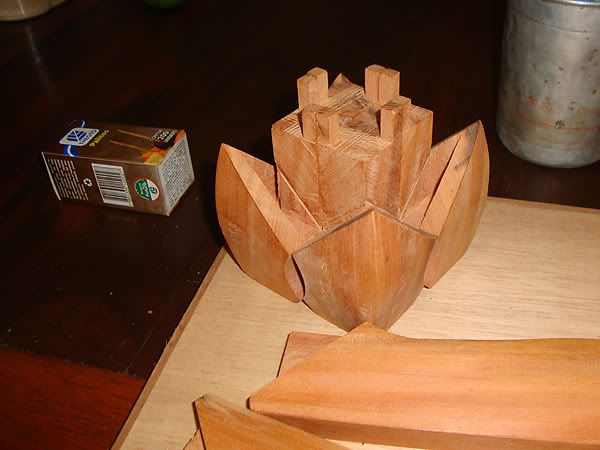
This is a chinese chest of my cousin, in chinese furniture is commom to see triple miter in the corners. The most complex triple miter is a complex joint, with inside mortises and tenons and slinding dovetails. The joint can be viewed in the link: http://1.bp.blogspot.com/_RSeTrS6Uy2...0/DSC02595.JPG
I wanted a triple miter joint in the corners, but the table is small and I am not crazy to do the most complex joint in such small thing. Then I make the joint without the slinding dovetails. Maybe in something not so small and with a more docile wood I can try the complete joint.
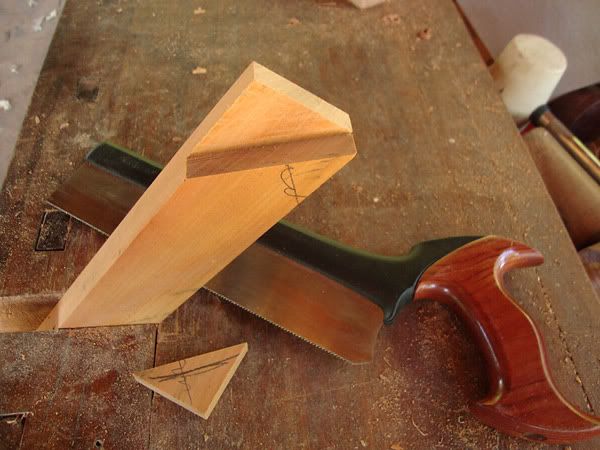
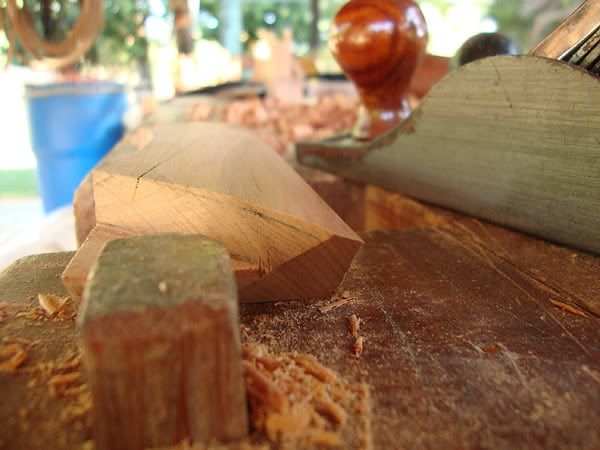
I cut the pieces (one apron in the photo) with hand and eletric tools. The miter is cut in the table saw with a dedicated jig to cut miters, and the rest is cut with a dovetail saw.
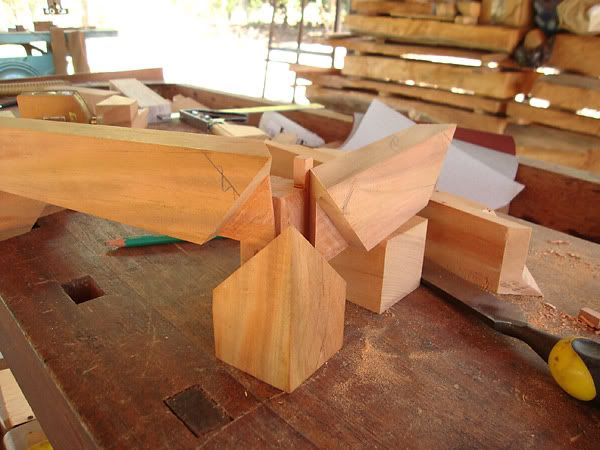
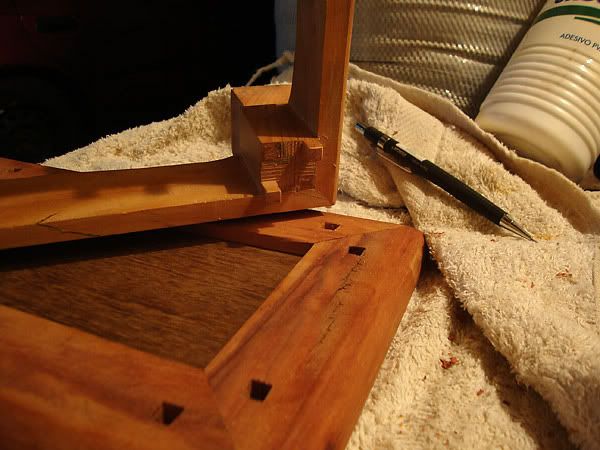
Here is the joint. The feet has two tenons on top that will be atached in mortises on the table top.

The feet has mortises that are chopped with a chisel, after the miter is cutted.
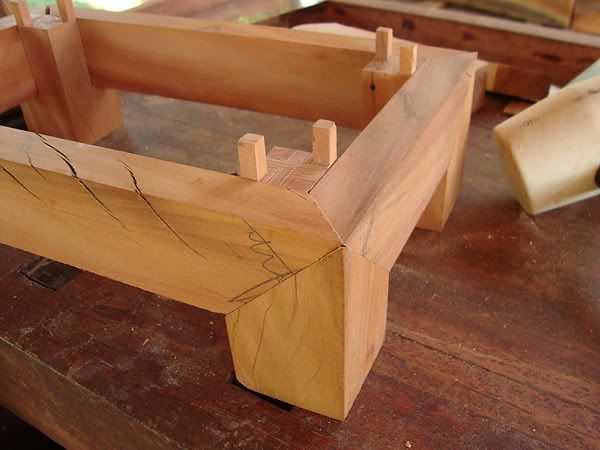
Here is the joint dry assembled, but yet squared. I cut the feet curves in the bandsaw.
I mark the aprons and hand planed the curvature to match the feet.
Here is the feet and aprons, ready to assemble.
After the glue is dry, I scraped and sanded the base.
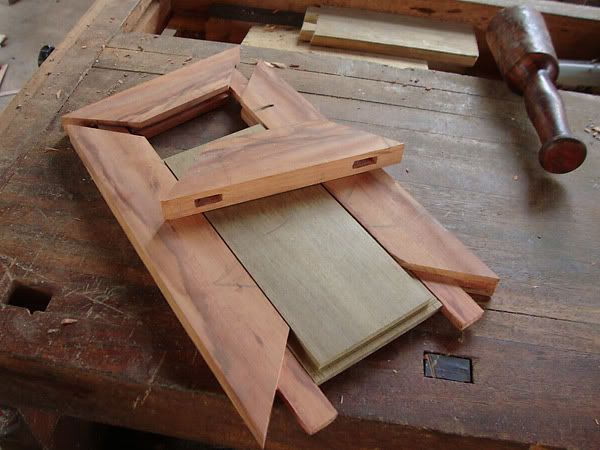
The table top is made with the classic chinese form, the frame is made with mitered corners but also through mortise and tenon. The panel is floating with a considerable gap to accommodate seasonal changes, especially because the table can receive some water and sunlight during its use.
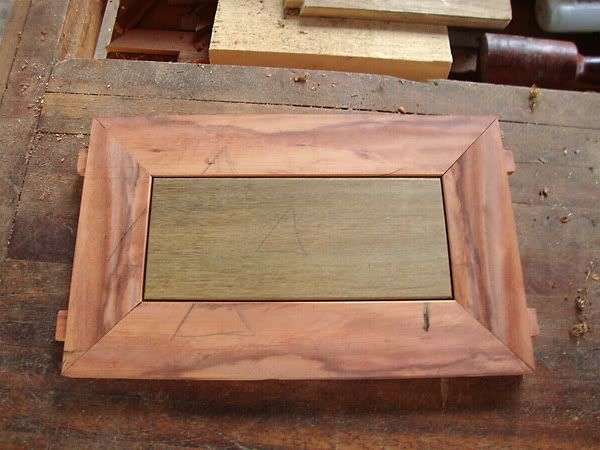
And here is the top table dry assembled, the protruding tenons will be cutted later.
As soon I can, I will post more WIP pictures.
-
13th July 2012 04:20 PM # ADSGoogle Adsense Advertisement
- Join Date
- Always
- Location
- Advertising world
- Age
- 2010
- Posts
- Many
-
13th July 2012, 07:33 PM #2
SENIOR MEMBER
- Join Date
- Jan 2008
- Location
- Blue Mountains
- Age
- 61
- Posts
- 866
Nice work Tomazelli, some tricky joinery there. Looks to be coming together well.
 The time we enjoy wasting is not wasted time.
-
14th July 2012, 11:16 AM #3
Intermediate Member
- Join Date
- Jun 2012
- Location
- Brazil
- Age
- 43
- Posts
- 27
Proceeding with the table making. I have marked and chopped the mortises in the top to fit the feet tenons, using first a undersized drill bit to remove most of the waste and proceeding with a chisel. Each of the two foot tenons stay on each side of the miter joint, this (and the tenons of the miter joint) keeps the joint assembled even if the glue fails.

As I do not have an appropriate bit, I made the border profile in the table top with a hand plane. The table is almost completed here, missing only the bead profile in the feet and aprons.

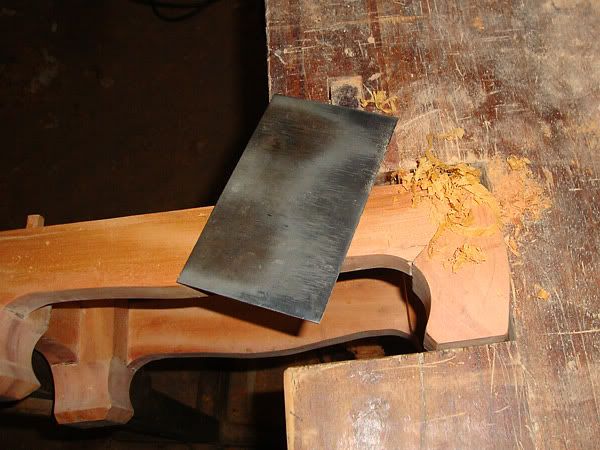
I do not have pictures when I made the bead, but I used a simple hand tool, made from an old steel plate. This tool works great in straigth and slight curves, but in the tight curves is almos impossible to make the profile only with this tool. Then I made some of the profile with this tool and completed it with a sharp chisel.
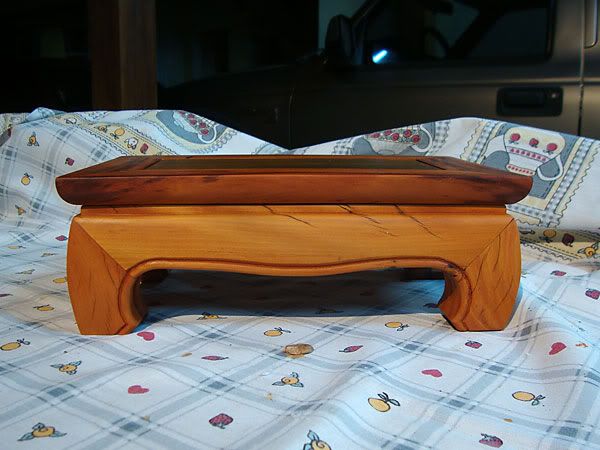
And here is the table completed, already with the first tung oil coat. The appearence do not will change much after more coats of oil.
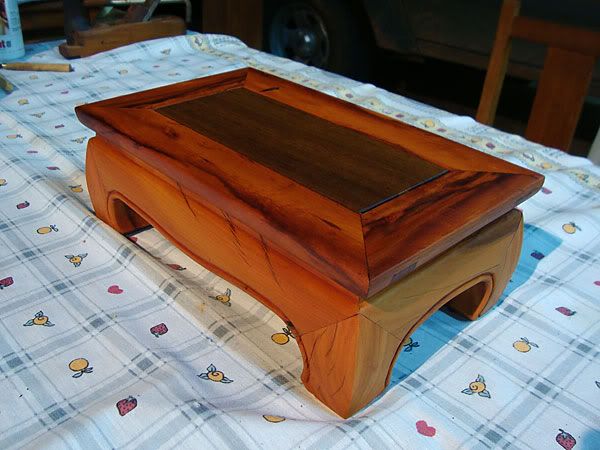
The wood from the base and the top frame is the same, reclaimed timber from old roof beams, know here as Peroba Rosa, Aspidosperma polyneuron, a wood that has been much explored and used primarily in carpentry, its color can vary from orange to rosy red. The wood from the top panel is Itauba, Mezilaurus itauba, a very durable wood, resistant to rot, that appears to have oil or wax in it and it is difficult to glue with PVA glue.
Sorry for the night pictures, I Will take some better pictures in the daylight and post.
Regards
Last edited by Tomazelli; 14th July 2012 at 08:39 PM. Reason: correcting my poor english :-)
-
14th July 2012, 01:03 PM #4
GOLD MEMBER
- Join Date
- Aug 2007
- Location
- Brisbane
- Posts
- 1,156
Wow! My Bonsai would be proud to stand on that table. Well done
The other day I described to my daughter how to find something in the garage by saying "It's right near my big saw". A few minutes later she came back to ask: "Do you mean the black one, the green one, or the blue one?".
-
14th July 2012, 06:28 PM #5
GOLD MEMBER
- Join Date
- Jun 2007
- Location
- North Of The Boarder
- Age
- 68
- Posts
- 16,794
Beautiful work.
-
14th July 2012, 07:52 PM #6
SENIOR MEMBER
- Join Date
- Feb 2012
- Location
- Nowra, NSW, Australia
- Age
- 65
- Posts
- 3,003
Great job Tomazelli.
A lovely looking little table.
Very informative thread, too, with good WIP pics.... Steve
-- Monkey see, monkey do --
-
18th July 2012, 09:34 AM #7
Senior Member
- Join Date
- Nov 2010
- Location
- Lone Tree, Colorado, USA
- Posts
- 340
Wow! Really fantastic work there!
-
18th July 2012, 10:05 AM #8
GOLD MEMBER
- Join Date
- Nov 2003
- Location
- Sydney
- Age
- 53
- Posts
- 8,879
-
18th July 2012, 10:42 AM #9
Neander Normite
- Join Date
- Jan 2005
- Location
- Melbourne
- Age
- 65
- Posts
- 11,997
-
18th July 2012, 02:06 PM #10
Intermediate Member
- Join Date
- Jun 2012
- Location
- Brazil
- Age
- 43
- Posts
- 27
Peter, if the distance from here to there were not so great
 , it would be a pleasure to make a table for your bonsai.
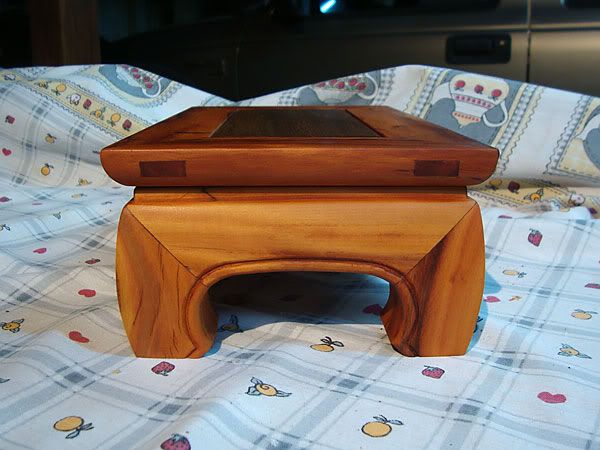
I finished the table with about 5-6 coats of tung oil. It is not waterproof, but is some water resistant. I take some better pics with a friend's camera. I am posting them almost all in links to avoid overloading the thread.
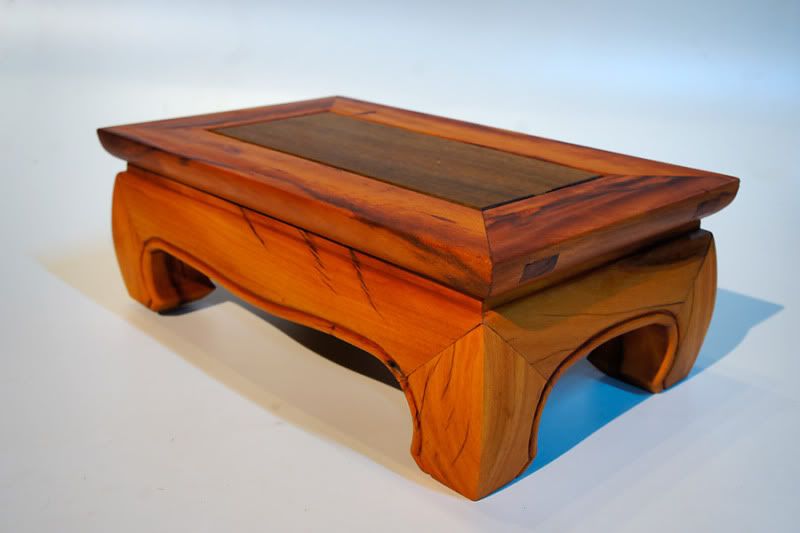
More pics:
http://i37.photobucket.com/albums/e9...ai/mesac21.jpg
http://i37.photobucket.com/albums/e9...ai/mesac22.jpg
http://i37.photobucket.com/albums/e9...ai/mesac24.jpg
http://i37.photobucket.com/albums/e9...ai/mesac25.jpg
http://i37.photobucket.com/albums/e9...ai/mesac26.jpg

And this is my logo poorly carved. Although I am not a professional woodworker, a friend that works with advertising kindly made this logo for me.
Thanks all for comments.
-
18th July 2012, 07:48 PM #11
Skwair2rownd
- Join Date
- Nov 2007
- Location
- Dundowran Beach
- Age
- 76
- Posts
- 19,922

Muito bom!! Excellent work there Tomazelli!!

As Hermit says, this is a very informative thread.
Your choice of Tung Oil as a finish is spot on.
Like your maker's mark.


 Reply With Quote


Similar Threads
-
Bonsai Australian trees...beautiful.
By Mollywood in forum WOODWORK - GENERALReplies: 7Last Post: 30th January 2012, 09:54 AM -
bonsai plant stand
By jasons673 in forum FURNITURE, JOINERY, CABINETMAKING - formerly BIG STUFFReplies: 7Last Post: 9th March 2011, 06:30 PM -
Sliding table and out-feed table for TSC-10HB table saw
By mikm in forum HOMEMADE TOOLS AND JIGS ETC.Replies: 31Last Post: 24th July 2009, 12:58 AM -
What's The Difference Between A Pool Table & Snooker Table & Billiard Table
By echnidna in forum NOTHING AT ALL TO DO WITH WOODWORKReplies: 47Last Post: 26th January 2007, 05:09 PM -
Bonsai stand - broke it!
By Clinton1 in forum WOODWORK PICSReplies: 6Last Post: 2nd January 2007, 07:21 AM
