

 Thanks:
  Likes:
  Needs Pictures:
  Picture(s) thanks:
Results 1 to 11 of 11
Thread: Circular louvre
-
7th December 2012, 10:47 AM #1
 Member


- Join Date
- May 2009
- Location
- Sydney Australia
- Age
- 70
- Posts
- 67
 Circular louvre
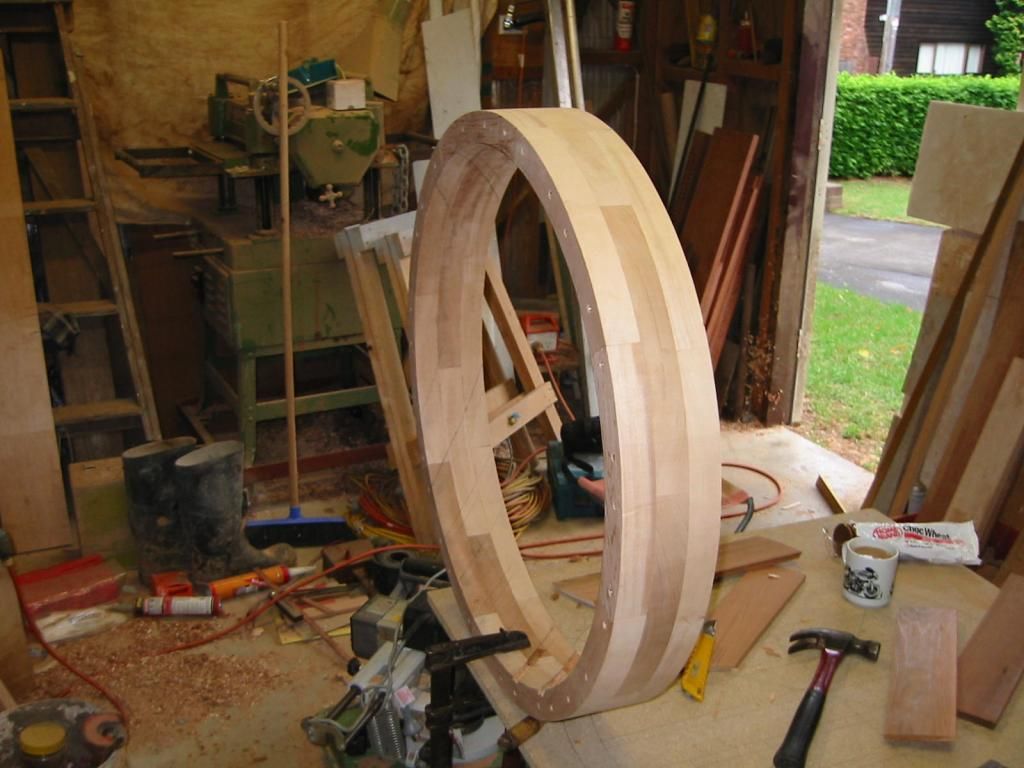
Back in the late '60's whilst doing my apprenticeship as a car and wagon builder with the NSW Government Railways, I was called upon to construct a timber circular louvre as an exercise.
I remember this being one of the most difficult tasks that I had to do whilst under their employment.
Fast forward to 2006, I'm now working for a high end residential builder in Sydney. I was once again called upon to construct a circular louvre in Western Red Cedar for a farm house in Oberon.
I was a bit daunted by the prospect of the construction, as I recall, when I built the one in the railways, the setout of the blades was critical to achieve a good result.
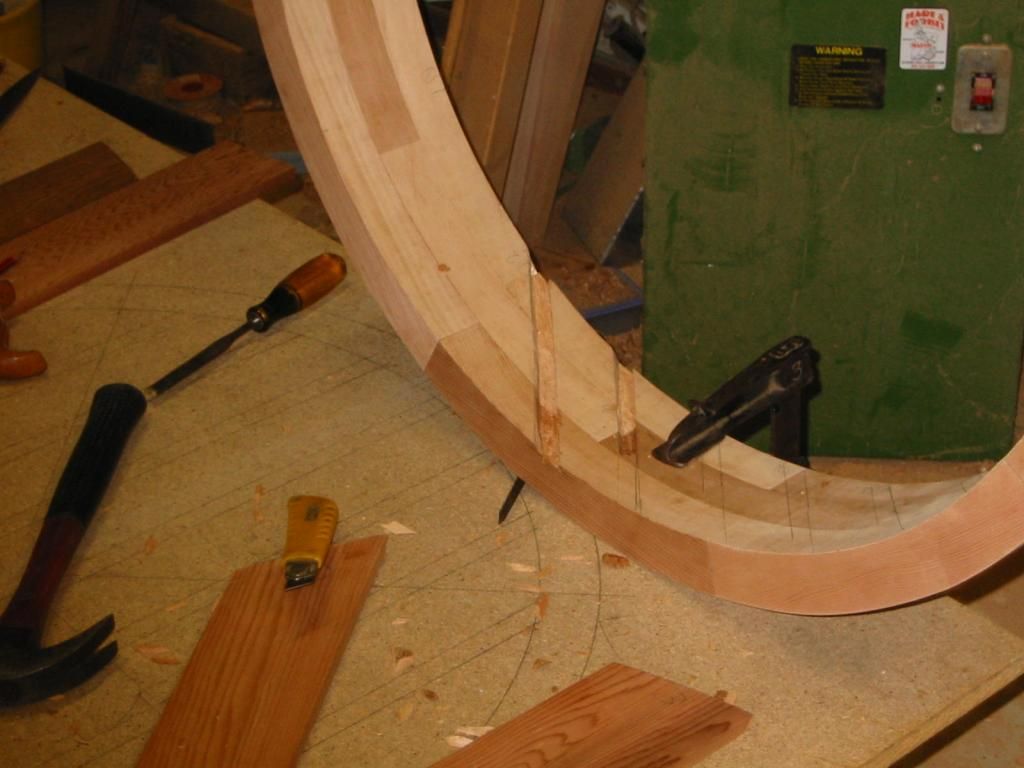
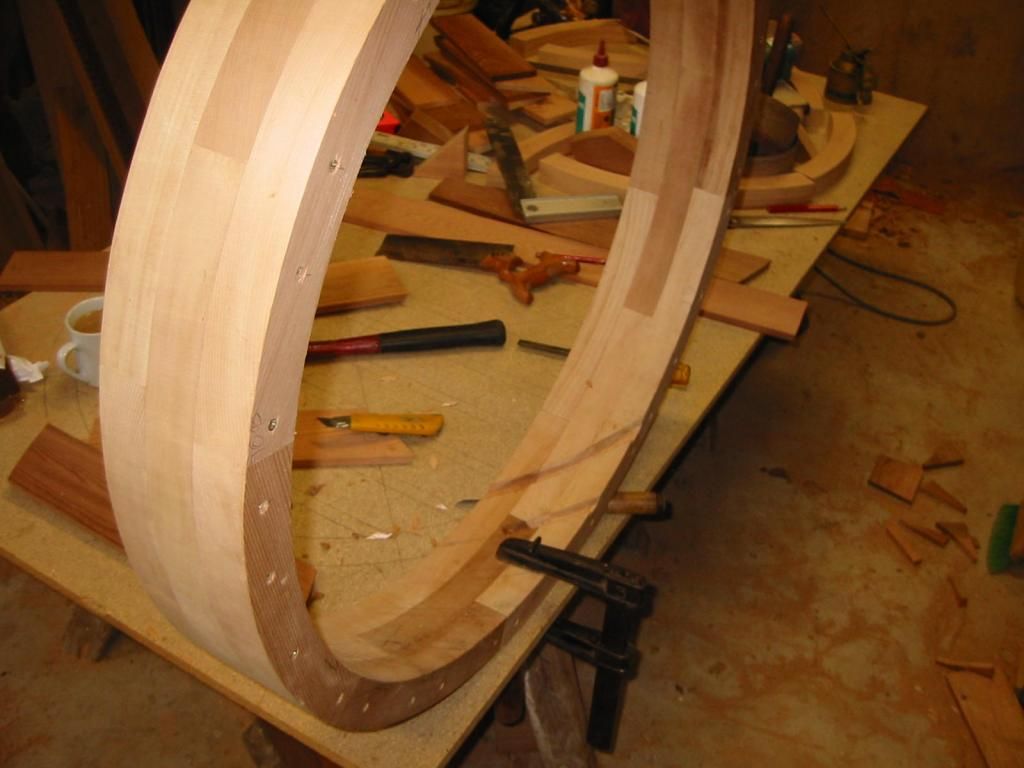
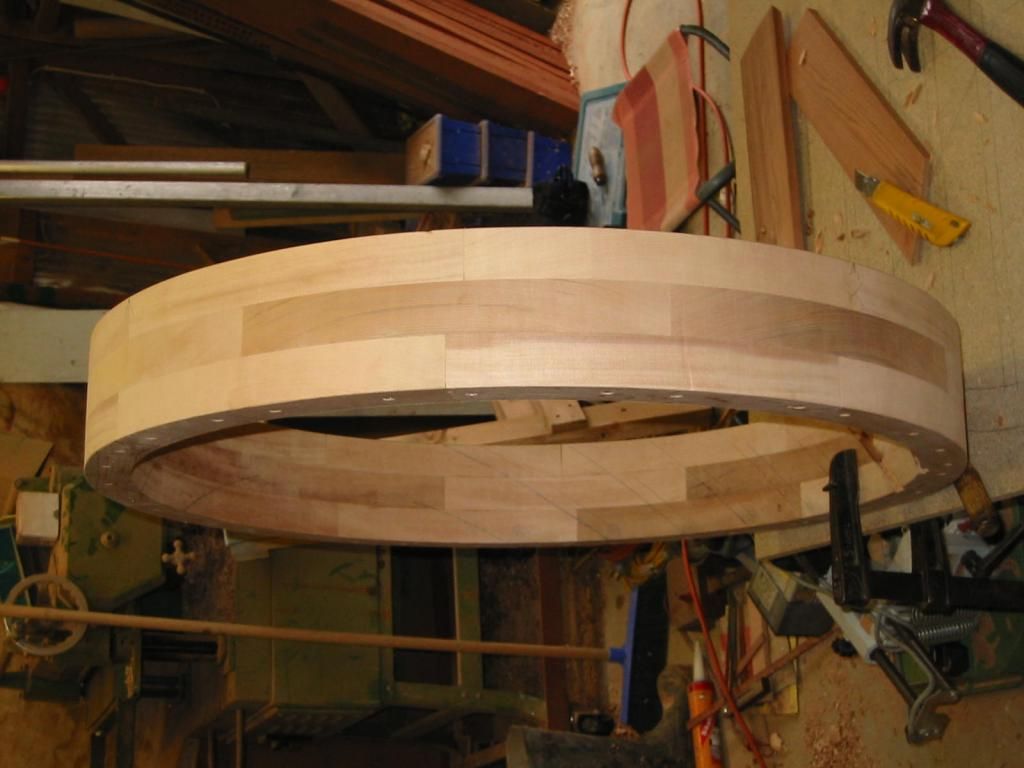
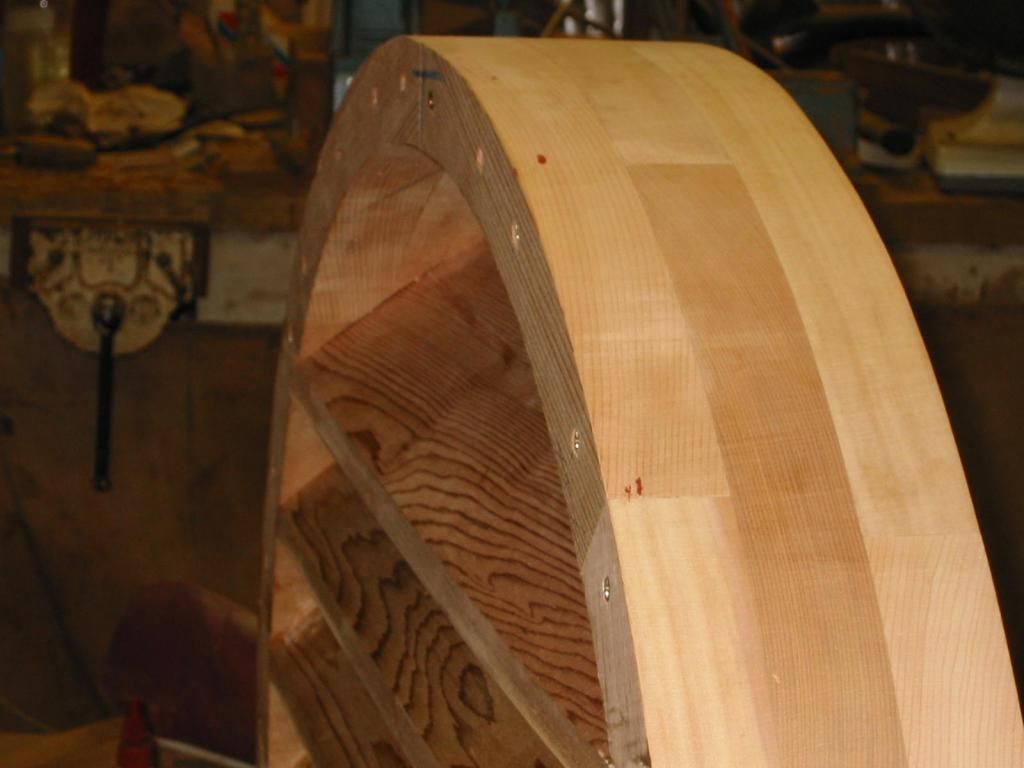
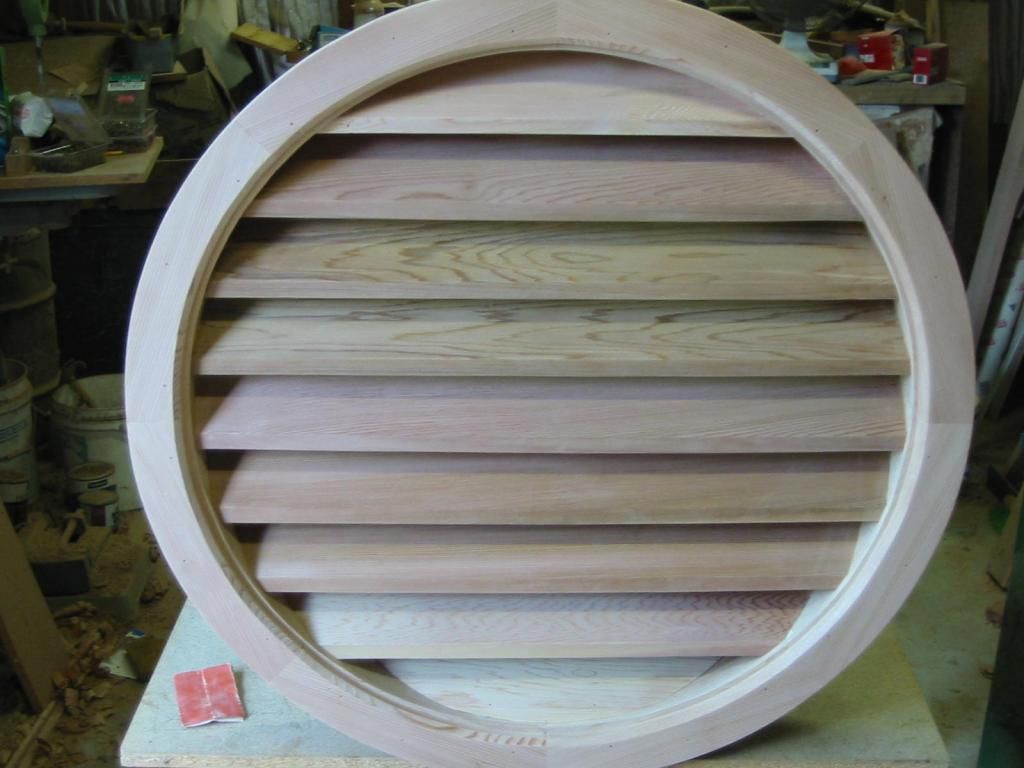
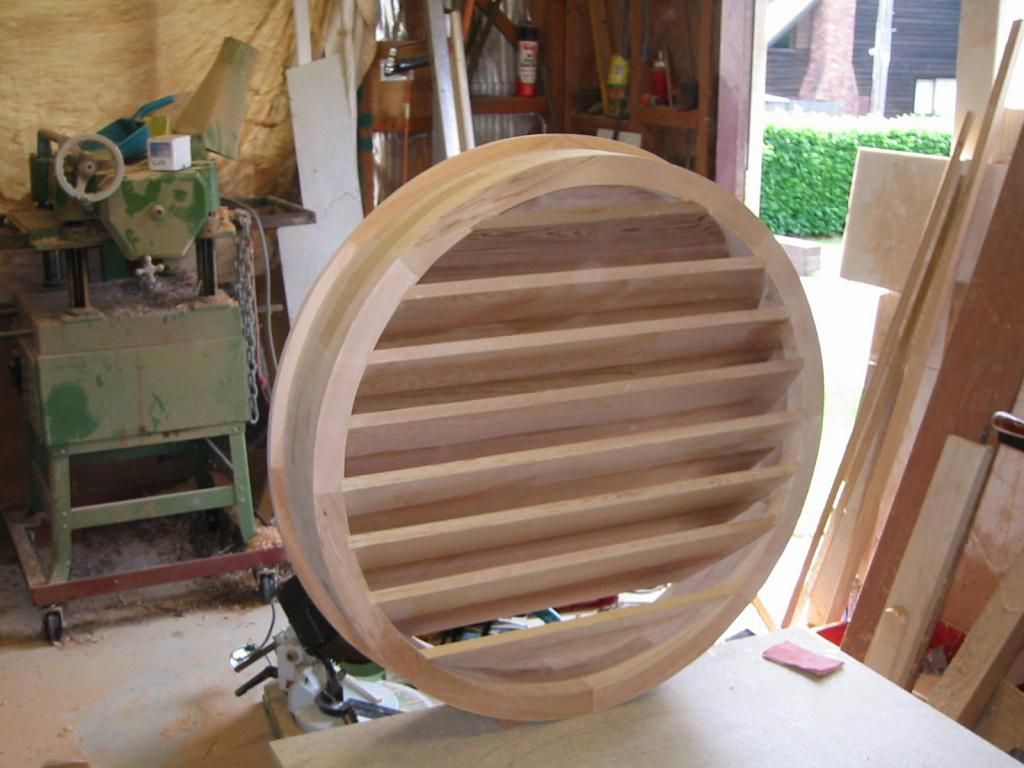
As can be seen in the pics, the frame is made of laminated WRC glued and screwed together......that was the easy part.......marking out and cutting the trenches for the blades was the challenge!!
As can be seen, a detailed drawing was made on a piece of chipboard. With perseverance, the louvre was completed in about 3 days with no major stuff ups!! The finished louvre is 900mm in diameter and 140mm thick.
 I'm not young enough to know it all.
-
7th December 2012 10:47 AM # ADSGoogle Adsense Advertisement
- Join Date
- Always
- Location
- Advertising world
- Age
- 2010
- Posts
- Many
-
7th December 2012, 11:51 AM #2
Senior Member
- Join Date
- Sep 2012
- Location
- Coffs Harbour
- Posts
- 226
That's impressive.
It hurt my brain just thinking about it.
Andrew
-
7th December 2012, 01:39 PM #3
almost a woodworker
- Join Date
- Feb 2007
- Location
- blue mountains
- Posts
- 4,891
That is an impressive bit of woodwork. I am tempted to ask how you calculate the curves to fit in the slots but the answer may be too much for my old head to get around.
Top job
Regards
John
-
7th December 2012, 04:38 PM #4
Skwair2rownd
- Join Date
- Nov 2007
- Location
- Dundowran Beach
- Age
- 76
- Posts
- 19,922

There! That wasn't so hard, was it?

Super job!!
-
7th December 2012, 07:27 PM #5
SENIOR MEMBER
- Join Date
- Jan 2010
- Location
- Range View, Australia
- Posts
- 656
You're the baddest billyt !!!
Cheers, Bill
-
7th December 2012, 07:38 PM #6

 Burnt Out Chip
- Join Date
- Feb 2009
- Location
- moonbi nsw Aus
- Age
- 69
- Posts
- 2,065
Congratulations billy t what a great job. Its such a shame that things have gotten so expensive that we can only rarely execute such tasks. Did it give you a "warm glow" as you worked on it and remembered back to the railways days?
Just do it!
Kind regards Rod
-
8th December 2012, 06:09 AM #7
GOLD MEMBER
- Join Date
- Feb 2009
- Location
- Bristol, UK
- Age
- 66
- Posts
- 1,540
Okay, I'm impressed - lots...
Well done and thanks for the WiP pics
Dragonfly
No-one suspects the dragonfly!
-
8th December 2012, 08:51 AM #8
Dehydrated Hydrographer
- Join Date
- Jun 1999
- Location
- Westleigh, Sydney
- Age
- 77
- Posts
- 9,550
-
8th December 2012, 09:11 AM #9
Member
- Join Date
- Apr 2009
- Location
- New Zealand
- Posts
- 71
Great job and very intriguing! Did you use a jig and router to cut the curved sections? I'm guessing you must have had a circular frame/former to hold the pieces in while screwing and gluing?
Was there a bit of advanced math involved with the marking out? Or I'm wondering if a laser level and pencil could have been used? Or perhaps just a straight edge on a smaller model louvre inside the circle slid out to mark insides? I see the cut outs were done by hand - no way to squeeze a router in there, right? Thanks for sharing
-
8th December 2012, 11:52 AM #10
GOLD MEMBER
- Join Date
- Aug 2011
- Location
- bilpin
- Posts
- 3,559
Thems were the days. Do you think the exercise was the difficulty, or old Dick Hunt looking over your shoulder and tut tutting in your ear?
-
8th December 2012, 11:52 AM #11
Member
- Join Date
- May 2009
- Location
- Sydney Australia
- Age
- 70
- Posts
- 67
You got it johnnz...........no lasers or routers, I made a shorter louvre for each blade and basically marked the trenches with that. A bit time consuming but it works. As you can imagine, the angle of the sides of the trenches changes from the front of the blade to the rear. Most of the side cuts were cut with a snap off blade knife and cleaned up with a chisel. But some problems arose while cleaning out the trenches as the grain orientation changes as you go from front to rear.
When I did the first circular louvre in the railways many years ago, they made us calculate all the angles needed to to do the cuts......it really messed with my brain!!!!! the way I did this one was the easiest way for ME!!
Glad you all like it. billly
 Originally Posted by Johnnz
 I'm not young enough to know it all.

 Reply With Quote


Similar Threads
-
Louvre
By spongdog in forum FINISHINGReplies: 6Last Post: 16th July 2007, 06:41 PM -
Wstrn Red Cedar Louvre blades
By Fantapantz in forum FINISHINGReplies: 4Last Post: 7th August 2003, 09:46 AM -
louvre door
By jow104 in forum TRITON / GMCReplies: 0Last Post: 1st November 2002, 05:55 AM
