

 Thanks:
  Likes:
  Needs Pictures: 0
 Picture(s) thanks: 0
Results 16 to 29 of 29
-
26th May 2017, 05:54 PM #16
 GOLD MEMBER

- Join Date
- Jun 2014
- Location
- Seattle, Washington, USA
- Posts
- 1,857

I'm with Derek, pretty much.
I groove the front and sides and leave the back open, and I also pick an easy dovetail profile with the fewest tails. I keep my pins larger than Derek has. It probably makes no difference, given the stresses that the drawer is likely to see, but it's one of those undeniable things that having tiny pins or tails weakens the joint, so I err toward stronger. I'd make neither of them less than 10mm at any point.
As far as the why, most of it is just a question of how much time you want to put into it and how good you want it to look. You could use full blind dovetails and just have it look like a mitred box at the back, but that would take way more time than it's worth, so no one does it. The widely accepted version that Derek and I use is the quickest and easiest one which is still a hand cut dovetail joint.
There is, however, one undeniable fact about doing it this way which makes it better on one topic, and that is the expansion of the drawer bottom. Since there is no back for the bottom to expand against, you don't risk it pressing against the front. You get a good, tight fit and then just put a bead of glue in the groove at the front and the bottom can have at it for the next hundred years. Yes, a back which encloses the bottom could do the job as well if you were careful, but, then again, that takes more time.
Hope that helps,
Luke
-
26th May 2017 05:54 PM # ADSGoogle Adsense Advertisement
- Join Date
- Always
- Location
- Advertising world
- Posts
- Many
-
26th May 2017, 06:38 PM #17
 Dehydrated Hydrographer


- Join Date
- Jun 1999
- Location
- Westleigh, Sydney
- Age
- 77
- Posts
- 9,550
If you'd like to see the cabinet I mentioned, and you are ever in Annapolis, MD, visit the William Paca House. The cabinet doesn't come from there, but is contemporaneous. Ask if the curator can let you see inside the top drawer - there's a surprise there.
When I was there last month it had just arrived, and the guide couldn't touch it. However, when the curator arrived, she was happy to put on her white gloves and do so. Also, ask to see the bullet hole.
-
26th May 2017, 08:43 PM #18
Be inspired. Be creative. Be bold.
- Join Date
- Apr 2001
- Location
- Perth
- Posts
- 10,826
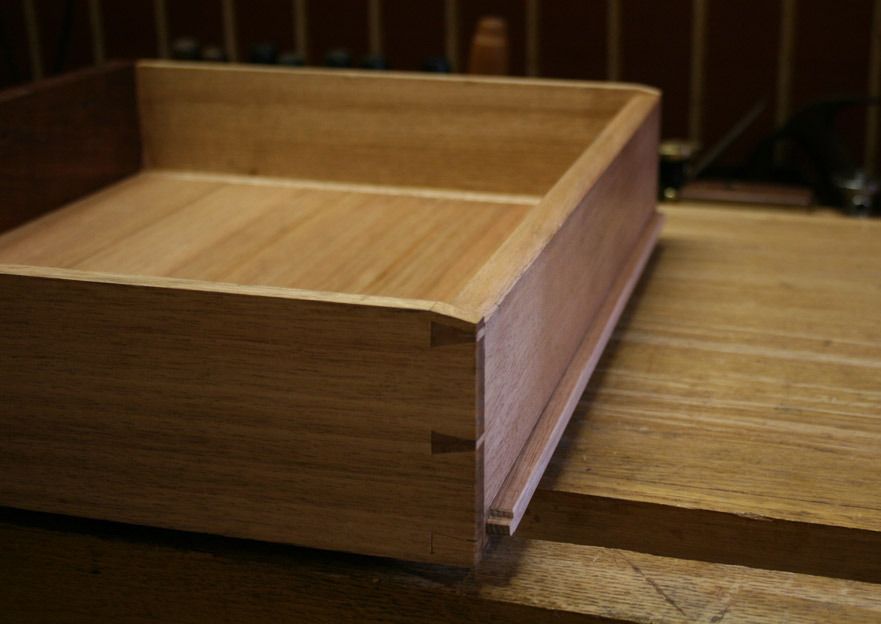
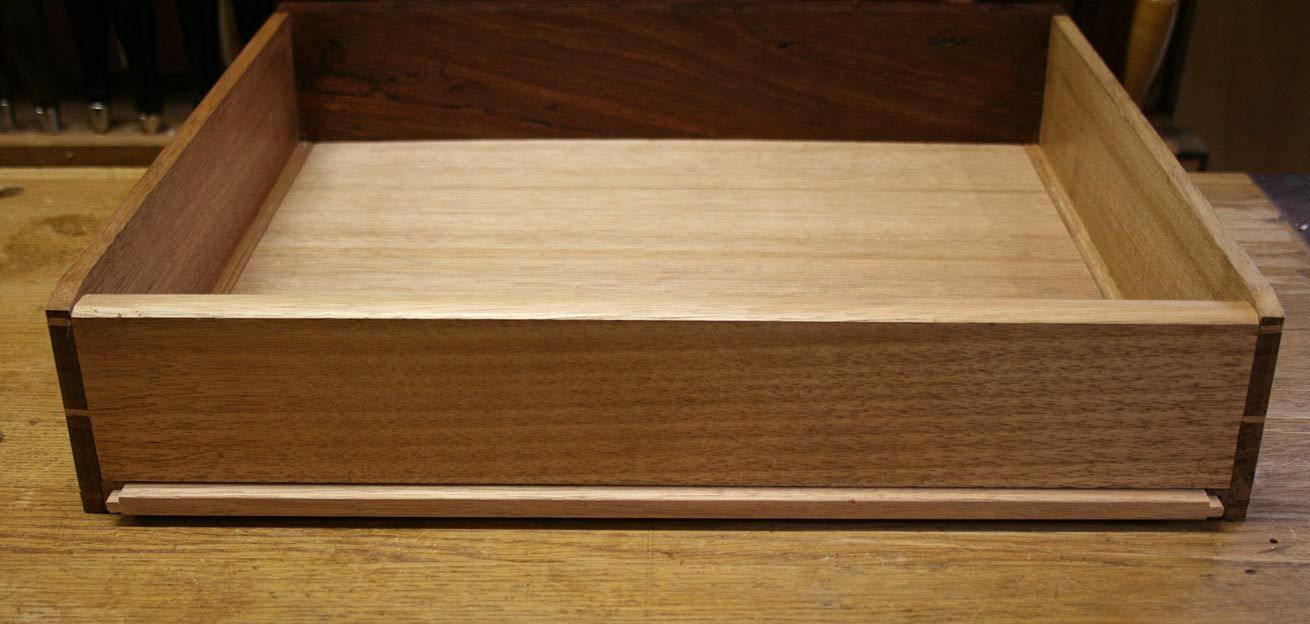
The purpose of the slip/front groove design is to float the drawer bottom to account for expansion and contraction. The drawer bottom is never glued. It is loose. The grain direction of the drawer bottom runs across the drawer, which enables all movement to be towards the front and rear of the drawer. There will be a slight gap at the front (groove is deep enough to accommodate this) and the rear is simply held by a screw in a slot (allowing the drawer bottom to move).
Taken before the screw hole/slot was made ..
Top two drawers have raised slips.

The lower drawers have flush slips ..
Regards from Perth
Derek
Visit www.inthewoodshop.com for tutorials on constructing handtools, handtool reviews, and my trials and tribulations with furniture builds.
-
26th May 2017, 09:21 PM #19
GOLD MEMBER
- Join Date
- Apr 2014
- Location
- Little River
- Age
- 78
- Posts
- 1,205
derekcohen Originally Posted by Bohdan

Thanks for your answer.
I understand how the bottom is fitted but that's not my query. I have always grooved the side wall and was not happy with the the appearance of thick timber to allow for the groove. I like your solution and I just want clarification as to how you attach the slip to the side wall.
BTW nice looking drawers.
-
26th May 2017, 10:52 PM #20
Be inspired. Be creative. Be bold.
- Join Date
- Apr 2001
- Location
- Perth
- Posts
- 10,826
I thought I had answered this, but obviously notI just want clarification as to how you attach the slip to the side wall.
Just glue.
Regards from Perth
DerekVisit www.inthewoodshop.com for tutorials on constructing handtools, handtool reviews, and my trials and tribulations with furniture builds.
-
27th May 2017, 09:15 AM #21
Senior Member
- Join Date
- Oct 2006
- Location
- Brisbane
- Posts
- 133
Dovetail Drawers - what on the rear? Consensus?
I've never made on of these so am wondering, is that the end of a board or the side/edge of a board? It seems it would be the side Originally Posted by derekcohen
edit: hmm it is probably the end of one side edge of a board. my pedantic brain reads things too literally sometimes )
)
-
27th May 2017, 02:20 PM #22
Be inspired. Be creative. Be bold.
- Join Date
- Apr 2001
- Location
- Perth
- Posts
- 10,826
Yes, Peter, if you used the end grain, the slip would crumble into tiny bits!
 Stay with long grain.
Regards from Perth
DerekVisit www.inthewoodshop.com for tutorials on constructing handtools, handtool reviews, and my trials and tribulations with furniture builds.
-
27th May 2017, 09:49 PM #23
Senior Member
- Join Date
- Oct 2006
- Location
- Brisbane
- Posts
- 133
thanks derek, that's what I was thinking
-
28th May 2017, 02:42 AM #24
GOLD MEMBER
- Join Date
- Feb 2003
- Location
- back in Alberta for a while
- Age
- 68
- Posts
- 12,006
WP, sorry I only have a drawing (taken from a learn to use Sketchup exercise) and not a picture Originally Posted by woodPixel
In "quality" work the drawer back is thinner than the sides, in this case 1/2" to go with 3/4" sides. (In your case maybe 12 mm to go with 18 mm sides). IMO 18 mm sides would normally teamed with a 25 mm front.
Also, in this drawing, the back is the same height as the sides. Properly, the height of the back should be about 8 to 10mm less than the height of the sides.
In particular, note that the bottom DT on the back is not a true dovetail -- only the top is angled, the bottom is at 90 degrees, so that it is parallel and flush with the top surface of the drawer bottom.
regards from Alberta, Canada
ian
-
28th May 2017, 08:48 PM #25
GOLD MEMBER
- Join Date
- Mar 2004
- Location
- Brisbane (western suburbs)
- Age
- 77
- Posts
- 12,130
Another vote for D/tails front & rear. Because rear sets are out of sight most of the time, through & fairly even is my choice - no point in putting flimsy, pointy pins back there - make 'em solid & lasting!
And I'm a groover - p'raps because I spent so much time in Nth America? The reason I don't like slips is because I like a clean, clear drawer bottom. I don't like fat drawer sides, either, but I think 3/8" isoverunderdoing it. For all but the smallest drawers, I think you can strike a balance with a slim enough side that will still allow a groove. However, it's all in the eye of the beholder, so if slips are your thing, why not? These COD sides are 16mm, which looks proportional to my eyes for a utilitarian piece, gives plenty of room for grooves, and a decent bearing surface on the runners ('kitchen drawers?' Hmmmm): Top drawer.jpg
Question for Derek - it's not clear from your drawing or pics, but I assume your slips also form part of the bottom bearing surface? Nine mm sides bearing on the runners sounds like a recipe for some serious wear with a heavy drawer, unless they get some help!
Cheers,IW
-
28th May 2017, 09:09 PM #26
Be inspired. Be creative. Be bold.
- Join Date
- Apr 2001
- Location
- Perth
- Posts
- 10,826
Philistine!These COD sides are 16mm, which looks proportional to my eyes
Hi IanQuestion for Derek - it's not clear from your drawing or pics, but I assume your slips also form part of the bottom bearing surface? Nine mm sides bearing on the runners sounds like a recipe for some serious wear with a heavy drawer, unless they get some help!
I agree, 8 or 9mm would be a little in the mingy side. The picture below is part of the process of making slips. I added a 3mm thick veneer of Jarrah, which will be the added bearing surface in the drawers in question (the reason for the siding bevel is that these drawers have compound angles, and the slips were also angled on the sides) ...

Here is a photo of the slips alongside the drawer side ...

Regards from Perth
DerekVisit www.inthewoodshop.com for tutorials on constructing handtools, handtool reviews, and my trials and tribulations with furniture builds.
-
28th May 2017, 09:45 PM #27
GOLD MEMBER
- Join Date
- Feb 2016
- Location
- Canberra
- Posts
- 5,125
Such a simple question, so many things.
So, its definitely through dovetails on the rear, using a thinner rear.
The slips are clever when you think about them, for they offer more surface to rub therefore reduces wear. The "replaceable" 3mm veneers work too.
Just for the sake of an argument, its my intention to make these fairly quickly, so I'm thinking about how to make the dovetails on the front and the back the same. I'm wondering whether to use the Incra, Leigh or do by hand, but get the blinds on the front and through on the rear in the one setup.
This is for a short run product, but I want it to be as nice as possible. The idea of traditional joinery fits very well into its modernity.
Many many many thanks to everyone. I've learned a lot (and Veritas, I fear, is getting richer by the week as I learn)
-
29th May 2017, 09:01 AM #28
GOLD MEMBER
- Join Date
- Mar 2004
- Location
- Brisbane (western suburbs)
- Age
- 77
- Posts
- 12,130
Originally Posted by woodPixel
Well, WP, it wouldn't be such fun if it were all just mechanical, & everyone agreed on everything, would it?
If it's a production run, then using a fixed setup & burning electrons makes sense, time is money, after all. I suppose you could use the same setup for both front & back pins, but remember the back is only as deep as the top of the groove for the drawer bottom, so you need to place your tails accordingly. For that reason, it's usual to space front & back tails differently. The back tails don't have to work as hard as the fronts, as Derek has already mentioned, so it's common practice to reduce them compared with the front lot. Originally Posted by woodPixel
For a one-off with just a single drawer or three, hand-cut would be quicker & more satisfying, I reckon I'd be done before you got the jig set & cutting perfectly. And if it's a graded set of drawers, it would be far quicker by hand for a single set, because each drawer needs different spacings.
And Derek, , yep, I definitely have Philistine tendencies - my agricultural origins plus producing 4 rambunctious children have conditioned me to structural soundness over finesse....
Cheers,IW
-
29th May 2017, 09:21 AM #29
gentleman woodworker
- Join Date
- Mar 2005
- Location
- Camden, NSW
- Age
- 74
- Posts
- 3,576
In the meantime, at the other end of the spectrum to Derek's "fine furniture", comes Chinese rustic.....
A couple of years ago I restored a small Chinese table and added a treatise on Chinese drawermaking ..... as one does ? Unfortunately the thread didn't survive THE GREAT FORUM PICTURE HEIST and so those pictures have disappeared.
I ducked downstairs before leaving this morning and took the following...
IMG_5918.jpg IMG_5922.jpg IMG_5921.jpg
This simple back-of-drawer treatment is common to a lot of Chinese furniture and I've seen Chinese furniture makers cut this joint, by eye, in seconds. The method requires a coping saw only, is strong (if not attractive) and provides a drawer depth stop as well!
flettya rock is an obsolete tool ......... until you don�t have a hammer!

 Reply With Quote


Similar Threads
-
Rear Verandah - WIP
By Glenn.Visca in forum FURNITURE, JOINERY, CABINETMAKING - formerly BIG STUFFReplies: 29Last Post: 9th August 2016, 12:12 AM -
rear toolpost ..how ?
By morrisman in forum METALWORK FORUMReplies: 6Last Post: 7th November 2011, 08:05 PM -
Consensus on this
By MICKYG in forum TABLE SAWS & COMBINATIONSReplies: 3Last Post: 10th March 2010, 01:21 PM
