

 Thanks:
  Likes:
  Needs Pictures: 0
 Picture(s) thanks:
Results 16 to 30 of 46
Thread: Gun Stockmaking and Checkering
-
5th December 2017, 03:30 PM #16
 GOLD MEMBER


- Join Date
- Feb 2003
- Location
- back in Alberta for a while
- Age
- 68
- Posts
- 12,006

thanks for sharing your work.
some questions on your tools if I may.
Do people like yourself still use gunsmith's floats or have they been replaced by other tools.
and can you show us some pictures of your checkering tool(s) and describe what they are.regards from Alberta, Canada
ian
-
5th December 2017 03:30 PM # ADSGoogle Adsense Advertisement
- Join Date
- Always
- Location
- Advertising world
- Age
- 2010
- Posts
- Many
-
5th December 2017, 04:43 PM #17
Novice
- Join Date
- Dec 2017
- Location
- Cairns
- Age
- 43
- Posts
- 23
Gun Stockmaking and Checkering
Gday Woodpixel, the ebony is an old old piece of PNG striped ebony on both the fore end tip and grip cap. The black ink is black tinted west system epoxy, used as an adhesive along with a couple of blind dowels in both the cap and tip. [emoji6]
The secret oil is a bit of a stock finishers joke, due to the proprietary and secretive nature the old gun makers used to adopt. These days i make my stock finishes much like most high end professionals. A brewed mixture of Copal resin, distilled natural turpentine, occasionally Alkyd resin, cold pressed flax oil (aka high end pure linseed oil), alkanet root, natural talc�s and cobalt salts. Ratios and ingredients are mixed and interchanged per purpose, So far that sealing coat seen applied was just a turps diluted red oil mix so it soaks deep into the wood.
That stock has since been wet sanded and grain filled, with the first coat of the proper finishing oil rubbed in. It will sit for two weeks in the drying rack before i look at it again.
-
5th December 2017, 05:17 PM #18
Dehydrated Hydrographer
- Join Date
- Jun 1999
- Location
- Westleigh, Sydney
- Age
- 77
- Posts
- 9,550
Very interesting thread.
Do you find the hand shaping the most satisfying part of it? I know I did.
I notice that your rasp us a plain old machine cut one. Can I suggest, if you haven't already done so, get your hands on a decent pattern maker's rasp. I have two - a Nicholson and a smaller Auriou. Wouldn't be without them.
-
5th December 2017, 05:43 PM #19
GOLD MEMBER
- Join Date
- Nov 2011
- Location
- Sutherland Shire, Sydney
- Age
- 71
- Posts
- 1,301
Amazing precision woodwork there. I had no idea what 'checkering' was when I first started this thread, but I am now very impressed with the process and your attention to detail.
Lovely piece of timber you have selected, but I just shudder to think how a bit of an 'oops' moment this far into the build would affect your ability to keep cool calm and collected!.
Might be worthwhile keeping the swear box handy, just in case.
Thank you for a very interesting thread.
Alan...
-
5th December 2017, 05:55 PM #20
Novice
- Join Date
- Dec 2017
- Location
- Cairns
- Age
- 43
- Posts
- 23
Gun Stockmaking and Checkering
Gday Ian, i had typed out a good reply and lost it. So will try again.
I think most smiths go immediately to the mill to inlet these days. Time is money and all that. But i still reach for the floats for letting in barrels.
I have an absolute mountain of checkering tools now. I will upload a pic of the essentials shortly.
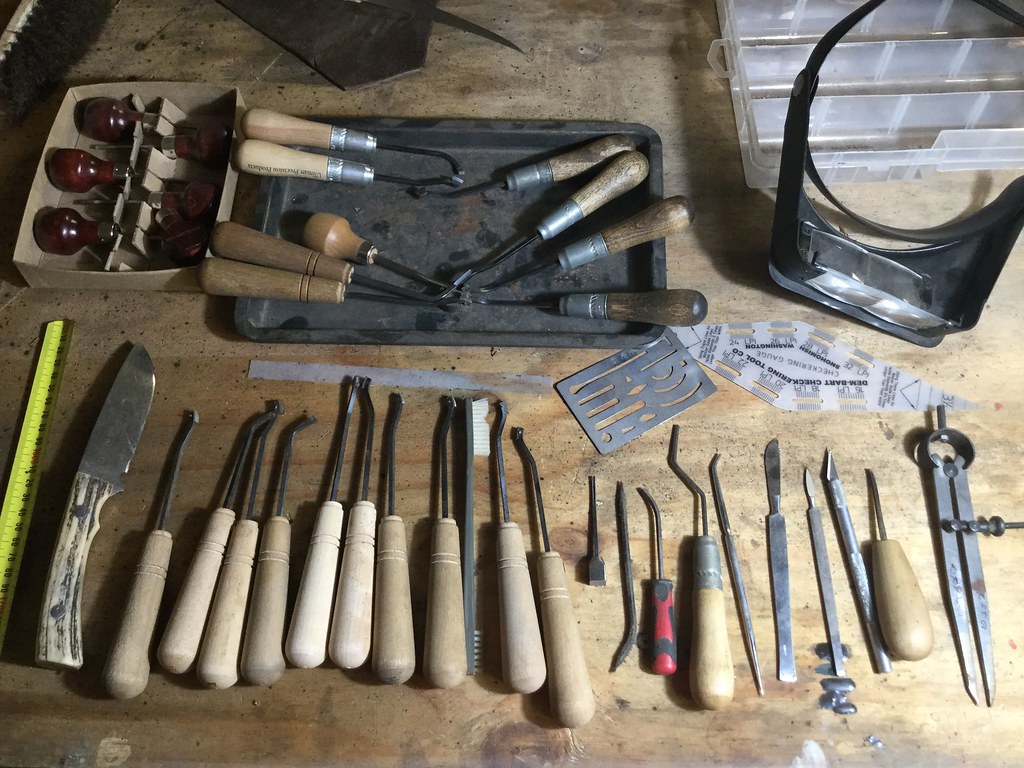
Here is a quick pic of what I find are my essentials. The process is simple, its the attention to detail and the discipline that makes it hard. There is gun-shop checkering and then there is checkering done right and the difference is amazing. Basically, the pattern is laid out with a layout gauge and the master lines 'pressed' in with the antler handled knife. These master lines are then set in with a veining chisel. Spacing files are then used to layout the rest of the pattern, with a plainter/jointing file used wherever grain try's to cause deflections. Spacing is where checkering is made or broken. First we space out all one way, then start again for the other direction. These lines will then define the outline of the pattern (if doing a point pattern style). Once these are done each line is passed over again and deepened, which i do to half finished depth with a 75 degree carbide tools (pictured in the metal tray). I then go over every damn line again individually to hopefully final depth with the 75 degree tools and this time clean right up to the very corners. Once you've done that you can swear at the moon cause your only just past half way and your neck hurts so bad that it wants to murder you.
The next step is to switch to the 90 degree cutter tools and bring those points up. Hence the magnifying lenses and a STRONG light source. I do this completely in the dark bar my lamp so that i can use the shadows and light contrast to highlight what needs to be done. Diamonds need to be brought to beautiful points with the tool continually held true to the surface of the wood without leaning over. At this point your really getting excited and your probably going to break a diamond, scratch the work and ultimately throw it in the bin.
But, if you survive this point your due to do the 5th and final pass with a fine 90 degree tool and really finish things up nicely. By this point the lines are easy to follow, the tool wants to sit nicely in the groove and so we are concentrating on 'polishing' the diamonds and smoothing out any burs or depth discrepancies.
Finally, you press on and go around the edges. Tidying corners up and bringing all the edges to depth. This is where you would add a border if having one, and this border should help remove all those 1million places you over-ran on cuts and knicked the edges. A good stiff brush out to remove all sawdust and standing back admiring you work for an hours or so to try and pick out any last minute defects, then add a single drop of finishing oil into the checkering. I then give it a good brushing with a toothbrush to spread that oil out without leaving any buildups in the valleys of your checkering...otherwise you completely undo all your hard work.
Simple. Hard. Impossible. Except if your name happens to be Gabe Gatti. Then you can do it in your sleep perfectly!
-
5th December 2017, 06:01 PM #21
Novice
- Join Date
- Dec 2017
- Location
- Cairns
- Age
- 43
- Posts
- 23
Gday Alex, by far my favourite part is the shaping. Its when you first get to see how she�s going to look. What lines she has and how she handles, but like Alan said, it doesn�t take too much of a mistake to send it to the scrapheap at any given time.
I actually rough out the bulk with drawknives initially and hack away with the rough machine rasp where the knives wont fit. Then move onto shaves where i can. I also have a pair of old english made pattern makers rasps that get their fair share of use too.
Sent from my iPad using Tapatalk
-
6th December 2017, 07:41 AM #22
Dehydrated Hydrographer
- Join Date
- Jun 1999
- Location
- Westleigh, Sydney
- Age
- 77
- Posts
- 9,550
-
6th December 2017, 10:33 AM #23
Novice
- Join Date
- Nov 2017
- Location
- Cairns, Qld
- Posts
- 14
Great thread Meller. Thanks.

-
6th December 2017, 03:18 PM #24
Novice
- Join Date
- Dec 2017
- Location
- Cairns
- Age
- 43
- Posts
- 23
Yeah Alex, it�s a handy bit of stainless to have around!
Cheers Matt, Glad you enjoyed.
Sent from my iPad using Tapatalk
-
6th December 2017, 03:38 PM #25
GOLD MEMBER
- Join Date
- Feb 2003
- Location
- back in Alberta for a while
- Age
- 68
- Posts
- 12,006
Thank you so much for sharing your work.
Do you think there is any chance you could convince your customer to add a dragon to the end of the forestock?
regards from Alberta, Canada
ian
-
6th December 2017, 04:44 PM #26
Novice
- Join Date
- Dec 2017
- Location
- Cairns
- Age
- 43
- Posts
- 23
Zero chance.... i wouldnt do it

Sent from my iPhone using Tapatalk
-
7th December 2017, 10:42 AM #27
Skwair2rownd
- Join Date
- Nov 2007
- Location
- Dundowran Beach
- Age
- 76
- Posts
- 19,922
Fascinating thread and damned fine craftsmanship!!
The thread has prompted an interesting memory for me.
Some years back the wife and |i decided to stay in Brazil, her home country, as a trial to see if we might shift there.
Given the current circumstances there We are glad things did not work out!!
I took some turning gouges and pen making kits as well as a couple of mandrels so that i could do a bit of turning.
Finding a lathe proved nearly impossible until a friend of SWMBO tracked down one for me to borrow.
I was short of some bits and pieces, in particular a #2 Morse taper for a mandrel so I went to a fitter and turner to have one made.
Finding him was a nightmare but when I showed him the parts and a sketch of what I needed his first thought was that I was an armourer!!!
-
7th December 2017, 11:14 AM #28
GOLD MEMBER
- Join Date
- Feb 2016
- Location
- Canberra
- Posts
- 5,125
This technique would be interesting on some of my figurines and boxes.
Is there a "best" maker or set of these checkering tools?
-
7th December 2017, 01:01 PM #29
Novice
- Join Date
- Dec 2017
- Location
- Cairns
- Age
- 43
- Posts
- 23
Dembart tools are widely regarded as acceptable tools, the problem is getting your hands on checkering tools in general from the states. The old guys who were the prolific manufacturers back in the day are all now old, dead or passed the business onto family members who have neglected production. I have been using ullman precision carbide tools lately, but they are so sharp you need to use them in conjunction with something else as a finishing tool. Plus at USD$55 ea when you need at least four to get started, you�d want to be certain you need them.
Have a google on making checkering files and you should get some good hits. They aren�t hard to make a set for odd jobs.
Sent from my iPad using Tapatalk
-
7th December 2017, 01:34 PM #30
GOLD MEMBER
- Join Date
- Dec 2010
- Location
- Mornington Peninsula
- Posts
- 2,746
Fantastic thread and work. Well done.


 Reply With Quote


Similar Threads
-
Gun stock checkering
By China in forum WOODWORK - GENERALReplies: 2Last Post: 18th September 2012, 11:47 PM -
checkering gun stocks
By twobob in forum WOODWORK - GENERALReplies: 2Last Post: 22nd June 2007, 01:51 PM -
Checkering, and damascene
By Arron in forum HOMEMADE TOOLS AND JIGS ETC.Replies: 4Last Post: 18th February 2006, 07:49 PM
