

 Thanks:
  Likes:
  Needs Pictures: 0
 Picture(s) thanks:
Results 1 to 15 of 22
-
19th May 2023, 10:49 PM #1
 Intermediate Member


- Join Date
- Oct 2016
- Location
- Adelaide
- Posts
- 26
 1:4 1:6 1:7 1:8 Dovetail Saw Guide Magnetic Joinery Cutting Guide Angle Saw Guide
What do these numbers represent in degrees? Can they be interpreted for mm sizing dimensions as well? Are these guides available for hardwoods as well as softwoods?
Thanks.
-
19th May 2023 10:49 PM # ADSGoogle Adsense Advertisement
- Join Date
- Always
- Location
- Advertising world
- Posts
- Many
-
19th May 2023, 11:54 PM #2
SENIOR MEMBER
- Join Date
- Mar 2018
- Location
- Sydney
- Posts
- 469
1:4 = 76�,
1:5 = 78.7�,
1:6 = 80.5�,
1:7 = 81.9�,
1:8 = 82.9�.
The angle can be calculated by inv tan the number if you like trigonometry.
I'm a pretty new at this, but I've read some people prefer the 1:6 for softwood and the steeper angles for hardwood, due to the softwoods being able to compress more.
Others have said this is a myth and use the same angle for both, stating its purely cosmetic choice of how you want the dovetails to look.
Others can probably advise better.
Regards,
Adam
-
19th May 2023, 11:57 PM #3
Be inspired. Be creative. Be bold.
- Join Date
- Apr 2001
- Location
- Perth
- Posts
- 10,826
These are in ratios of 1:5, 1:6, 1:7, and 1:8 ...
For example, on graph paper, 1 unit across and 5 units down = 1:5
Regards from Perth
DerekVisit www.inthewoodshop.com for tutorials on constructing handtools, handtool reviews, and my trials and tribulations with furniture builds.
-
20th May 2023, 09:22 AM #4
Senior Member
- Join Date
- Aug 2014
- Location
- Geelong, Victoria
- Posts
- 284
The reason they are normally expressed as ratios is ease of use. Using the standard carpenters combination square you measure say five inches down and one across and strike your angle. Then set your sliding bevel to that and away you go. The fact that the blade portion of both square and bevel were usually one inch made it really easy to do and you needed no special tools or guides.
The really expert tradesmen often just did it by eye.
-
20th May 2023, 09:42 AM #5
GOLD MEMBER
- Join Date
- Mar 2004
- Location
- Brisbane (western suburbs)
- Age
- 77
- Posts
- 12,132
I think you put it pretty well, Adam.
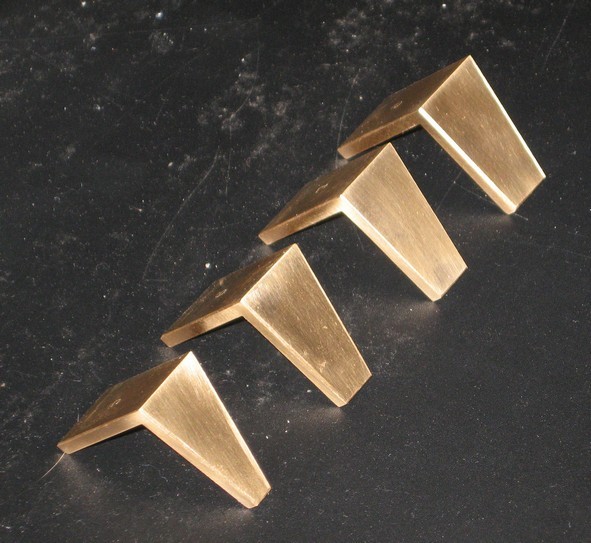
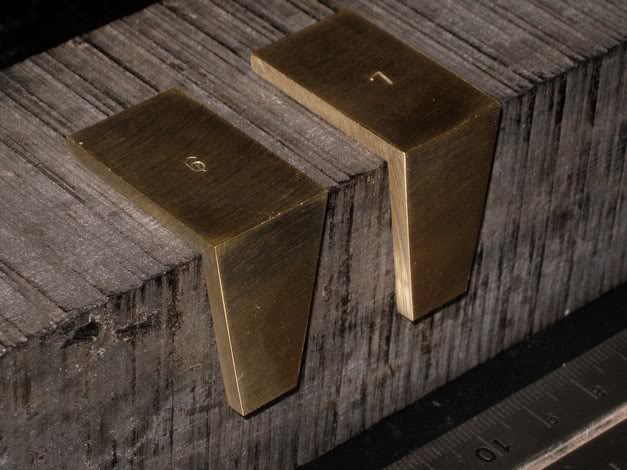
As a lad I was taught the "steep angle for softwood/shallow angle for hardwood" rule, but have come to regard it as one of those shibboleths that sounds plausible but doesn't stand up to much scrutiny. I heartily agree with you that it's mostly a matter of aesthetics, putting a steeper angle on thin parts emphasizes the angles. For furniture scale work, I use either 1:9 for thicker parts or 1:6 for thin sections pretty much exclusively. Most dovetails I cut are purely functional, I long ago decided that unless they are exposed on the outside of a carcase (very fashionable 40 years ago!) no-one even notices them on drawers unless you point them out. My favourite D/T marker is a home-made thing: DT She oak.jpg
It has the two ratios I mostly use on each side and is very quick & easy to use. After reading an article by Frank Klausz many moons ago, I started setting out by eye & the blades on the tool give a convenient guide to spaces & tail size. With a little practice you can space accurately enough by eye, and this method makes it easy to vary the spacing to match drawer-size & add a bit of interest: Drawer fitting1.jpg
And a marker doesn't need to be fancy, the one that inspired mine was made entirely of wood and would've taken me less than 1/2 an hour to make but I had time on my hands & lots of brass scraps.....

Cheers,IW
-
20th May 2023, 10:41 AM #6
Senior Member
- Join Date
- Nov 2020
- Location
- Newcastle, NSW
- Posts
- 227
Oh no. Now I have to make one. Added to my list! Originally Posted by IanW

-
20th May 2023, 11:10 AM #7
GOLD MEMBER
- Join Date
- Mar 2004
- Location
- Brisbane (western suburbs)
- Age
- 77
- Posts
- 12,132
Go fer it, JK. I wrote up my method here if it's any help. I've made a few more since & got quicker at it, but it didn't take that long - a good project for a rainy afternoon..
..
IW
-
20th May 2023, 11:36 AM #8
Be inspired. Be creative. Be bold.
- Join Date
- Apr 2001
- Location
- Perth
- Posts
- 10,826
Bruce, I would debate that. The high end makers I personally know set out their dovetails with great care, since these are now a part of the aesthetic and design. Perhaps this was the case 150 years ago. Now it is folk law.The really expert tradesmen often just did it by eye.
Now, regarding making a marker �
It is possibly going to appear insensitive but, as much as I love both my friend Ian and his super tools, his dovetail marker design is not one I would recommend. Note, this is my opinion only.
In my experience, a good dovetail marker design enables one to see the marks on the edge of the board, draw the line across the top, and then the angled line � and to do this in a single action. They are a �saddle�.
Hence ..
A small sliding bevel can only do the angle, but is frequently needed for marking the ends of half-blind pin boards �
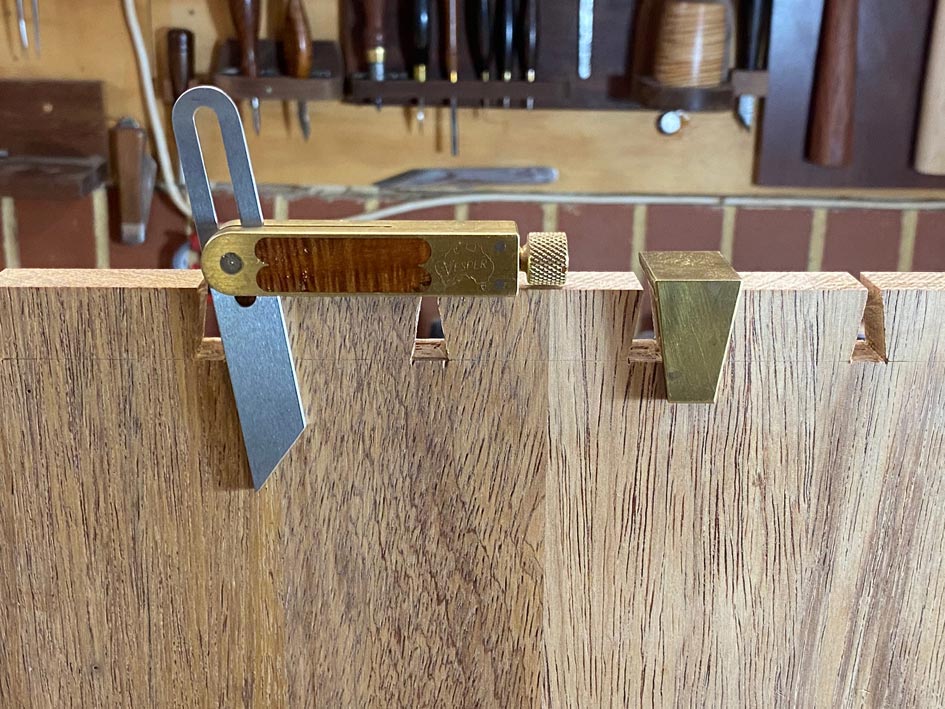
In addition to brass, I have also made them from perspex, which has advantages of its own ..
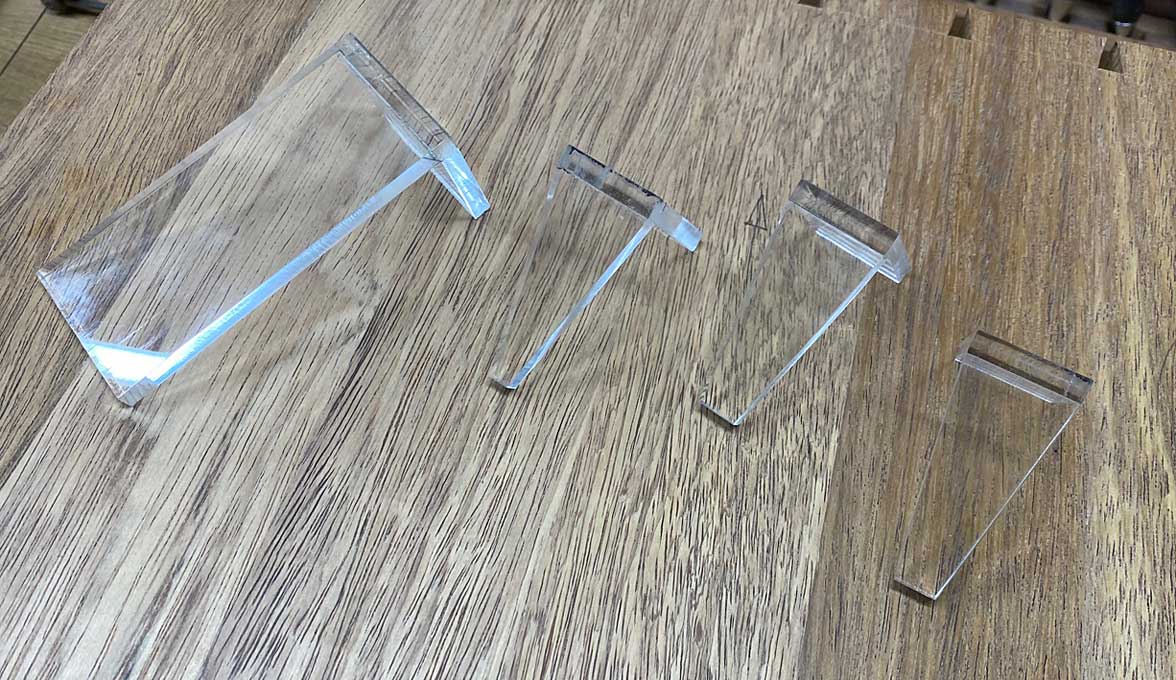
Regards from Perth
DerekVisit www.inthewoodshop.com for tutorials on constructing handtools, handtool reviews, and my trials and tribulations with furniture builds.
-
20th May 2023, 01:43 PM #9
GOLD MEMBER
- Join Date
- Mar 2004
- Location
- Brisbane (western suburbs)
- Age
- 77
- Posts
- 12,132
Derek, I agree that my marker has the drawback that I can't square the line on the end with the same tool, but it is so quick & easy to set out the tails with it (the part that usually takes the longest), that I don't mind, I either don't worry about it & eyeball square to saw the tails, which I find pretty easy to do with my regular saw that I'm thoroughly used to (& close enough for non-critical D/Ts), or mark them once I stand the piece up in the vise ready to saw if I'm being fussy. There is always a small square to hand because it's necessary to extend the lines when you transfer tails to the pin board anyway, so it's not much of an impost to add the extended line on the tails.
I made a couple of sets of those "both lines at once" markers you show & used them once or twice, then tossed them in a drawer where they have languished ever since. I just found it awkward to hold the darned things firmly & keep fingers out of the way while marking the line. With my marker there is always plenty of stock sitting on the work & it's easy to hold it firmly whilst marking without any bits of anatomy getting in the way. It's just personal preference and the work-flows we are used to, I would never claim superiority for my marker...
But I have to disagree that dovetails were not cut by eye, even on high-end work, by skilled craftsmen. The modern obsession with 'perfection' was not shared by a couple of old-time makers I knew (both trained in the 1920s, & long since departed this earth). I well remember a diatribe by one in particular, who had employed a graduate of one of those fancy English cabinetmaking schools, describing his methods for laying out & cutting dovetails. He was probably exaggerating a bit (maybe quite a bit), but I got the impression the chap took an extraordinarily long time to make a drawer that my complainant would have done (probably at least as well) in about 1/10th the time doing much of it by eye & certainly not using anything like sawing guides! The bloke I'm talking about was Rob Dunlop, who was no slouch as a cabinetmaker, his work is displayed in quite a few places, including the new Parliament House in Canberra....
Cheers,IW
-
20th May 2023, 02:44 PM #10
Be inspired. Be creative. Be bold.
- Join Date
- Apr 2001
- Location
- Perth
- Posts
- 10,826
Ian, I agree with you about craftsmen marking out in the past. I said as much above, but perhaps further back in time than I should have. It is a modern phenomenon to view dovetails with such importance, as evidence of fine hand work ... possibly because there is so much joinery that otherwise gets hidden, such as the use of biscuits, etc. Further, if someone was pounding out drawers, for example, and was limited in time, it is quite reasonable that they would just use a router plus fixture. I doubt that someone like that would take the time to carefully hand cut all. But those that do have the time, are more likely to mark it out - I'm surmising here ... hopefully a few of the pros on the forum will say what they do. For my (amateur) builds - and I do a lot of drawers every year - I have the luxury of time, and the desire to make the dovetails as much of a statement as other parts of the build.
With regard the design of a marker, I was trying hard to emphasise that there is so much personal choice and preference in everything we do. There is no one right/best way. I can see your marker working well, but I will stick with mine
Regards from Perth
DerekVisit www.inthewoodshop.com for tutorials on constructing handtools, handtool reviews, and my trials and tribulations with furniture builds.
-
20th May 2023, 05:50 PM #11
 SENIOR MEMBER
- Join Date
- Aug 2020
- Location
- Sunshine Coast
- Posts
- 743
Interesting thoughts. Many years ago I had the opportunity to thumb through an invoice book from an English furniture maker from about the mid to late 1800s. It took me by surprise on how fast they made the furniture. It's been decades since I read through it but I think a highboy was done in 4 or 5 days. A 5 drawer dresser was 3 days sort of times... From looking at it I deduced that the only way to crank out furniture like that they had to have standardised and stockpiled as much of the parts as possible. Other readings seemed to indicate that the less experienced apprentices/tradesmen had pretty specific jobs. I.e. When rough timber was received, a specific crew cut and planed it to width and thickness. When drawer side stock was low, someone would plane up a bunch and another would chop out all the dovetails... After a couple hundred drawer sides I would suspect that a joiner could do it by eye alone and scribing the depth to cut only... I've also seen some footage of a cooper that supports this, in that he didn't measure or mark out the staves he simply planed them to what he knew the curve and angle should be by eye. In my own work I found, especially with production turning many years ago, I was doing a lot with only one reference diameter and the rest simply by eye after a half day of cranking out the same leg. Originally Posted by derekcohen
EDIT: I'll add to this. I had a friend in Canada that was much older than I. He and his wife, unknowingly to them (until I started freaking out over their furniture (but that's another story), had collected some very expensive high-end furniture over the decades from Philidelphia and the surrounds that I estimated was early to mid 1800s Chippendale and Federal styles. The wife wasn't all that pleased with me pulling drawers out and snooping through her furniture but one thing I found was, where joinery wasn't to be seen, it was quite rough. And the dovetails at the back of the cabinet or drawers were tight but were not as good as the ones at the front or visible. And I've read elsewhere that joinery shops in the handmade days didn't waste time on unseen aspects any more than they had to. I can certainly say that's been the case in antiques I've had the opportunity to have a sticky beak at in Canada, USA, UK, France, Italy, Hungary, and here. Sometimes the roughness can be a surprise.
-
20th May 2023, 07:23 PM #12
GOLD MEMBER
- Join Date
- Mar 2004
- Location
- Brisbane (western suburbs)
- Age
- 77
- Posts
- 12,132
SD, I absolutely agree - when workmen did much the same task day in & day out, they became incredibly deft at what they did - what my old pot could do with an axe was very impressive. I remember reading about coopers many years ago & being impressed by how much they did by eye alone. I'd hate to be given a pile of white oak and a few odd-looking tools & told to make a water-tight barrel by sundown, or else.....

And yep, I've had the opportunity to have a good stickybeak at a few high-end pieces too, and they sure didn't waste time on the unseen parts as a rule. As you discovered, the D/Ts at the back of the drawers were not given the loving attention modern makers confer on such details (they were also often reduced to a single D/T). Back boards in particular were not planed meticulously - I have a very nice Georgian mahogany COD (not 'original' period, almost certainly made 100 years later, in late Victorian times). It is very nicely done wherever you see anything in daily use, but the way the backs of the drawer runners are fixed is pretty crude by my standards and the back boards are as rough as hessian undies, with deep scrub-plane marks all over!
I'm with Derek in that having the luxury of time, & not having to earn a crust with my woodwork, I like to finish every part of a piece to the same standard - the backs of fancier pieces like the desk I'm sitting at is frame & panel, & I don't think you will find too many scrub plane marks on it. But it might look a bit different if I'd been making it to earn groceries....
Cheers,IW
-
20th May 2023, 11:47 PM #13
SENIOR MEMBER
- Join Date
- Mar 2018
- Location
- Sydney
- Posts
- 469
As this discussion had gone a nice tangent from the OP, May I add another change in direction?
Do you find you use different DT angles for the different DT variations, I.e through, half blind, blind, mitred, houndstooth, etc...
Regards.
Adam
-
21st May 2023, 01:31 AM #14
Be inspired. Be creative. Be bold.
- Join Date
- Apr 2001
- Location
- Perth
- Posts
- 10,826
Adam, it really comes down to the thickness of the boards, and the look you want to achieve. The shape is altered by the width of the "tip" (what do we call the apex of the dovetail?). Also how wide apart the dovetails are positioned.
1:8 can look like box joints as they are close-to-parallel. I like 1:7 as a compromise for drawers, and 1:6 for a stronger look on cases. 1:5 can be used for more "earthy" designs.
Regards from Perth
DerekVisit www.inthewoodshop.com for tutorials on constructing handtools, handtool reviews, and my trials and tribulations with furniture builds.
-
21st May 2023, 03:27 AM #15
GOLD MEMBER
- Join Date
- Mar 2010
- Location
- US
- Posts
- 3,131
I was talking to George at one point, which may have been intertwined with him giving the coopers A2 irons instead of the irons that CW blacksmiths were making, which based on the one I have, may have been very underhardened, or perhaps the hardening was very superficial and the dent test isn't quite as good of a measure as it should be. Originally Posted by IanW
At any rate, when the museum needed coopers, rather than have someone come in and look all thumbs, they hired two either Irish or Scottish coopers who were making barrels for a distillery. They had to make two per day, were working mostly by hand and living in a house that was almost entirely unheated because at that point, the job didn't pay much.
Drawing a salary at Williamsburg was probably like a gift and I'm sure they didn't have to work as fast. Seemed like a smart way - like being able to reach back in time and find guys making barrels by hand, plus the museum patrons are always going to like someone who speaks with an English, Irish or Scottish accent.
This is another good example of something I've said before - we don't have a real concept of how good a hobbyist could be dimensioning by hand because the idea of doing it is shouted down. Until I started burning through toolmaking the last two years or so, I never found it limiting - if anything, the only drawback is that you work with wood that was intended to be used with power tools.
Well, and jumping too fast into axe/hatchet dimensioning could result in injury - though I guess the TS and miter saws in power tools take their share, too.
At one point, George was making a lot of necks, bandsawing the blank out to a flat blank and then working a neck to rough shape by hand. I asked him how long it took him because I'd pretty much shaped a neck from blank to final sanding in about an hour, and he said...
......15 minutes.
In regard to the older furniture and dovetails, the makers would've made what paid. People obviously didn't care that much about the back dovetails, and the furniture had other features to stand on. When you look at the world of what's promoted now (look at the pieces cosman and others have made, but beyond that, what's on the market), if you were making sloppy joints, the furniture often has nothing else going for it. The wood isn't as good, it's lacking much for moulding or carving details, and the finish work is cheap and boring compared to what it would've been 200 years ago with grounds/permanent pigment colorants and rubbed copal varnish. Even that's an interesting topic - one of the pieces on display at the carnegie here was from the early 1800s and boston. I thought for sure it had been refinished, and the carving and surface textures were otherworldy. it hadn't, however, been refinished. I've never seen more perfect carving on something even though the carving was sort of shells and flowers and typical things on a chest on chest - it just had a sublime perfection to its make and a smoothness that you don't often see.
We have the choice to get into these kinds of things, but it's not good for the woodworking vendor market or magazines - what are they going to sell if they can't sell cheap to make finishes, spray equipment, oddball block planes, and so on.

 Reply With Quote


Similar Threads
-
N.S.W. Veritas 1:8 Dovetail cutting Guide
By Wongo in forum WOODWORK - Tools & MachineryReplies: 6Last Post: 7th April 2022, 01:49 PM -
QUEENSLAND Veritas Magnetic Dovetail Saw Guide
By woodchopper in forum WOODWORK - Tools & MachineryReplies: 3Last Post: 28th February 2022, 10:09 PM -
SOUTH AUST Dovetail jigs: Katie Jig, Leigh R9 Plus, David Baron 1:7 guide, Angle Mag
By rev in forum WOODWORK - Tools & MachineryReplies: 8Last Post: 20th September 2020, 08:36 PM -
FESTOOL GUIDE RAIL EXTRACTOR HOSE LEAD GUIDE- Half Price - $20
By barrysumpter in forum FESTOOL FORUMReplies: 4Last Post: 28th July 2020, 09:25 PM -
Using Trend Guide Bushes with Triton TGA001 Template Guide Kit
By Chop 'n' Join in forum TRITON / GMCReplies: 1Last Post: 13th May 2008, 04:08 AM
