

 Thanks:
  Likes:
  Needs Pictures: 0
 Picture(s) thanks:
Results 16 to 26 of 26
Thread: Adjustable Sticking Board
-
2nd March 2018, 02:03 AM #16
 Be inspired. Be creative. Be bold.


- Join Date
- Apr 2001
- Location
- Perth
- Posts
- 10,820

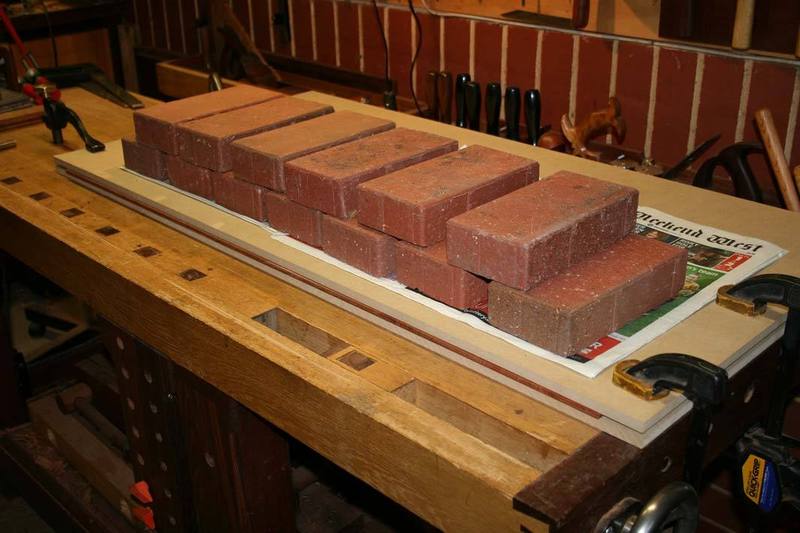
Not that uncommon, David. I have done this several times. Here is one I recorded, jointing two 1/4" book matched boards to make a panel.
Boards sandwiched between layers of MDF and loaded with bricks to keep flat ...
Shooting the edges with a jointer ..

Regards from Perth
DerekVisit www.inthewoodshop.com for tutorials on constructing handtools, handtool reviews, and my trials and tribulations with furniture builds.
-
2nd March 2018 02:03 AM # ADSGoogle Adsense Advertisement
- Join Date
- Always
- Location
- Advertising world
- Posts
- Many
-
2nd March 2018, 02:50 AM #17
GOLD MEMBER
- Join Date
- Mar 2010
- Location
- US
- Posts
- 3,101
Derek - big difference between narrow boards (which are commonly shot since they're too narrow for a plane to be stable on their edge) and wider (4/4 size) boards, etc.
By common practice, I mean the following:
* what would've been done by skilled users (and basic things like this are quick to become skilled at)
* what provides a reasonable return for effort involved.
I use a long sticking board for mouldings, and I've shot a few veneer boards (1/8th solid stock that gets attached to a ply substrate) and thin paneling for small cabinets. Anything that approaches 3/4ths of an inch matched is better shot without a board like this, unless the boards are short and small and you're going to do a whole bunch of them at a time.
Setting up a sticking board takes time if you're using the bench for anything else. Not tons, but a long one is bulky to handle for no reason.
I'm not a historical text reader, laziness guides me. It'd be interesting to see what someone who reads something like Nicholson would find.
Here's what I'd see as a normal practice with those two boards:
* do as little as possible to find out how you're going to match them from rough
* match plane the joint and glue and clamp them.
* do all of the rest of the planing after they're together
This provides at least as good of a result as processing separate boards, then continuing to do additional steps after that processing. Terry demonstrates a lot of very meticulous methods, but someone trying to build things may find them tiresome if they do them more than once or twice. Sort of like using a 65 degree smoother on a board that's anything but dead flat and straight off of the planer is tiresome (Terry didn't appreciate my questioning that on his youtube channel).
If just shooting something like thin stock to become drawer bottoms, nothing more is really needed than a pair of holdfasts and any flat stock lying around. I can't imagine many people are laminating thin stock for drawer bottoms these days, but it does make them a little bit more interesting (and it's cheap). All of the jigging that's not needed (as in Terry's video on that pair of boards) is attractive to wood show attendees because they imagine gadgetry taking away the chance of failure when very little experimentation does the same.
-
2nd March 2018, 08:25 PM #18
Senior Member
- Join Date
- Apr 2017
- Location
- Dandenong Ranges
- Posts
- 266
added a space bw words :)
Thanks Derek I'll try that. When I did a couple of small table tops recently going diagonally to flatten - traversing? - it was a pain to keep them still. The doe's foot would help I think."The best substitute for a tail vice is the doe's foot .."
DW - Whether or not it is common practise to use a long planing board or not, it was an invaluable find for me. I think it's easy to forget how much there is to learn as a beginner (planing or woodworking generally) once you have learnt it.
(I have seen this view expressed a few times here so it isn't personal but it just got to a certain point of frustration.)"Basic skills like this are quick to become skilled at..."
I don't know if it is common or not, but for me learning to plane involved first rejuevinating an old Stanley by reading up and watching stuff online. I had only seen hand planes in reality at Bunnings before that and had never held one. Bevels, micro bevels, cambered blades, chip breakers, frogs, soles, cap iron or not etc. Then the sharpening and the set up. And any of those may be wrong or slightly out and be the reason I am having trouble learning to do an aspect of something I have never seen done in real life. Trial and error.
I haven't sanded in sometime, I can get a beautiful look and feel from planing, I can flatten a glued up top and I can get a 90 d edge on a board but for some reason I can't reliably get the same edge straight. So I love my long planing board.
On the other hand none of that is your fault and it probably is a basic skill for you. I imagine if I was talking about horse riding with other horse riders I might refer to a sitting trot or changing diagonals as basic skills (though it feels like you are talking of a flying change). Still I would understand if a beginner of a year or two got frustrated. So I will leave the rant as a reminder to us all that what is basic to one is not necessarily basic to all.
-
3rd March 2018, 03:55 AM #19
GOLD MEMBER
- Join Date
- Mar 2010
- Location
- US
- Posts
- 3,101
I have a suspicion about inability to get a long flat edge, but will withhold that for now, at least in detail. The summary of it is that I noticed (through a conversation on the UK board) that I am one of apparently few people who flatten and square a board at the same time without stop shavings or separate steps. The conclusion was that the cap iron use makes this possible and easy.
That said, if it doesn't work for you no matter what, it doesn't work, and if the long board does, it does. It just relies on things i'm not in love with (fiddling with the board, the need for a backer if the long board in use isn't sufficiently rigid, wide, the need to have a good power jointer to expedite planing, and the inability to take advantage of the plane's ability by itself stay in the cut under its own weight.
I noticed how quickly terry used the board (which suggests, given the thin cut, that he already has a very good power jointer. I have none, but a friend of mine has one that he spent a great deal of time working up to acceptable accuracy, and faster in this case is doing that and just gluing straight off of the jointer.
I think we have a lot to learn from people who made a living making furniture by hand, and if there is a hold up (in your case, the edge planing), it's something simple. Just as tearout reduction is something simple (best done with a cap iron - you can use all manner of things like high frogs, etc, but they are gimmicks and didn't survive professional use for a good reason). Too with the cap, it's a method that obsoletes everything else, and not buy it, set it and you're good to go within an hour. You learn with it, it makes everything else easier vs. the purchased solutions like a high frog which promise much initially and little in the long term.
The other thing with this is (ghee, this did get long) is that until we stop building, there's really no situation that we need to give up on. Aside from design and creativity (which can be learned, but often is more of a born thing, just like running speed), the mechanical things are of the sort "what one man can do, so can another".
-
3rd March 2018, 09:01 AM #20
GOLD MEMBER
- Join Date
- Feb 2003
- Location
- back in Alberta for a while
- Age
- 68
- Posts
- 12,006
in respect to long grain shooting boards, another use -- which may or may not be traditional -- is the production of matched parts.
With the fence set to the required width, it's possible to make almost number of components (like drawer sides and fronts) all the same width.regards from Alberta, Canada
ian
-
3rd March 2018, 02:20 PM #21
Senior Member
- Join Date
- Apr 2017
- Location
- Dandenong Ranges
- Posts
- 266
Ian, I am using it for that reason at the moment.
DW, I don't have a power jointer so everything is with the no. 5. I have a 4 1/2 but one side of the frog sits higher than the other so I can't get the blade even in depth without it skewing.
I wouldn't say it doesn't work for me no matter what - just that I can't do it yet. I will. Definitely not giving up but in the meantime the edge needs to get straight somehow. I would actually like to hear your theory. Even if it doesn't solve the problem, I will learn and it may solve something else. At the moment - past couple of days- I've been trying to work out where I'm going wrong, not just with the edges but in general, and I feel like I'm totally losing my ability. I seem to have temporarily lost my feel.
The point about being something simple is very applicable to my case. I'm stumbling around in the dark and it's often difficult to tell why I am successful when I am never mind what's going wrong. I think a couple of hours in the flesh with someone who knows what they are doing would - actually I'll start a thread to ask if someone is willing to do that.
Cap iron - what is often called the chip breaker? Except for 'closer to the blade for finer shavings' I know nothing. Think I'm going to go experiment now actually.
-
3rd March 2018, 03:23 PM #22
SENIOR MEMBER
- Join Date
- Jan 2008
- Location
- NSW southern Highlands
- Posts
- 548
Mnb
The first plane I acquired was a No 5 which I still have, and have tuned up several times. This plane is adequate to do most of the basic tasks such as jointing an edge or smoothing a surface.
My suggestion would be to study some books to find out where the common problems with planes are likely to lie and also how to tune a plane to get the best performance possible.
One book to start with could be The Essential Woodworker by Robert wearing which you may find in your local Library or purchase from Lost art press or retailers. Another is Vol 1 of the Hayward years which covers Tools and Techniques. The other 3 Vols you can acquire at a later date.
One technique you can try to get a straight edge using your No5, is to start the cut with the plane set for a fine cut and place the blade a little inboard of the end of the board, then push the plane along and lift the plane off a little before the end of the board. this should form a very slight hollow along the edge of the board.
Then start your cut with the blade just off the board and push along to just past the end of the board. Continue until you get a continuous shaving all along the board for the full width of the board and it will be straight.
You say you are able to get a square edge on a board so I shall assume you have the correct technique for holding a Plane, if not you will also need to do some study on that aspect.
Good luck with your endeavours
Regards
-
6th March 2018, 06:22 AM #23
GOLD MEMBER
- Join Date
- Mar 2010
- Location
- US
- Posts
- 3,101
Yes, that cap iron. Not so much just for finer shavings as it is matched to the shaving you want to take. If you have, let's say, a 50 degree or 60 degree bevel meeting the shaving coming up the back side of a plane iron, perhaps it's something like 1 1/2 times as far back as the shaving is thick. The idea in using it is that it creates a situation where a shaving stays together (due to lack of significant tearout) which means that your shaving is uniform across a surface. If you already have a flat board edge, a full stroke across it doesn't threaten it. If you are working off a high spot, you can do it quickly and precisely without creating another problem to deal with. For whatever reason (aside from that), it just seems like every basic planing issue (chatter on planes, tearout, grain direction issues aside from that making it difficult to plane) because much easier once you use a plane with the cap iron set properly. Originally Posted by Mnb

(no need to get too obsessed with exact distance of the edge from the cap iron, relatively close by eye is fine, and then set the plane from there to where the shaving shows a little bit of evidence of running into the cap iron (it will start to straighten a little bit, or a lot if you choose).
-
6th March 2018, 07:46 PM #24
Senior Member
- Join Date
- Apr 2017
- Location
- Dandenong Ranges
- Posts
- 266
That was really well explained. I (believe) I see what you mean. Thank you.
Will get back to you once I have a try.
-
14th March 2018, 06:45 PM #25
Senior Member
- Join Date
- Apr 2017
- Location
- Dandenong Ranges
- Posts
- 266
DW, I did some work on the chip breaker/cap iron - the chip iron, no the breaker iron I think sounds better. Yeah so I cleaned it up a bit more and made sure it sat flat etc and gave your suggestion a try.
I 'll have to practice obviously but I think I got the spot!
Once the plane bit into the wood at the beginning of the cut it was just a matter of keeping it moving forward to get a uniform shaving along the length. Thanks. Anymore tips? I haven't tried with a different depth of cut or mouth opening.
-
15th March 2018, 12:33 AM #26
GOLD MEMBER
- Join Date
- Mar 2010
- Location
- US
- Posts
- 3,101
You've pretty much got it. Everything after this is subtlety, and the more you learn to use the cap iron, the more reward you'll get (to the point that it will significantly outperform any other plane design that you have on hand for everything other than endgrain). I have a couple of general thoughts that I've learned over the years:
* a general set that I use on a given plane (which will vary based on what thickness you intend to take) is one that allows a tiny bit of tearout at the most unless you ramp the shaving thickness way up. There's less resistance, still no chance of significant damage to wood, and you can pretty much do a two step with a finish plane - step 1 is getting uniform shavings from left to right or right to left along the length of a board, and step 2 is backing the shaving off to something very thin and taking another pass or two. "tiny bit of tearout" means the shaving stays together, the plane stays in the cut, etc, but the surface isn't bright-perfect in trouble wood. If the shaving comes apart or the plane comes out of the cut, that's too much tearout
* the bed of the plane is more important than the mouth size. Meaning, if you have a mouth that's not too large, allow the frog and casting to be one plane. If the mouth is too large (and it can be, not for tearout, but in that it can catch on the ends of things or be difficult for small work - both of which can lead to splitting, chunking, etc) then that needs to be mitigated. I've never measured a mouth to see what i like exactly on a metal plane, but if a smoother mouth is getting toward an eighth or something, it's too large. I'd rather have a thicker iron and the frog even with the casting than move the frog forward, though. If that doesn't solve it, I sell the plane and get a different one.
No close set on the jack plane unless it's needed - we always try to plane across or with the grain with a jack plane. Once in a great while, it will be needed, though. "needed" means the planing is just a horrendous pounding experience or the damage is so severe that the subsequent plane won't remove it in the course of regular work.
Now that you've got your plane uniformly staying in the cut, everything will be easier. Keeping things flat, making them flat, removing even amounts of wood from something end to end or side to side, and not overshooting marking lines. Of course, you can do these things with high angle planes, but they need more frequent sharpening and work wood a lot more slowly if the volume is greater than a few thin smoother shavings.


 Reply With Quote

Similar Threads
-
Sticking on Stencils
By Dibbers in forum SCROLLERS FORUMReplies: 9Last Post: 5th February 2018, 02:27 PM -
Clever adjustable shooting board
By steamingbill in forum WOODWORK - GENERALReplies: 1Last Post: 19th April 2017, 11:50 AM -
Clever adjustable shooting board
By steamingbill in forum WOODWORK - GENERALReplies: 2Last Post: 19th April 2017, 08:28 AM -
Sticking hot tap
By DavidG in forum NOTHING AT ALL TO DO WITH WOODWORKReplies: 13Last Post: 11th February 2016, 01:47 PM -
Adjustable sticking board
By derekcohen in forum HAND TOOLS - UNPOWEREDReplies: 9Last Post: 29th April 2013, 11:26 AM
