

 Thanks:
  Likes:
  Needs Pictures: 0
 Picture(s) thanks:
Results 1 to 15 of 37
-
8th March 2017, 06:46 PM #1
 Bloke
Bloke


- Join Date
- Jan 2008
- Location
- Central Coast NSW Australia
- Posts
- 1,136
 How do you cut in a new saw recess for the blade?
I have picked up a couple of Disston's last year at an auction and have been slowly rehabbing them. Both D8's, one a Canadian 6 tooth rip saw and the other an 8 tooth cross cut. It's the cross cut I'm having difficulty with. It's been damaged repaired and also has a piece of the top horn missing. So I though easy peasy, I'll make a new one and so far so good. Ive cut the blank out and have stated to shape the handle. I realise that I don't know how to make the cut for the blade. Is there something I'm missing? Or is there a special tool for this?
20170308_163809.jpg 20170308_185009.jpg
I notice that the blade protrudes into the bottom of the handle so am also wondering if it is a bodgie?
20170308_163819.jpg
On another note I've been on the Distonian site trying to date the saw. The etch is all but gone but the medallion seems to suggest its age as pre 1917.
20170308_164255.jpg
Any help appreciated.
TTLearning to make big bits of wood smaller......
-
8th March 2017 06:46 PM # ADSGoogle Adsense Advertisement
- Join Date
- Always
- Location
- Advertising world
- Posts
- Many
-
8th March 2017, 07:04 PM #2
Lignum Vexator
- Join Date
- May 2007
- Location
- North of the coathanger, Sydney
- Age
- 68
- Posts
- 9,417
a thin saw shaped something like this
saw.jpg
with the teeth on the curvie bitregards
Nick
veni, vidi, tornavi
Without wood it's just ...
-
8th March 2017, 07:32 PM #3
Bloke
- Join Date
- Jan 2008
- Location
- Central Coast NSW Australia
- Posts
- 1,136
Mmmmm maybe a multi tool blade? Originally Posted by Sawdust Maker

TTLearning to make big bits of wood smaller......
-
8th March 2017, 09:46 PM #4
GOLD MEMBER
- Join Date
- Nov 2004
- Location
- Millmerran,QLD
- Age
- 73
- Posts
- 11,135
TT
You probably have to make a decision asto whether you wish your handle to be authentic or if you would settle for just a useable handle. That may sound a little condescending but I don't mean it that way.
The original D8 has a covertop handle which is difficult to slot for the blade. If you have the right size slotting blade (about 150mm from memory) you could use that, but probably you don't.This means you will have to cut as much as you can with a suitable thickness (including the set) back saw and then use something similar to the saw Nick described to "hollow" out the rest of the cut.
This is a hassle to put it mildly! The alternative is to modify the saw plate so you can use a straight kerf with a back saw only for the plate.
The plate should not protrude into the hand hole region. It was either a mistake from the factory or more likely it is a replacement handle that didn't quite fit. It may still be from a D8 as my experience of them is that they all varied slightly and the handles are rarely interchangeable unless modified.
Regards
PaulBushmiller;
"Power tends to corrupt. Absolute power corrupts, absolutely!"
-
8th March 2017, 10:03 PM #5
Bloke
- Join Date
- Jan 2008
- Location
- Central Coast NSW Australia
- Posts
- 1,136
Thanks for that Paul. This is my first attempt at a saw handle so the result is a bit agricultural, so I think I may be doing another on in the future. I don't want to interfere wit h the plate so I will make the adjustments in the handle. The slotting blade you mentioned is a multi tool blade? Originally Posted by Bushmiller
TTLearning to make big bits of wood smaller......
-
9th March 2017, 06:46 AM #6
GOLD MEMBER
- Join Date
- Nov 2004
- Location
- Millmerran,QLD
- Age
- 73
- Posts
- 11,135
TT
The slotting saws are thin circular saws, but normally only 50mm or 75mm diameter. The one I have is much larger and I mounted it in a 185mm circular saw under a bench. Somewhere I put up some posts on it but I can't remember where that was. If I can track it down I will post a link.
Regards
PaulBushmiller;
"Power tends to corrupt. Absolute power corrupts, absolutely!"
-
9th March 2017, 11:14 AM #7
Senior Member
- Join Date
- Mar 2005
- Location
- Razorback
- Age
- 66
- Posts
- 194
I used on of these from Bunnings. It worked well, just a tedious task.
https://www.bunnings.com.au/irwin-ja...d-saw_p5712931
cheers,
Peter
-
9th March 2017, 12:18 PM #8
almost a woodworker
- Join Date
- Feb 2007
- Location
- blue mountains
- Posts
- 4,888
Afraid I just went for a usable handle so a little bit of open cut is visible on the top and a very little bit on the underside. Handle still works fine.
I did see a plan someplace for laminating the handle in 3 pieces to get around this issue. The thin center lamination being traced off the blade for a snug fit. Would make a nice strong handle also.
Regards
John
-
9th March 2017, 02:39 PM #9
GOLD MEMBER
- Join Date
- Nov 2004
- Location
- Millmerran,QLD
- Age
- 73
- Posts
- 11,135
I still have not found the thread, but I retrieved the pix on a D8 Thumbhole resto.
It shows the circular saw (slotting) blade and a cut away of the original handle.
After that I dropped the saw and broke the top horn!
I think the pix will appear below.
Regards
PaulBushmiller;
"Power tends to corrupt. Absolute power corrupts, absolutely!"
-
9th March 2017, 06:30 PM #10
Bloke
- Join Date
- Jan 2008
- Location
- Central Coast NSW Australia
- Posts
- 1,136
Thanks Paul. I got there in the end.
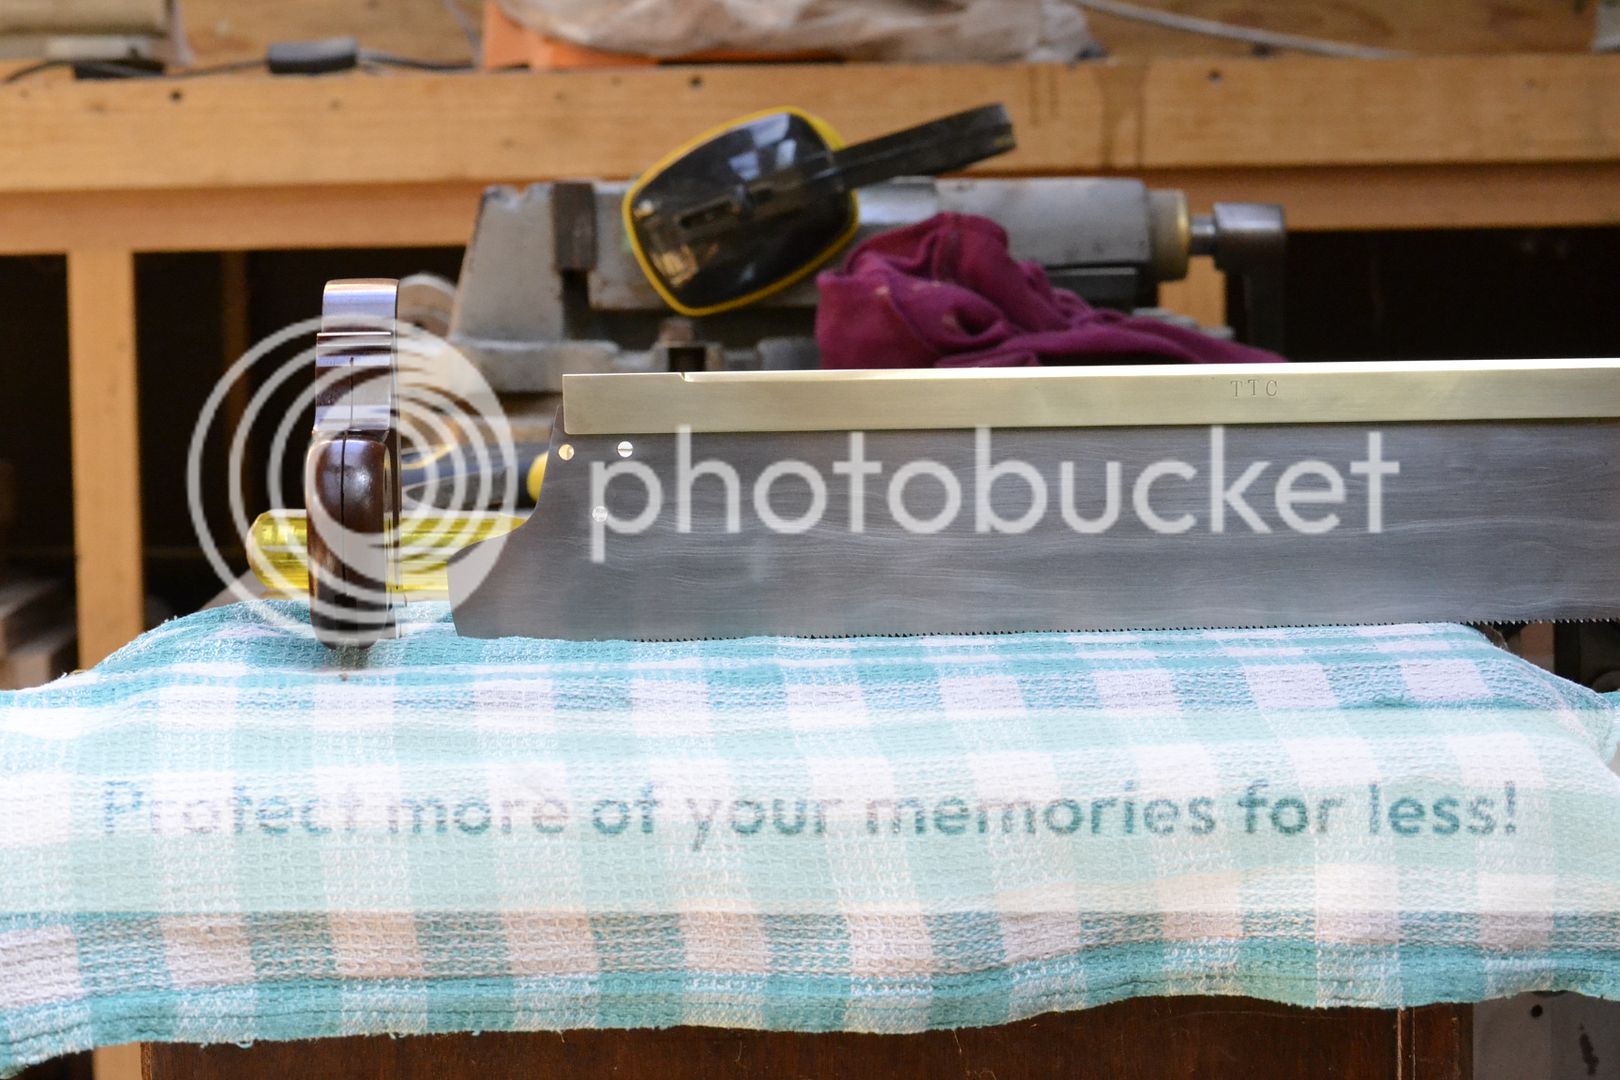
Saw Handle.jpg
It was a bit of a pain but the multi tool came to the rescue. As I said earlier it is a bit ruff but my next one will get better. I'm coating it with tung oil and then some polish and it should be good to go. I have lost the saw medallion in my work shop somewhere and SHMBO is chuckling.
I'll post a pic when I have completed it.
TTLearning to make big bits of wood smaller......
-
9th March 2017, 06:33 PM #11
Bloke
- Join Date
- Jan 2008
- Location
- Central Coast NSW Australia
- Posts
- 1,136
Originally Posted by Peter57
Had one of those a while ago Peter. Don't know what happened to it.
TTLearning to make big bits of wood smaller......
-
9th March 2017, 06:55 PM #12
GOLD MEMBER
- Join Date
- Mar 2004
- Location
- Brisbane (western suburbs)
- Age
- 77
- Posts
- 12,126
TT, I've been away for the last week, & didn't see your post til now. I posted on my attempt at fitting a new handle to a Disston with that curvy-wavy shaped end here. You cut most of the slot with a straight saw, and the curved saw is used to cut the rounded bottom of the slot. It's not that hard to cobble up something like Nick suggested. The teeth don't have to be anywhere near perfect for a one-off, as long as they cut (make the teeth so they cut on the pull stroke, you'll find that much easier than the other way). And if you can find a bit of old sawplate that is close to the same thickness as your saw, you don't need to worry about setting it. It may bind a little, but if you rub a bit of wax on the blade & take your time, it will get you there. The saw I made is far more elaborate than necessary, but as a 'sawmaker', what else could I do?
 I've used it quite a bit since, so the effort was justifiable......
Cheers,IW
-
10th March 2017, 01:21 PM #13
Bloke
- Join Date
- Jan 2008
- Location
- Central Coast NSW Australia
- Posts
- 1,136
Thanks Ian & Paul. I get it now. I've been doing a bit of research on this saw and see that Henry Disston thought this type of handle would be more likely to resist becoming loose. It also meant that if you broke the handle that it was easier to buy a new one from him that make your own.

I've had this multi tool for a couple of months (late Christmas present) and had only used it for sanding. Here are the two blades I used. I did the initial cut with a tenon saw as Ian has suggested to get a start and basically scribe the line I needed to follow. The rest was easy.
20170310_115350.jpg 20170310_115454.jpg
Sorry for the poor quality pics. I have no camera and am reliant on my mobile phone for now.
TTLearning to make big bits of wood smaller......
-
10th March 2017, 06:52 PM #14
GOLD MEMBER
- Join Date
- Mar 2004
- Location
- Brisbane (western suburbs)
- Age
- 77
- Posts
- 12,126
To be frank, TT, I think the closed top handle is nothing more than a gimmick, or as you say, to encourage saw owners to buy replacement handles from Henry. I doubt the bit of wood left between the top of the handle & the blade slot adds anything remotely significant to structural strength, and as far as preventing it from coming loose, well, I'd like to see their explanation of how that works! Adding an extra bolt or two, which they did over time, would contribute much more to making sure the sucker stays put, I reckon.
In my case, it was a bit of fun to see if I could replicate the closed-top, but if anyone re-handling an old saw doesn't want the extra hassle, make an open-topped handle, which will allow cutting more of the slot with a regular saw, and reduce the amount of 'circular' cutting involved. I'm sure it would give every bit as good service. Anyway, you solved your problem TT, & got the job done, so all is well. Looks like it will do nicely.....
Cheers,IW
-
18th March 2017, 02:25 PM #15
Deceased
- Join Date
- May 2008
- Location
- Australia
- Posts
- 2,357
Not a D8 handsaw, but an 18 inch toothline backsaw that has the slot extending into the bottom rail of the handle.

The slot for the bottom rail was cut to a depth of 5mm using 40mm slitting blade mounted to a router table. Note; the top mounting flange on the slitting saw holder I use has an OD of 30mm.
For cutting the slot around the cheek line and spine mortise I normally use a 50mm slitting blade to achieve an initial slot depth of 10mm. The remaining depth of cut is completed using a backsaw of matching kerf width. (tooth set removed)
These type of slitting blades are designed to be run at low speed to minimize vibration. The greater the OD of the slitting blade, the greater the potential for vibration to occur. Personally I prefer not to exceed an OD of 50mm. Excessive vibration will result in the slot turning out oversize. If using a router it needs to be mounted securely to a router table. A variable speed router set to its lowest rpm is highly advised.
The following shows the type of 1/2 shank holder I use. The graduated steps allows the user a greater choice of inner bore sizes that are common within the range of slitting blades available.


 Reply With Quote


Similar Threads
-
Recess Cut
By DIY DAN in forum WOODTURNING - GENERALReplies: 44Last Post: 10th January 2011, 10:56 AM -
Recess tool
By haemish762 in forum WOODTURNING - GENERALReplies: 13Last Post: 20th December 2005, 11:35 PM -
Recess
By DPB in forum WOODIES JOKESReplies: 0Last Post: 24th February 2004, 10:25 AM
