

 Thanks:
  Likes:
  Needs Pictures:
  Picture(s) thanks:
Results 1 to 13 of 13
-
30th October 2018, 11:11 AM #1
 GOLD MEMBER


- Join Date
- Aug 2004
- Location
- Lost in Space
- Age
- 53
- Posts
- 2,406
 A dark side voyage into combination handplanes
Gidday

After noting some interest around the forum in combination planes we thought it a great idea to get a dedicated thread going. So a Shoutout to all interested to post Pics of your combination planes fav threads tips and tricks start
up blade kits, iron making and sharpening tips and so on and so forth.............
Is the combination plane truely the Death Star of the Dark Side? can it really deliver?
Some argue thats its always better to use a dedicated plane for the task at hand others reckon the idea of a combination or universal handplane is just to dam fiddly and to much a compromise
Fans of Combination or Universal Planes champion that if wielded correctly and setup right they can for the most part most of the time deliver comparable and perhaps in most cases near identical results
For some having the flexibility and potential in one tool makes it special, economical, a space saver, and a liberation from the scream of an electric router or needing the space to house 2 dozen dedicated tools
Death Star Vs Light Saber Sophistication Vs Simplicity Scope Vs Precision
Regardless of your take on the landscape these tools are consistently referred to as a joy to use
There just might be something in that ..................................lets see Just Do The Best You Can With What You HAve At The Time
-
30th October 2018 11:11 AM # ADSGoogle Adsense Advertisement
- Join Date
- Always
- Location
- Advertising world
- Age
- 2010
- Posts
- Many
-
30th October 2018, 11:16 AM #2
GOLD MEMBER
- Join Date
- Aug 2004
- Location
- Lost in Space
- Age
- 53
- Posts
- 2,406
Heres some great Primers on Combination Planes to kick things off
The Wood Wrights Shop
https://www.pbs.org/video/woodwright...nation-planes/
A great series on Wood by Wright on all things combination Plane as they relate to Stanley versions
https://www.youtube.com/watch?v=5_85S1681q0
https://www.youtube.com/watch?v=2rrv-i03HJs&t=64s
https://www.youtube.com/watch?v=6sY1_3KkiWw&t=205s
A dedication to Alf
https://www.youtube.com/watch?v=yxo6ROrs3wI
https://www.youtube.com/watch?v=YK284m0wJME
Mitch Peacock
https://www.youtube.com/watch?v=7KsSYJ4iir0
Regards Lou
Just Do The Best You Can With What You HAve At The Time
-
30th October 2018, 11:44 AM #3
GOLD MEMBER
- Join Date
- Aug 2004
- Location
- Lost in Space
- Age
- 53
- Posts
- 2,406
My Veritas Combination HAndplane.....The Deathstar? OR is that the No 55?
Nice nothing like getting your hands on some new Kit
Just Do The Best You Can With What You HAve At The Time
-
30th October 2018, 03:44 PM #4
Senior Member
- Join Date
- May 2016
- Location
- Blue Mountains, Australia
- Posts
- 462
I love my Stanley No. 45 and try to employ it as regularly as possible.
I've sought out the hard-to-find reeding and fluting cutters and been tempted to buy a No. 55 to do more moulding work. But honestly besides a few tasks (dadoes, rebates, tongues & grooves, beading, reeding and fluting and the odd bit of chamfering) it doesn't get used all that much. I more often design a project for the 45 than vice versa. And if there's some hardwood in the project - forget about it.
But I do love my old 45!
The Veritas combi looks very cool!
-
30th October 2018, 04:44 PM #5
Deceased
- Join Date
- May 2008
- Location
- Australia
- Posts
- 2,357
Lou; your best option is to take on board Derek's advise and rely on back bevels to increase the effective pitch on your combo plane.
From Patrick Leach's site on Stanley Combination Planes;
#45 Combination plane 10 1/2"L (11 1/2" 1897 on), various widths (see below), 9 1/2lbs, 1884-1962.
I hate them. There, I said it right off. Why? I find them to be tempermental beasts, where it seems just as much time is spent setting them up as there is when using them (obviously this isn't the case when sticking 10's or 100's of feet of stuff). Then there is their problem with tearout; stock selection is very important to use them satisfactorily. Unlike the wooden planes that the #45 replaces, there is no complete bearing surface ahead of the cutter. Instead, two narrow skates 'serve' that function. As a consequence, the majority of the iron has a mouth that is, in essence, infinitely wide, which, naturally, makes for suboptimal results. Now, the wooden planes (that the #45 replaces) aren't known for the tightness of their mouths, and as a result will tearout on grain changes. But, I've found the amount of tearout to be far less than that of a #45. Beads are the worst performer of the #45, and I'd rather use 'lectrical tools to make sash than to use this plane for the same.
One other thing I dislike about combination planes is that they are heavy, much more so than the wooden planes. Wooden planes, because they are dedicated to a particular task, only need to have their irons set and then it's off to the planing. Oh, I thought of something else bad about the #45 - there are too many parts that can get lost or broken, which any owner of a #45 is all too familiar.
My personal opinion aside, these planes are useful for many people. Those folks who do not have the space for, nor the chance to acquire, the wooden planes the #45 replaces find them very useful. The #45 also is cheaper than having to buy all the other planes it replaces. If I had to use the plane (like if a gun was stuck to my head, or something like that), I'd only do so for making reeds. It does a respectable job of that, provided the wood's grain is even, and you have copious scraps of wood about to test the plane's setting with each adjustment. It also ploughs about as well as any wooden plane, but that's because wooden ploughs, like the #45, do not have a complete bearing surface ahead of the cutter.
#55 Universal Combination Plane 10"L, (various widths), 15 1/4lbs, 1897-1962.
Bought it. Used it. Hated it. Sold it.
The Great Zeus Himself thought His sentence of Prometheus to be the ultimate punishment for mankind, and throughout the millenia it was. That is, until the year 1897 when Messrs. Justus Traut and Edmund Schade devised a torture that knew no bounds betwixt Gods and mortals. We should all be so lucky to be chained to a rock and have our livers eaten daily by an organ-hungry raptor than to suffer the agony of this contraption. Even the Chinese would have gladly abandoned their infamous drip, drip, drip of water to the forehead had they been on Stanley's favored nations tradelist. If there can be a ball and chain of planes, this is it, baby.
Down in Australia this chunk of metal has been used as a doorstop (no lie). Here in America, it's been used as a woodworking tool. Now, you tell me which nation is more civilized? And since I'm on a roll slamming this tool, why stop here? Stanley advertised that the #55 was "A planing mill in itself." More like "A paining kill in itself" is a befitting slogan for the tool. Over in Greece, sponge divers tie these things around their waists as ballast to get them to the briney depths sooner. In India, swamis position a few dozen of them in a rectangular fashion and then have a snooze atop them.
-
30th October 2018, 05:00 PM #6
Be inspired. Be creative. Be bold.
- Join Date
- Apr 2001
- Location
- Perth
- Posts
- 10,820
Lou, there are a bunch of articles/reviews on my website on the Veritas planes: Small Plow and Combination Plane.
Veritas Small Plow: The Veritas Small Plow Plane
Accessory Blades for the Veritas Small Plow: http://www.inthewoodshop.com/ToolRev...SmallPlow.html
The Veritas Combination Plane - Part one - dados or housing joints:http://www.inthewoodshop.com/ToolRev...ane-dados.html
Part two � groovin� baby:http://www.inthewoodshop.com/ToolRev...e-grooves.html
Here is the latter one ...
The Veritas Combination Plane
Part one - dados or housing joints

Usually, combination planes are not my thing. I prefer planes that are dedicated to do one task well, than those that are capable of doing several tasks in a mediocre manner. A plough plane should plough grooves, mouldings and beads should be made by woodies designed for the task, and dados should be made by a dado plane.
I have owned combination planes, such as the Stanley #45 and, while they work, they always feel like an excuse for the Real Thing. As a result, I was more curious than excited when Lee Valley sent along their Combination Plane for pre-production testing. I wondered if this was to be another example of an excellent construction with creative design � as we have come to expect from the design team at Lee Valley producing their Veritas range of tools � or whether this was to end as a great idea but just not good enough to play with the dedicated planes?
It is no surprise when I say that this is possibly the most complex plane that Lee Valley have produced to date. It is a modern-era version of the famous Stanley #45 combination plane, which was produced between 1884-1962.
Stanley advertised the #45 as �Seven planes in one�. It could bead, plough (no, not �plow�) a groove, dado (or create a housing), rebate (not �rabbet� � ugh), match plane (create a tongue and groove joint), plane sash (for windows), and slit (thin boards). The Veritas Combination Plane does all the above other than the last two items. Actually, it could plane sash since it accepts the blades from the Stanley #45.
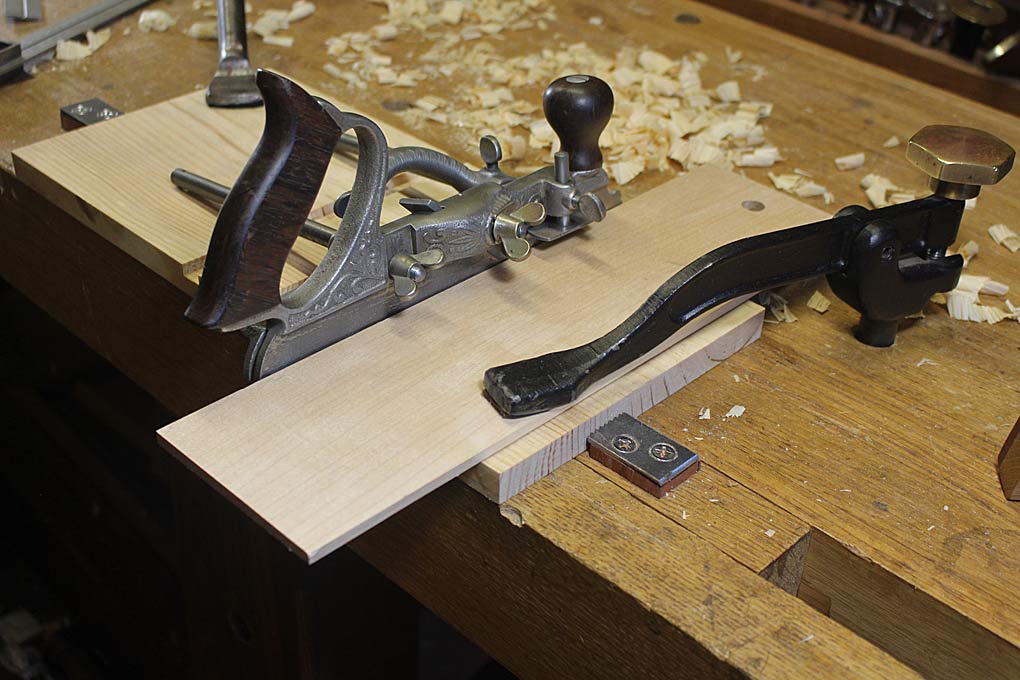
Below: the Combination Plane match planing a tongue �

The Combo is an upgrade on the Small Plow, which is capable of a number of the same uses through the upgrade kit, however the Small Plow cannot plane a dado. The Combo is certainly a striking looking plane with � what is it � 15 brass knobs?
I built a box for it, using the plane to complete a number of different tasks, such as grooves and beads. I did this because it seemed the right thing to do. You can purchase a box with the plane, but I�ve always made my own. Inside this one is the plane plus two rolls of blades.

There is a wide range of available blades. Rebates and grooves, beads, etc, etc �


I must point out before your eyes glaze over that it is not my intention to write a review of the Combination Plane here. There are a number of these already.
What I do mainly wish to offer are my thoughts on setting up and using the combination plane so that one might extract the best from it � and, incidentally, other combination planes, since I shall include what I can here.
The Dado or Housing
The present article will focus on the through dado or housing joint. I have chosen this first as I consider it to be one of the more difficult tasks with a combination plane.

The dado is also the basis of a sliding dovetail, since this is simply a dado with either an angle at one or both sides:

There are a few simple techniques that I recommend, and these will help create perfect dados.
To compare with dados off the Veritas Combination Plane, included is the fabulous (and specialist) HNT Gordon dado plane, which I reviewed here, and the Stanley #46, which is a combination plane that features a skew blade for improved cross grain planing.
The work piece
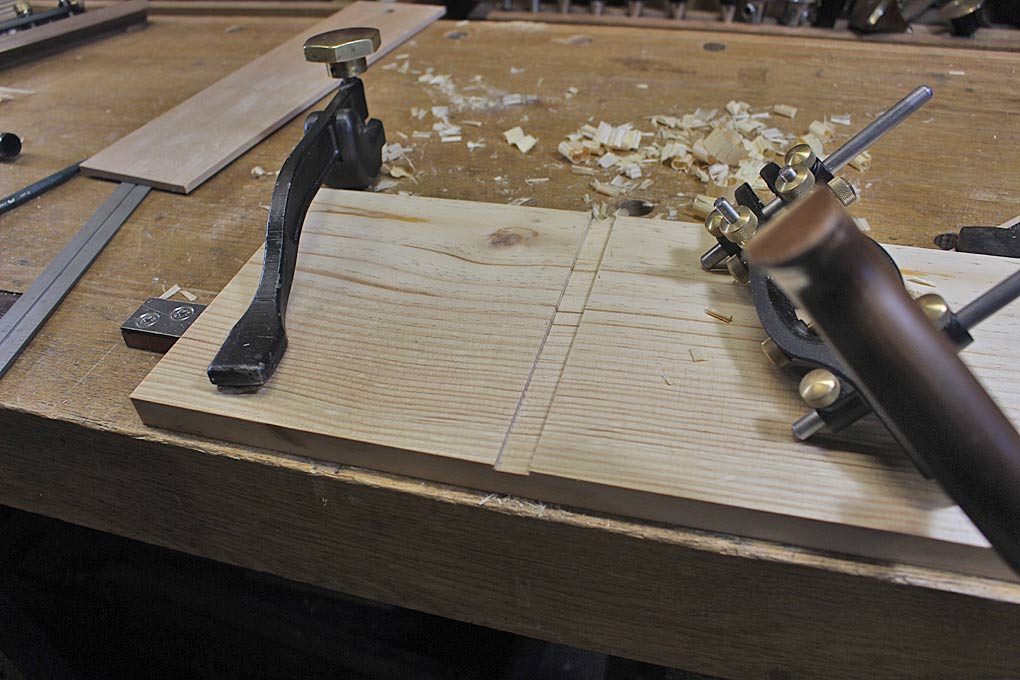
To demonstrate the process, the board chosen was pine. This softwood will test the edges of planes across the grain. It is vulnerable to spelching at the sides and exit of the dado.
Below is the board held by a sawtooth planing stop and Doe�s Foot. The doe�s foot is reversible and has non-slip tape on both sides.

Setting up the plane
The combination plane is used without the fence � just the main body and the second skate �

Now the key to planing a clean dado is the alignment of nicker (or �spur�, as Stanley refers to it) with the side of the blade. Therefore, let�s first look at the nicker.
The nicker in the combination plane is a double-edged (or V) knife. It arrived with a sharp and pointed V. I found that the point broke off quite quickly, and consequently honed them into a rounded tip.
Keep in mind that this is what you do with pre-production planes. They arrive warts and all. I have no idea whether the production nickers are different from mine (I recommended that they be rounded). The steel in these was also soft, and they would not hold an edge for long. You will struggle to cut clean dados without sharp nickers.
What I did was to heat the tips of the nickers with a torch to a glowing red ho, and then quench in peanut oil. This left a very hard tip and still flexible blade. It was possible to hone and polish on a very fine diamond stone. Be careful � an edge like this is brittle. However I have not experienced a problem, and the nickers have remained very sharp over time.

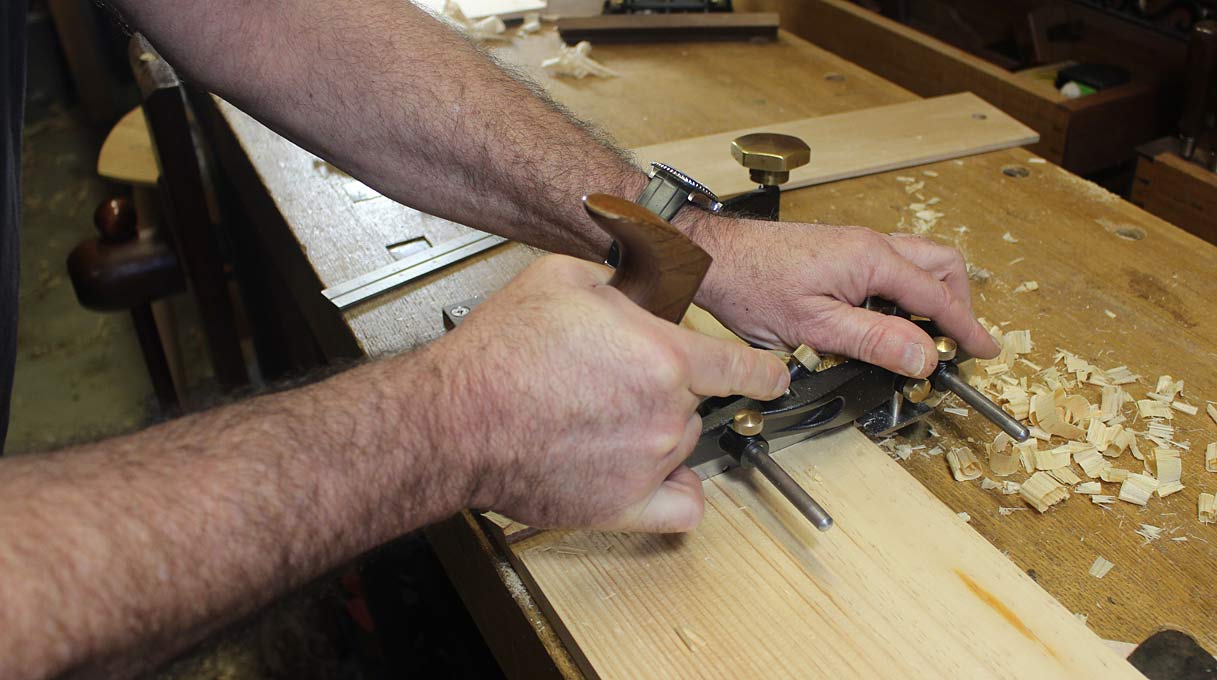
On the other side of the body are two adjusting screws. One holds the nicker in position, and the second, a set screw, adjusts the nicker beyond the body. The idea is that this can be a fine adjuster to align the nicker with the side of the blade.
You will note that the set screw is missing. These were removed and will not be returning. I found two issues with the setscrews. The first is that the nicker would become bent and deform when pushed away from the body. It was also then vulnerable for waste (wood) to jam underneath it.

The second issue, in my opinion, is that this adjustment is unnecessary in the first place. As I have always understood, when setting up a plane for a dado, the nicker is aligned with the blade. It prepares the way for the blade, when planing across grain, by slicing the surface and avoiding spelching. To do this, the nickers must be aligned exactly with the outer edges of the blade. Further, if the nicker extends outside the body, it would interfere with the body running along a fence. There is a place for the nicker to be situated outside the body, but this is when planing a rebate, which is with the grain. In this situation, the nicker and blade are still coplanar, with both placed a smidgeon outside the body. The purpose here is to cut into the corner of the rebate to keep the side wall vertical. If the plane is not set up that way, it will gradually plane further away from the sidewall, creating a sloped wall.
So we are left with just the nicker, and it is set flush against the body of the plane. It extends about 1/16� below the sole.

Now the other issue with my pre-production planes was the tight fit of the arms. I was warned about this beforehand. In comparison with my Stanley #45 and #46, the Combination Plane was more difficult to fit together. I have not heard complaints from users of new planes, and so assume that it is a trait of my pre-production version, however I will mention what I do to get around this just in case you have a similar issue �
All fences run very smoothly if the brass lock-down knobs are loosened slightly. Obviously what this does is minimise any minor misalignments.
I place the plane (with loosened knobs) on its side, and then drop the other skate or fence on top. Then tighten the knobs.

Once the nickers are adjusted, then insert the blade � here using a �� � and align it with the outside of the body. Use the lever cap knob to lock it down for now.
Use a straight edge to ensure that the outside of the blade is flush with the body and the nicker. I would take this opportunity to adjust the depth of cut (approximately).
Once this is done, slide on the second skate, and do this again.
Below is a small combination square being used as a straight edge �

Once all is set up, you can secure the blade with the blade guide knob �

Planing the dado
When I watch others planing dados, what I am struck by is the outer boundary lines are created by drawing the plane backwards over the work piece, pressing the plane against the fence, and then using the nickers to score the lines for the dado.
I used to do this as well in the past. I do not do this any longer, and I do not recommend it for others now.
The reason is that these boundary lines are critical for a clean finish. Drawing the plane back does not assure you of straight lines. It is very easy for the nickers to be carried off line by the grain. It is also possible that the plane is not drawn back cleanly, and the result is a mish-mash of lines.
What I do is lay out the lines with a square, and score them with a knife. Score the first line very lightly, just enough to break the fibres. Do this again, and repeat, each time scoring with a little more down force. You will be left with clean and straight boundary lines.

Now transfer the lines over the edge on both ends, and mark off the depth (use a cutting gauge for this) �

The last task is to use a chisel to undercut the boundary lines at the exit. This is to prevent any spelching ...

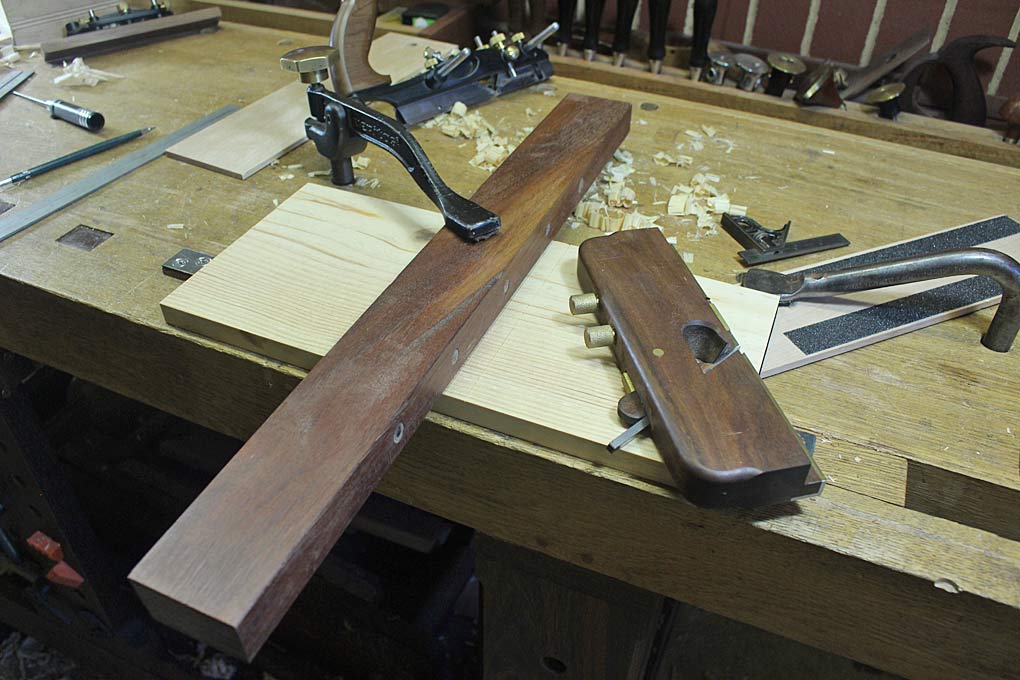
The fence is placed against one line. Here I am using a �� thick section of hard maple. Underneath is some of that non-slip tape ...

Now take the time to set the depth stop. Only one side is needed. I think I was going down about 3/8� here �

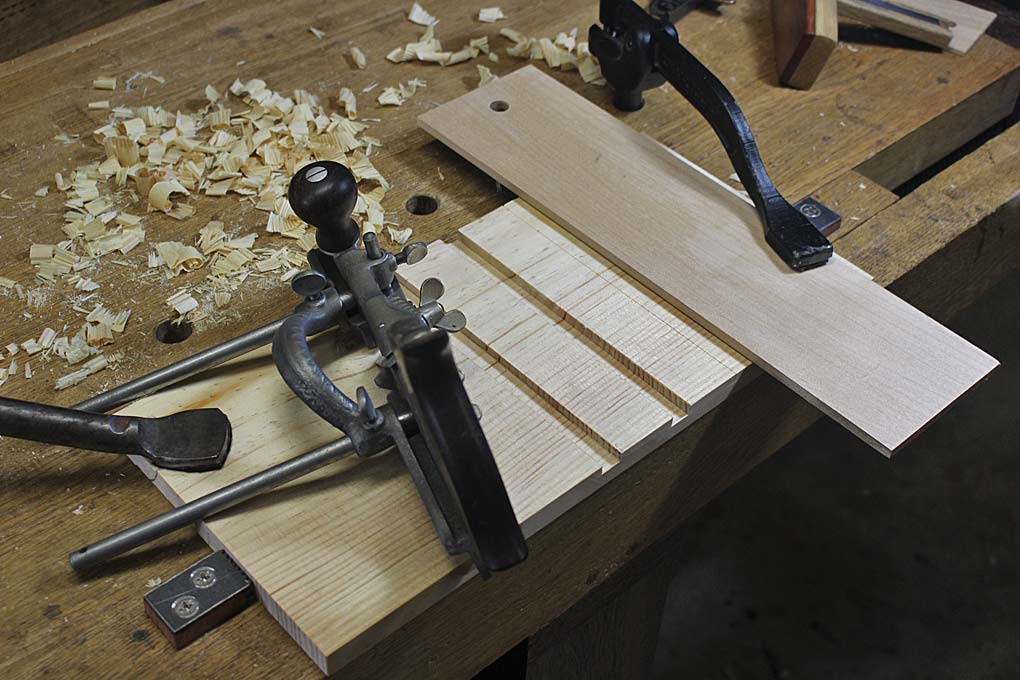
OK, now it is time to take the first shaving. Light is good. Start at the far end and work back to the start. The aim is to establish the dado.

Take care to keep the body pressed firmly against the fence. Once a pass is complete, pull the plane back along the housing. Do not lift the plane (you could damage the boundary lines). The nickers are cutting and preparing the way for the next pass.
Once you have done down about 1/8�, stop �.

� and remove the fence. It is no longer needed.
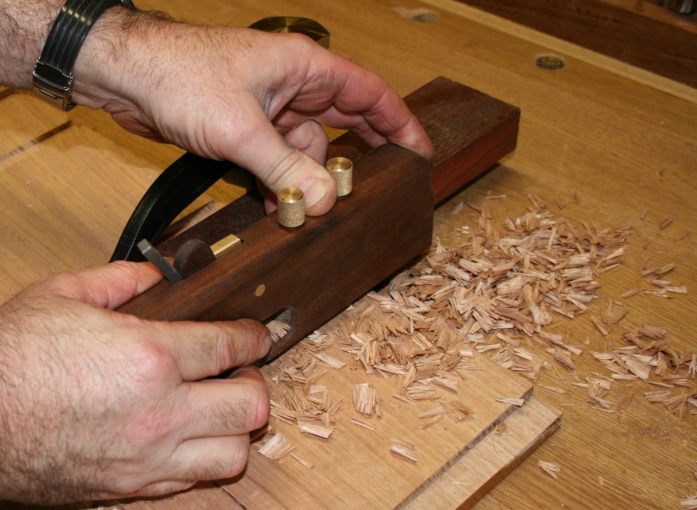
It is now possible to complete the dado with the plane guided within the dado itself.
Below is my handgrip. The rear hand is pushing forward, while the front hand is pushing the toe down to prevent the plane coming out of the housing.
The other task is to keep the plane vertical. You are balancing on two skates, and it is not always obvious if the plane is leaning slightly to one side. Check that the floor of the housing is level.
Keep going until the plane stops cutting. This will signal that the depth stop has bottomed out.
Finished.
The HNT Gordon dado plane
Terry Gordon makes beautiful and very functional planes. His dado plane was reviewed several years ago, and became my go to plane for dados. This one cuts a �� housing (�� is a very good all round size as it works with inset �� boards, rebated- and sliding dovetailed �� boards).
The dado plane is used in conjunction with a shop made straight edge �
Below, the hand grip from the review. It really does not require much force �
Below: the shavings made in the current demonstration. Note that the set up was exactly the same for the Veritas Combination Plane, that is, boundary lines were scored before planing �

The Stanley #46
The Stanley #46 is essentially a collector�s plane. These are available on the second hand market, but no longer made. They have gained a reputation for excellence owing to using a skewed blade.
Mine only has the 8� arms, which resulted in the fence being placed on the right side of the body (the arms are not able to be transferred across the body, as they can be on the Veritas).
Below is a glimpse of the dados cut, and the lines scored for the Stanley �
The hand hold for the Stanley. Less down force is needed with this plane than with the Veritas �

Again, once the housing is established, the cut can proceed without the fence �

The results
The bottom-line first: the planes were all capable of excellent results, with minimal differences in their results.
Ease of use and set up goes to the HNT Gordon. It uses a dual nicker (i.e. one section divided into two cutters) and this is aligned in the most simple manner (just align the outsides with the body). It cut with less attention needed for accuracy than the others. Part of this was due to not having skates on which it was balanced, and part due to the high fence with which it was used.
Blade depth adjustment was easiest on the Veritas, and least so on the HNT Gordon, which needs a hammer. With practice, this is not a factor.
The skew blade of the Stanley was preferred to the straight blade of the Veritas for speed of cutting, but both these planes also sliced cleanly through the soft wood. In absolute ranking, I would say that the Stanley did so slightly easier also than the HNT Gordon, with the Veritas bringing up the rear.
How does the Veritas stack up against these two planes, which are better suited to dados with their skewed blades? Really, it equipped itself very well. It is easier to set up and use than the Stanley. It produced slightly better results than the Stanley, and was equal here with the HNT Gordon, the dedicated dado plane.
Below are the results.
Firstly, a top view. There is nothing in it. Clear, spelch-free upper edges for all �

The entry view shows all the planes managed square and vertical entries �

The exits were also very similar � the Veritas slightly best, but I would say that differences were down to my relief chiselling. All exits were square �

From one side all the sidewalls are clean. I would rate the Veritas and HNT Gordon equal best, with Stanley slightly behind �

The other side is similar, but the Veritas shades the HNT Gordon very slightly. It is so slight that I am inclined to say that this is user error �

In conclusion, these are three great planes. In my opinion if you prefer a dedicated dado plane, such as the HNT Gordon, then that will be an excellent choice. It is also evident that a combination plane, such as the Veritas is capable of equally excellent results. It simply requires a little more set up time. Since one purchases a combination plane to obtain a wider variety of uses, it is reassuring that it can keep up with the big boys.
Visit www.inthewoodshop.com for tutorials on constructing handtools, handtool reviews, and my trials and tribulations with furniture builds.
-
30th October 2018, 05:01 PM #7
Be inspired. Be creative. Be bold.
- Join Date
- Apr 2001
- Location
- Perth
- Posts
- 10,820

Regards from Perth
Derek
March 2018Visit www.inthewoodshop.com for tutorials on constructing handtools, handtool reviews, and my trials and tribulations with furniture builds.
-
30th October 2018, 08:37 PM #8
GOLD MEMBER
- Join Date
- Aug 2004
- Location
- Lost in Space
- Age
- 53
- Posts
- 2,406
Very Nice posts all thank you..................
HEy Derek

YES I have been a regular visitor and reader of your webpage for many years and truely enjoyed the articles I've always got a tickle out of your writing style!
That said, Im hoping you'll be doing some combination plane tips and tricks on your Youtube Channel Nothing like seeing it all happen in the flesh!
Im thinking of getting some perspex or such to deepen the fence has anyone tried this? Is it worth doing?
I'm also just waiting for some more blades to arrive ......................... then i'll have a play and do some posts........................Love to hear some thoughts about the journey from some other forum members
Regards LouJust Do The Best You Can With What You HAve At The Time
-
30th October 2018, 09:02 PM #9
GOLD MEMBER
- Join Date
- Feb 2003
- Location
- back in Alberta for a while
- Age
- 68
- Posts
- 12,006
I don't think so. Originally Posted by NewLou

Wooden fences are IMO a better option.
They have the added benefit of adaptability -- you can slope the fence at 15 degrees (say) for planing the edges of panels intended for a coopered construction.
Veritas's small plough plane is a good place to start the combination plane journey.Love to hear some thoughts about the journey from some other forum members
Out of the box, the small plough will groove and create smaller rebates, plus the smaller beads.
Add the conversion kit and you can tongue (for tongue and groove work) and wider rebates and larger beads.
Perhaps get the combination plane as an alternate to adding a Left Hand small plough to your kit
In storage I have Record #405 with 3 hollow and round "soles".
What I really miss with my current "fleet" is the 405"s slitting cutter. I've been doing a bit of work recently with 3/32" thick veneers (bought as a skate board kit)regards from Alberta, Canada
ian
-
30th October 2018, 09:46 PM #10
GOLD MEMBER
- Join Date
- Aug 2004
- Location
- Lost in Space
- Age
- 53
- Posts
- 2,406
HAHA love it! @ Planemaker! :-)
What a laugh really enjoyed this read thx so much man! Cheers!....................................what can I say must love to be punished!
Originally Posted by planemaker
Just Do The Best You Can With What You HAve At The Time
-
30th October 2018, 09:57 PM #11
GOLD MEMBER
- Join Date
- Aug 2004
- Location
- Lost in Space
- Age
- 53
- Posts
- 2,406
A tibute to Alf
Luckily Hiroller from another thread was kind enough to posts Alf's revered "Combi Plane Central"
https://web.archive.org/web/20180902...ionplanes.html
NICE!
Just Do The Best You Can With What You HAve At The Time
-
31st October 2018, 04:52 PM #12
GOLD MEMBER
- Join Date
- Aug 2004
- Location
- Lost in Space
- Age
- 53
- Posts
- 2,406
Paul Sellers doing some plough work - Some great tips on grooving
Gidday
Though not using a combination plane Heres Paul Sellers giving a master class on Plouging start @ 12:32 of his presentation ...................... Nice!
https://www.youtube.com/watch?v=26yCz9TOTNA&t=95s
Something I started thinking about was that if its likely Blades are going to need accurate backbevels is the veritas thin blade guide worth getting my hands on? HAs anyone got some primers on how to best sort back beveling on combination cutters?
I'm guessing this may be a circumstance shooting for your higher end of Sharp [what ever that means for you and how you get there]is worthwhile aiming for ???
Any favorite sharpening techniques What comes to mind for me are using dowells with sandpaper/ Dowells with somekind of paste or cutting compound slipstones is there a definite size to look out for ?
(**&%^&% All this thinkin is making me sweat
Regards Lou
Just Do The Best You Can With What You HAve At The Time
-
31st October 2018, 08:00 PM #13
GOLD MEMBER
- Join Date
- Feb 2003
- Location
- back in Alberta for a while
- Age
- 68
- Posts
- 12,006
well it's said by more than one high profile woodworker "sharp fixes all" Originally Posted by NewLou
regards from Alberta, Canada
ian


 Reply With Quote


Similar Threads
-
A win for the dark side!
By Skew ChiDAMN!! in forum HAND TOOLS - UNPOWEREDReplies: 18Last Post: 30th April 2015, 03:45 PM -
Hi from the dark side
By spoinky in forum G'day mate - THE WELCOME WAGON -Introduce yourselfReplies: 5Last Post: 4th November 2008, 11:17 PM -
Ruminations on the Dark Side/Light Side divide
By Rocker in forum WOODWORK - GENERALReplies: 65Last Post: 3rd July 2006, 10:19 AM -
Sharpening....A Dark Side Voyage for Beginners
By NewLou in forum SHARPENINGReplies: 200Last Post: 24th October 2005, 09:55 AM -
Come to the Dark Side
By Grunt in forum HAND TOOLS - UNPOWEREDReplies: 10Last Post: 9th November 2004, 09:25 PM
