

 Thanks: 0
 Likes: 0
 Needs Pictures: 0
 Picture(s) thanks: 0
Results 31 to 45 of 72
Thread: Diamond Lapping Film
-
10th April 2012, 10:33 PM #31
 The prize lies beneath - hidden in full view


- Join Date
- Oct 2010
- Location
- 1017m up in Katoomba, NSW
- Posts
- 10,662

Christopher Schwarz has just done his review. A bit late for some, I expect, given that it's been on the market for, what, 5 months now, and there must be reviews on countless websites and blogs all over the world. I note that he paid for it.

 He did get free shipping, and he even declared that!
I expect that thousands will read the review, without bagging him out....unless.....
-
10th April 2012 10:33 PM # ADSGoogle Adsense Advertisement
- Join Date
- Always
- Location
- Advertising world
- Posts
- Many
-
11th April 2012, 05:35 PM #32
Hewer of wood
- Join Date
- Jan 2002
- Location
- Melbourne, Aus.
- Age
- 71
- Posts
- 12,746
heheh ...
1. If they're like diamond stones they overperform when new and underperform some time down the track. He makes that point.
2. 'Sharpening' also includes (re)polishing a chisel or plane blade back. This is where the cost/performance equation gets serious.
3. Performance/value equation. Need a comparo with the 3M micro-finishing films of similar grits. When those hit the market everyone said 'Oh my' as did I. They come in AlOx or Chromium Oxide. Local price $3.50 for 34 x 6.5cm approx. US price per 7.5 x 15cm sheet of diamond $5.60 (@ one sheet of a set of 4).
Does the performance diff. justify the price diff.?
Do we need diamond for HCS? Sure, it's good for HSS.
(Edit: apologies, I appear to be repeating myself. Should've reread the whole thread.).Cheers, Ern
-
11th April 2012, 07:43 PM #33
Be inspired. Be creative. Be bold.
- Join Date
- Apr 2001
- Location
- Perth
- Posts
- 10,820
It is not just for PM and HSS steels. It works on everything. However, I made the point at the outset that these diamond films should not be considered an alternative to more permanent mediums, such as waterstones. They make superb travel kits, or an ultra-clean honing system.
Here is the honing kit I take to shows and handwork demonstrations (repeat post I made elsewhere) ..
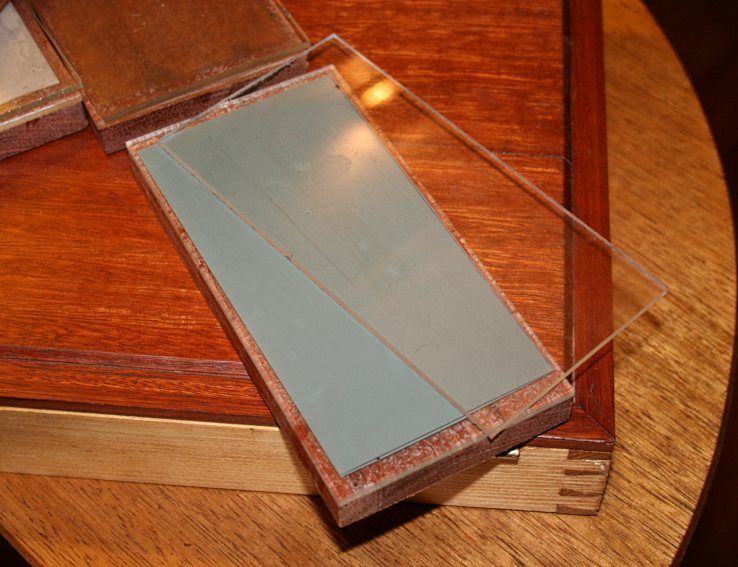
The kit consists of a 600 grit diamond stone (for removing fine chips), and then four plates with diamond lapping film in 15, 3, 0.5 and 0.1 microns.
Each plate (and film) is 6" x 3", and made from a flat section of hardwood (Jarrah for me), with a 1/8" layer of clear vinyl as the substrate (the self-adhesive film needs a flat and smooth surface). There is an extra piece of vinyl as a cover. I use Camellia oil as a lubricant.
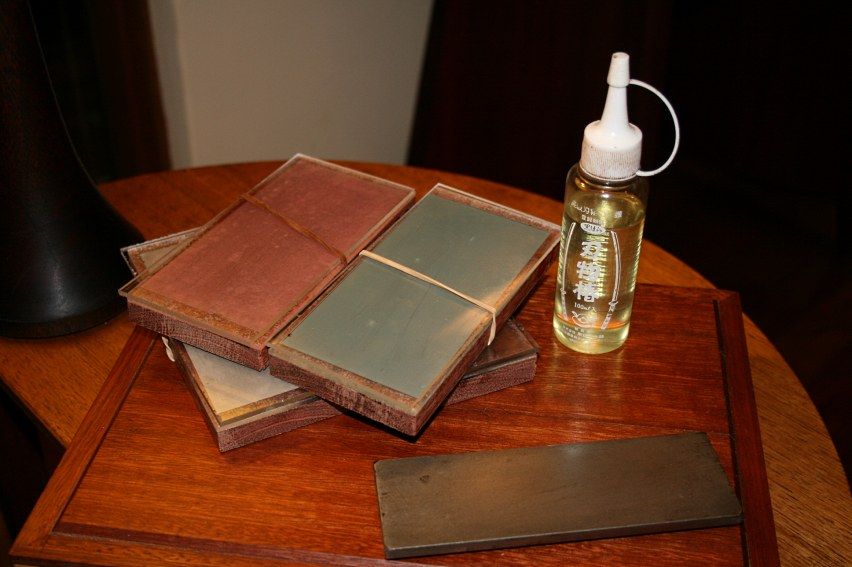
The 3M sheets are not in the same ballpark. I estimate that you could use the diamond films about 200 times before they need replacing. For reference, I would be replacing a sheet of wet-and-dry after a couple of uses. Further, the diamond cuts very fast and I only need about 2-4 light strokes per grit (working with microbevels).
I emphasise that the film must not be used with blades that are chipped or have serrated edges as this can tear the film. However as a medium for dull blades it works very well.
Regards from Perth
DerekVisit www.inthewoodshop.com for tutorials on constructing handtools, handtool reviews, and my trials and tribulations with furniture builds.
-
11th April 2012, 08:03 PM #34
Hewer of wood
- Join Date
- Jan 2002
- Location
- Melbourne, Aus.
- Age
- 71
- Posts
- 12,746
You 'estimate' Derek? In what application? (steel type, hardness, bevel or back width).
And of course diamond cuts fast on micro-bevels. There's SFA to cut.
Replacing a sheet of W&D after a couple of what uses? And since when was W&D a benchmark of any worth over the last five years or more?
For heaven's sake, let's compare apples with apples.
And let's declare any pecuniary interest we may have in a product we're talking about.Cheers, Ern
-
11th April 2012, 08:12 PM #35
Be inspired. Be creative. Be bold.
- Join Date
- Apr 2001
- Location
- Perth
- Posts
- 10,820
Ern
I was predominantly using a preproduction PM steel plane blade (for the LV SBUS) when I evaluated the diamond mesh. I also used A2 (same plane, production blade). I compared the performance against Shapton Pros.
The testing was as objective as possible. I examined the number of sharpening strokes and the number of shavings from different grits, and from gaps between different grits (to determine the ideal jumps between the meshes - how do you think LV chose the ones they are selling?). The conditions were made as similar as possible for each blade and medium. Even if I was 50% off, the numbers were strikingly obvious.
Declare any pecuniary interest? Have you forgotten the opening sentence to this thread?
Regards from Perth
DerekVisit www.inthewoodshop.com for tutorials on constructing handtools, handtool reviews, and my trials and tribulations with furniture builds.
-
12th April 2012, 01:21 AM #36
Senior Member
- Join Date
- Feb 2012
- Location
- Adelaide
- Posts
- 451
 Originally Posted by rsser

yep, never has been, its quite hopeless for tool steel, always has been ,at least a very very poor choice, i have no idea why people still recommend it, its main usefulness is in the car industry, its ok for removing paint if used wet (to prevent and wash out the loading up of paint and soft metal) and ok for soft metals (copper, brass etc) but if used on tool steel the silicon carbide breaks down far too quickly, you would have to go through reams of the stuff to make decent progress . perhaps ppl think it works ok because the steel will become shiny (give the appearance of being sharp), but its really just being burnished
cheers
chippy
-
12th April 2012, 01:26 AM #37
Senior Member
- Join Date
- Feb 2012
- Location
- Adelaide
- Posts
- 451
opening sentence! that would be something about high elation, without coitus Originally Posted by derekcohen

Originally Posted by derekcohen
-
12th April 2012, 01:36 AM #38
Be inspired. Be creative. Be bold.
- Join Date
- Apr 2001
- Location
- Perth
- Posts
- 10,820
Don't be a stirrer Ch!ppy.
I started this thread, and one of the first sentences reads, "I helped evaluate these films, working through a wad of different grits to narrow down the micron progression, and trying to get a fix on their longevity". I would say that this nails my flag to the mast. Ern's comment was unnecessary.
Further, the mention of W&D was simply a link to the old days when this was - and still is for many who continue to support the "Scary Sharp" method - the way to sharpen.
Regards from Perth
DerekVisit www.inthewoodshop.com for tutorials on constructing handtools, handtool reviews, and my trials and tribulations with furniture builds.
-
12th April 2012, 01:40 AM #39
Senior Member
- Join Date
- Feb 2012
- Location
- Adelaide
- Posts
- 451
note the smiley! someones lost their sense of humour at this late hour maybe
the comment on the W&D stands, its just the facts, whether people support it or not doesnt mean the information shouldn't be shared
-
12th April 2012, 06:30 AM #40
GOLD MEMBER
- Join Date
- Nov 2004
- Location
- Millmerran,QLD
- Age
- 73
- Posts
- 11,129
Derek Originally Posted by derekcohen
I have used W&D glued to glass for sharpening and honing, but would agree that it is limited and is difficult to get a flat surface, particularly in the finer grits, as the glue produces irregularities. I believe it's wear factor is poor too.
However my understanding was that the scary sharp method used the 3M microfinishing film, which is quite different.
Regards
PaulBushmiller;
"Power tends to corrupt. Absolute power corrupts, absolutely!"
-
12th April 2012, 11:15 AM #41
Be inspired. Be creative. Be bold.
- Join Date
- Apr 2001
- Location
- Perth
- Posts
- 10,820
Hi Paul Originally Posted by Bushmiller
"Scary Sharp" has been around a long time - long before 3M microfinishing film was used by woodworkers. I believe it was first described by Steve LaMantia in 1994.
Here is a copy of the original Scary Sharp post. This was back in the days (it closed down about a decade ago?) of rec.woodworking, which was the first woodworking forum many of us shared on.
Regards from Perth
Derek
The D&S Scary Sharp(TM) System
No, you can't sharpen sandpaper. And please don't ask me how I know that.
Required Warnings:
If you don't like sharpening tales, or sandpaper, or handplanes, or any deviation from simple declarative sentences, please don't read this post. Also, it's a process gloat, and it's windbaggy, so be forewarned. And if you prefer one-clause synopses, here: "I sharpened a plane blade with sandpaper." Now move along now.
For anyone else:
I recently emailed a few folks about some attempts I made at sharpening a plane iron with sandpaper. Some suggested I post my story to the group. So here it is.
Dear Mom,
I've recently been experimenting with using sandpaper for honing. I had my fill with the oilstones getting unflat and glazed and needing to be lapped all the time, tired of oil all over the place and on my hands so I couldn't even scratch, tired of having to clean the stones after each use, tired of having to keep a conscious effort going to distribute wear on the stones evenly. So tired of all of this.
So I started thinking about abrasives and abrasive action in general, and read up a bit, and asked around, and found out that there's nothing different, in principle, between sandpaper and an oilstone. Silicon carbide sandpaper (i.e. wet-or-dry) goes up to 600 grit in the hardware and woodworking stores, but up to 2000 grit in the automotive finishing stores, as I learned from David Opincarne, a local rec.woodworker and admitted metalhead who works right here at the school and who sent me some 1200 and 2000-grit samples and who's recently been helping me greatly to understand the secrets of metal. Hardening the steel in cutting blades is achieved by the sudden and even cooling of the blade.
Me and other folks had been talking lately about this abrasive business, and it got onto sandpaper somehow, and so I decided to test something out. For the sharpening-with-sandpaper experiment, I used a slightly-pitted 2" wide jack plane blade that came with an old beat-up Stanley Bedrock #605 I bought last year at a tool swap. The bevel on the plane iron had been somehow ground *concave* by the previous owner (or else it just wore that way), so I first straightened the edge out on the grinding wheel, grinding in straight at first so as not to create a thin edge that would burn, and then grinding in a bevel but stopping a bit short of a real edge, again to prevent burning. Because of this care not to burn the steel, this grinding goes slow and light, but it's time well spent. Time now to lap the back behind the cutting bevel. I took a page out of the plane-sole lapping book -- figuratively speaking of course, you should never tear pages out of a book -- and used very light coatings of 3M "77" spray adhesive to temporarily glue small 1-1/2" x 3-1/2" rectangular pieces of sandpaper along the edge of a sheet of 1/4" plate-glass.
The paper I used was Aluminum Oxide in grits 50, 80, and 100, and Silicon Carbide (wet-or-dry to you lay people) in grits of 150, 180, 220, 320, 400, 600, 1200, and 2000. The plate glass was placed with its edge flush to the edge of the workbench. I lapped the end one inch of the back of the iron on each grit in turn. I didn't use any water; I just went at it dry. So as I lapped -- can you call it lapping if it's dry? -- anyway, about every ten seconds or so I'd stop and brush off the sandpaper with a whisk broom and wipe the blade off on my shirt. (On the coarser grits, I found that a dustbuster vacuum actually cleaned up the paper quite thoroughly, much better than sweeping it off, but this sucking advantage disappeared at around 220 grit.) Since I progressed through the grits so gradually, I found I had to spend only about a minute or so on each grit, including the suck-down and sweep-off and shirt-wipe time.
One trick to efficiency is knowing when you've lapped the back sufficiently on each progressive grit. I previously had trouble gauging this, and didn't know how to tell when enough is enough. Thanks to a clever suggestion from Jeff Gorman, I tried a trick that seemed to work wonderfully. I have a cheapie Radio Shack 30-power hand microscope -- "microscope" sounds impressive, but it's only $10, although I forget where I got it from -- and used that to tell when the striations from the new grit had replaced all the striations from the previous grit, and when they had, I stopped there and moved on to the next grit.
About ten minutes after starting, I had gone from 50 grit on up to 2000, and there was a mirror finish on the back of that iron the likes of which must be seen. The back of the iron became so shiny I could count my nose hairs in it; 98 on the left, 79 on the right, but 109 and 85 if you count the white ones.
I then jigged the blade in a Veritas honing jig -- which, by the way, Mr. Lee, should be called a honing fixture, not a jig, since a jig's for holding a tool and a fixture's for holding a workpiece and in the sharpening operation the plane iron, while usually thought of as a tool, or as a part of one, is actually in this instance the workpiece -- man, near-terminal digression there, almost lost it for good; Boy, snap out of it! -- I clamped the blade down in the Veritas blade-holder device, taking care to have the hollow-ground bevel resting on the glass perfectly along both edges of the hollow grind. I then adjusted the microbevel cam on the jig up to its full two-degree microbevel setting and honed away on the 2000-grit. Even though I had not ground a sharp edge on the primary bevel with the bench grinder, even on that little slip of fine 2000 grit it still took only about another couple of minutes before I had a nice sharp little 1/64" microbevel gleaming back at me.
I flipped the blade over on the sandpaper several times, hone and lap, hone and lap, each time gentler and gentler, to remove the little bit of wire edge. (Which, by the way, as a result of using such a fine grit must have been so tiny that it was very hard to see or feel, so pretty much just from my awareness of the process I assumed it was there.) The resulting little thin secondary bevel was shiny. I mean *clean* shiny, like nothing I'd ever seen before. Unlike the secondary bevels I'd previously coaxed out of my hard white Arkansas stone, this one was unbelievably shiny with a capital "S". I mean *clean* shiny, like nothing I'd ever seen before. Oh, I said that already. Okay, it's hard to describe; about the best I can do is to say that it looked almost *liquid* when you catch the light on it just right. I mean, it was so darn clean and shiny that it takes ten lines just to say it was so shiny it's hard to describe.
Of course, shine is not the ultimate goal. But sharpness *is*. Still, they equate. The more shiny, the more uniform the surface is microscopically, and the closer to the geometric ideal of a *line* is the edge, and hence the sharper it is. Cool. I mean *COOL*!!! I was trembling in my Mickey Mouse boots in anticipation. This cutting edge looked downright *dangerous*! I didn't dare touch it. But yet, there was still something I just *had* to try. I removed the blade from the jig, and anxiously tried the old cliché "cut a finger off before you can notice and bleed all over your screaming wife in the car on the way to the hospital" test. Oops; no, wait. Sorry, that's the wrong test, for those other kinds of tools. Sorry. For the Neanderthals, it's the "shave some arm hairs off" test. Now I've done this test before, on other blades sharpened up on white Arkansas stones, and while these other blades would pop *some* hairs off the back of my wrist, many other hairs would just bend on over down under the blade's edge (probably from the sheer weight of four prepositions in a row), and those hairs that *did* pop off would do so quite painfully, as though the blade was more grabbing the hairs and *ripping* them out, and I could feel every one of them offering their stubborn and vengeful resistance. Not much fun, and nothing to be doing voluntarily in front of others. But the edge on this blade was something else! Not only did it cut off every little hair in its path with total ease, but it didn't hurt at all. In fact, I couldn't feel a thing; for all I could tell, there were no hairs there in its path to begin with. But of course there were many, since I'm Italian and also since I could see the fallen hairs all over the back of the blade. And my arm where I had shaved it was a smooth as a non-Italian baby's butt. Again, man, this had gotten downright *frightening*.
But of course, the ultimate test of a plane iron's sharpness is what it does on wood. So I put the blade back into the plane, that old early-model Bedrock jack, which I've not yet tuned in any way. I tried it on the edge of a piece of pine, and as I adjusted the blade for the finest cut possible, it glided through the wood with no effort. None whatsoever. In fact, it almost seemed like the plane was pulling itself along, or that the wood was *wanting* to be planed and was throwing itself into the blade -- no, I've not read Krenov -- it took that little effort. I ended up getting a shaving that was so darn thin I could read newsprint through it easily. Unbelievably easily. So easily, in fact, that I thought for a moment about taking the iron back on out of the plane and putting the shaving over the shiny part of its back and counting my nose hairs again, but by this time I had grown weary of counting nose hairs, and of my concerned wife repeatedly asking me why I was doing that. I thought, no way, this can't be! So skeptic that I am -- I'm so skeptical, that I can't be fully sure that I'm really that much of a skeptic -- I put a micrometer to the shaving, and get this: it measured .0004 thick! Four ten-thousandths of an inch! (Or, as my eternally-pestered but forever-patient metalmentor David Opincarne showed me, "four-tenths" in machinist talk.) No, I read the mike right. Less than one half way to the very first line after zero.
Man! That's a cubic hair less than one-half of a thousandth of an inch! Incredible! Amazing! And it just gets better. For a while there, I actually thought I had taken off another shaving that was even thinner, one so thin in fact that it was invisible and of no measurable mass. I'm pretty sure I did, actually, but I'm having a hard time trying to think of a way to check this out, or even to find the spot on the ceiling that it floated up to. And what about the planed wood itself? Well, the surface the plane iron left on the wood in indescribable! It's like glass! No, it's like glass wet down with water and a tad of liquid soap added and then some Slick-50 and then frozen and polished. And this is on pine, a softwood! Not only that, but I then gave it the torture test: end grain. I put the same piece of wood in my shooting board, and had a go at the endgrain. Man oh man, I've never seen such a smooth surface on *endgrain* in my life. And again, this is on *pine*! The endgrain was almost as smooth as the edgegrain! This has gotten good! Still, having exclaimed all this, I'm making no claims to the throne of King of the Neanderthals. This shaving wasn't the minimum three feet long as per the Rules for the Contest to Become the King of the Neanderthals, so it shouldn't qualify. But it still feels just as nice. One more good thing is that in the process of taking this plane iron from misshapen funkiness to terrifying sharpness I used up all of about 25 cents worth of sandpaper, and probably about 3 cents worth of spray glue, and about fifteen or so minutes of my time, twenty if you stop for a nosehair count.
When it was all done, I peeled the sandpaper from the glass and threw it away -- well, actually I could have but in truth I stick them together back-to- back and save them in a "used-sandpaper" box for odd tasks that never come up. I then scraped the little bit of residual adhesive from the glass with a razor blade, a quick wipedown with acetone on a piece of paper towel, and the cleanup was done in a minute. No oil, no water, no mess, no glaze or flatness problems to worry about, and a cutting edge that is Scary-Sharp (TM).
I think I'll still keep my stones, though; they can sit atop the packets of sandpaper to help keep them flat.
-- Steve LaMantia [I'm talking about my oilstones.] Seattle, WAVisit www.inthewoodshop.com for tutorials on constructing handtools, handtool reviews, and my trials and tribulations with furniture builds.
-
12th April 2012, 12:58 PM #42
Jim
- Join Date
- Feb 2008
- Location
- Victoria
- Posts
- 3,191
A 'beautiful' example of evangelical woodworking where language gets in the way of information.
Back to the films. I haven't tried them or even bought them so I'm just going by the thread. It doesn't seem as if you are gaining anything in portability unless you are a dyed in the wool waterstone user and comparing them with that. By the time you have fixed them to substrates you seem to have quite a bulky package to carry around.
Cheers,
Jim
-
12th April 2012, 03:18 PM #43
Be inspired. Be creative. Be bold.
- Join Date
- Apr 2001
- Location
- Perth
- Posts
- 10,820
Hi Jim
Not really bulky when you consider them also to be a relatively clean and "self-sufficient" medium. That is, they do not need water like waterstones do, and the individual packages have a smaller footprint. The "travel kit" I made up is light and not at all fragile, again like waterstones. When the films were first sent to me they came with the recommendation to lubricate with water. However I did not experience this to be nearly as good as Camillia oil, which I recommended to LV, and the latter also had the advantage of not evaporating and remains "active" for a longish while - which is one less item to consider in the grand scheme.
Regards from Perth
DerekVisit www.inthewoodshop.com for tutorials on constructing handtools, handtool reviews, and my trials and tribulations with furniture builds.
-
13th April 2012, 11:24 AM #44
Jim
- Join Date
- Feb 2008
- Location
- Victoria
- Posts
- 3,191
Hi Derek,
I take your point but it was surely no harder in the old days to carry an oilstone and a bottle of oil.
These days I tend to use Spyderco ceramics with water. Since the drought broke I don't even need to carry a bottle of water.
Cheers,
Jim
-
13th April 2012, 11:59 AM #45
Senior Member
- Join Date
- Feb 2012
- Location
- Adelaide
- Posts
- 451
Hi Jim
Not really bulky when you consider them also to be a relatively clean and "self-sufficient" medium. That is, they do not need water like waterstones do, and the individual packages have a smaller footprint. The "travel kit" I made up is light and not at all fragile, again like waterstones. When the films were first sent to me they came with the recommendation to lubricate with water. However I did not experience this to be nearly as good as Camillia oil, which I recommended to LV, and the latter also had the advantage of not evaporating and remains "active" for a longish while - which is one less item to consider in the grand scheme.
actually i read Jim's comment in a different way, to say that he doesnt think there is an avantage in portability unless comparing to waterstones, e.g waterstones would be more cumbersome than this, however compared to other honing methods not much difference considering you have to carry around something ,glass/stone etc. to place these on
adding water or such is not so much to "lubricate" but to float or wash away the swarf off the surface where it can damage the edge your trying to hone, in coarser grits, water with detergent added is often all thats needed but with the ''micro' abrasives (for lack of better word that escapes me atm) it was found many years ago that didnt work as well, there are a number of alternatives that seem to work, some cheap household kitchen cleaners seem to work as do some oils, some cheap home brew recipes that i use to clean my LP's does ok too, WD-40 works very well too, pick your poison! its not a new thing though so i think Derek you reinvented the wheel
so far the trouble i have noticed with diamond abrasives (both mono and poly diamonds) in the fine mesh size (again its not new, although perhaps new from that retailer i guess) is not from swarf damaging the edge but from the diamond particles breaking off and wedging in-between the others and tearing a groove in the metal, not easy to see. so far diamond to me is more suitable in larger grits but i am always in hope they will come out with a fine diamond mesh that will hold up, not sure if its possible yet, just keep trying em out i guess...until then there are other options for good honing with advantages or disadvantages as case maybe
still wouldnt compare these to W&D paper, its not a suitable or recommended abrasive for tools, that guys post was entertaining to say the least
cheers
chippy
haha, edit, always the way, just as i type he replies lol


 Reply With Quote

Similar Threads
-
3M Microfinishing lapping film
By groeneaj in forum SHARPENINGReplies: 7Last Post: 18th December 2011, 08:24 AM -
3M Imperial lapping film: first impressions
By rsser in forum SHARPENINGReplies: 9Last Post: 23rd June 2011, 02:04 PM -
Lapping a dog
By rsser in forum SHARPENINGReplies: 0Last Post: 22nd June 2011, 05:43 PM -
What oil to use in lapping a plane.
By Christos in forum HAND TOOLS - UNPOWEREDReplies: 2Last Post: 10th April 2011, 11:29 PM -
Gloat, and lapping #4-1/2
By LineLefty in forum HAND TOOLS - UNPOWEREDReplies: 12Last Post: 8th June 2005, 09:10 PM
