

 Thanks: 0
 Likes: 0
 Needs Pictures: 0
 Picture(s) thanks: 0
Results 1 to 15 of 24
Thread: A Galoot's Infill Smoother
-
30th December 2006, 12:28 AM #1
 Be inspired. Be creative. Be bold.


- Join Date
- Apr 2001
- Location
- Perth
- Posts
- 10,826
 A Galoot's Infill Smoother
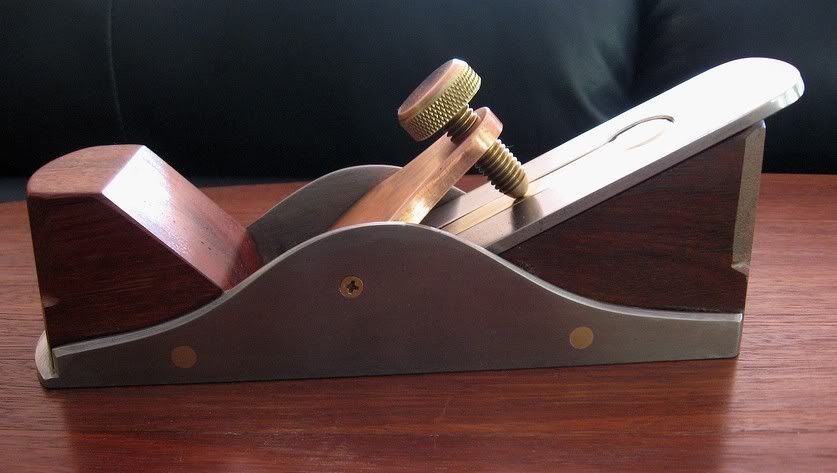
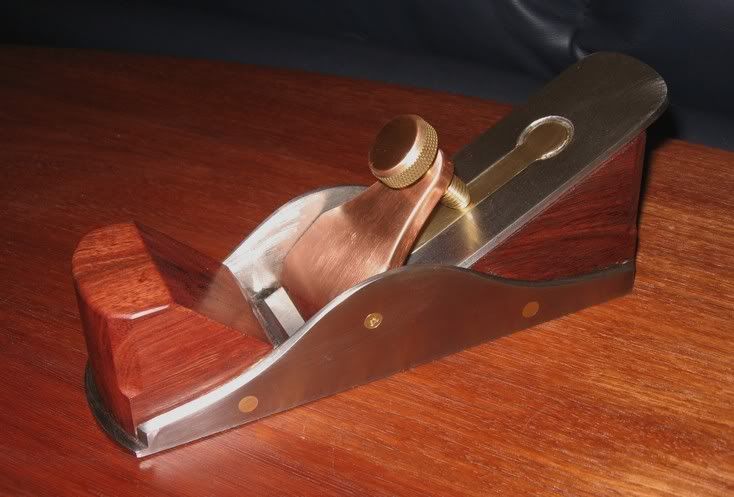
It is several years since I last built a “Stanley infill”, my previous effort based on a #4. This time I decided to use the shell of a derelict #3 Stanley to create a small smoother – the final length is just 7 ½”. I also wanted to incorporate a few ideas. So what we have here is a bevel up configuration with a 25 degree bed.
The reason for the high bed (the standard at present – from LN and LV – is 12 degrees, while Karl Holtey’s #98 is 22 ½ degrees) is to reduce the primary/secondary bevel angle. The bevel here comprises a 30 degree primary with a 35 degree micro, creating a 60 degree cutting angle.
The blade is 1 ¾” wide and 5/32” (about 4mm) thick. It came out of a Danish Langeskov woodie. No cap iron is needed. Since a solid surface was needed, I filledthe blade slot with a piece of brass. This was filed fractionally too large, then left in the freezer to shrink, before force-fitting it (a big hammer!). After it thawed the brass expanded and the whole piece became one solid affair.
The lever cap was carved (!) from a block of Phosphor Bronze or Beryllium copper (as I was informed) since I had nothing else to hand that was the desired thickness. This stuff is incredibly hard. It has a warm pink tone. I have used a combination of this and yellow brass throughout.
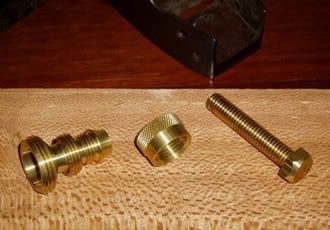
I lack metal machining tools, unless you include a drill press and an angle grinder. So the task of building a lever cap screw would be well beyond me – if I did not cheat a little. What I do is raid the local Borg’s gardening section for solid brass hose fittings and weld these together. The cap cover was a copper (Australian) 2c piece, so as to match the colour of the lever cap.
The infill is just scrap Jarrah, well seasoned but I did not have the desired thickness and had to laminate two pieces. This was shaped, then epoxied into place. For additional strength and a “a look”, brass screws were added, then filed flush.
I must admit to having ambivalent feelings about the final shape. I much prefer round to straight sides, and the result here seemed to evolve as if it had a life of its own.
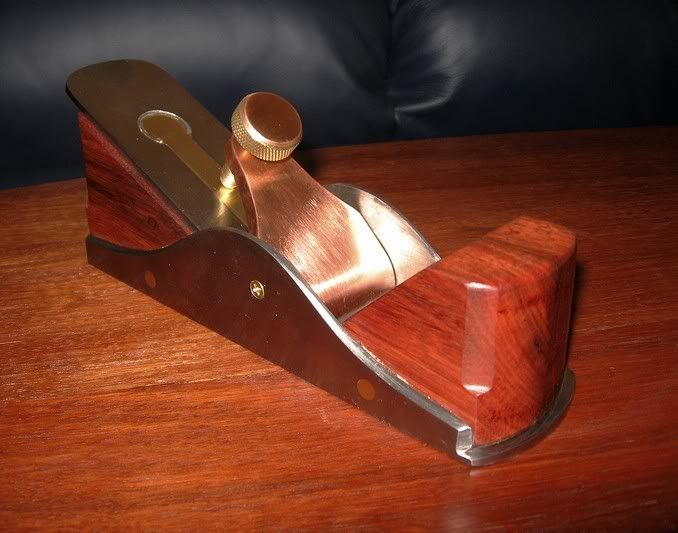
The mouth was completed last of all, deliberately made too small, and opened up gradually with files. The end result is a very fine mouth.
How well does it work?

I hope this effort might inspire a few more Stanley infills!
Regards from Perth
Derek
December 2006Visit www.inthewoodshop.com for tutorials on constructing handtools, handtool reviews, and my trials and tribulations with furniture builds.
-
30th December 2006 12:28 AM # ADSGoogle Adsense Advertisement
- Join Date
- Always
- Location
- Advertising world
- Posts
- Many
-
30th December 2006, 12:42 AM #2
SENIOR MEMBER
- Join Date
- Sep 2004
- Location
- Sydney
- Posts
- 590
Very nice work Derek. Thanks for showing it to us.
Regards,
Ian.
A larger version of my avatar picture can be found here. It is a scan of the front cover of the May 1960 issue of Woodworker magazine.
-
30th December 2006, 01:12 AM #3
SENIOR MEMBER
- Join Date
- Nov 2004
- Location
- Mount Hutton N.S.W
- Age
- 59
- Posts
- 632
thats nice derek
-
30th December 2006, 11:28 AM #4
overated member
- Join Date
- May 2004
- Location
- Moo, G'day from CASINO NSW the real home of Beef.
- Age
- 58
- Posts
- 1,336
Very nice Derek, am glad you came up with this one.................................. before I even started to imitate the last one you built
 guess I may just plagiarise this design instead
 Bruce C.
catchy catchphrase needed here, apply in writing to the above .
-
30th December 2006, 06:39 PM #5
Senior Member
- Join Date
- May 2005
- Location
- Forest Grove, Oregon USA
- Posts
- 496
Proper job, Derek!
Heck, I might even have a go. I have a nice little #3 which would make a good donor.
Thanks! Mike
-
30th December 2006, 07:42 PM #6
SENIOR MEMBER
- Join Date
- Nov 2004
- Location
- Port Pirie SA
- Age
- 52
- Posts
- 6,908
Nice work Derek, the copper stuff sets it off nicely.
....................................................................
")
-
30th December 2006, 08:22 PM #7
Banned
- Join Date
- Apr 2005
- Location
- kyogle N.S.W
- Age
- 50
- Posts
- 4,844
Wow Derek. When you try something, you put your heart into it. I think thats great.
-
30th December 2006, 11:26 PM #8
Be inspired. Be creative. Be bold.
- Join Date
- Apr 2001
- Location
- Perth
- Posts
- 10,826
No, you can't do that Mike. Not if your toolchest is to now comprise only wooden planes!Heck, I might even have a go. I have a nice little #3 which would make a good donor.
Incidentally, does that include your 5 1/4 scrub? If you are getting rid of that too, I am interested.
Regards from Perth
DerekVisit www.inthewoodshop.com for tutorials on constructing handtools, handtool reviews, and my trials and tribulations with furniture builds.
-
31st December 2006, 12:02 AM #9
The rain is horizontal???
- Join Date
- Apr 2005
- Location
- Japan。
- Age
- 49
- Posts
- 1,622
Oh.
I uncovered a derelict Turner #4 that's missing a cap iron and lever cap.
Guess I just found out what's going to happen to it.
-
31st December 2006, 05:56 AM #10
Senior Member
- Join Date
- May 2005
- Location
- Forest Grove, Oregon USA
- Posts
- 496
Hey Derek--you are correct. Hmm. What to do? I originally tried to sell off the remainder of my metal bench planes. The #3 with a LN blade is still left.
I am keeping my metal plow planes too. Bit of a hypocrisy there. Maybe I can justify that by not keeping them in the chest <G>.
I hadn't thought about the scrub, actually. Let me think about it. I will need to get rid of it. Heck, consider it sent off to you, gratis.
I think that will bug you. So if after receiving it--if you really want it--and your conscious bothers you [it shouldn't] maybe we can plan on some sort of swap.
This plane does have an ever so small crack in it. An old crack, too small to photograph. In fact, I'll probably have to remember where it is to even try. Just say the word and it's yours.
I also have an old Scottish, heavy as heck infill I need to finish refurbing. Lucky for me, it is nearly as old as the period I am going for. In its case, I'll make an exception and keep it...
Take care, Mike
-
31st December 2006, 08:44 PM #11
Be inspired. Be creative. Be bold.
- Join Date
- Apr 2001
- Location
- Perth
- Posts
- 10,826
Mike
If you are serious about the #5 1/4, I will take it off your hands with much delight.
Now I will have to rack my brains to come up with something fit for a 19th century toolbox! That should be fun!
My best regards for New Year
DerekVisit www.inthewoodshop.com for tutorials on constructing handtools, handtool reviews, and my trials and tribulations with furniture builds.
-
1st January 2007, 03:40 AM #12
Senior Member
- Join Date
- May 2005
- Location
- Forest Grove, Oregon USA
- Posts
- 496
Of course I'm serious! Now if this had been April 1st...Nah. Even then it could be construed as cruel!
It'll go off on either Tuesday or Wednesday.
No exchange is necessary, ya know. Appreciated though. If for no other reason as to see what you come up with!
Our best to you and yours.
Take care, Mike
-
1st January 2007, 05:04 PM #13
Be inspired. Be creative. Be bold.
- Join Date
- Apr 2001
- Location
- Perth
- Posts
- 10,826
No exchange - indeed!No exchange is necessary, ya know. Appreciated though. If for no other reason as to see what you come up with! You want to spoil my fun? Just wait till you see what I have come up with. I am now making one for each of us.
Warm regards to the family
DerekVisit www.inthewoodshop.com for tutorials on constructing handtools, handtool reviews, and my trials and tribulations with furniture builds.
-
3rd January 2007, 09:32 PM #14
GOLD MEMBER
- Join Date
- Apr 2006
- Location
- near Mackay
- Age
- 59
- Posts
- 4,635
Derek,
I've been toying with the idea of building a bevel-up plane (#5 size), mainly for use on a shooting board, for a while now, so your 2nd stanley infill has given me food for thought .
My initial train of thought was that a low bed angle, would need a blade adjuster to prevent the blade moving up, if a heavy cut was taken.
So do you think you could give me your thoughts (and/or anyone else with an opinion on this), that a blade adjuster would be anything more than a luxury.
Ironwood.
-
3rd January 2007, 10:08 PM #15
Be inspired. Be creative. Be bold.
- Join Date
- Apr 2001
- Location
- Perth
- Posts
- 10,826
Ironwood
A low angle (12 degree bed) bevel up version would make a great plane for the shooting board. Length is not important for this purpose (think LV LA Smoother), and a #4 would be adequate (the plane registers against the side fence not the board being planed, unlike a jointer plane). A #5 would be great as well - I love using my Stanley #62.
The reason I did not add a tote (ala my Spiers infill smoother) was because there would not be room to use a hammer to adjust the blade. Using a hammer is all that one really needs - in fact it can be more accurate that an adjuster. Adjusters are overrated, to quote a well-known plane maker. That said, I did design a $5 Norris-type adjuster and, should you be interested, I can demonstrate this.
Regards from Perth
DerekVisit www.inthewoodshop.com for tutorials on constructing handtools, handtool reviews, and my trials and tribulations with furniture builds.


 Reply With Quote


Similar Threads
-
The Marcou S15/BU Smoother - Reviewed
By derekcohen in forum HAND TOOLS - POWEREDReplies: 17Last Post: 11th June 2006, 10:23 AM -
Renovation of Spiers infill smoother - completed
By derekcohen in forum HAND TOOLS - UNPOWEREDReplies: 14Last Post: 25th April 2006, 05:10 PM -
LV Bevel Up Smoother - a review
By derekcohen in forum HAND TOOLS - UNPOWEREDReplies: 12Last Post: 9th October 2005, 10:38 AM -
Free Infill Planes
By Ben Knebel in forum ANNOUNCEMENTSReplies: 11Last Post: 18th June 2005, 03:46 AM -
My Stanley #4 Infill plane
By derekcohen in forum WOODWORK PICSReplies: 5Last Post: 21st June 2003, 11:10 PM
