

 Thanks: 0
 Likes: 0
 Needs Pictures: 0
 Picture(s) thanks: 0
Results 1 to 15 of 23
-
14th October 2011, 11:46 PM #1

 GOLD MEMBER


- Join Date
- Mar 2006
- Location
- Earth
- Posts
- 3,567
 How Do I Improve My Mortise Chisel Technique?
In my never ending search for achieving an accurate precise mortise. I have explored a few options.
The first method was the drill and pare method. Now this method is slow and time consuming. With lots of fiddling about, however with practice I can get a good mortise, limited only by my skill.
I tried the router with template approach. This is very fast, however it depends heavily on your template to achieve accurate reproducible results. The mortice is however in short perfect, clean square sides and nice flat bottom. Only bug is the rounded ends, but no major problem. My major caveat with this approach is the need to make a new template every time you are locating a new mortise to run of the bushing.
Two days ago I bought a Lie-Nielsen 3/16" mortising chisel and it came in the post this morning. I gave it a quick sharpen and took it for a spin after getting some tips and sharpening to 13000 grit waterstone at 35º micro bevel according to LN instructions.
My method is fairly standard starting in the middle, bevel facing the direction I am moving towards. Moving the chips into the center. My mortise in straight, clean, parallel and the inside walls are square. I would say they are 85% as good as a routed mortise with practice I can improve that score.
I was able to cut 5 mortices 20 mm long at 3/16" wide in under 15 minutes and that was me moving slowly. So the speed is good, however I have three problems.
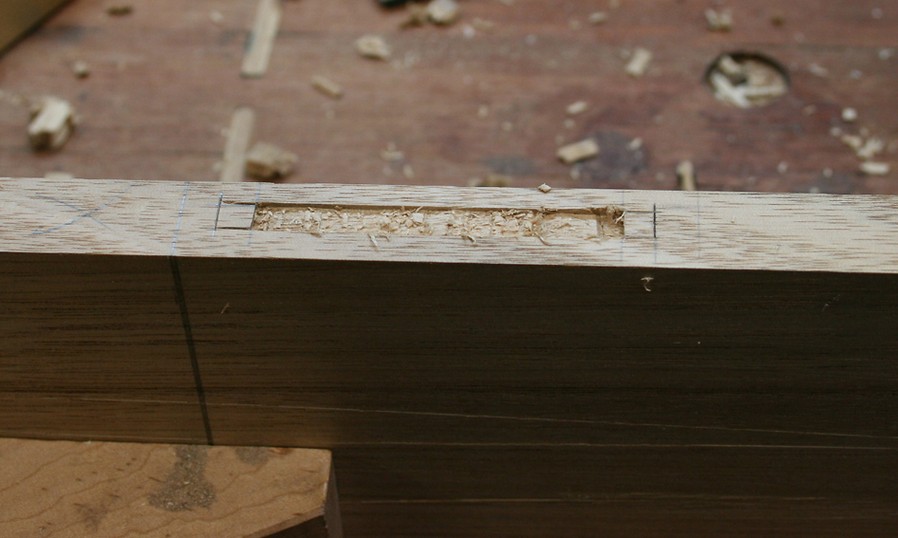
1 - The chisels is 3/16" (4.7625 mm) now the mortise however came out at around 5.1 mm. What am I doing wrong or is this normal? A 0.45 mm is a large enough discrepancy to make the productions of tenon problematic due to irregularities in the mortise. With a router I cut a 4 mm mortice, I make a 4 mm tenon and have a 0.0 mm difference. Any discrepancy means individual adjustment of tenons, slowing down the production process.
2- The inside faces of the mortices were nice and square however they were raggedy in so much they they have lose fibers and surface irregularities. Making them far from the pristine mortises you get with a router or with the drill and pare method.
Now going in after the fact and paring them clean kind of defeats the point. Is this normal or can i get router quality finish to the inside faces? I found that that the side walls were worse in a course timber like black locust and better in QLD maple, I would suspect its would be even better in pear wood. While this is not a a major problem with blind mortises through mortices would look ugly.
Also the cleaner the faces the better glue adhesion. Would polishing up the sides of the chisels on stones give cleaner inside faces, as the grind is good but its still ruff and not shinny.
1- After five mortices the edge on this chisels had minor chips and ruff spots and needed to be re-honed. Maybe I am to used to M2 but that seems a little poor. Am I expecting to much?
-
14th October 2011 11:46 PM # ADSGoogle Adsense Advertisement
- Join Date
- Always
- Location
- Advertising world
- Posts
- Many
-
15th October 2011, 12:08 AM #2
Be inspired. Be creative. Be bold.
- Join Date
- Apr 2001
- Location
- Perth
- Posts
- 10,820
Why do you want a "router quality finish"? The tenon does not care. As long as it is a good, even fit ...
Regards from Perth
DerekVisit www.inthewoodshop.com for tutorials on constructing handtools, handtool reviews, and my trials and tribulations with furniture builds.
-
15th October 2011, 12:28 AM #3
GOLD MEMBER
- Join Date
- Jun 2008
- Location
- Victoria, Australia
- Age
- 74
- Posts
- 6,132
Hi Helmut,
Derek has got it.. so long as the fit is reasonably ok, and not too tight, it doesn't matter what it looks like inside, a bit of roughness doesn't matter.
The most important thing is that the shoulders of the tenon pull up neat and tight. Cut the mortise a little deeper to get the shoulders snug.
Regards
Ray
-
15th October 2011, 12:59 AM #4
GOLD MEMBER
- Join Date
- Mar 2006
- Location
- Earth
- Posts
- 3,567
Going by the two responses its seems like I am expecting to much.
Yes surface finish does not matter in real world terms. The shoulders do. But that is no problem
I have learned to be finicky. The fact remains that the better the mating surface the better the glue joint. Any voids and discrepancies between the two faces will create a weak spot, since most glues form poor adhesion across voids. In an ideal world we would be able to plane all and every face inside and out.
What about the difference the width of the mortise and the chisel? Also is 5 small mortises the limit of this tool between sharpening.
-
15th October 2011, 01:31 AM #5
Be inspired. Be creative. Be bold.
- Join Date
- Apr 2001
- Location
- Perth
- Posts
- 10,820
If you are really concerned about the holding power, then draw bore the joint.
http://www.inthewoodshop.com/Furniture/Drawboring.html
The width of the mortice and the chisel should be the same. They are marked at the same time with the same cutting gauge.What about the difference the width of the mortise and the chisel? Also is 5 small mortises the limit of this tool between sharpening.

http://www.inthewoodshop.com/Furnitu...ndMortice.html
Five small mortices? I guess that depends on the hardness of the wood and what you define as "small".
You said that you were using an LN mortice chisel. As I recall this is has a 30 degree primary bevel and a 35 degree secondary bevel. These are sash mortice chisels and not a heavy-duty type. An oval bolstered mortice chisel (pigsticker) is traditionally given a 20 degree primary bevel (for deeper penetration) and a substantial 35 degree secondary bevel (for strength). These are larger, heavier duty chisels and can remove the waste pretty quickly. Still, your LN should do a very good job.
I suspect that you are not chiseling straight. Perhapsthe chisel is not sharp enough?1 - The chisels is 3/16" (4.7625 mm) now the mortise however came out at around 5.1 mm. What am I doing wrong or is this normal? A 0.45 mm is a large enough discrepancy to make the productions of tenon problematic due to irregularities in the mortise. With a router I cut a 4 mm mortice, I make a 4 mm tenon and have a 0.0 mm difference. Any discrepancy means individual adjustment of tenons, slowing down the production process.
I like to first pare out the surface of the mortice. This makes it easier to keep the first deep strikes in line with the edges.

This defines the mortice and makes it easier to keep it all straight and square.
Regards from Perth
DerekVisit www.inthewoodshop.com for tutorials on constructing handtools, handtool reviews, and my trials and tribulations with furniture builds.
-
15th October 2011, 01:36 AM #6
GOLD MEMBER
- Join Date
- Jun 2008
- Location
- Victoria, Australia
- Age
- 74
- Posts
- 6,132
Hi Helmut,
Assuming that the LN is A2...
I've heard anecdotal evidence that brand new A2 blades sometimes suffer from chipping, but settle down once you get past that layer. I can't find any references just now, but I'd persevere and see if it gets better... what about a group production run of socket mortice chisels? Know any good suppliers of M2 bar stock?
As for the width of the mortise, a mortising chisel should register on the sides nicely, it might just be technique, keeping the chisel vertical and so on. I'm sure there are others here who can offer better advice than I can.
Regards
Ray
-
15th October 2011, 01:44 AM #7
Be inspired. Be creative. Be bold.
- Join Date
- Apr 2001
- Location
- Perth
- Posts
- 10,820
Hi Ray Originally Posted by RayG

I made a few smaller mortice chisels to square the ends of grooves and router-made mortices. These used HSS section from McJing.

http://www.inthewoodshop.com/ShopMad...ngChisels.html
They work very well for smaller mortices as well. Nevertheless I would not give up my pigstickers, which are trapazoid-sided.
Regards from Perth
DerekVisit www.inthewoodshop.com for tutorials on constructing handtools, handtool reviews, and my trials and tribulations with furniture builds.
-
15th October 2011, 05:44 AM #8
Senior Member
- Join Date
- Oct 2007
- Location
- Naples - Italy
- Age
- 57
- Posts
- 127
Ciao
 ,
,
I think is very difficult to reach the precision of routers by hand as well as the inside surface smoothness. So, apart to pay attention to the correct use of mortice chisels and setting-out, I use to cut the mortice with the line and the tenon just outside the line. Then a block rabbet plane help me for a fast fine fitting.
Giuliano
-
15th October 2011, 07:47 AM #9
Novice untried
- Join Date
- Apr 2007
- Location
- Melbourne
- Age
- 56
- Posts
- 235
Ts , I've moved almost exclusively to what Wouldwood calls, horse sauce or hide glue as it seems to deal with voids in the joint far better than white glues.
X-rays I've seen of fine furniture in restoration seems to show greater space within the mortice an a looser tenon than I would expect. I suspect the idea of a piston fit joint is actually counterproductive to joint strength/efficiency as the joint may be starved of glue in many places . The rough sides may infect help key the surfaces together, similar to when we key a surface before laying veneer
The idea of a perfect internal surface of a joint is
probably more of a hang over from being taught by perversly sadistic woodwork teachers in high school.(maybe that last bit is just me .....?)
Cheers
IanLast edited by Ian Wells; 15th October 2011 at 08:04 AM. Reason: Rethought ,recant, reconsider
-
15th October 2011, 09:06 AM #10
Jim
- Join Date
- Feb 2008
- Location
- Victoria
- Posts
- 3,191
The main thing we were taught when chopping mortices was to stand in line with the work so you could make sure you were holding the chisel vertically. Leaning a bit towards you or away didn't really matter of course as long as you weren't chopping from the ends. Once you've got enough depth you can square the ends.
Cheers,
Jim
-
15th October 2011, 09:31 AM #11
SENIOR MEMBER
- Join Date
- Nov 2007
- Location
- Victoria
- Posts
- 733
Thumbsucker,
In one of David Charlesworth's videos he chops a mortice sitting on a stool and references an engineer's square behind to ensure the chisel is vertical.
His eyeline is almost at mortice level which means he gets the full height of the square against the full length of the chisel blade, I think this is much easier than trying to line it up from above ie standing. He demonstrates this method for width accuracy and also the end wall of the mortice where he either shifts his seat or the timber around 90 degrees (cant remember which one).
Cheers,
Sam
-
15th October 2011, 09:43 AM #12
GOLD MEMBER
- Join Date
- Mar 2006
- Location
- Earth
- Posts
- 3,567
This is one of my suspicions and hope it will improve. Originally Posted by RayG
Why do you think I bought this tool. Originally Posted by RayG
 I wanted to learn about it. Before proposing it, also lots of blokes are keen on something like this.
A technique I have come to love is using the table router to face my tenons. Getting micrometer accuracy with perfectly square tenons. I have used a borrowed LN block rabbet plane and its a great tool for exactly this job. So this is an easy sale. Originally Posted by ac445ab
I think this maybe my problem. I have been standing front on not end on to the mortise. Originally Posted by jimbur
I found an article. This give different methods. However Schwarz says that the pre drill methods (Hayward) gives best interior mortises faces.
-
15th October 2011, 12:06 PM #13
Class Clown
- Join Date
- Nov 2005
- Location
- Darkest NSW
- Posts
- 3,207
Sam - I use Charlesworth's method all the time for dovetails, i.e. sighting the chisel to a square sitting on the bench behind the workpiece. It really does work brilliantly.
As for mortise chisels, well there's always one of these
English Mortise Chisels by Ray Iles at Tools For Working Wood
D2 steel anyone??
-
15th October 2011, 12:24 PM #14
Be inspired. Be creative. Be bold.
- Join Date
- Apr 2001
- Location
- Perth
- Posts
- 10,820
HI TS
As Mr B suggests ..
... here is an aid to holding the chisel vertical.
I prefer to hold the stile over a leg of the bench using a handscrew. The handscrew is clamped to the bench with a long F-clamp. The shaft forms a handy sight for the mortice chisel.
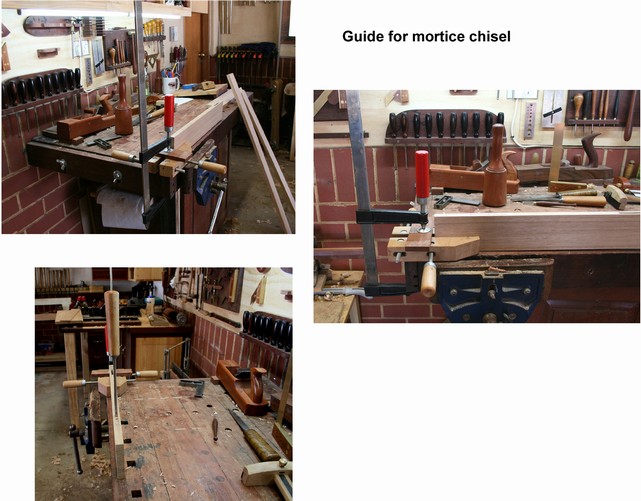
I stand directly behind the chisel and in line with the red handle ..
(there is more here: http://www.inthewoodshop.com/Furnitu...ndMortice.html)
Regards from Perth
DerekVisit www.inthewoodshop.com for tutorials on constructing handtools, handtool reviews, and my trials and tribulations with furniture builds.
-
15th October 2011, 12:30 PM #15
Class Clown
- Join Date
- Nov 2005
- Location
- Darkest NSW
- Posts
- 3,207
Good idea Derek - two birds with one stone and all that !

Interesting to read the blurb in the Ray Iles mortise chisel description concerning the shape of the chisel handle for mortise work. I can see that a round section handle would be less than ideal.

 Reply With Quote


Similar Threads
-
Mortise chisel shape
By dedward.rocks in forum HAND TOOLS - UNPOWEREDReplies: 3Last Post: 31st January 2011, 01:40 PM -
mortising chisel technique
By spongebrain in forum WOODWORK - GENERALReplies: 8Last Post: 10th June 2009, 03:01 PM -
Mortising Chisel Technique
By spongebrain in forum HAND TOOLS - UNPOWEREDReplies: 0Last Post: 9th June 2009, 07:24 PM -
Chisel technique, or how to stop cutting my fingers
By gonty in forum HAND TOOLS - UNPOWEREDReplies: 10Last Post: 24th April 2009, 07:27 AM -
Mortise Chisel basic set
By Yxoc in forum HAND TOOLS - UNPOWEREDReplies: 4Last Post: 1st February 2008, 05:56 PM
