

 Thanks:
  Likes:
  Needs Pictures: 0
 Picture(s) thanks:
Results 16 to 30 of 46
Thread: Learning basic hand plane use
-
11th May 2018, 08:33 AM #16
 GOLD MEMBER


- Join Date
- Mar 2004
- Location
- Brisbane (western suburbs)
- Age
- 77
- Posts
- 12,127

Mary, the road to any worthwhile destination is seldom straight & short! I know it's frustrating when you don't seem to be getting where you want to be as quickly as you'd like, but just think how far you've come already. Patience? Dunno what that is - persistence is what you need in this business.

Cheers,IW
-
11th May 2018 08:33 AM # ADSGoogle Adsense Advertisement
- Join Date
- Always
- Location
- Advertising world
- Age
- 2010
- Posts
- Many
-
11th May 2018, 09:49 AM #17
 GOLD MEMBER
- Join Date
- Mar 2010
- Location
- US
- Posts
- 3,126
The reward for working by hand is perhaps fewer pieces, but more time to think about taste and design, which likely means better pieces. Unless you're one of the very few gifted who can plan perfectly, work through the bulk work fast with machines (without being tempted to bend the designs to the machines) and then do the fine work in a different mode.
I'm not. I dropped machines because I don't enjoy the process, which leads to speeding up, spending time trying to think about ordering operations (like a project manager) and ultimately making an error 10 percent of the time and wasting a lot of stock.
the process is enjoyable, and learn to enjoy breaking a sweat and (some of the highbrow folks won't agree with this) feel what your body is doing, allow yourself to be present and engaged rather than struggling to be involved.
-
11th May 2018, 01:06 PM #18
Senior Member
- Join Date
- Apr 2017
- Location
- Dandenong Ranges
- Posts
- 266
Thanks guys. This thread has really got me thinking about what I'm doing.
I haven't done as much planing as I feel like I have. For a start I haven't had the waterstones for as long as I thought I had and it hasn't been long that I've been able to sharpen straight even at a basic level. Ian's comment regarding thinking about what I am trying to achieve and how the plane will do it helped me see that part of my frustration comes from my health. I have an infection from failed root canals and I keep thinking I'm better and then go down hill again. A significant amount of my planing time is just planing with no real direction because I want to do something with wood but aren't really well enough. Normally I would take a more methodical approach. It isn't that surprising that I haven't progressed further I guess. I can use my time better.
Getting the planes tuned better and improving my sharpening skills will help. What would you guys suggest regarding set up of the planes? I'm really trying to do everything by aggressive smoothing I think. I have a camber on the blades of the 4 and the 5. The 4 1/2 doesn't. I use the 5 the most but since it is the longest I have maybe it would be better not to use it as the smoother but use the 4. The 4 1/2 feels the most aggressive and takes off a lot of material easily. It's good for shooting too because it's heavy I guess.
Oh, DW I know what you mean by the bump. I didn't know that scewing was an alternative but getting the balance to take off material at the start was a satisfying moment. Though at first the bump would sometimes be a stop instead
Ian, From the hips? I lean forward and extend my arms which I already knew wasn't the way to go. My back gets sore after a while. I've seen people mention using your legs but not your hips. Do you mind explaining?
Do you walk forward?
Minimum extension of the arms?
Elbows?
-
11th May 2018, 01:19 PM #19
Senior Member
- Join Date
- Apr 2017
- Location
- Dandenong Ranges
- Posts
- 266
Thank you everyone
Just a quick thank you to everyone in the thread.
The replies have been fantastic. Detailed, useful and I feel like you are all genuinely wanting to help me. I'm not used to being the person struggling (well with psychological issues I am but not with learning skills or understanding) - I don't think I appreciated how valuable a forum like this can be until now. This is a good one though
Anyway, I feel much more positive now. I will learn to dimension by hand!
-
11th May 2018, 01:20 PM #20
GOLD MEMBER
- Join Date
- Mar 2010
- Location
- US
- Posts
- 3,126
You definitely extend your arms. The planing motion is subtle, and if you're doing heavy work, it's push forward (and not a rotation).
The extension isn't full like a basketball pass, though, it's more like a comfortable extension without losing your center of gravity. I don't know what it is 18 or 20 inches? If you have to do a lot of work, you do it sectionally like that, and then consolidate with full passes at the end - keep with the plane off the high spots idea and that consolidation will take little time. YOu'll begin to feel the high spots very quickly, even when you run a well cutting plane continuously over a small one, you'll feel "did I just notice that was a little big high?"
You'll get it, and there's a reason you'll get it. It's the easiest way to plane. David Charlesworth has popularized that you turn yourself into a large rigid being, and sort of walk with the plane, but that's perhaps a good way to start if you have accuracy troubles and a very bad habit to get into (the accuracy will take care of itself over time - you make a mark to hit, you plane to it, the end - the subtleties aren't paint by number but rather let your brain figure out how to do it and just think about wanting to keep the plane working at a speed where you can see things developing and stop before those things are problems - like going past marks).
You'll be a little sore, but it won't be long. You can raise your heart rate to whatever you choose, but in general, planing is more like a brisk walk plus a little than it is like jogging for exercise (which is sheer exertion that you can only do for a few minutes to a fraction of an hour if you're in normal shape).
re: the bump and skew. The skew is a way (to me) to get a smoother to start smoothly. The bump is something for cuts that are a bit heavier, where the plane is fully engaged in a hefty cut from the start.
-
11th May 2018, 01:30 PM #21
Be inspired. Be creative. Be bold.
- Join Date
- Apr 2001
- Location
- Perth
- Posts
- 10,824
Mnb asked ...
This is a quick answer between appointments, by cut-and-pasting from an article of mine I linked to previously (not everyone like to go off site) ...Ian, From the hips? I lean forward and extend my arms which I already knew wasn't the way to go. My back gets sore after a while. I've seen people mention using your legs but not your hips. Do you mind explaining?
Do you walk forward?
Minimum extension of the arms?
Elbows?
During the course of my research I became aware that many do not actually push their planes as expected by the design of their handle. For example, experienced uses of Stanley planes often praise the handle for being comfortable and offering much control. This is a forward leaning handle, and is expected to direct the force vector towards the mouth.

However, users of these planes do something else.
How do I know? Because I spent much time watching experienced woodworkers actually using both jointers and smoothers - rather than describing how they are used - watching them on DVD and YouTube video. A few are mentioned below. It was very revealing.
Firstly, a couple of long standing hypotheses:
The first hypothesis is that a vertical handle best suits a high bench and encourages one to push forward. This is shown here with a Veritas BU Jointer �
The second hypothesis is that the forward-leaning Stanley handle encourages one to push down towards the mouth, and that this is more easily facilitated by a lower bench. This is demonstrated below with a Stanley #7 �

One of the interesting videos I watched was that of Paul Sellers. In this he demonstrated that a smoother would cut without any downforce.

This was reinforced when Paul pushed the smoother from the base of the handle.

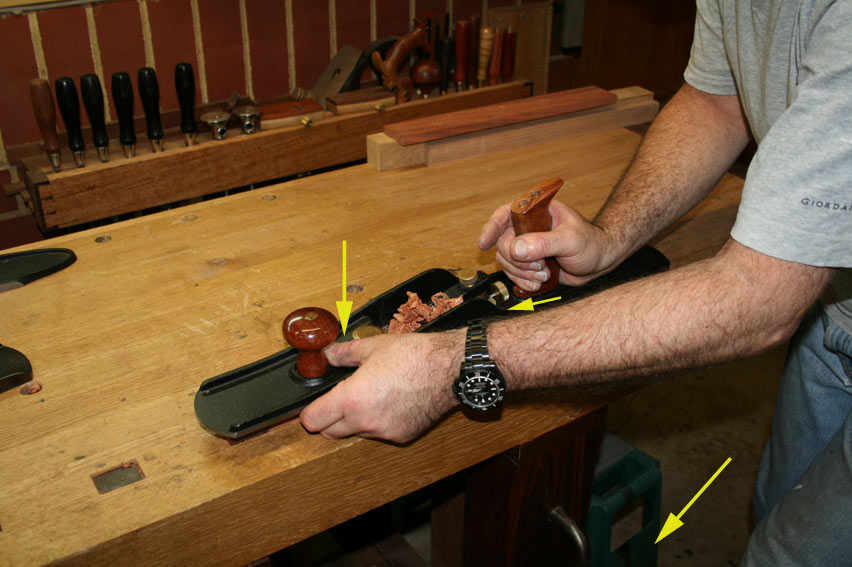
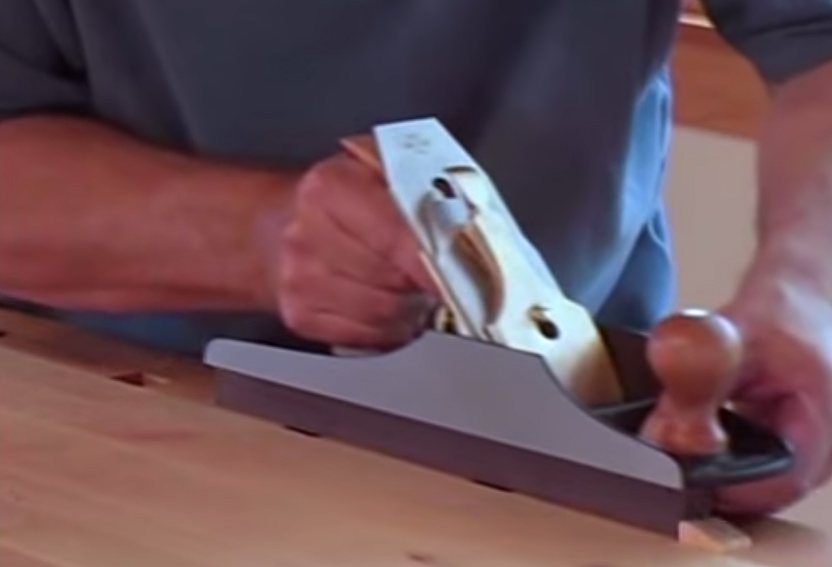
In the next picture we begin to get a clue to what it is all about. Here Paul is pushing a #4. Notice the angle of his forearm � it is parallel to the bench. This means that he is not pushing down, but pushing on the horizontal �

This is a process repeated by all experienced woodworkers.
Below is Garrett Hack � notice his horizontal forearm. This is a Lie-Nielsen BU Jack (which has a Bailey-style handle) �
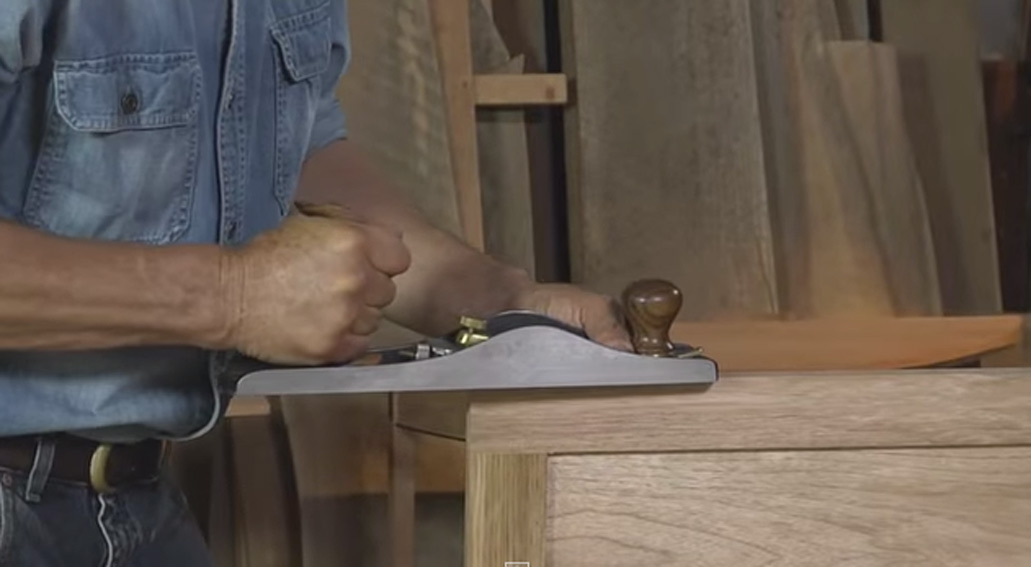
He does exactly the same on a Bedrock #604 �.
Also note that all the planes so far have Bailey-style handles with a forward lean.

Here is one of Chris Schwarz. He looks like he is leaning down and pushing on the diagonal, however his fist is pointed forwards, as is the direction of his forefinger. Chris is a tall fellow (6�5�) and likes low benches. The forward lean is no doubt related to using a bench that is too low! More about bench height in a little while.

Frank Klausz is a doyen among woodworkers. There are two elements to watch for here. The first is that he drops his arm to push forward (and this is not simply because he has reached the end of the board). The second is that he is not using the knob to generate forward movement � rather, it appears that he is lifting the toe up as the plane reaches the end of the board.
David Charlesworth, teacher extraordinaire! � once again, a strong horizontal push with a Lie-Nielsen LA Jack, plus this time we see the knob being used to place downforce over the toe of the plane � the knob creates the downforce, not the handle.

The pushing action is repeated on a BD Jack. The knob is ignored and the thumb is placed directly on the body in front of the mouth for downforce �
Here is a great shot of Konrad Sauer repeating the same action of those who came before �

Not one of these individuals is pushing down on the handle, only on the toe.
The next piece of the puzzle begins with a confession. I have had a love-hate relationship with the Veritas handles over the years. I hate their looks, but I love the way they work. And every year or so, I swap them out for something nicer looking, and then swap them back for the original because they just feel better in the hand.
A couple of years ago now I built a new bench, a Roubo. This bench was about 2� lower than my previous one, and I thought that this would be a good reason to add Stanley-style handles to the Veritas BU planes (jointer and jack below) to avoid cocking the wrist when planing. Bill Rittner makes some beautiful handles and knobs (just like the LN in the picture below)�

Over time, however, I discovered � as good as these handles are (and they are very good indeed) - they are not as comfortable as either of the new Veritas handles ... and so I switched back again! How could this be so?
The key here is body posture. What I found myself doing when planing at a lower bench was to automatically drop my hips and lower my body (thereby �raising� the bench). This posture is a common practice in Karate (where punching power comes from the hip), and other sports where balance creates control creates timing and creates power, such as tennis, squash and skiing � ("bend ze knees!").
Inexperienced woodworkers appear to push down on the handle and lunge forward from the waist or shoulders. This leads to poor balance, poor control and limited power.
Experienced woodworkers, such as Jim Kingshott, describe that there is an optimal position for one�s feet for the push stroke (see his video, �Bench Planes�). Similarly, Jeff Miller (in �The Foundations of Better Woodworking�) demonstrates dropping the planing height as he pushes forward.
<<<<<<<<<<<<<<����������������������..<<<<<<<<<<<<<<<<
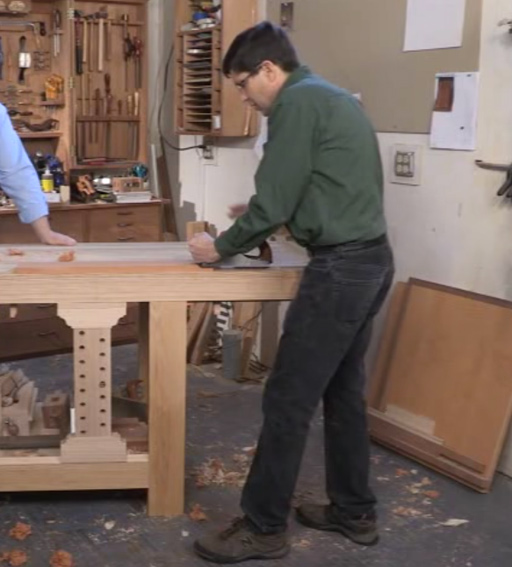
Obviously, by squatting low, the effective height of the bench is being raised. What I discovered I was doing was simply compensating for the lowered bench, dropping down lower and pushing the plane forward � as if I was working at a higher bench and standing more upright. This meant that the �advantage� of a forward leaning Bailey handle was lost.
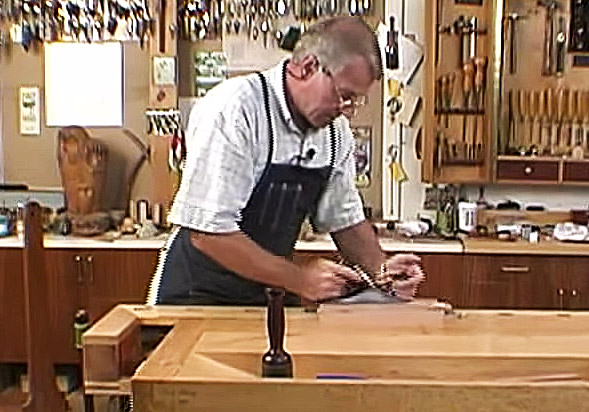
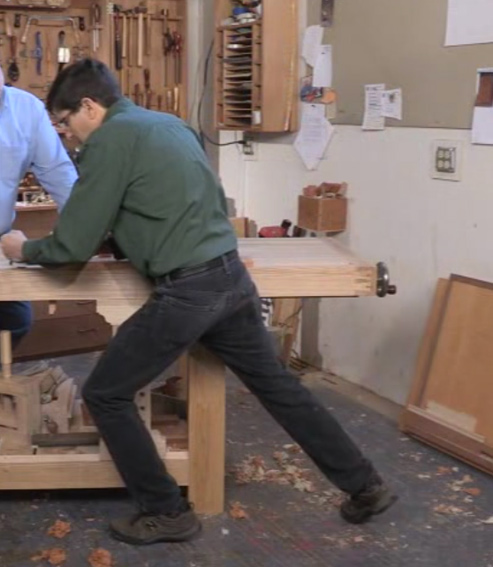
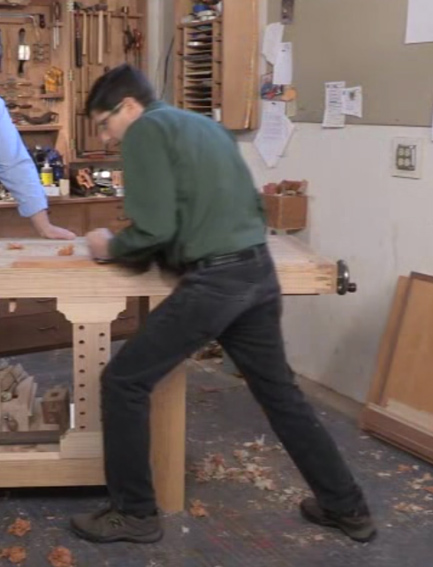
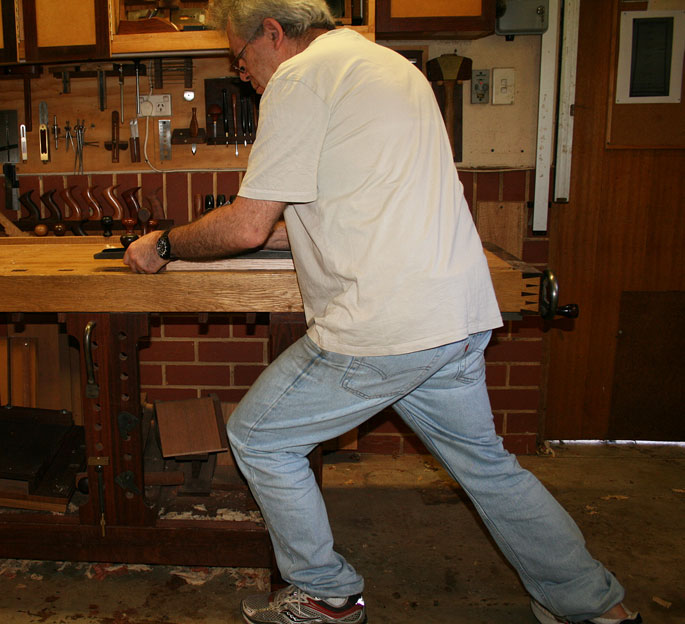
Here is an illustration. Below is my bench. Notice that the top aligns with the hem of my t-shirt.

Now in the sequence below note that the hem has dropped below the skirt of the bench (about 5�), and it does not move in height as I shift my weight forward. The hips are the source of the forward drive and transfer force into the lowered forearms.
<<<<<<<<<<<<<<< ��������������������<<<<<<<<<<<<<<<<<<

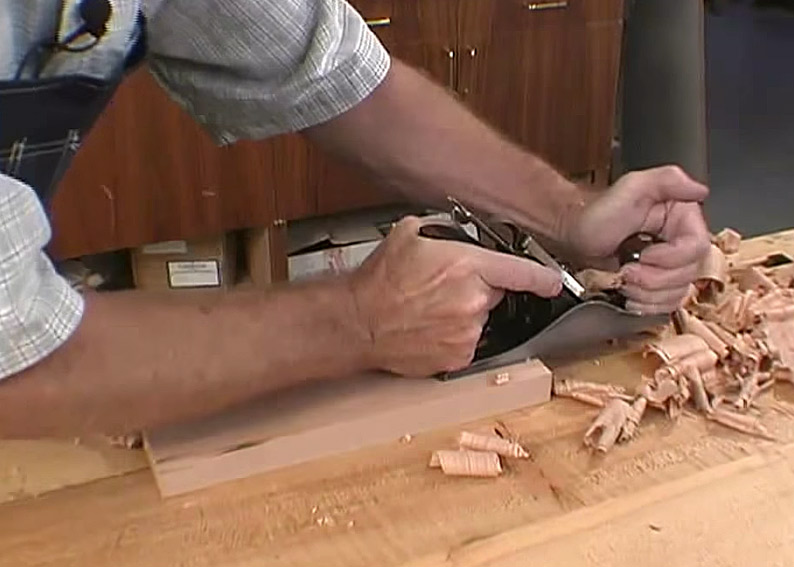
Below is the forearm driving the plane through the base of the handle �. Now recall the words of Rick Blaiklock: �We had a couple of testers with arthritic hands. They both commented they had to push with the heel of their palm, not the top and for that reason they very strongly preferred the Veritas-style handle. In fact they were pushing more than they were gripping the handle�.
Bevel Up Jointer �
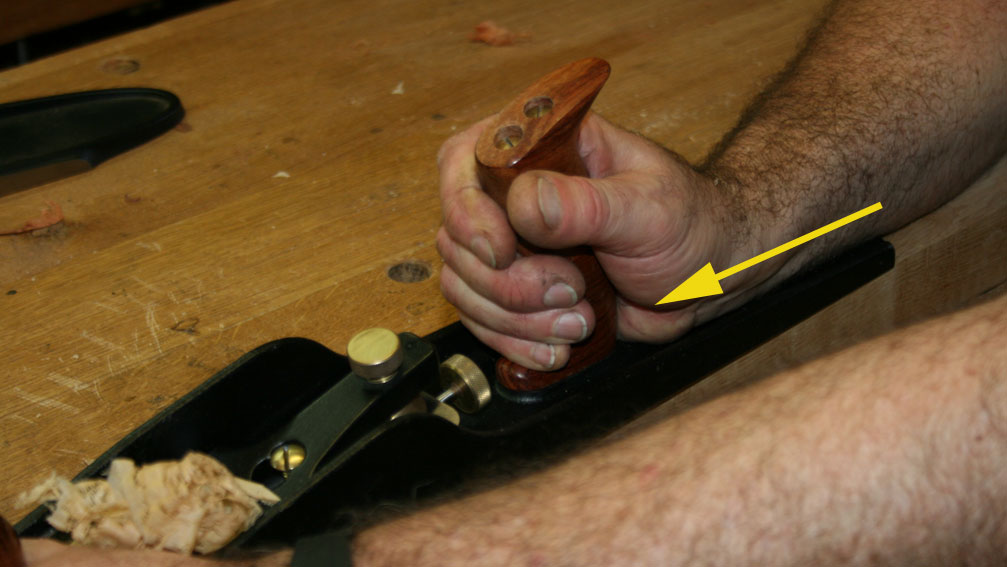
Custom Jointer �
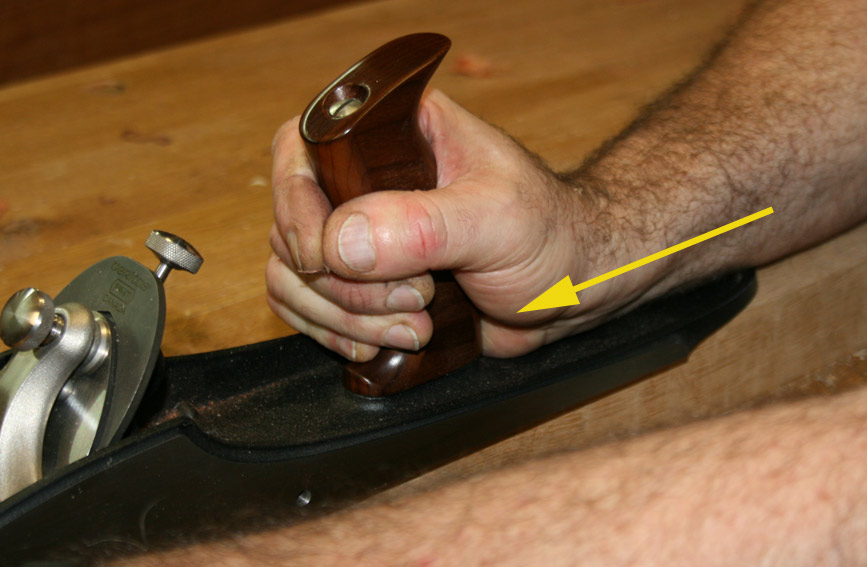
So where is the effort going with the Stanley handle? Pushing at the base with the heel of the hand leaves a part unsupported.

The third part of the puzzle comes from measuring the angle of the handles under discussion. The upper two are the Veritas, and the lower two are the Stanley (left) and LN (right).
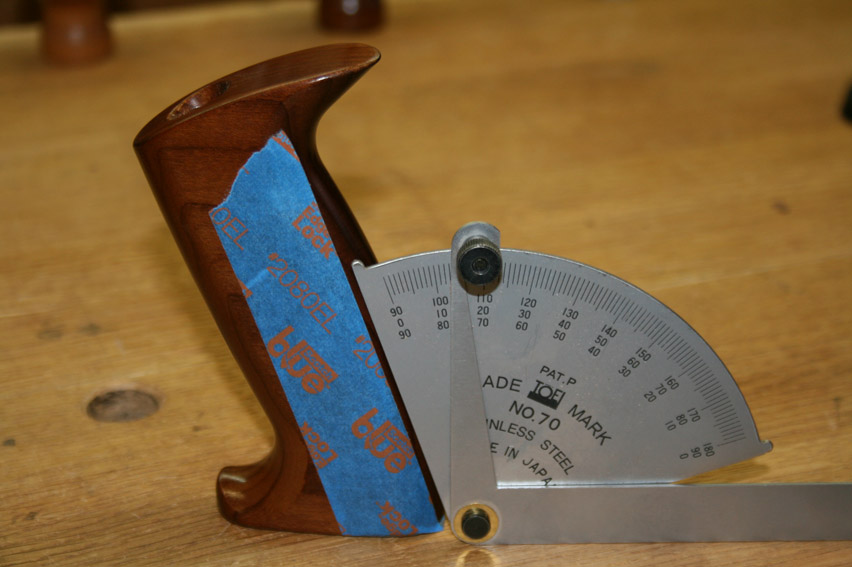
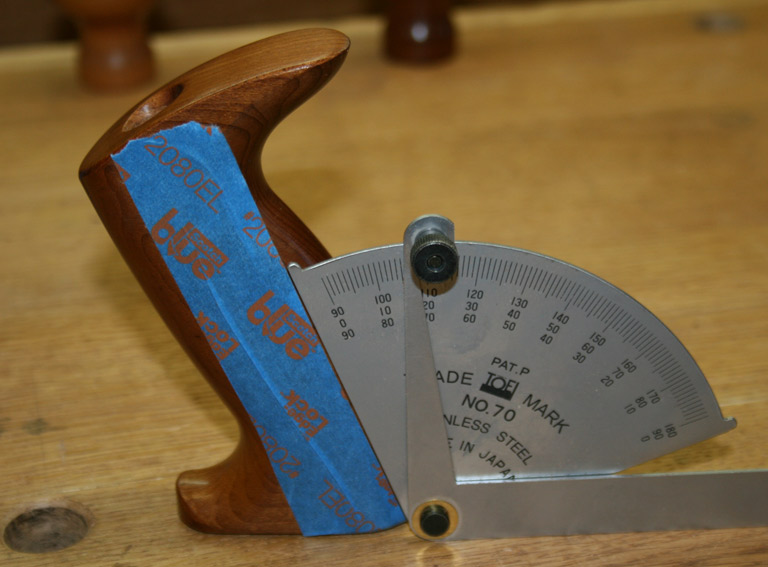
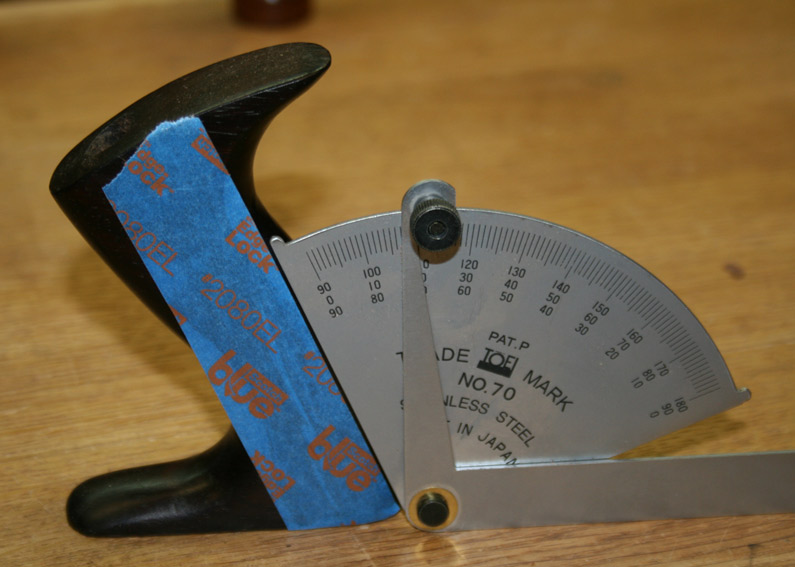
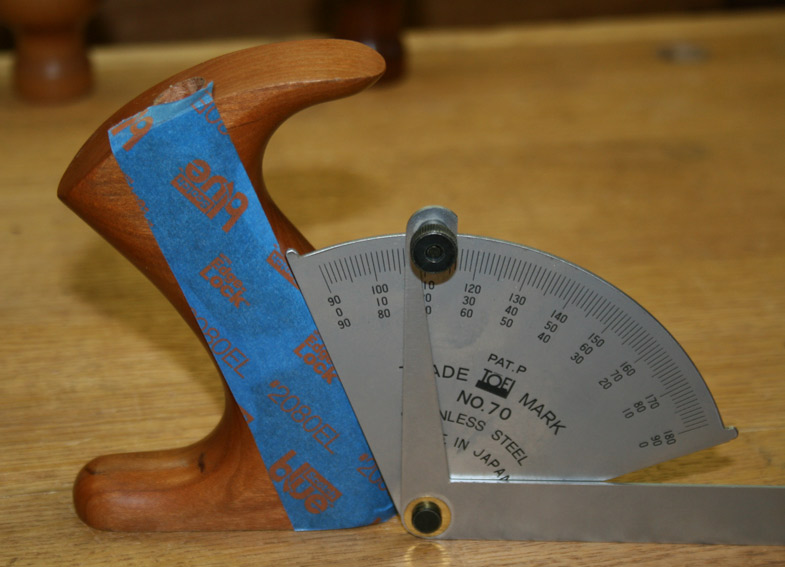
What becomes apparent is that they are all within a few degrees of one another in regard to forward lean (somewhere between 68 � 70 degrees) when ignoring the curves. The curve, especially on the Bailey style, creates a distinct upper and lower section to the handle.
It occurred to me that if pushing at the heel creates power, the important handle dimension is not simply about width but about the amount of registration for the heel. I measured the height of the flat where the heel of the hand would rest in a mostly vertical orientation.
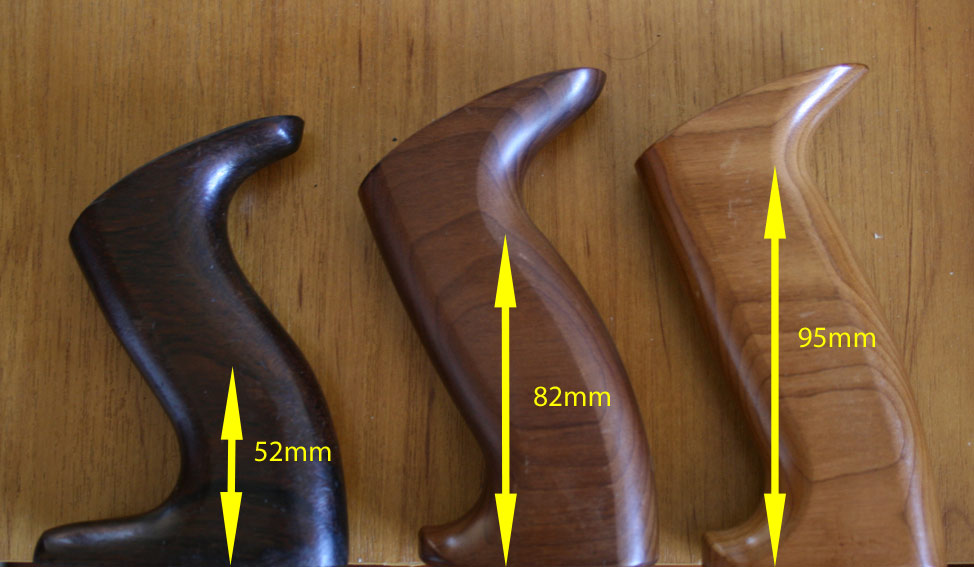
It is evident that the Stanley has the least vertical height, and the traditional Veritas has the most. Could this be the reason why arthritic hands enjoy this handle more than any other? Simply, that they have more stable area to push against?
At this point it was necessary to find a way to test out this theory. What I did was build a handle for the Stanley that increased the height of the flat (it�s a bit rough-looking below, but it was cleaned up for the #604 � see later).

How did this feel? In a word, great! Forward drive appeared to require less effort. The Stanley #7 was much less effort and significantly more controllable when pushed.
The question remaining was whether this would have the same effect with a shorter smoother?
Knobs
The question must be asked whether one actually needs a knob on a plane?
If they are not ideal for helping the plane move forward, and primarily for holding the toes flat to the surface, why have one at all - why not simply push on the toe of the body?
Stanley #7 �

Custom #7

(There is more. The article is at http://www.inthewoodshop.com/ToolRev...omPlanes3.html )
Regards from Perth
DerekVisit www.inthewoodshop.com for tutorials on constructing handtools, handtool reviews, and my trials and tribulations with furniture builds.
-
11th May 2018, 05:09 PM #22
Senior Member
- Join Date
- Apr 2017
- Location
- Dandenong Ranges
- Posts
- 266
Derek Wins!
Quite rightly chastened Derek. I am somewhat chagrined to say that though I have the tab opened right next to this one that I have not yet read it. I will do so later - I have to head out to take the dog to the vet shortly. I am slightly ashamed that I didn't think of doing video analysis. I've become mentally lazy and haven't used my brain for this at all. hmm
Thanks, will get back to you later.
-
11th May 2018, 07:34 PM #23
GOLD MEMBER
- Join Date
- Dec 2006
- Location
- East of Melbourne Aus.
- Age
- 72
- Posts
- 1,220
I live not far from you. Bring your planes down and Let me watch you work. P.M.me.
I am learning, slowley.
-
11th May 2018, 09:07 PM #24
Senior Member
- Join Date
- Apr 2017
- Location
- Dandenong Ranges
- Posts
- 266
Pagie I'll take you up on that but it will have to be in a couple of weeks. Thanks man.
So it seems that many have figured this out.
. Brettbut I don't believe I use my front hand for movement - more pressure and guidance
ChiefTiffthe front knob is now used to merely steer the plane. You don't apply any downward force to the rear handle; all you are doing here is pushing the tool horizontally
Ian WThis is pure technique, you have to learn to lean on the toe as you start the cut & ease back to almost no pressure at all on the front as the plane gets into its stroke. I put my palm flat on the front knob, which automatically promotes the transfer of pressure.
Yes. Though you've reminded me of the Paul Sellers video which is why it's only recently that I started experimenting with weight on the handle. I lunge forward from the shoulders.Inexperienced woodworkers appear to push down on the handle and lunge forward from the waist or shoulders. This leads to poor balance, poor control and limited power.
Thanks Derek, yet again the link you recommended provided the answers to my question. (As someone who is smart but hampered by ADHD I suspect I would both love and be incredibly frustrated to have a good conversation with you ) It reminds me of horse riding. Balance and lines. With horse riding you have the line from the top of your head straight down through your spine, and your elbows, hips and heels go straight down the same line in a different plane. Hands are in a horizontal line with the elbows. You lower your center of gravity and your hips are where the power and balance come from. Then of course you need to be in tune and move with the horse yet you guide the horse with your weight. Lines. Balance. Connection. And hope you have the feel on top.
There is a similar line in the upper body with planing and with the horizontal line between elbow, wrist and plane. Balance with both the plane use and the body. Lowering the center of gravity always improves balance so I wonder about the possibility of a bench being too high. Love the whole body aspect. Getting this information early provides a chance to get it right and build up muscle memory - in theory anyway.Last edited by Mnb; 11th May 2018 at 09:09 PM. Reason: Added a word and a bracket
-
12th May 2018, 12:21 AM #25
GOLD MEMBER
- Join Date
- Mar 2010
- Location
- US
- Posts
- 3,126
I can't remember the context of what caused that article from Derek. I may have believed at the time that we're pushing down on the plane some (ultimately, we are a little bit), but have learned from making planes that the handle angle on the lower planes is perhaps partially about some twist to keep downforce at the mouth, but likely more because people figured out that it's just what's comfortable.
I started building wooden planes because I knew from dimensioning that metal planes will punish you much more if you don't religiously keep them waxed, and in really heavy work, they are a little bit uncomfortable. A wooden plane feels much more solid but a little bit dead at the same time. There's no flex in the handle, there's nothing jiggling on it, and most importantly, if you err and lean on it a little bit instead of focusing on pushing it forward, it won't punish you so much.
A metal plane will torture you when you get tired if you start leaning down on it. It will give you the illusion that it's getting dull.
Don't worry about reading too much more right now. Find yourself a project to make and dimension the wood. Figure out how to mark out everything you want to do (as in, flatten the face of a board, square the edge and then mark the thickness and work to hit it - you can fairly easily flatten a board end to end to within a hundredth. I can hit 5 thousandths if there's a need, and when I'm dimensioning plane infills, I shoot for dead square and thickness 1 thousandth below a measure. Use some cheap calipers to see how you do, don't get too obsessed with perfect, but shoot for functionally good. Reasonable tolerances, nice appearance of the wood when you're done.
And if you're using a metal plane, wax when it seems like the plane is getting dull to check that it is - it may just be you leaning on a plane that needs wax because you're getting tired. paraffin on the sole and then try the plane. If it's still sharp, you won't have to lean on it to keep it in the cut. If you have to lean on it to keep it in the cut, then it's time to sharpen (but at least you'll have a waxed plane as soon as you bring a sharp iron back to it).
You'll learn about 10% of what you need to know by reading - the other 90% will be subtleties.
I see you mentioned psychological battles. Welcome to the club. I don't know which ones you fight, but if anxiety is one of them, this will be one of the most fulfilling things you can do.
-
12th May 2018, 06:48 AM #26
GOLD MEMBER
- Join Date
- Feb 2003
- Location
- back in Alberta for a while
- Age
- 68
- Posts
- 12,006
Hi Originally Posted by Mnb

Derek has provided a very comprehensive reply.
to break the issue down into components
1. the tool.
I suggest that for now you concentrate on getting one or both of your #5s "working". I'm using quotes to indicate that by "working" I mean a combination of the tool and how you as the user use it.
a flat sole -- for dimensioning, the sole needs to be flat enough, while for smoothing the sole needs to be flatter.
Sharp blade -- you seem to have covered
square across the cutting edge is not as important because the plane's lateral adjuster can be used to make up for an cutting edge that is not exactly square.
setting the chip breaker -- this is more important when smoothing difficult woods and taking a very fine shaving. It is less important when taking a coarse (= thick) shaving. In the beginning, setting the chip breaker really close to the cutting edge to minimise tear out can be skipped. Come back to this once you have mastered straight and square.
the blade can be straight across, eased at the corners, slightly cambered or heavily cambered. If your practice piece is narrower than the blade -- recommended -- then easing and cambering can be ignored. Again, come back to this once you have mastered straight and square.
2. the work space
Bench height is a tricky one. High benches are good for detail work, low ones are better for tasks that require full body power.
I don't believe that there is one answer. The guides about height in relation to your wrist or joints on your little finger work for me. If your current bench is too high, get a couple of 4x2s and a piece of yellow tongue or 17mm CD ply and build a platform to fit your body relative to the bench. Once you are past the learning stage you can decide if you want a high or low bench. (I'm interpreting your comments to imply that your current bench is too high.)
Initially limit your practice pieces to lengths that don't require you to move your feet during a planing stroke. Walking forward as you plane can come after you master the basic movements and skills.
3. planing.
practice leads to muscle memory making the seemingly difficult less so.
grain direction -- most important, always try to plane down hill.
weight (pressure) on toe (at beginning of a stroke) and heel (at the end) has been covered.
Fingers on knob, or thumb on knob or on the casting is in part personal preference and also about control. I find that placing my thumb on the knob or castling and wrapping the fingers underneath helps to keep the plane's sole square to the edge. I also find that extending my index finger onto the blade/frog helps keep the plane straight.
because of how the mass of a plane is distributed, with practice you should be able to tell if the plane is sitting square.
in terms of an (abreviated) "ten step" process
Step one -- work on getting a straight edge without any dip at the start or end.
Step two -- work on converting the straight edge into one that is also square to the face. Balance is important here.
Step three -- work on achieving straight and square as a single process.
then the challenge
Step four -- move onto getting a face (a stick wider than the plane blade) flat and straight. Your planning strokes need to overlap. (winding sticks are useful here.)
step five -- get an edge square to the face you flattened in step four.
You are essentially done.
There is much more to learn through experience, including turning a dimensioning plane into a smoother, but once you have the basics committed to muscle memory, you are mostly thereregards from Alberta, Canada
ian
-
12th May 2018, 11:03 AM #27
GOLD MEMBER
- Join Date
- Jun 2005
- Location
- Helensburgh
- Posts
- 7,696
There is another important factor in bench height and that is age, the older you get the need seems to be for a higher bench. Another point about practise is that it is pointless and detrimental to practise bad technique and some times even five minutes with more knowledgeable person can sort things out very quickly.
CHRIS
-
13th May 2018, 12:42 AM #28
Senior Member
- Join Date
- Mar 2006
- Location
- West Chermside
- Posts
- 119
Hi,
You have asked a big question. First up I am not an expert but I do have an interest in hand planes and hand planing. I've put some links for youtube videos that may help. These people are verified experts not half baked youtube experts. My suggestion is learn about planes by renovating a second hand plane guided by the people on youtube. You will soon spot the dead heads. Go to Amazon and buy a king 1000/6000 combo stone for US$34. and on eBay you can buy a double sided400/1000 grit diamond stone in a hard rubber holder for AU$50 they will allow you to learn to sharpen your plane blade. I have specified these two items because I know they are a good starting point and are of reasonable quality. Stay away from the very cheap Chinese made stones labelled as 8000/10000 as they are not that grit probably closer to 600 or 800 grit and are rubbish. My preference is for a honing guide as it gives a higher success rate. You can learn to hone freehand when you know how to sharpen.
Then look at your timber you are going to plane and learn how to read the grain. Then spend a lot of time planning timber trying to get the finest shaving you can and the smoothest surface you can. After you have got planeing down Pat, or think you have practice planning to a line and eventually get a piece of timber around 300mm long and 50mm square and plane it to a dimension say 45mm square with all sides square to one another, and coplanar. At that point you will be able to say you know how to plane and then you can look at buying yourself a top quality plane iron or perhaps even a modern quality plane. That will help you get to the next level, good tools can make a difference.
I hope this helps.
All the best
Jeff
David Charlesworth https://www.youtube.com/watch?v=0KDbwtRJ3Iw
Rob Cosman. https://www.youtube.com/watch?v=6nxKVpVmXGI
Lie Nielsen https://www.youtube.com/watch?v=JLOWVpfEQh4
RWW https://www.youtube.com/watch?v=5QPw5I3sBXs
Chris Schwarz https://www.youtube.com/watch?v=2_96gNMMc_g
Garrett Hack https://www.youtube.com/watch?v=AzDygUaWGj0
-
22nd May 2018, 06:14 PM #29
Senior Member
- Join Date
- Apr 2017
- Location
- Dandenong Ranges
- Posts
- 266
Been away
Hey guys. Just a quick post to let you know I've been away for the last week - hence the silence. I was writing a reply before I left but didn't have time to finish it.
-
22nd May 2018, 07:24 PM #30
GOLD MEMBER
- Join Date
- May 2011
- Location
- Albury
- Posts
- 3,039
So when you open a large can what do you find? Lots of worms! There's stuff in this thread I've never thought about before.


 Reply With Quote


Similar Threads
-
Can I trim a #6 hand plane & use as a #5 1/2 jack plane? Your opinion needed
By woodhog in forum WOODWORK - GENERALReplies: 9Last Post: 16th May 2017, 12:32 AM -
Hand Scraping a Hand Plane to .0001" Accuracy
By Ulma Doctor in forum METALWORK FORUMReplies: 4Last Post: 28th February 2015, 06:38 PM -
Basic hand tool kit for small children?
By xjapan in forum HAND TOOLS - UNPOWEREDReplies: 14Last Post: 8th November 2010, 06:30 PM -
Learning to cut dovetails by hand
By derekcohen in forum HAND TOOLS - UNPOWEREDReplies: 0Last Post: 7th March 2004, 03:27 PM
