

 Thanks:
  Likes:
  Needs Pictures:
  Picture(s) thanks:
Results 1 to 15 of 24
-
7th September 2015, 01:28 AM #1
 Be inspired. Be creative. Be bold.


- Join Date
- Apr 2001
- Location
- Perth
- Posts
- 10,826
 MF 15 1/2 mitrebox rebuild and Groves saw build
I've wanted a small mitre box for sawing mouldings forever. The Miller's Falls #74 I have is a HUGE beast, a carpenter's tool. Had my eye on a Miller's Falls #15 1/2 several years ago, but then it got Schwarzed, and I watched the prices climb. Finally I just built a small mitre box, the Steam Punk Mitre box, which was fun and functional, but I doubt that it has the fortitude to take it into the next century.
I kept an eye on eBay, and a #15 1/2 would come up every now-and-then, but starting at silly money. Damn The Schwarz.
Finally one came up that was reasonable, not cheap, but reasonable (with low shipping - that is the killer to Oz) .. and there looked to be little interest from others. Not too surprising as it had issues. I put in a snipe bid, and won it. Of course the Seller miscalculated shipping costs, but was good for the amount .. however sent it on a slow ship. It arrived ... eventually.
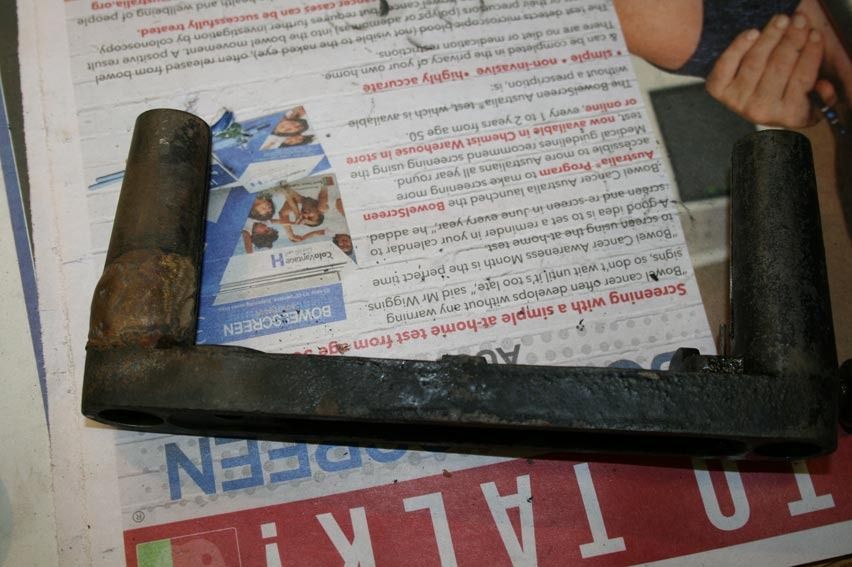
It looked like this ..

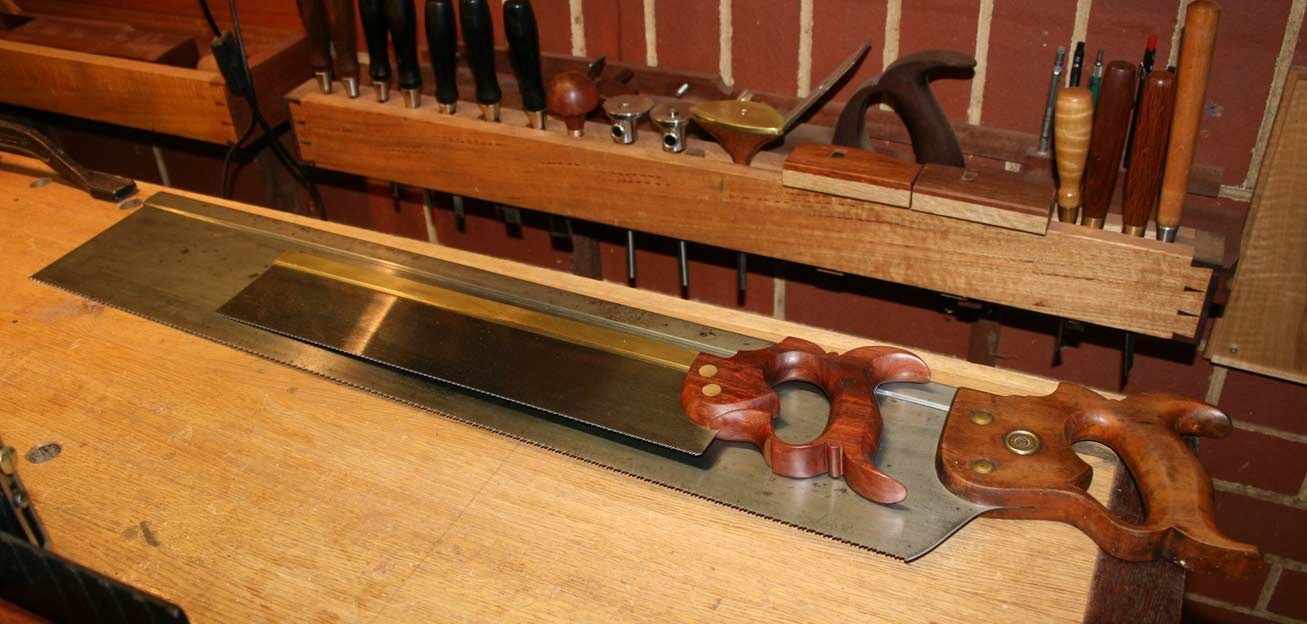
The # 15 1/2 is 12" long. Here it is with the #74C and its 28" long x 5 1/2" deep saw ...

The issues? Well, the rear guide had broken off (must have been dropped) and been brazed. It was a good job insofar being straight ...
The shell was stripped down, and one of the repairs was to smooth over the weld before repainting ...
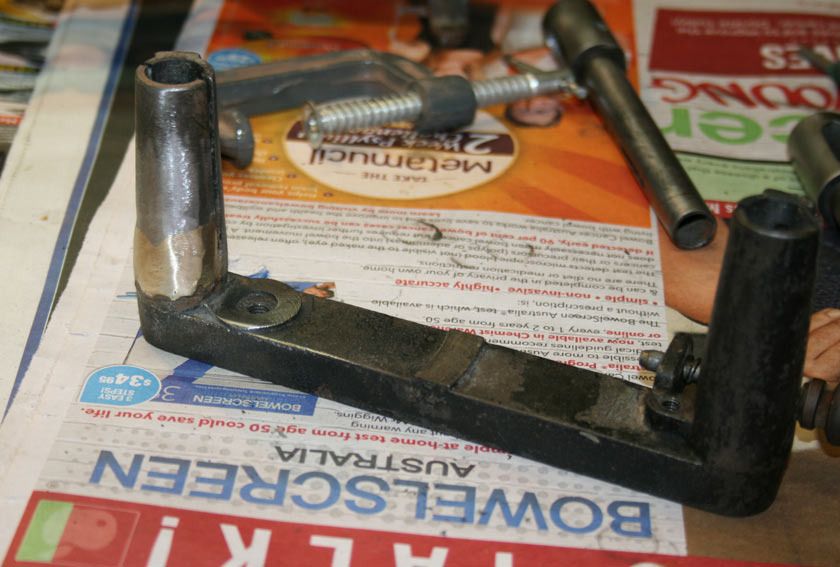
I discovered that the blade holder (that runs inside the guide) had also been welded at the lower end, and then the weld carefully filed flush. However it removed some of the steel, and now the fit was a little sloppy.
To tighten this up, I tapped both sides of the guide and made set screws in nylon ..
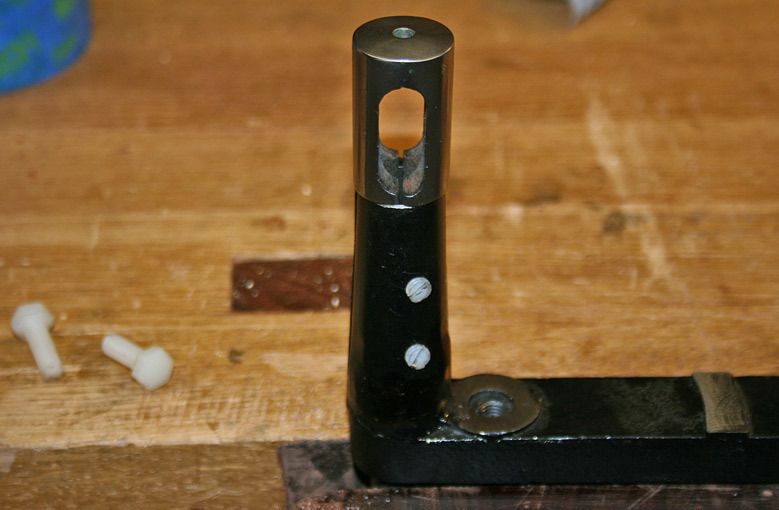
The other modification I made was to add more nylon inside the blade holder, where the saw back runs, to create tighter tolerances and a smooth action. It works really well ..
Now I needed a saw. The original saw was 16" long with a depth of 2 1/2". Here is the one I made - more info in a short while - together with the 28" beast for comparison ...
The saw plate and brass back came from Isaac Smith (Blackburn Tools). The plate is filed 13 tpi crosscut, and is 0.20" thick. The brass back just needed draw filling and polishing. I chose not to go with a folded back as like the clean look of the slotted back, as well as it being a more reliable construction. Isaac does a fabulous job. The saw cuts as cleanly as a Japanese saw.
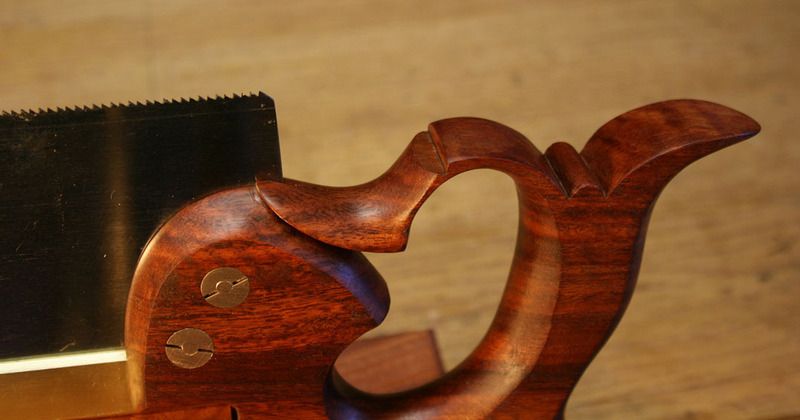
The saw handle was inspired by a Grove tenon saw handle made by George Wilson, whom I consider to be one of the finest craftsmen around, whether tools or musical instruments. George built the saws for Colonial Williamsburg. Here are two of his saws, a dovetail and the tenon saw in question ...
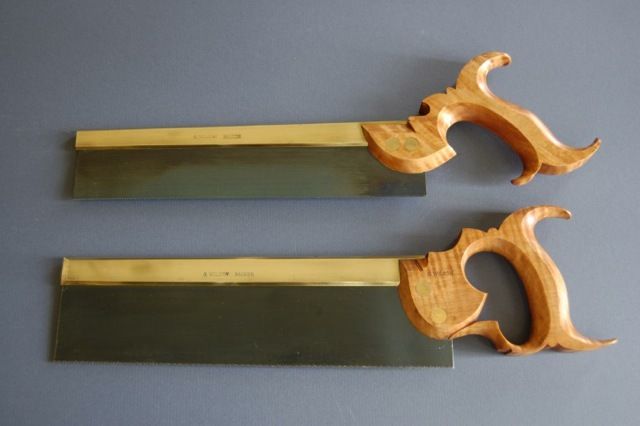
The detailing on these handles is exceptional, in particular the crisp, defined lines. This was my aim (only, of course, the proportions for a mitre saw will be slightly different).
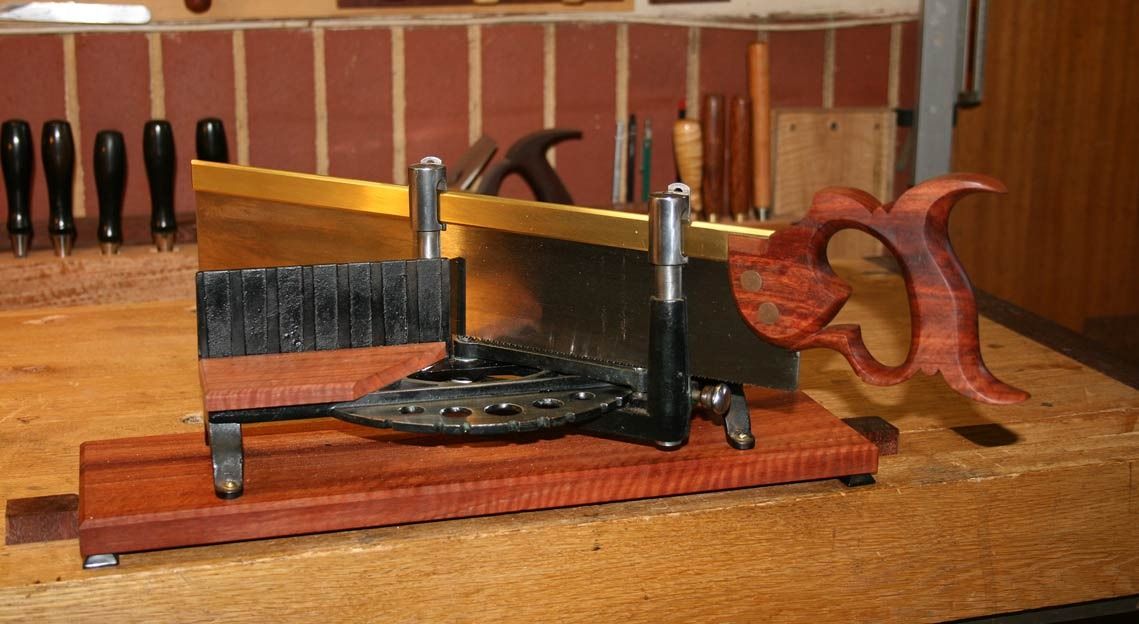
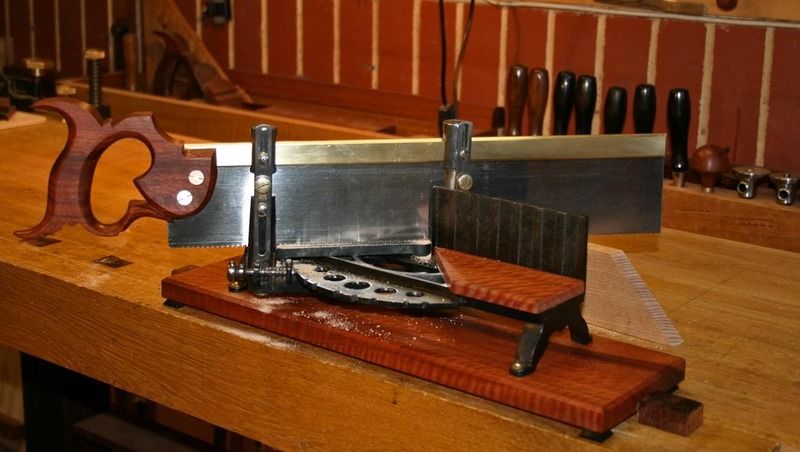
This is the boring shot of the completed mitre box and saw ...
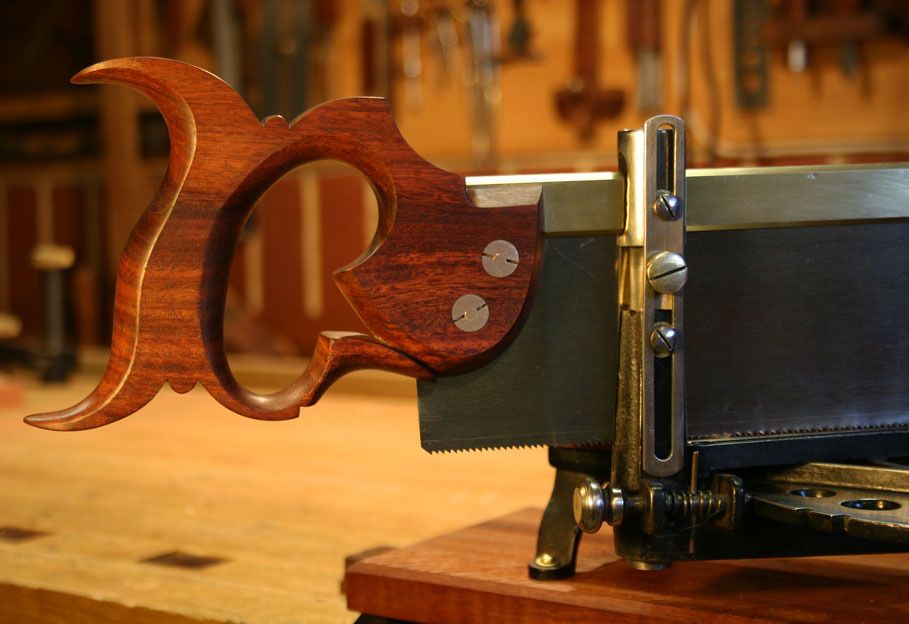
The wood used throughout is Fiddleback Jarrah. I had a few scrap pieces left over from the Wegner Chair build. I should have remembered that carving it was a nightmare: beautiful but hard and brittle, especially brittle at the edges. A lot of careful work went into the shaping here.
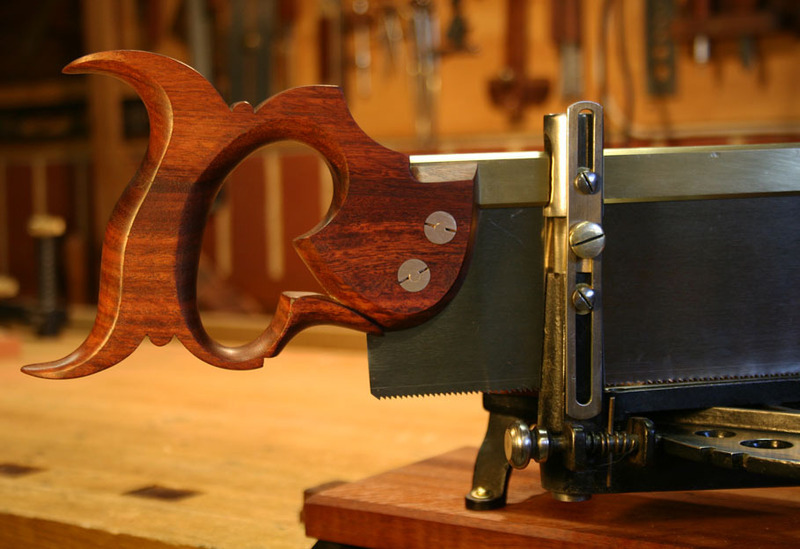
This is the money shot ...

The last issue was that there was a missing depth stop. Consequently, I made two new ones from brass. I thought that would help in matching to the brass in the saw.
I had never made a lamb's tongue like this one before. In looking at photos on the Internet I became aware that no one posted a picture of the underside. So here is mine ...
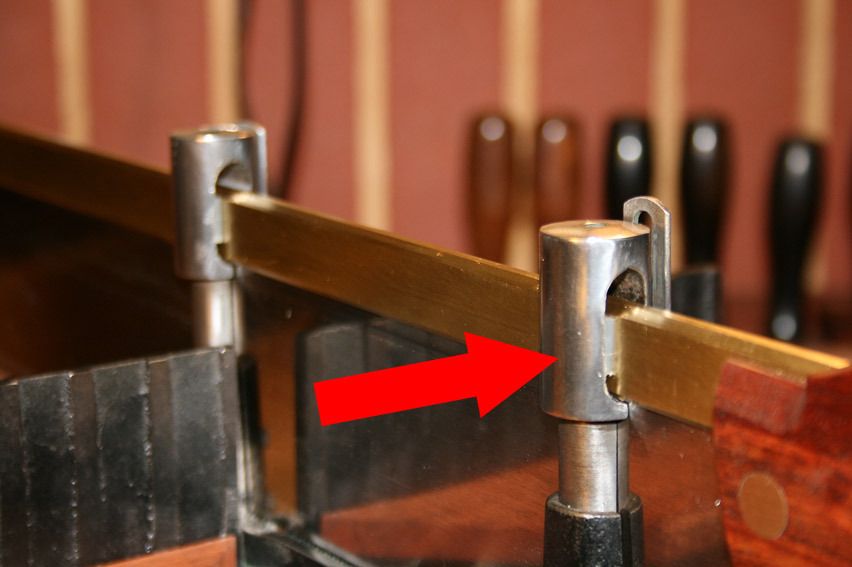
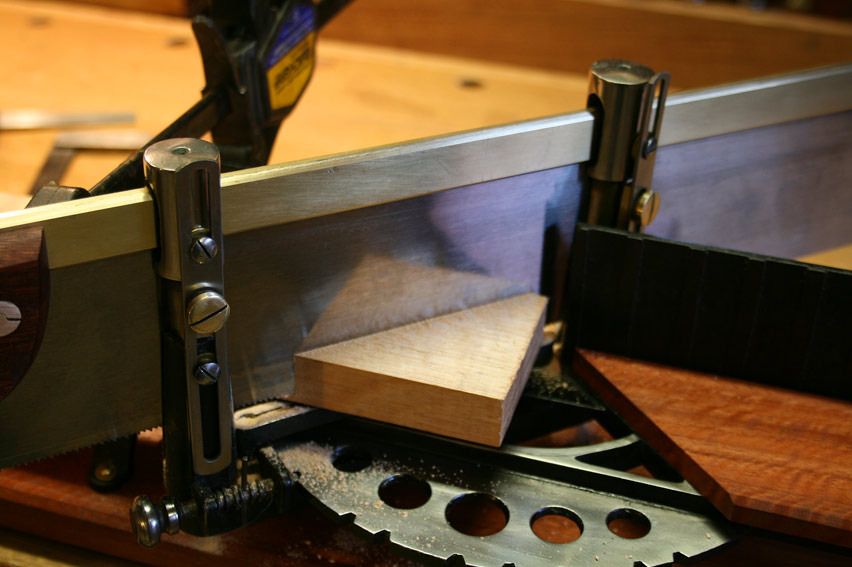
One other modification was allowing sone of the cast iron to remain unpainted at the front. Here is the combination sawing a mitre. It performs as well as hoped ..
Thanks for looking.
Regards from Perth
DerekVisit www.inthewoodshop.com for tutorials on constructing handtools, handtool reviews, and my trials and tribulations with furniture builds.
-
7th September 2015 01:28 AM # ADSGoogle Adsense Advertisement
- Join Date
- Always
- Location
- Advertising world
- Posts
- Many
-
7th September 2015, 01:33 AM #2
Intermediate Member
- Join Date
- May 2015
- Location
- Adelaide
- Age
- 57
- Posts
- 34
Work of art, looks awesome!
-
8th September 2015, 09:41 AM #3
GOLD MEMBER
- Join Date
- Mar 2004
- Location
- Brisbane (western suburbs)
- Age
- 77
- Posts
- 12,132
Nice repair job, Derek, and that's not a bad saw, either, for a beginner.

Jarrah wouldn't be my first choice of raw material for a saw handle, but I certainly couldn't fault your workmanship! I did try a piece of it for a handle, but scrapped it before it was finished because it was far too coarse & splitty for my likings. Which makes me even more impressed by the delicate shaping you've managed. I guess you aren't blessed with the range of choices we have over this side of the island, but you do have a couple of woods that I've enjoyed using, like Lace She-oak. Now that can be a spectacular wood, & I found it a lot nicer to work with than Jarrah.
One thing puzzles me no end - where on earth do you store all of your gear? Your workshop was rather small & crowded when I saw it last, but you seem to have acquired quite a few more tools & gadgets since then. Have you discovered the secret of the Tardis? If so, would you please divulge to the rest of us - I've got more room and fewer tools than you, & I'm still cramped for space....
Cheers,IW
-
9th September 2015, 03:29 AM #4
Be inspired. Be creative. Be bold.
- Join Date
- Apr 2001
- Location
- Perth
- Posts
- 10,826
Thanks Ian.
I did begin to curse my decision to work with the Fiddleback Jarrah. Jarrah in general is tough but brittle. this stuff has some wonderful figure but was so stressful to work with - the number of chips and breakouts I had to repair ...
Where do all the tools go? You make it sound as though I have so much. Actually I do have far more than needed by 10 craftsmen. What can I say - I get curious and want to try it out. I do sell or give stuff away. I would be just as happy having a few tools, and I am at the point where I am wanting to thin out the herd towards this end. Over the next year I shall probably do so.
Regards from Perth
DerekVisit www.inthewoodshop.com for tutorials on constructing handtools, handtool reviews, and my trials and tribulations with furniture builds.
-
9th September 2015, 09:24 AM #5
GOLD MEMBER
- Join Date
- Mar 2004
- Location
- Brisbane (western suburbs)
- Age
- 77
- Posts
- 12,132
 Originally Posted by derekcohen

I guess that is a common affliction, and one reason why many of us end up with more tools than we really need...
I've been down that road, too. My attempts to rationalise have been only moderately successful. It's that curiosity thing you mentioned, you see something that needs a good home, or is badly in need of some TLC, or a tool that looks like a lot of fun to make, and it sneaks up on you again! Originally Posted by derekcohen
I got my tool cupboard under pretty tight control a few years ago - got rid of quite a few surplus-to-requirements planes, in particular. Then I developed a thing for chisels. For years, I got by with a small set of BEs and a couple of mortise chisels, and in blissful ignorance, managed to make all the things I needed to make with them. As I was getting towards the end of my paid career, I decided to spoil myself with a set of shiny new Lie-Neilsen BEs whilst finances still allowed the odd indulgence. Then I acquired a couple of socket firmer Titans from my father's kit, took a real shine to them, and lost any semblance of self-control after that. I now have more chisels than I would have imagined any one person could want - I've even extended some sets by making my own in sizes that aren't otherwise available. 'Tis nice to be able to pull out just the right tool for a given job, but I know in my heart that I could probably do just as well in most cases with a few 'general purpose' chisels.
I see these articles like "The anarchist's tool-chest" and think yep, that's what I need to do; pare down to a nucleus of essentials, and concentrate on using skill rather than hoping the tools will compensate for my deficiencies. So I'll sometimes sit with a mug of coffee, and stare at the various drawers full of chisels, and try to think which ones I could live without. Unfortunately, I never get very far with that line of thought, so many of them come with a good back story, or have strong sentimental attachments, so they have to stay. And not the least consideration is the memory of how much pain & effort went into lapping ill-treated backs, fitting new handles and finding the odd 'missing' sizes. At that point, I decide to think about other things.")
So good luck with your pruning...
Cheers,IW
-
9th September 2015, 11:02 AM #6
Be inspired. Be creative. Be bold.
- Join Date
- Apr 2001
- Location
- Perth
- Posts
- 10,826
That's what I say, Ianunfortunately, I never get very far with that line of thought, so many of them come with a good back story, or have strong sentimental attachments, so they have to stay.
But still, many of the tools are not just "tools" but memories. How does one give those away?
Regards from Perth
DerekVisit www.inthewoodshop.com for tutorials on constructing handtools, handtool reviews, and my trials and tribulations with furniture builds.
-
9th September 2015, 10:00 PM #7
GOLD MEMBER
- Join Date
- Nov 2004
- Location
- Millmerran,QLD
- Age
- 73
- Posts
- 11,136
Derek
That is a wonderful job and thanks for picturing the two mitre saw alongside each other for comparison It really does highlight the monsterous size of those old mitre saws. As you probably know they weigh about twice as much as a full size handsaw of the same length.
Now I am not familiar with this "rationalisation" malarkey. In fact, I looked it up in my dictionary and the word doesn't appear, but there again there was also a page missing .
.
Regards
PaulBushmiller;
"Power tends to corrupt. Absolute power corrupts, absolutely!"
-
3rd March 2023, 12:25 PM #8
SENIOR MEMBER
- Join Date
- May 2019
- Location
- Brisbane
- Posts
- 836
Hi Derek, I came across this thread and your blog while researching the Miller Falls #15 1/2 mitre box. I am currently restoring two mitre boxes and one of them is also 15 1/2.
Reading your thread I have two questions, which hopefully you can answer:
1. How did you fix the nylon in the upper end of the blade holder? I guess you glued it. What glue did you use?
2. I am trying to understand how the depth stops work on this particular model. The metal strap has two elongated holes and is fixed with two screws. One at the top in the blade holder and one in the bottom to the guide. And then there is this extra brass pad which can be moved and fixed with a screw. How do you set them up and which screws need to be tighten and which allow the metal strap to move? I tried to find instructions or so on how to set this mitre box up. Maybe you can tell me how you set them up?
Thanks CK
-
3rd March 2023, 02:41 PM #9
 GOLD MEMBER
- Join Date
- Apr 2006
- Location
- Hobart
- Posts
- 5,130
Good Morning Derek and CK
Hope I am not hijacking the thread.
I have an old mitre box which looks almost identical to yours, Derek. It came from a great uncle who closed his pro workshop c.1970. Mine has a broken foot, and this has stymied me every time I have considered restoring it.
Derek, how do you know yours is a Millers Falls #15�. So far, I have not been able to find any branding or identifiers anywhere on mine; it is exactly 12 inches long.
CK, is yours a more recent one? Mine and Derek's would pre-date nylon by a lot of years.
Finally, does anyone have any suggestions about the broken foot?
IMG_1645.JPG
IMG_1646.JPG IMG_1647.JPG
-
3rd March 2023, 05:11 PM #10
SENIOR MEMBER
- Join Date
- May 2019
- Location
- Brisbane
- Posts
- 836
Hi Graeme,
I think you misunderstood. Derek had nylon retrofitted for better support and glides and I want to know how he did it.
On identification I went purely by feature.
Langdon #15-1/2 and 16-1/2 – A Langdon Mitre Box Reference
Looks and dimensions fit and mine has the slotted elevators, which the #16 1/2 did not have. But I might also be wrong.
This is mine

Sent from my SM-G781B using Tapatalk
-
3rd March 2023, 07:21 PM #11
GOLD MEMBER
- Join Date
- Mar 2004
- Location
- Brisbane (western suburbs)
- Age
- 77
- Posts
- 12,132
Graeme, is it the front RHS foot where a bit is broken off across the mounting screw hole? Meself, I'd do one of two things 1) just put a thick washer over the broken hole & screw it down (most likely course Originally Posted by GraemeCook
), or 2) If I were feeling really energetic, I'd build it up with braze, smooth it off, & re-drill the hole......
Cheers,IW
-
3rd March 2023, 07:25 PM #12
Be inspired. Be creative. Be bold.
- Join Date
- Apr 2001
- Location
- Perth
- Posts
- 10,826
Hi CK Originally Posted by Cklett
Incidentally, the article is on my website: http://www.inthewoodshop.com/ToolRes...oxRebuild.html
Attaching the nylon was done quite simply with two-part 15-minute epoxy. While epoxy does not stick well to nylon, there is little-to-no stress on it ... nothing pulling on it ... and the tolerances are tight enough to keep it pressed against the parts. Anyway, it has lasted 7 years so far with lightish use.
Regarding the depth stop - note that I am not in the workshop - my recall is that the large screw limits the travel and the smaller ones act as guides ...
Regards from Perth
DerekVisit www.inthewoodshop.com for tutorials on constructing handtools, handtool reviews, and my trials and tribulations with furniture builds.
-
4th March 2023, 05:07 PM #13
GOLD MEMBER
- Join Date
- Apr 2006
- Location
- Hobart
- Posts
- 5,130
I did misunderstand. Thanks. Originally Posted by Cklett
Thanks, CK. Yours is identical to mine, except that mine, like Derek's, still has the red trimmed wooden bed. That reference also mentions the length - 12 inches - which helps confirm. There is no sign of any paper labels on mine. And there is definitely zero embossed or engraved branding. This probably dates it to the late 1800's as branding didn't really become ubiquitous until the late 1800's. Any ideas, or have you done more research?... On identification I went purely by feature.
Langdon #15-1/2 and 16-1/2 � A Langdon Mitre Box Reference
Looks and dimensions fit and mine has the slotted elevators, which the #16 1/2 did not have. ...
The reference quotes it as coming from a Millers Falls 1925 catalog. I cannot imagine any major company producing an unbranded core product in 1925.
-
5th March 2023, 08:31 AM #14
GOLD MEMBER

- Join Date
- Oct 2018
- Location
- Dandenong Ranges
- Posts
- 1,893
Derek, your handles are always so crisp. Love the lines and the execution (and the timber)! Glad you don't use photobucket anymore, the watermarks obscured half the image. Good luck on your restos CK and Graeme.
-
6th March 2023, 02:53 PM #15
GOLD MEMBER
- Join Date
- Apr 2006
- Location
- Hobart
- Posts
- 5,130
Correct, Ian, the break is the right hand front foot. Originally Posted by IanW
I am definitely not a metal worker, and my first reaction is usually to consider the hippocratic oath - "First, do no harm" - and then do nothing.
I had been considering burying the foot in a fibre-reinforced epoxy pad, basically because it is withing my skill and experience range.
But you second solution is probably better. Thanks.


 Reply With Quote


Similar Threads
-
Steampunk Mitrebox
By derekcohen in forum HAND TOOLS - UNPOWEREDReplies: 9Last Post: 11th August 2013, 04:43 AM -
British Seagull adverts featuring art of RE Groves
By buzzook in forum MISC BOAT RELATED STUFFReplies: 0Last Post: 19th February 2013, 03:27 PM -
Prep for new Build - Bass Rebuild
By mannym in forum MUSICAL INSTRUMENTSReplies: 5Last Post: 8th November 2009, 07:40 AM -
Stanley mitrebox 246?
By spoinky in forum HAND TOOLS - UNPOWEREDReplies: 0Last Post: 15th November 2006, 03:52 PM -
Stanley # 60 Mitrebox
By George Radion in forum HAND TOOLS - UNPOWEREDReplies: 0Last Post: 17th October 1999, 11:51 PM
