

 Thanks:
  Likes:
  Needs Pictures:
  Picture(s) thanks:
Results 1 to 15 of 29
Thread: Planes Cupboard
-
10th December 2011, 03:52 PM #1
 When the student is ready, the Teacher will appear


- Join Date
- Jan 2006
- Location
- Telegraph Point
- Posts
- 3,036
 Planes Cupboard
I have had a couple of problems in my shed:
not enough storage space and ....
too much left over material that might be useful one day that was taking up space.
I decided to see what I could make with the leftovers.
Here is the result - a home for the woodies -
......... and the whole story of the bubble and squeak cupboard can be seen on my blog:
The Village Woodworker: Bubble and Squeak
Cheers
SG.... some old things are lovely
Warm still with the life of forgotten men who made them ........................D.H. Lawrence
https://thevillagewoodworker.blogspot.com/
-
10th December 2011 03:52 PM # ADSGoogle Adsense Advertisement
- Join Date
- Always
- Location
- Advertising world
- Posts
- Many
-
10th December 2011, 05:31 PM #2
SENIOR MEMBER
- Join Date
- Jan 2008
- Location
- NSW southern Highlands
- Posts
- 548
SG
Like the story, & it brings back similar nice memories of my mum stretching the Sunday roast through the rest of the week.
I recall a cooking show ' Two fat ladies ' ? where they cooked Bubble and Squeak with cabbage & bacon which they claimed was the original recipe and the name came from the noise it made whilst cooking.
That looks like a nice collection of planes you have.
regards
-
10th December 2011, 05:57 PM #3
 GOLD MEMBER
- Join Date
- Mar 2004
- Location
- Brisbane (western suburbs)
- Age
- 77
- Posts
- 12,124
Looks nice & ship-shape, SG. I would need some doors on it for my shed, though, or there'd be a lot of rusty irons, plus everything in the cupboard would soon be covered by dust. No matter how careful I am with dust control, anything that isn't used often, ends up with a good coating....
Cheers,IW
-
10th December 2011, 06:38 PM #4
GOLD MEMBER
- Join Date
- Jun 2007
- Location
- North Of The Boarder
- Age
- 68
- Posts
- 16,794

See what getting out of the Hammock can get you
-
10th December 2011, 07:15 PM #5
Peter McBride
- Join Date
- Nov 2007
- Location
- Melbourne
- Posts
- 1,139
Ian, Originally Posted by IanW

can't beat the protective dust coating my planes get...also in an open front shelves.
Nice work SG!!
Regards,
Peter
-
10th December 2011, 11:32 PM #6
 Fossil Member
- Join Date
- Jan 2005
- Location
- Perth
- Posts
- 1,181
Hi SG,
Nice work, nice assembly of woodies too. You could have just sent them all to me and saved you the effort of making that cabinet you know. Could have had all that itme in your hammock. Got to get me one of those, and a pool, and a view.
I hope all the blades in the woodies are sharp and ready to go, else you have a big job there.
Cheers
Pops
-
11th December 2011, 08:54 AM #7
When the student is ready, the Teacher will appear
- Join Date
- Jan 2006
- Location
- Telegraph Point
- Posts
- 3,036
Thanks everyone for the kind words.
I have spent most of my working life putting together the tools that I have, and it has been a fun journey.
The woodies I have were acquired - usually one at a time, but sometimes a pair. When I got them I cleaned and then sharpened the blade, and have kept them sharp as I have used them. (Except for a few - whose blade profile I considered beyond my level of expertise to sharpen at the time - and these were put aside.)
I am hoping to encounter an old(er) woodie who will show me what to do with these. Some I have used quite a bit, some a little and some I have never used, but maybe one day I will.
There are a couple of fellas in The Woodworkers Guild who would know - it is just a matter of having the plane and them in the same room at the same time.
I very recently retired, and am bringing my shed to order as well as getting on with all those other plans/jobs/activities - planned and unplanned - that life presents.
One of the reasons for starting my blog, was to share the fun and give me a chance to meditate upon it.
I am enjoying this immensely.
Cheers
SG
.... some old things are lovely
Warm still with the life of forgotten men who made them ........................D.H. Lawrence
https://thevillagewoodworker.blogspot.com/
-
11th December 2011, 10:19 AM #8
Senior Member
- Join Date
- Oct 2007
- Location
- Naples - Italy
- Age
- 57
- Posts
- 127
-
11th December 2011, 01:51 PM #9
GOLD MEMBER
- Join Date
- Aug 2009
- Location
- Armadale Perth WA
- Age
- 55
- Posts
- 4,524
disston
Hi SG.
I read in your blog about your Disston handsaw (panel saw?) and wondered if you or anyone else could tell me anything about a saw I bought recently.
It was only $10 and I bought it because of the handle - just to have one of these saws that The Great Schwarz has talked about using in the reversed-saw-sitting-down position.
I had it (the rusty parts) soaking in WD40 for a few days and then I thought I could try the rear section on some 100x100 jarrah I needed to tenon. OMG
I have never had a ripsaw that cut like this one before ... and I just wanted to keep using it. The handle feels so perfect I don't want to put it down ... so ... if anyone knows more about this model or type of saw I would love to know more about it.
Thank you very much,
Paul McGee
-
11th December 2011, 02:10 PM #10
When the student is ready, the Teacher will appear
- Join Date
- Jan 2006
- Location
- Telegraph Point
- Posts
- 3,036
Hi Paul,
that looks like a Disston D8.
The Disstonian Institute says this about the D8:
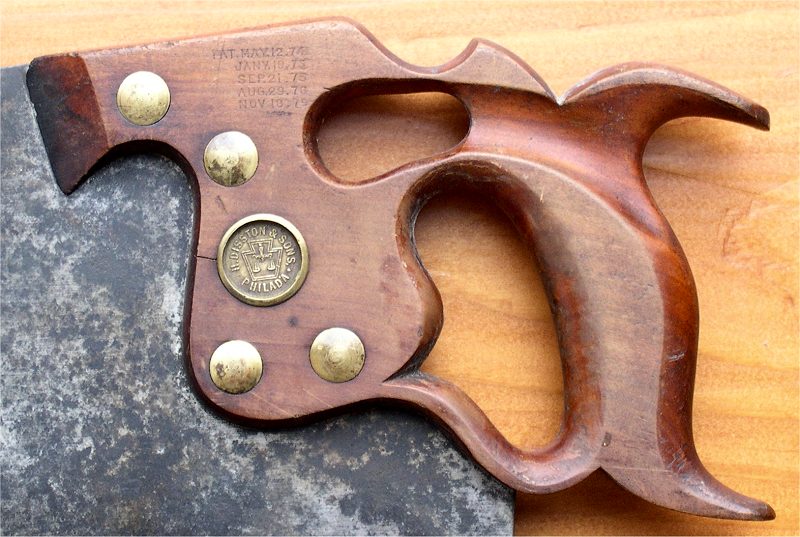 The most obvious feature of some D-8's is the extra hole in the handle. Offered on 26" and longer ripsaws from the about 1880 until about 1950, the Dual-Grip or thumbhole-handled saw was designed for those laborious rip cuts. The handle is gripped normally with the lead hand and the thumb of the second hand is put through the thumbhole. The fingers of the hand are then wrapped across the top of the saw handle. The thumbhole handle was also offered on 28" and 30" crosscut saws for a time, although its usefulness on a crosscut is questionable. When crosscutting wood with the saw, your other hand normally would hold the board. The hole for your lead hand is smaller than normal saws, making it necessary to hold the saw with three fingers in the hand hole. This was considered the proper method to grip a handsaw at the time. If you are left handed, the handle was not designed with you in mind, as it is not symmetrical. That said, it's an interesting design, and every collector seems to have one. Similar handles were put on D-100 and No. 120 "Acme" saws as well.
You can find much more info on Disston D8 Saws here:
Online Reference of Disston Saws -- D8 Model
And the full Disston lineup here:
Disstonian Institute.com -- Online Reference of Disston Saws
Lovely saws aren't they.
Lucky you to find one in such good nick.
Well done.
Cheers
SG
PS You can usually date the saw by looking at the medallion.
This page will help:
http://www.disstonianinstitute.com/medezguide.html.... some old things are lovely
Warm still with the life of forgotten men who made them ........................D.H. Lawrence
https://thevillagewoodworker.blogspot.com/
-
11th December 2011, 02:27 PM #11
GOLD MEMBER
- Join Date
- Aug 2009
- Location
- Armadale Perth WA
- Age
- 55
- Posts
- 4,524
Thank you so much for the info. I'm just loving this saw.
I need to follow up IanW about getting some good saw files and learning to sharpen.
I really like your photo progress and write-ups on the blog and forum.
Have a great day,
Paul
-
11th December 2011, 02:29 PM #12
When the student is ready, the Teacher will appear
- Join Date
- Jan 2006
- Location
- Telegraph Point
- Posts
- 3,036
Thanks Paul, no worries.
Your saw is pre-1917.
Not too shabby for a saw going on a century is it!
Cheers
SG.... some old things are lovely
Warm still with the life of forgotten men who made them ........................D.H. Lawrence
https://thevillagewoodworker.blogspot.com/
-
11th December 2011, 02:41 PM #13
GOLD MEMBER
- Join Date
- Aug 2009
- Location
- Armadale Perth WA
- Age
- 55
- Posts
- 4,524
From your link about the medallions ... (assuming it's original to the saw)
"1896-1917" .... I'm shocked ...
To think that there's a possibility that this saw is in workable shape 100 years after it was made says something about the original quality, and that one or more people have looked after it through the years.
I don't know why I might find it more striking in this saw than in say an infill hand-plane or a block plane or a #2. It shouldn't, but that's the way it has occurred to me today.
Cheers,
Paul.
-
11th December 2011, 02:42 PM #14
GOLD MEMBER
- Join Date
- Aug 2009
- Location
- Armadale Perth WA
- Age
- 55
- Posts
- 4,524
Hah - just read your post
-
11th December 2011, 07:15 PM #15
GOLD MEMBER
- Join Date
- Mar 2004
- Location
- Brisbane (western suburbs)
- Age
- 77
- Posts
- 12,124
Hi Paul - you won't have much trouble finding a file to sharpen that baby. It looks like about 5 tpi, so any 6 inch file should fit well enough to do the job. Originally Posted by pmcgee
You will need to give it a good jointing, once it's cleaned up, then re-form the teeth, by carefully filing until the flats formed by jointing become points again. The re-forming step can be done from one side. Take it slowly & give each gullet two or three strokes, as you bring them all down to depth - don't try to file one tooth at a time to depth, or you'll end up with something that looks like the mouth of a very ancient horse. Be careful to apply even pressure to both front and back of each tooth, to maintain the rake angle. It's easy to push harder on one side of the file or the other, so you have to concentrate at first, but you'll soon get the hang of it. (I'm stressing these points because they were things I had to learn the hard way. )
)
If you want to get it straight from the master, take a look at this thread.
https://www.woodworkforums.com/f127/n...oration-57366/
Don't be discouraged by the apparent complexity - even a poorly-sharpened saw will stilll cut reasonably well, and after a few attempts, you will figure out the more important bits to pay attention to...
It's a nice saw, with plenty of metal, so go at it!
Cheers,IW


 Reply With Quote


Similar Threads
-
The DVD Cupboard
By HazzaB in forum WOODWORK - GENERALReplies: 8Last Post: 24th November 2009, 08:07 PM -
The Cupboard Where Everything IS
By Gumby in forum WOODWORK - GENERALReplies: 25Last Post: 4th September 2005, 11:48 PM -
Painted MDF Cupboard
By Darryl in forum FINISHINGReplies: 3Last Post: 27th March 2002, 09:59 PM
