

 Thanks:
  Likes:
  Needs Pictures: 0
 Picture(s) thanks:
Results 1 to 9 of 9
Thread: Planes for flattening table tops
-
30th October 2016, 12:13 PM #1
 Woodworking mechanic


- Join Date
- Jan 2014
- Location
- Sydney Upper North Shore
- Posts
- 4,470
 Planes for flattening table tops
I was reading an article re flattening table tops using hand planes. The process described was:
1) plane across the grain using a jack plane eg. Stanley No. 5
2) plane diagonally one way then the other with a jointer plane eg. Stanley No. 7
3) finish off - plane along the grain with a smoother eg. Stanley No. 4
Having never attempted flattening a large surface, is this article on the money or could the process be improved?
I have at my disposal a #4, #4 1/2, and #5 Stanley.
Cheers - Peter
-
30th October 2016 12:13 PM # ADSGoogle Adsense Advertisement
- Join Date
- Always
- Location
- Advertising world
- Posts
- Many
-
30th October 2016, 01:45 PM #2
Be inspired. Be creative. Be bold.
- Join Date
- Apr 2001
- Location
- Perth
- Posts
- 10,823
In theory, yes. In practice, no.
The art of getting a table top flat is to remove the bits that are not flat. What's left is flat.
Make yourself a set of winding sticks. Google for these if you are unsure. There must be videos around. These are to ensure that the top is not twisted. The sticks may also be used to determine high spots.
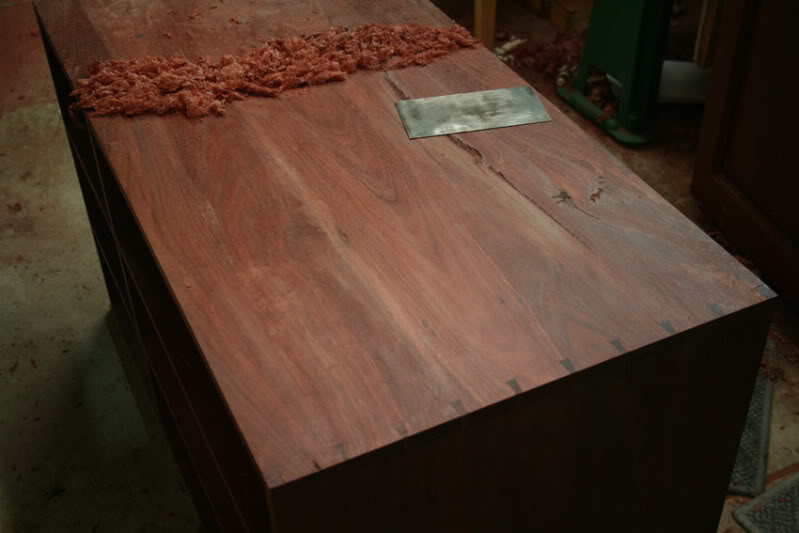
This is the top of a chest being checked ...

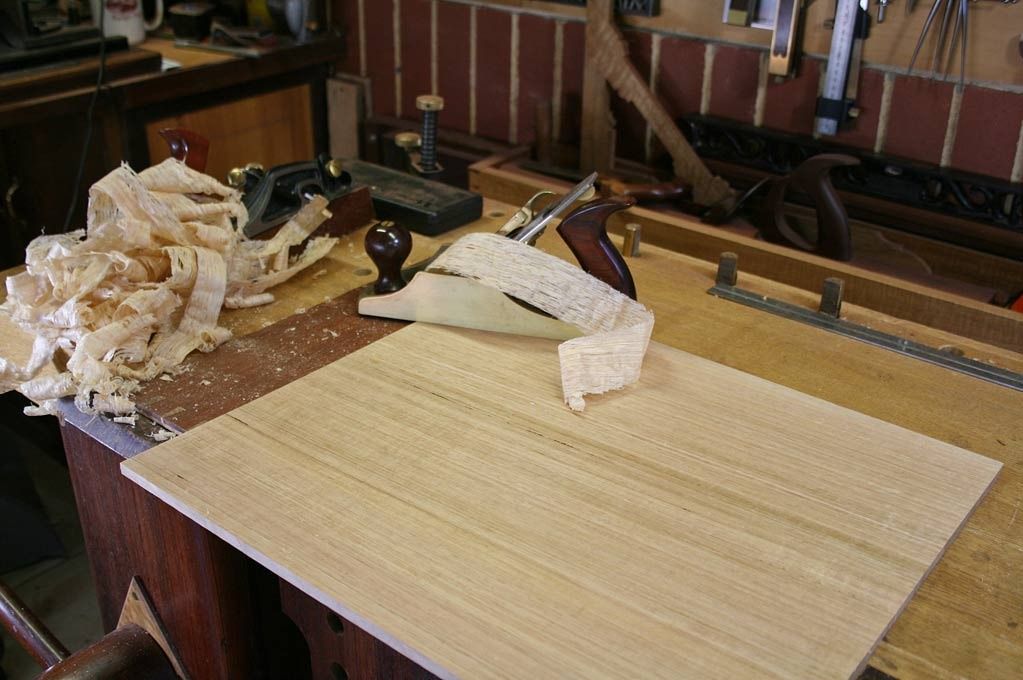
Use the jack plane to remove the high spots. For this I will either use a slight camber if the highs are mild, or a 12" radius camber if they are moderate. If severe (unlikely), use a 9" radius.
In the picture you may notice the pencil scribbling over the surface of the board. That is to let me know that I have planed all. Alternately, if you do this and traverse the board (plane across the width), you will see where the depressions lie. Don't just start planing with a jack on the diagonal - you may simply maintain twist.

Assuming now that you have removed the twist and traversed the board, bring out the jointer and plane along its length ...

After this you can use the smoother.
About smoothers: for a tabletop, I would use a very mild camber and take thin shavings. A wider smoother (#4 1/2) works better for this as the aim is to keep the surface free of scallops. I would not use the #5 1/2 as it want to take off more of the thickness. The #4 1/2 has a shorter sole.
If you need, go over the surface with a card scraper.
Regards from Perth
Derek
Visit www.inthewoodshop.com for tutorials on constructing handtools, handtool reviews, and my trials and tribulations with furniture builds.
-
30th October 2016, 03:36 PM #3
GOLD MEMBER
- Join Date
- Nov 2012
- Location
- SE Melb
- Age
- 64
- Posts
- 1,278
I haven't done any large table tops myself but have done a few tables upto 500mm wide.
A pair of winding sticks is defintely a must. I made mine out of tassie oak floor boards, My sticks are fairly short because I take them out of my shed sometimes, but it would be better for them to be longer than the width of your table top. In my case, If I make another pair, I'd make them to be 650mm long just to get the magnification of the twist/cup in the board.
If when I sight down the winding sticks and detect twists in my boards. I put some spacers (cut up aluminum cans are quite good) underneath under one end of the stick so that the sticks are level with each other. The thickness of the spacers together is the amount I need to trim off at the opposite corner. I also like to place 1 stick at the top end of board (furthest from me) and 1 stick at the bottom end first, followed by moving the bottom end stick to mid way up the board to see how the twist progresses along the length. Then I mark along the edges of board with straight lines all around so that I know how much I have trim off and where.
The straight lines tells me how much to trim to cater for cupping across grain, twist and bow. I then start on the area that I need to trim off the most. I find that I use the 4 the most initially, but I hardly ever go horizontally across grain. I first plane diagonally to take care of some of the twist, then along the grain to take care of the cupping and some of bow. I found that by checking my lines along the edges, I can tell how much I need to remove and from where without having take the board out of vice and check the level with the winding sticks until I'm fairly close.
I then move to a wider plane, like a #7 or a #8 for long board and #6 for shorter boards. I guess the 5 and 4/12 together would do if that's all you've got. (4 1/2 is better for taking care of the cupping and 5 for bowing) After it's level, I smooth it off with another #4.
The following videos is pretty good too but is slightly different to what I do.
-
30th October 2016, 06:03 PM #4
Woodworking mechanic
- Join Date
- Jan 2014
- Location
- Sydney Upper North Shore
- Posts
- 4,470
Thanks guys for the advice, pictures and links. I've used winding sticks on chassis.
I've been raving about a picture I saw of a small table with contrasting timbers using Maloof joints. The contrast between the legs and top as seen with the joint is stunning. I've now been asked to make a footstool come small side table similar to the picture (me and my big mouth).
As the top will be joined timbers, and I don't have a jointer or thicknesser, the advice on planing flat is appreciated.
Looks like I need to buy a #7
-
31st October 2016, 03:30 PM #5
GOLD MEMBER
- Join Date
- Feb 2003
- Location
- back in Alberta for a while
- Age
- 68
- Posts
- 12,006
or a #6. Originally Posted by Lappa

Derek has provided some good advice above.
Personally I find the #4 and #4-1/2 a little too short to use as a scrub plane. However, depending on the width and length of the top, you should be able to flatten and thickness it with your #5. You just need to be aware of where you need to remove material.
Remembering that the #4 and #5 use the same width blade, I'd set one with a pronounced camber to use for travesing and the other for smoothing.
Remember to open and close the plane's mouth depending on the size of the shaving you're trying to pass.regards from Alberta, Canada
ian
-
31st October 2016, 09:46 PM #6
Deceased
- Join Date
- May 2008
- Location
- Australia
- Posts
- 2,357
Ian; would you like to explain to the OP how he is going to open and close the mouth opening when the bench planes he has on hand are all Stanley bench planes.Remember to open and close the plane's mouth depending on the size of the shaving you're trying to pass.
Stewie;
-
31st October 2016, 10:33 PM #7
GOLD MEMBER
- Join Date
- Jun 2008
- Location
- Victoria, Australia
- Age
- 74
- Posts
- 6,132
Move the frog? Originally Posted by planemaker
-
1st November 2016, 12:32 AM #8
 GOLD MEMBER
- Join Date
- Mar 2010
- Location
- US
- Posts
- 3,121
If you haven't learned to set the cap iron before you start flattening something large like this, now is a good time. It'll save you a lot of labor on a large surface.
Your biggest problem will be (or should be) back trouble from having to reach the middle of something large. If it's not comfortable to plane it across its width or when smooth planing the final surface, don't be afraid to get on it (physically) to do your work.
Double emphasis on the cap iron, as derek says, the first order of business is removing the high spots. you don't want to chunk a bunch of wood out due to deep tearout and leave yourself a whole lot more work than you want.
On work like this, I don't use winding sticks, I use a single straight edge and eyes.
As a general rule, I'd avoid content produced by the channel "wood and shop" on youtube, unless it involves another maker (sometimes he has a plane maker from the woodwright's shop on his channel, etc). I haven't seen him do anything other than just repeat advice he's seen elsewhere and most of the advice is too generalized to be useful (you could read the same thing elsewhere). I also tend to think things like working a white pine or poplar board over a 20+ minute period isn't productive for people to watch - it's not accurate in terms of actual work for several reasons (it's presented too paint by number, too much wasted work, and it's done on wood you're not likely to be working on - pointless to watch when the next thing you pick up is a white oak slab that isn't perfectly sawn).
-
1st November 2016, 01:59 AM #9
GOLD MEMBER
- Join Date
- Feb 2003
- Location
- back in Alberta for a while
- Age
- 68
- Posts
- 12,006
Originally Posted by RayG

The OP needs to remove the blade to get at the hold down screws.
That is unless he has a bedrock version where the adjustment can be made from the back of the frog.
Edit:
Oh, in my earlier post where I referred to the blades in the #4 and #5 being teh same width and to set one up with a much deeper camber than the other, I should clarify that when flattening a top, both blades will be used in the #5, one to do the travessing, the other to do the jointing and smoothing.regards from Alberta, Canada
ian

 Reply With Quote


Similar Threads
-
Rout table tops
By rgum in forum ROUTING FORUMReplies: 0Last Post: 15th April 2007, 04:58 PM -
Flattening Jointer table
By Squirrel in forum HAND TOOLS - POWEREDReplies: 5Last Post: 16th November 2006, 10:05 AM -
Hand Planes and Flattening Boards
By Slavo in forum HAND TOOLS - UNPOWEREDReplies: 8Last Post: 2nd July 2004, 01:26 PM -
Fixing Table tops to Table Base
By Warrigal in forum WOODWORK - GENERALReplies: 6Last Post: 29th January 2002, 12:29 PM
