

 Thanks:
  Likes:
  Needs Pictures:
  Picture(s) thanks:
Results 1 to 15 of 77
-
17th November 2007, 10:22 AM #1
 Neander Normite


- Join Date
- Jan 2005
- Location
- Melbourne
- Age
- 65
- Posts
- 11,997
 Plow Planes: Tapered blades, discussion.
This thread has been created from pieces of a discussion on Derek Cohen's review of the Veritas Plow Plane. The thread turned into a discussion of the merits of using a blade with a taper, which applies to ALL plow planes, and deserved a thread of its own - which is why this thread has been created. This thread picks up from post #18 in the other thread.
This thread should focus on comments or observations of the effectiveness of tapered blades in plow planes generally.Last edited by Groggy; 1st December 2007 at 12:39 PM.
-
17th November 2007 10:22 AM # ADSGoogle Adsense Advertisement
- Join Date
- Always
- Location
- Advertising world
- Age
- 2010
- Posts
- Many
-
25th November 2007, 09:18 PM #2
Banned
- Join Date
- Apr 2005
- Location
- kyogle N.S.W
- Age
- 50
- Posts
- 4,844
Don't want to be just a critizing bugger. But there's a bit of a lean too there I think you should address. The bottom of each groove indicates the planes dropping in off square. the blades sides are scraping off the sides of the groove.
Consider, either the fence face being out of square of the skate.......or your style.
And all that tear in there on those bottom grooves. don't want that.
Flared blades ! (oh god he brings it up again)....more compensating for side to side wobble. Which is great because where not robots.
What ever it is you should get far cleaner cuts than that. somethings wrong. Constructive crit a sizum
oh, uno what else is probably contributing....your fence face probably doesn't extend up high enough towards the rods. ie. as plane drops into the cut, the fence face drops, and you get less bearing off that thin edge, and she starts to rock more. Stability changes.
I've noticed that plenty. Thats the reason why fences should be height adjustable too so you have full fence support from start to finish. I did that with my 55 and 45's. You could probably do the same with that woodern face. Ideally that might mean you should tap a thread in the holes of that brand new fence, to take bolts that slides in slots that you rout into the woodern face.
But you probably won't do that. Anyway goodluck.
-
26th November 2007, 02:45 AM #3
Be inspired. Be creative. Be bold.
- Join Date
- Apr 2001
- Location
- Perth
- Posts
- 10,831
JakeBut there's a bit of a lean too there I think you should address. The bottom of each groove indicates the planes dropping in off square.
It is called the "error of parallax". The grooves are perfectly square but, from the angle you see the picture, they just look skewed.
Out of curiosity I went to the workshop and found the pieces I had planed. I had cut them off the board and tossed them, hence the small piece in my hand. But you can see it is the same piece from the end grain pattern.
Here is a picture with a square alongside the groove.
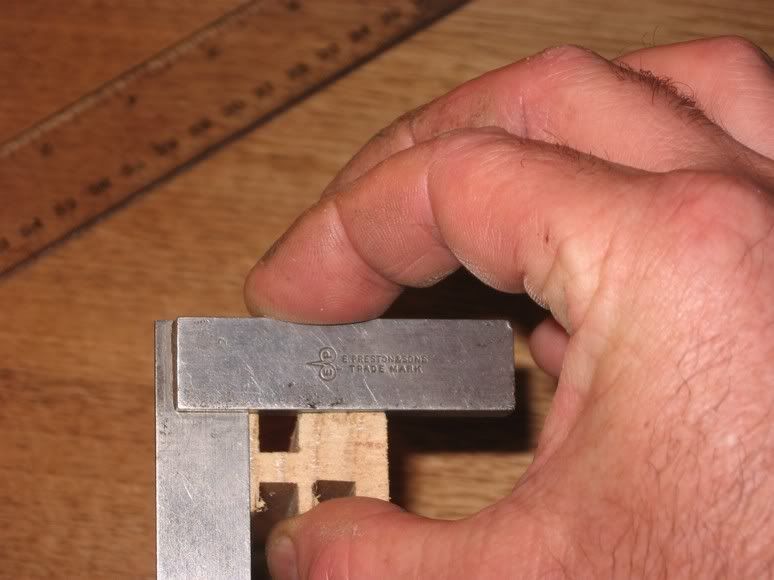
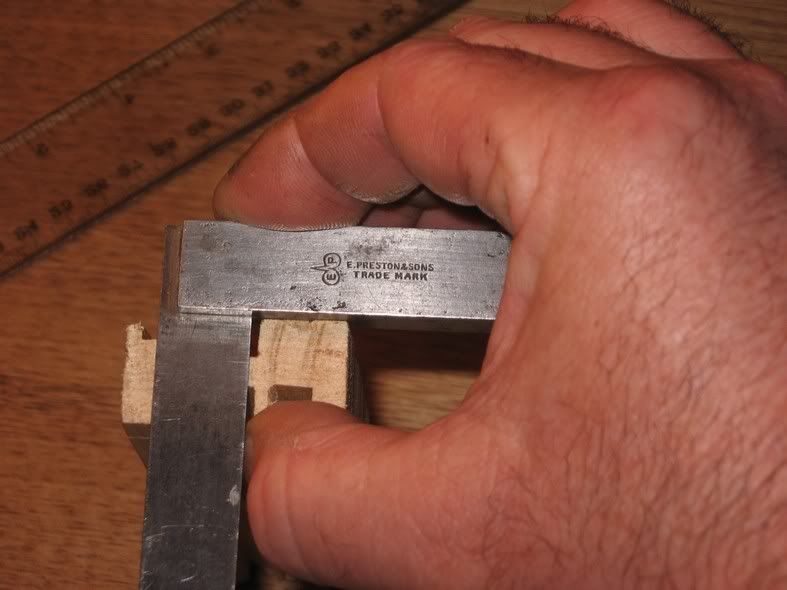
The only "error" that may give the impression of skewness is a little breakout at the start of the groove in the last picture.
Actually it is interesting since you can now see that all the other grooves I planed by eye are also square.
There is no tearout Jake. There may be a tad of chatter. Blade is getting a little dull I should imagine. It has cut a lot of grooves without once being re-honed.And all that tear in there on those bottom grooves. don't want that.
I'm sure whatever else you believe is wrong can be put down to my inadequate technique.
Regards from Perth
DerekVisit www.inthewoodshop.com for tutorials on constructing handtools, handtool reviews, and my trials and tribulations with furniture builds.
-
26th November 2007, 02:49 AM #4
GOLD MEMBER
- Join Date
- Sep 2002
- Location
- Paignton. Devon. U.K.
- Posts
- 6,062
David your finger prints have just been logged by Interpol.
") woody U.K.
woody U.K.
"Common looking people are the best in the world: that is the reason the Lord makes so many of them." ~ Abraham Lincoln
-
26th November 2007, 04:31 AM #5
Senior Member
- Join Date
- May 2005
- Location
- Forest Grove, Oregon USA
- Posts
- 496
Let me preface this with the statement that the finish of the bottom of the groove in Derek's photos is fine. In fact, in the typical groove or rebate, tear-out is a who cares. So too slightly angled shoulders usually present no issue if they happen.
That bit of chatter could be induced or exacarbated by non-relieved and/or non-tapered cutters as well. That it could be an issue of the iron scraping the sides of the cut is a possibility.
Take care, Mike
-
26th November 2007, 06:27 AM #6
SENIOR MEMBER
- Join Date
- Jan 2004
- Posts
- 686
Hi All,
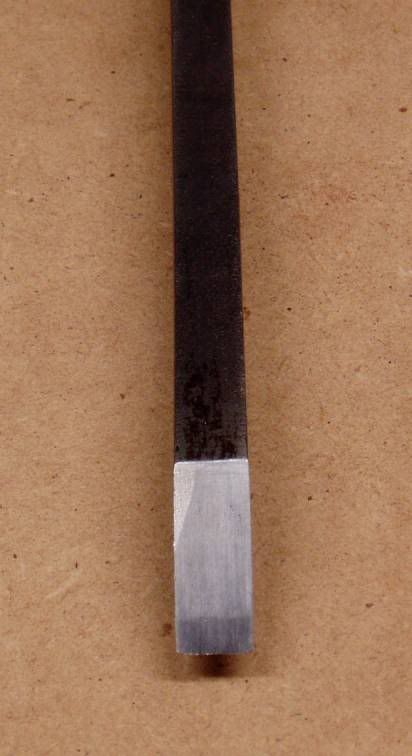
The tapering of the iron is in cross-section that is being talked about, not a taper along the length. The width of the plane iron remains unchanged along its length. (ie: if it's half an inch at the cutting edge, it's half an inch wide at the top of the plane iron.)
The widest part of the plane iron is the cutting side - the other side that sits on the plane bed is a smidgeon narrower. Ie: If you cut the plane blade in half across it's width, you'd be looking at a trapezium-type shape.
Cheers,
eddie
-
26th November 2007, 07:16 AM #7
Banned
- Join Date
- Apr 2005
- Location
- kyogle N.S.W
- Age
- 50
- Posts
- 4,844
ok. Sorry. So your happy with the top one. Your happy with all them ? Parallex error on all ?

How about the 3 along the bottom.
And the tear....whats that in the second picture then. Shouldn't be getting any of that. Tear means something wrong. Sure it may seem ok because its all being hidden. But if its not cutting as it should and tearing instead, then that means the planes out of wack.
Look I know whats going on with normal planes. Too many hours put into fiddling with them. Their a tight blade trying to drop into a groove with no room to move. Its going to leave marks. Its going to be harder to push than the tapered blade I've been talking about.
If I was getting results like that, and there was no way for improvement, I'd ditch the plane and buy a small trimmer for $80. Plug it in and with its little fence and a straight bit run it along. far better results than that.
Its not your skill level Derek at pushing the planes thats really at question. Its the tool design. It hasn't been designed as best it could be. Like all ploughs.
If your happy with the results I think thats great. But please at least replace that fence face so it extends up at least 10 mill towards the rods if your going to use it on thin edges only.
-
28th November 2007, 11:04 AM #8
Banned
- Join Date
- Apr 2005
- Location
- kyogle N.S.W
- Age
- 50
- Posts
- 4,844
Not interested in a contructive conversation unless you've got the upper hand
come on. I've got to point out negitives to make an improvement. And there's much improvement to be made here. Don't you want to improve it ?
I know its not all parallex error. I know how traditional ploughs drop when running off thin edges.
The improvements I mention will make a huge difference to your results. In the time it'll take you to make one 'so so' groove, you'll have say 1/2 a dozern grooves completed of the quality and consistancy you'll find in powered routers. And it has little to do with co-ordination or strength. The skill is in the setup of the tool.
I know this is your thread so...is this really one of those 'teacher doesn't like to be taught' things. I'd imagine you really don't want everyone to just nod their heads and tell you how brilliant it is?
-
28th November 2007, 12:31 PM #9
Be inspired. Be creative. Be bold.
- Join Date
- Apr 2001
- Location
- Perth
- Posts
- 10,831
Hi Jake
I am all for discussion. That is why I post to and participate in the forums. I am here to learn as much as the next guy. So I am very open to anything you have to say or demonstrate - as long as the motive to do so is in the spirit of this. I will apologise loudly for all to hear if I am barking up the wrong tree, but your posts in this thread have had a strong underlying tone of pushing your own wheelbarrow - that is, proving that your tapered blades are superior to any other offerings (and not just the Veritas here). That is why I stopped responding. It stopped being about the Veritas plough. However, if you can turn this into an objective analysis, then I am there with you all the way. Show me what you mean, how it could work differently.
I would also be interested in seeing a plan and cross section drawing of your tapered blades because my mental image is that you have them tapering vertically. There would be much more benefit if blades tapered horizontally - that is the criticism of the Veritas plow blades, that is, that the cross section is square and that this causes binding.
Regards from Perth
DerekVisit www.inthewoodshop.com for tutorials on constructing handtools, handtool reviews, and my trials and tribulations with furniture builds.
-
28th November 2007, 01:09 PM #10
Banned
- Join Date
- Apr 2005
- Location
- kyogle N.S.W
- Age
- 50
- Posts
- 4,844
Well I have to push it alone, because nobody else seems to have tried it. And whenever I bring it up, its dismissed. I mean, how can people dismiss with a tone of wisdom something that they haven't even tried. Originally Posted by derekcohen

 Its just rediculous don't you think ?
Well, I suppose this is part of the problem. I've described it before. So much so I'm beginning to feel uncomfortable bringing it up. I've provided links aplenty all over the joint in response to your posts....uno, talking to you. Silence is what I normally get.that is, proving that your tapered blades are superior to any other offerings (and not just the Veritas here). That is why I stopped responding. It stopped being about the Veritas plough. However, if you can turn this into an objective analysis, then I am there with you all the way. Show me what you mean, how it could work differently.
Are you switching off as soon as you read something that opposes your point of view ? Its hard not to think that because I've got a strong point, you don't want to hear it (you don't want me to bother voicing weak points of view do you ? ). Or because it opposes a tool that your quite fond of. Or because of loyality or whatever. Which is understandable stuff too. I don't know.
You will not find a more objective bloke than myself. If I'm wrong, then I will say as much as soon as I realise. But you gota proove to me that I'm wrong. You don't want me to be just an agreeable person do you? Just say yes all the time even though the truth says the opposite.
****
Ok, less words. firstly. Am I right about those grooves above ? The bottoms arn't parallel to the top surface ? right ? There nowhere near as good as a groove from a powered router ? Here's a new start to an objective conversation.
-
28th November 2007, 04:21 PM #11
Be inspired. Be creative. Be bold.
- Join Date
- Apr 2001
- Location
- Perth
- Posts
- 10,831
Hi Jake
OK, I have a few minutes free during lunch. Unfortunately I am at the office and not in my workshop, so no direct access to tools or the sample I photographed. Instead I have a question for you (and an observation as well).
I am certainly prepared to make a plough blade like yours, but I need to know what it really looks like. A picture tells a thousand words.
Here are two options. Which is yours?
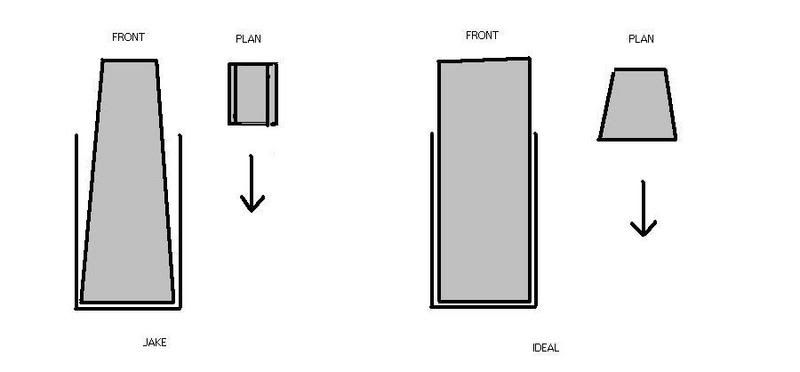
My perception is yours is like the one on the left, designed along the lines of a butterfly chisel (increasing taper). The reason I have not been enthused is that this design would reduce the width of the cutting edge over time (as it is honed). Of course I may have misunderstood you.
Butterfly chisel ...
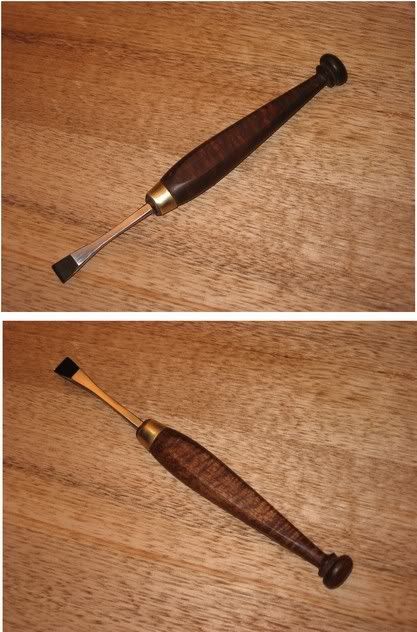
The other design is what this recent addition to the thread is all about. Here the blade tapers front to back, like a mortice chisel. Or should I say like some morticer chisels. There is debate here. The ones I use (vintage English oval bolstered types) taper this way. On the other hand, the ones made by Lie Nielsen are parallel sides, as per the Veritas plough blades.
LN mortice chisels with parallel sides ...

Tapering mortice blade ...
Of course, both these designs work.
Regards from Perth
DerekVisit www.inthewoodshop.com for tutorials on constructing handtools, handtool reviews, and my trials and tribulations with furniture builds.
-
28th November 2007, 08:37 PM #12
Banned
- Join Date
- Apr 2005
- Location
- kyogle N.S.W
- Age
- 50
- Posts
- 4,844
yes....I am talking about the diagram of the blade you have my name under. Increasing taper as you put it.
And I understand your concerns about the width changing over time. But its not really an issue. I've tried to tell you why already. You wrote about this concern earlier in this very thread. And in post #14 (back there on page 1), I quoted what you said, and then gave my answer....here it is in bold (I thought I was being constructive then, breaking up qoutes like this with answers.. But maybe thats not constructive enough)
(my answer)That is a clever idea. Clearly it works. My reservation (based on what I see in the pictures you post) is that the blade is altered along its length, and that this will effect the blade's width as you sharpen it.
I know what your saying. But we're talking fractions of a mill here, that are way too gradual to be noticed.. The reductions of width due to sharpening won't affect your joinery. Mating pieces are made to fit the current groove.
The benifit of flaring blades is often the difference between a plane working or not. Being a pleasure to use or not. Easier to push the plane. Make cleaner faster cuts with a flared blade. Don't get as much tear in those trenches of yours there either. Some of that surface tear is due to the side of the side of the blade (or skate) rubbing off the side of the trench. Flared blades solve that.
The only time I must make a groove consistant is when I'm fitting to it something I can't modify. Like glass or acrylic. I have blades for them I don't flare. The cuts not as nice, but I like a nice fit.
Its been that way for a couple of years now of frequent use. Its not an issue I can assure you. The advantages far outweigh this.
The taper need only be slight.
******
Essentially, the concept will free up the plane and make it easy to use. The diagram of the blade you labelled as ideal is actually the opposite due to us being human. Its troublesome, because we don't push the plane straight and perfectly vertical. And to try to, slows the whole process down incredibly. (yet another reason why people love powered routers)
In reality you roll a bit here in there. If you do that with a straight shanked blade you can imagine what happens.......things like
- resistance from the blade rubbing off the shoulder your cutting
- bruised shoulders
- off square cuts.
And if the plane is not setup spot on to do deal with these tolerances we expect of it, combined with us not pushing it like a robot, it will pack it in........ie. jam up....feel hard to push etc. End up on a shelf for the rest of its life. Which I imagine is the fate of many plough planes you find on ebay.
Here... The concept works so well with all ploughs I wrote a thread on it once.
http://www.sawmillcreek.org/showthread.php?t=50413
My techniques have changed a touch in places, but the concept of tapered blades is still the same.....I describe it near the beginning and near the end I think if memory serves.
You really must try it yourself at least once. Just grind up a spare blade.
If you set it up right you'll love it. It will feel like the planes suddenly on roller skates. You'll have more control and therefore cleaner cuts and have it done in a flash. It will make that veritas plough of yours sing.
-
28th November 2007, 09:12 PM #13
Neander Normite
- Join Date
- Jan 2005
- Location
- Melbourne
- Age
- 65
- Posts
- 11,997
Could you alleviate concerns about the 'blade wear' issue by starting the taper, say, 2 to 3mm back from the tip?
-
28th November 2007, 09:19 PM #14
Be inspired. Be creative. Be bold.
- Join Date
- Apr 2001
- Location
- Perth
- Posts
- 10,831
Jake
What I will do - if I can find three similar blades (I don't think that I have any spare at this time. I'll have to get them off eBay first, so it will take a few weeks) - is grind them into the two tapers above and one parallel sides, then compare them for ease of use and cleanness of cut.
What do you think?
Regards from Perth
DerekVisit www.inthewoodshop.com for tutorials on constructing handtools, handtool reviews, and my trials and tribulations with furniture builds.
-
29th November 2007, 01:14 AM #15
Senior Member
- Join Date
- May 2005
- Location
- Forest Grove, Oregon USA
- Posts
- 496
Me thinks--not that anyone asked--it is an exercise in futility when time and money could be better spent. But it's not my time nor money.
While I am on record writing that trapazoidal cross-sectioned plow blades provide a bit more ease to push, they are no easier to keep square than, well, square blades.
I have some plow blades which have both an ever so slightly tapered width and trapazoidal cross-section--and other blades from the same set that are trapazoidal but not tapered in width. Cannot say there is a difference in effort to push either of them on the same plane. And still no guarantee they will plow a square-sided groove (i.e., no easier to keep square).
I own a shaper, a WoodRat and still own 3 routers (the Festool 2000 being in the 'Rat). With any of them, there is also no guarantee they will produce an absolutely even width, even depth, perfectly square to the surface groove. Nor for most processes does a groove need to have such perfection, by hand nor by powered means.
And heck, if it were all about such accuracy, I wouldn't make moldings by hand as I can get better accuracy using the power feed on the shaper using custom cutters. While more accurate, there is still "error" or inconsitancy. Big whooping deal.
Have fun, take care. Mike


Similar Threads
-
Homemade Plane Blades from M2 HSS for Wooden Planes
By thumbsucker in forum HAND TOOLS - UNPOWEREDReplies: 351Last Post: 27th July 2009, 04:52 PM -
D2 Plane Blades - Batch Order 02
By thumbsucker in forum HAND TOOLS - UNPOWEREDReplies: 259Last Post: 16th November 2008, 08:34 PM -
removing stuck blades from old planes
By bannock in forum JAPANESE HAND TOOLSReplies: 13Last Post: 31st January 2008, 04:29 PM -
The Veritas Small Plow Plane
By derekcohen in forum HAND TOOLS - UNPOWEREDReplies: 18Last Post: 1st December 2007, 11:30 AM -
Putting wooden plane blades in Stanleys.
By JDarvall in forum HOMEMADE TOOLS AND JIGS ETC.Replies: 18Last Post: 30th November 2005, 08:29 AM
