

 Thanks:
  Likes:
  Needs Pictures: 0
 Picture(s) thanks:
Results 1 to 15 of 32
-
31st December 2022, 02:30 PM #1
 Franklin Ferrier


- Join Date
- May 2007
- Location
- Gold Coast
- Age
- 70
- Posts
- 2,735
 Rejuvenating an old cobbler's heel shave
I've had this lump of rust for a while. Time to see if it can be put to use as a woodworking shave.
There was quite a lot of rust and the screws wouldn't move so I started by drenching with WD40 a few times over 24 hr.
heelShave1.jpg heelShave2.jpg
Eventually the screws gave up their grip and I had it all apart. There was a bit of crud on it which I took to be cobbler's glue and as far as I could see there wasn't a painted finish underneath the rust so I got out the wire wheel and went to work.
heelShave3.jpg heelShave4.jpg
The blade was well worn and somewhat pitted. I cleaned it up as best I could with a bit of wet and dry then gave the edge a few strokes with a scythe stone and tested it out.
heelShave5.jpg heelShave6.jpg
It cuts but I think it really needs some refinement of the cutting edge.Franklin
-
31st December 2022 02:30 PM # ADSGoogle Adsense Advertisement
- Join Date
- Always
- Location
- Advertising world
- Age
- 2010
- Posts
- Many
-
1st January 2023, 07:38 AM #2
GOLD MEMBER

- Join Date
- Oct 2018
- Location
- Dandenong Ranges
- Posts
- 1,893
Thanks F. I have seen these for sale before and wondered how useful they might be.
-
1st January 2023, 01:05 PM #3
Be inspired. Be creative. Be bold.
- Join Date
- Apr 2001
- Location
- Perth
- Posts
- 10,826
I have a few which I renovated for chair bottoms. The front of the blades are worn away to a hollow and cannot be reground without opening the mouth. The solution is to turn the blade around and use the other end.
Regards from Perth
DerekVisit www.inthewoodshop.com for tutorials on constructing handtools, handtool reviews, and my trials and tribulations with furniture builds.
-
1st January 2023, 06:35 PM #4
GOLD MEMBER
- Join Date
- Mar 2004
- Location
- Brisbane (western suburbs)
- Age
- 77
- Posts
- 12,132
I was going to suggest they might be handy for scooping out things like chair seats, but Derek beat me to it. Even one that is working crudely could be handy for initial roughing out while a well-fettled example could do a good job of tidying up.
It's basically similar, at least in function to a travisher:
T6.jpg
T3.jpg
(Any resemblance between mine & one Derek posted a few years back is not co-incidental :; )
That, and my home-made double-curved compass plane do most of the heavy-lifting for me when it comes to scooping out chair seats & the like:
DR 20.jpg
So if you take up chair building, you're off to a good start there....
:U
Cheers,IW
-
1st January 2023, 07:50 PM #5
GOLD MEMBER
- Join Date
- Oct 2007
- Location
- Yarram
- Age
- 63
- Posts
- 2,207
Did we have hollow heals once or something?
-
1st January 2023, 08:14 PM #6
Franklin Ferrier
- Join Date
- May 2007
- Location
- Gold Coast
- Age
- 70
- Posts
- 2,735
My blade unfortunately is not reversible. I'm not sure yet about setting the mouth. The leading sole piece is adjustable vertically rather than in and out. By lifting it the front sole is in a different plane to the rear sole, this appears to be the only way to get my blade exposed enough to take a cutting. I've never fully mastered aligning the sole on a stanley #75 and I expect this shave is going to give me just as much challenge. Originally Posted by derekcohen


BTW, now it is clean I can see there is still a bit of black japanning on the top side of the adjustable sole piece and I expect the whole thing was originally japanned.Franklin
-
1st January 2023, 08:36 PM #7
Franklin Ferrier
- Join Date
- May 2007
- Location
- Gold Coast
- Age
- 70
- Posts
- 2,735
Ian, in the short term I'm just aiming to make a second curved top jewellery box lid similar to the one I made last month (I had made a second set of sides just in case the first box went pear shaped..) I hope having a 'scorping' type blade tool will make shaping a second lid a lot easier.
(I think I've put my Windsor Chair making dream away.)
I think the tool was used to form the hollow on the leading edge of the leather built up to make those old leather D shaped men's shoe heels. I seem to remember the outside curves being trimmed back with very sharp knives and then brought down to shape on a sanding machine. Maybe they were used to correct flat feet as well. Originally Posted by springwater
 Franklin
-
2nd January 2023, 04:05 AM #8
Be inspired. Be creative. Be bold.
- Join Date
- Apr 2001
- Location
- Perth
- Posts
- 10,826
Originally Posted by Fuzzie
Here is one I reversed and reground (bottom) and one where the blade was not too bad (top). The handles were removed as they got in the way when leaning the tool over ...
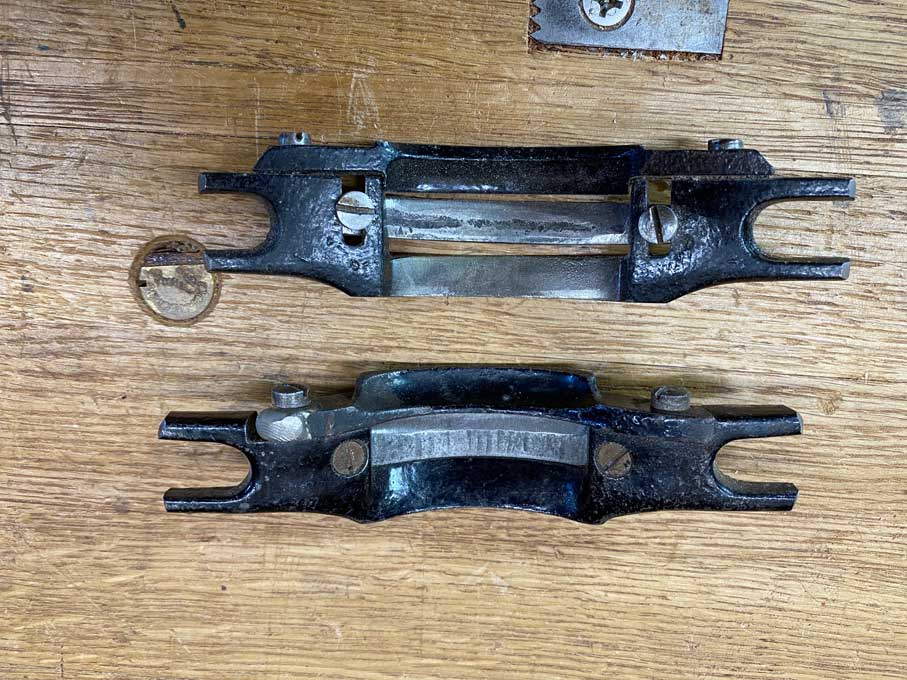
Other tools I use for hollowing out chair seats ...

Veritas pull shave, Clifton round spokeshave, Ray Iles scorp, Veritas round bottom block plane, and two travishers (different curve soles).
Regards from Perth
DerekVisit www.inthewoodshop.com for tutorials on constructing handtools, handtool reviews, and my trials and tribulations with furniture builds.
-
2nd January 2023, 07:36 AM #9
Franklin Ferrier
- Join Date
- May 2007
- Location
- Gold Coast
- Age
- 70
- Posts
- 2,735
Hi Derek, nice kit. I can see now how you accommodated reversing the blade by turning the locating holes in the body into slots. Do your blades project below the sole or do you lift the front adjustable portion to expose the cutting edge? I thought of trying to shim the blade out a little bit to see if I could control the cut a little better, but the blade also forms part of the sole so that wasn't going to work!
I suspect the best tools for the job I have at hand would actually be a largish round plane, I'm just trying to hollow out a curve evenly along the grain, the little round bottom squirrel plane looks cute though and I expect more suited to the job than my heel shave.
Cheers,Franklin
-
2nd January 2023, 08:45 AM #10
GOLD MEMBER
- Join Date
- Mar 2004
- Location
- Brisbane (western suburbs)
- Age
- 77
- Posts
- 12,132
Fuzzie, we tend to use what tools we have & feel most comfortable with, but if I read you correctly, your top panel is a part of a straight cylinder? I should think a round (as in hollows & rounds) plane would be handy for that, as it would make it easier to keep the curve straight end to end. Tools like the little double-curved squirrel plane are designed more for dished curves as on chair seats, but could be persuaded to do the initial clean up of a hollow shape, I suppose. The side to side & end to end radii of the Veritas squirrel plane are very similar to my home-built job, which would sort of work in that situation, but it's not the tool I'd be reaching for. Originally Posted by Fuzzie
There are always multiple ways to achieve an end in woodworking. I have only made a couple of curved panels in my entire life, & that was back in my early years. I glued up a thick block & made a series of diminishing cuts with the tablesaw, knocked out the residual slivers of waste, & finished with sandpaper wrapped around curved blocks (it was before I had come to grips with scrapers & was yet to discover hollows & rounds). I don't think I could have chosen a more cumbersome way of doing the job! If I had to repeat that exercise nowadays I would cooper the top & clean the inside curve with a hollow. I only have 3 pairs of H&Rs, which don't get a lot of use, but when they do get their chance, it's remarkable what they can manage (once I learnt to sharpen & set then tolerably well.....)
And BTW, don't shy away from chairs - they are intimidating before you tackle one or two, but they are nowhere near as difficult as I first thought! I confess it took me many years to overcome my fear & try my hand on my first Windsor chairs; a pair of very simple child chairs (these were not the chairs, but they are pretty close):
Child chairs & table.jpg
There was no looking back after that, & I would have made dozens of chairs of all sizes over the years since. The most difficult one I ever did was this small continuous-arm rocker:
continuous arm rocker.jpg
- the chair itself was easy enough, it was bending the arm that caused me grief. Being small means the bends are very tight & I destroyed at least a half-dozen carefully-selected & prepared arm blanks before finally achieving it!

Cheers,IW
-
2nd January 2023, 09:49 AM #11
Franklin Ferrier
- Join Date
- May 2007
- Location
- Gold Coast
- Age
- 70
- Posts
- 2,735
Hi Ian, I did much the same on my box lid. Defining the curve with table saw cuts, removing more waste with a couple of different size blades in a #55, moving on to a rasp, a round bottom spokeshave, scrapers and sandpaper.
box2.jpg
It was a fairly shallow curve and showing the grain of the Jacaranda was the idea so coopering wasn't on the agenda. The Jacaranda comes from my stash of 'maybe one day a chair stuff', but to be honest there is no foreseeable need for another chair in our household. That of course doesn't mean acquiring tools that might help make one is off the agenda.
Cheers,Franklin
-
2nd January 2023, 10:53 AM #12
GOLD MEMBER
- Join Date
- Oct 2007
- Location
- Yarram
- Age
- 63
- Posts
- 2,207
Thanks Fuzzie, I know what you mean but the step would be concave as a result of using that tool which may have been the desired shape, Im not sure. I think for the step to be curved with a straight side then youd have to use something like this: Originally Posted by Fuzzie
9A103BFA-89F6-4C78-975A-3BFD210B824B.jpeg
Anyway, perhaps Im being too pedantic.
-
2nd January 2023, 11:14 AM #13
GOLD MEMBER
- Join Date
- Mar 2004
- Location
- Brisbane (western suburbs)
- Age
- 77
- Posts
- 12,132
Originally Posted by Fuzzie
Of course!...
IW
-
2nd January 2023, 01:20 PM #14
Franklin Ferrier
- Join Date
- May 2007
- Location
- Gold Coast
- Age
- 70
- Posts
- 2,735
Not at all! The blades on these all seem to be very well used, I would like to know their real application for a cobbler. Originally Posted by springwater
A little more searching indicates they may have actually been used to shape the shoe lasts bespoke shoemakers created. (Using for hollow heels and flat feet might not be too far from the truth.) All the lasts I've ever seen have a very fine finish I can't see being left by this shave!Franklin
-
2nd January 2023, 03:02 PM #15
 GOLD MEMBER
- Join Date
- Apr 2006
- Location
- Hobart
- Posts
- 5,130
Unless they are molded with the sole, heels still have a shallow U-shape on their leading edge. Originally Posted by springwater
My late father was a cobbler who did shoe repairs and made othopedic shoes but he sold the business when I was about ten - memories are fading. He had a number of cast iron shaves - both straight and curved blades.
The only task that I can remember him using a curved shave was for thinning leather. I do not remember him using it on heels.


 Reply With Quote


Similar Threads
-
Snell & Atherton Heel Shave
By Morbius in forum ANTIQUE AND COLLECTABLE TOOLSReplies: 10Last Post: 23rd April 2016, 11:52 AM -
D8 Heel Backsaw.
By planemaker in forum Saws- handmadeReplies: 31Last Post: 26th May 2015, 11:02 PM -
The Toymakers Achilles (w)heel
By Sir Stinkalot in forum TOY MAKINGReplies: 6Last Post: 23rd January 2009, 12:30 PM -
Do motorsailers heel?
By TK1 in forum MISC BOAT RELATED STUFFReplies: 19Last Post: 7th June 2006, 10:32 AM
