

 Thanks: 0
 Likes: 0
 Needs Pictures: 0
 Picture(s) thanks: 0
Results 16 to 27 of 27
Thread: Son of Stanley #52
-
9th March 2010, 11:45 PM #16
 Be inspired. Be creative. Be bold.


- Join Date
- Apr 2001
- Location
- Perth
- Posts
- 10,827

Hi Dion
I do have a "Dummies Guide to Setting Up The Shooting Board Fence" .... step-by-step pictures. It should take all of 5 minutes to do. Really simple. Tools supplied.
In fact - here's a challenge - how would YOU set it up?!
The next version will have improvements.
I must say that this is a fun interlude before the next project (a 5m sideboard for the livingroom).
Regards from Perth
DerekVisit www.inthewoodshop.com for tutorials on constructing handtools, handtool reviews, and my trials and tribulations with furniture builds.
-
9th March 2010 11:45 PM # ADSGoogle Adsense Advertisement
- Join Date
- Always
- Location
- Advertising world
- Posts
- Many
-
10th March 2010, 03:28 AM #17
Be inspired. Be creative. Be bold.
- Join Date
- Apr 2001
- Location
- Perth
- Posts
- 10,827
Manual for setting up a multi-angle fence
I prepared a pictorial to aid installing this multi-position fence. Note that this fence requires only two inserts in the shooting board for the fence to cover any amount of angles you may wish to use. I will show you how this is achieved.
As I mentioned at the start of the thread, blame this on the boredom of painting ceilings.
The first picture shows the fence with the two main threaded holes. The one on the left is a threaded 6mm (M6) that acts as a pivot. This is a snug fit (nil slop). The threaded hole on the right is 8mm (M8). This acts as a micro-adjuster for a 6mm bolt – in other words, 1mm movement either way. I may change this to a M10 threaded hole, which will double the adjustment. At this time it is not needed as the method for installation creates a very precise placement of the holes.
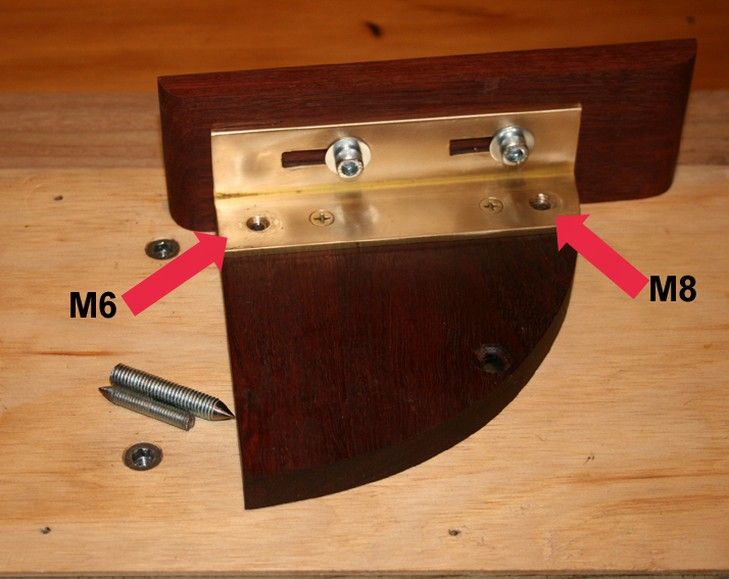
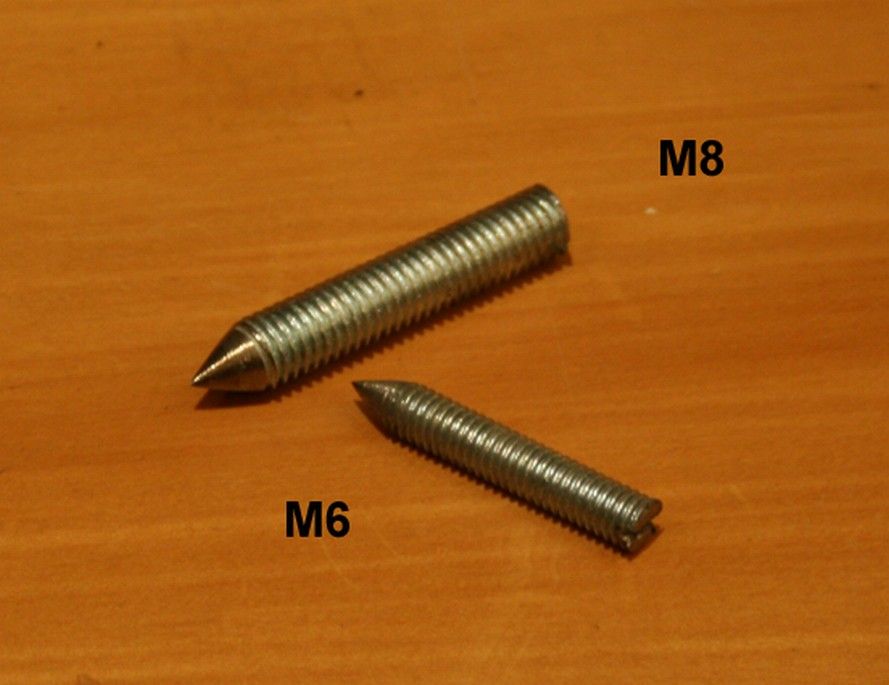
I made two “tools” to aid accuracy in placing the holes. These are simply two bolts that were turned to points at the end (on a disk sander).
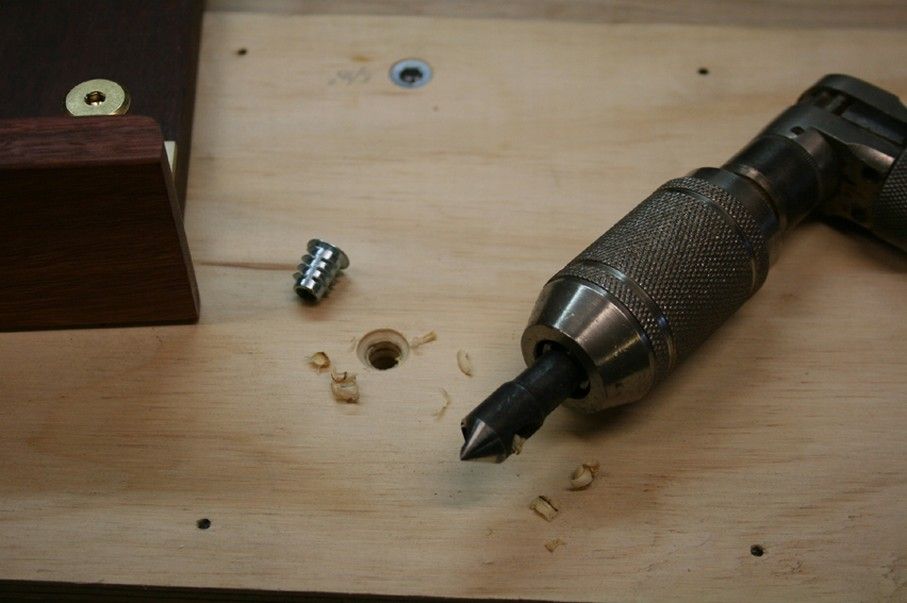
Installing the fence
I began by drilling a 5/16” hole for a metal insert 2” off the side of the board.
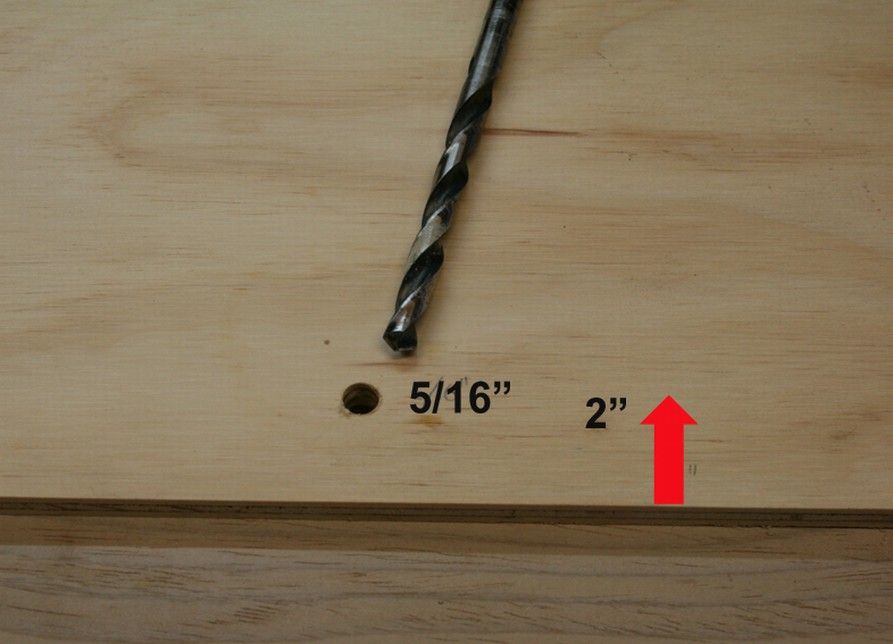
Chamfer the inside edge to enable the insert to sit flush with the table top.

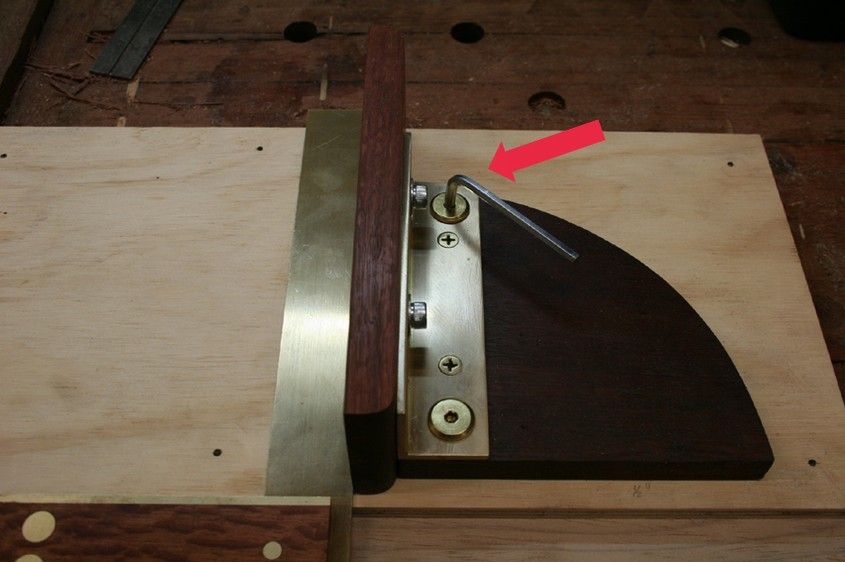
Now attach the fence at this point, square it to the side, and clamp it in place.
Using the M8 centering bolt, thread this through the far hole until it pierces the table top.

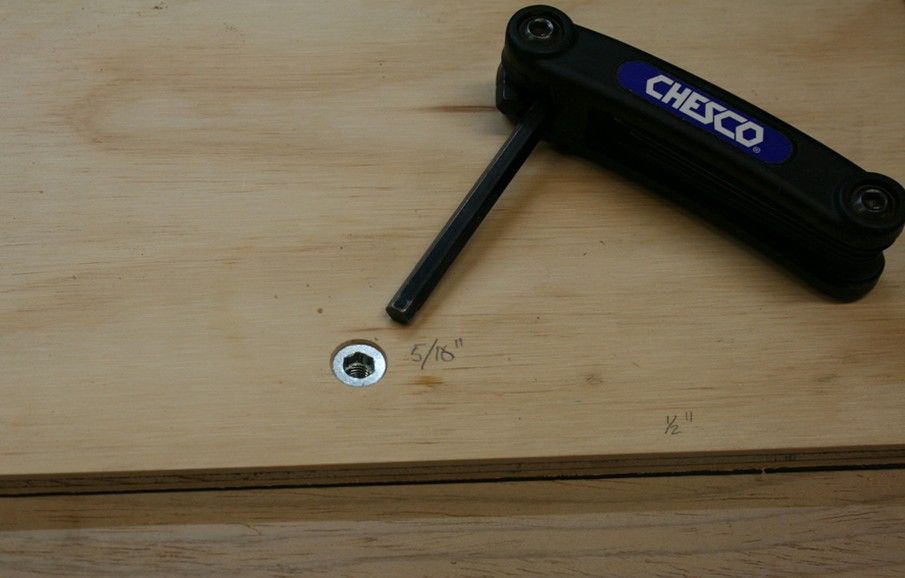
Again drill this out with the 5/16” bit and insert the thread for a M6 bolt.
You can now use a M6 bolt to use the fence in the 90° mode. Attach with a hex key ..
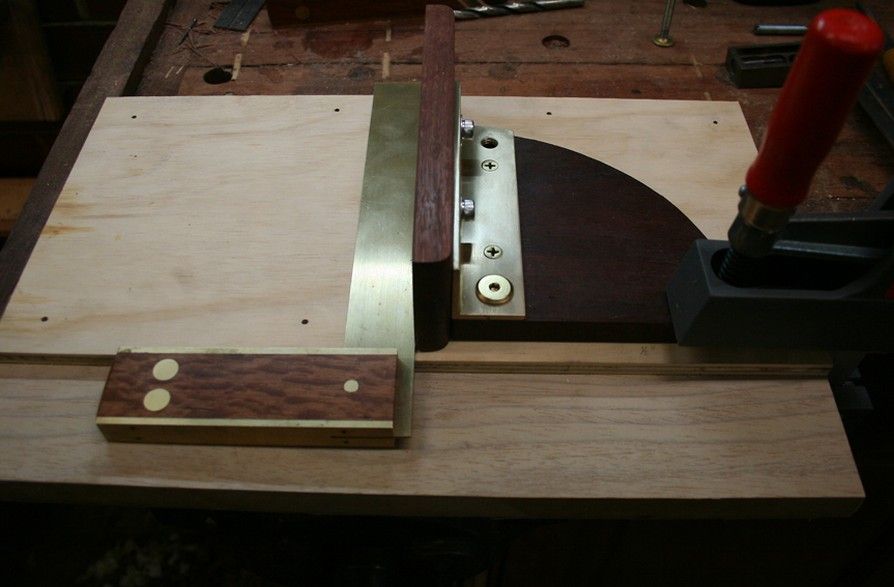
Setting up angles
Here I demonstrate setting up a 45° angle. Other angles (30- and 60 degrees) are completed in the same manner.
The first thing to do is unlock the 90° hex bolt, and clamp the fence at 45°. Be accurate.
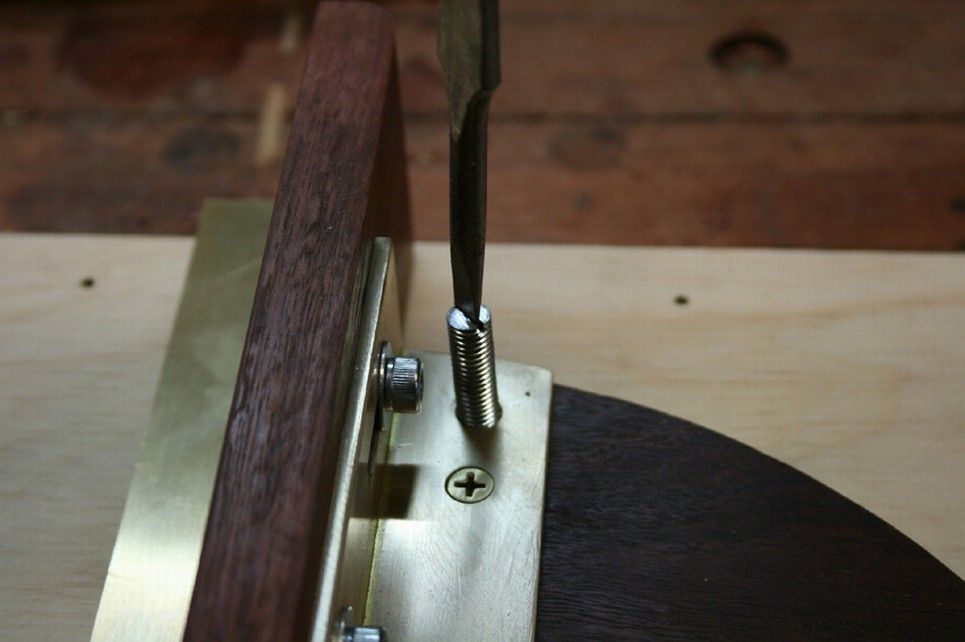
Carefully place the board on its side and – from underneath – thread the pointed M6 bolt up and through the empty metal insert ..
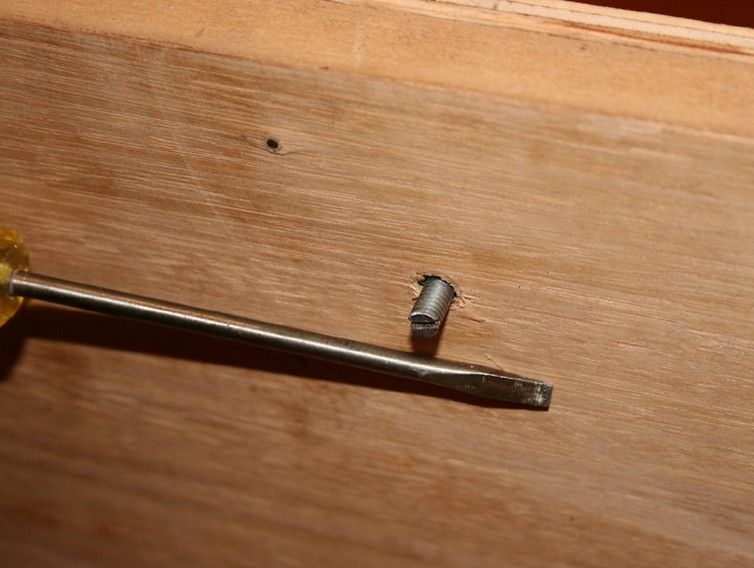
Here is a side view ..
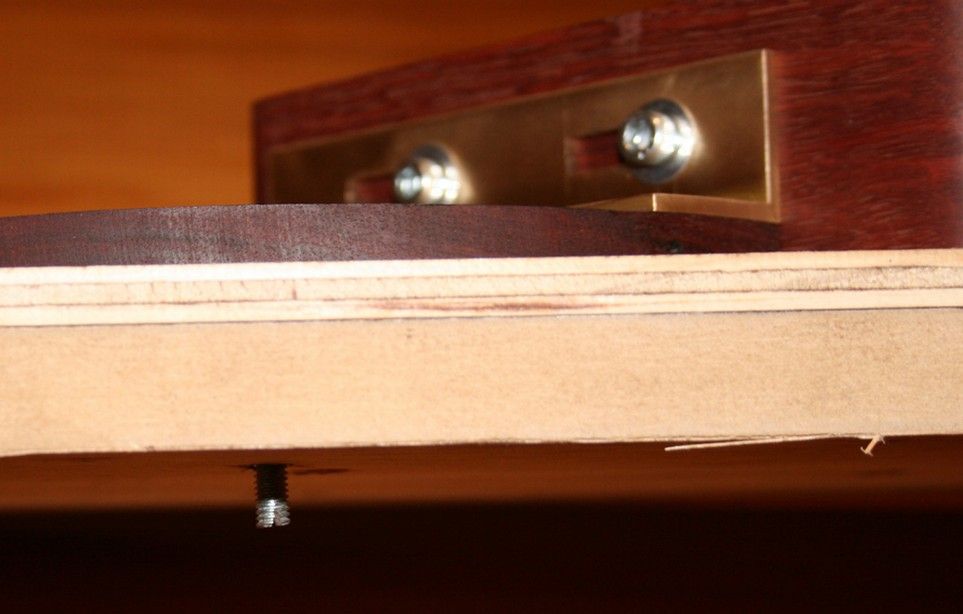
That marks the precise position where you need to drill the fence base for the 45° setting. This hole should be drilled with an 8mm bit to match the micro-adjustment on the 90° setting.
Do the same for other angles.
Installation of your fence is now completed.
Regards from Perth
DerekVisit www.inthewoodshop.com for tutorials on constructing handtools, handtool reviews, and my trials and tribulations with furniture builds.
-
10th March 2010, 07:50 AM #18
Dan @ TheLoveOfWood
- Join Date
- Jan 2008
- Location
- Australia
- Posts
- 752
Very nice. I think this will be a very versatile addition to the shop.
 My blog: ~ for the love of wood ~ - http://theloveofwood.blogspot.com/
-
10th March 2010, 10:22 AM #19
SENIOR MEMBER
- Join Date
- May 2007
- Location
- Melbourne
- Age
- 58
- Posts
- 832
Well done Derek,
I'd be happy to put my hand up to be part of the "Little" batch you may be making.
Thanks in advance.
kevin
-
10th March 2010, 11:18 AM #20
Moderate Moderater
- Join Date
- Feb 2006
- Location
- Lindfield N.S.W.
- Age
- 62
- Posts
- 5,643

I'll be in the small production run too, DerekCheers
Jeremy
If it were done when 'tis done, then 'twere well it were done quickly
-
10th March 2010, 08:36 PM #21
Darksdr&Gardenr
- Join Date
- Jan 2007
- Location
- Grange, Brisbane
- Age
- 53
- Posts
- 1,642
Looks like it won't be a 'small' production run already!
Cheers, Richard
"... work to a standard rather than a deadline ..." Ticky, forum member.
-
10th March 2010, 11:42 PM #22
Old Boy
- Join Date
- Feb 2007
- Location
- Katherine ,Northern Territory
- Age
- 69
- Posts
- 1,977
Excellent idea Derek , saves the hassle and angst created by bidders on Ebay .
I reckon I would go for one of your fences.
Kev."Outside of a dog a book is man's best friend ,inside a dog it's too dark to read"
Groucho Marx
-
11th March 2010, 08:55 PM #23
Senior Member
- Join Date
- Jan 2009
- Location
- The Shire
- Posts
- 325
Look out Derek, you're on a slippery slope to becoming a tool producer. Once you start making a quid it'll seem like work and won't be fun anymore. By this logic the more money this hobby takes (rather than earns) the more fun I am having!
Cheerio,
Virg.
PS Do you make a left handed version...?
-
11th March 2010, 09:23 PM #24
Be inspired. Be creative. Be bold.
- Join Date
- Apr 2001
- Location
- Perth
- Posts
- 10,827
Hi Virg
I can't see why a LH version should be any more difficult.
There is no chance of my becoming a toolmaker. My heart lies in building furniture, but these take time and require patience. I get a quick-fix from building tools, which is great between projects. If I can make something at the same time for others, and it is not intrusive, then I get a great deal of pleasure from the pleasure that others get using these tools.
Regards from Perth
DerekVisit www.inthewoodshop.com for tutorials on constructing handtools, handtool reviews, and my trials and tribulations with furniture builds.
-
11th March 2010, 09:52 PM #25
Senior Member
- Join Date
- Oct 2003
- Location
- Gold Coast
- Posts
- 302
Thanks for the pics and guide Derek. How would I set it up? Not sure.... probably a fixed pivot point with a bolt coming up from below the fence to a wingnut on top to screw down. The second hole would be slightly elongated to alow fine adjustment. Originally Posted by derekcohen
 "If something is really worth doing, it is worth doing badly." - GK Chesterton
-
12th March 2010, 05:39 AM #26
Senior Member
- Join Date
- Jun 2007
- Location
- Queanbeyan NSW
- Posts
- 231
I'd be interested too - buying one would save me some precious time
Neil
-
15th March 2010, 02:12 AM #27
Be inspired. Be creative. Be bold.
- Join Date
- Apr 2001
- Location
- Perth
- Posts
- 10,827
Hi all
See here fir the latest version of the shooting board fence: https://www.woodworkforums.com/f152/c...4/#post1126400
Regards from Perth
DerekVisit www.inthewoodshop.com for tutorials on constructing handtools, handtool reviews, and my trials and tribulations with furniture builds.


 Reply With Quote


Similar Threads
-
Stanley #8 and Stanley #62 LA Plane
By Shedhand in forum HAND TOOLS - UNPOWEREDReplies: 5Last Post: 19th April 2006, 03:04 AM -
Quick ! Quick, ya Stanley collecting freaks..a stanley # 1 !
By JDarvall in forum HAND TOOLS - POWEREDReplies: 29Last Post: 17th March 2006, 09:17 PM -
Stanley #20 or #113
By goodwoody in forum HAND TOOLS - UNPOWEREDReplies: 1Last Post: 19th July 2005, 10:48 AM
