

 Thanks:
  Likes:
  Needs Pictures: 0
 Picture(s) thanks: 0
Results 1 to 9 of 9
Thread: Using combination planes
-
22nd April 2019, 07:50 PM #1
 SENIOR MEMBER


- Join Date
- Mar 2018
- Location
- Sydney
- Posts
- 469
 Using combination planes
Hi all,
I've just started experimenting with an old combi plane ove just finished tidying up (a Stanley 12-050) and would be really interested to get some pointers from the brain trust do i get the best out of it.
Questions i am currently pondering are:
1. What tricks do you use to keep the plane upright?
2. Nickers. Do you use them only on cross cut grooves/rabbets or do you use them when ripping too? If yes, is this only for the initially scoring the groove or for longer?
3. Stopped grooves. Is it the case of planing as much as possible then reaching for a router plane to bring the groove to the correct stopping point? The front skate on the plane marks the wood for a good two inches in front of the blade.
4. Do you start planning at the front or back of the grove? Is there proper technique for this or is this just a personal preference?
5. Depth stops. Do you set these at full depth at the beginning or do you treat these just like a power router and reduce these to full depth as you go along?
I imagine that these could help keep the plane mostly vertical if these are close to the surface. A little like bike stabilisers..
Any advise would be most welcome. If these have been asked previously then i apologies in advance.
Anyone else with combi plane questions feel free to join onto this thread.
Regards,
Adam
-
22nd April 2019 07:50 PM # ADSGoogle Adsense Advertisement
- Join Date
- Always
- Location
- Advertising world
- Posts
- Many
-
22nd April 2019, 08:21 PM #2
Butcher of wood
- Join Date
- Jun 2010
- Location
- Bundaberg
- Age
- 54
- Posts
- 3,427
This link to ALF�s Combi plane central is a very good read that will answer or provide guidance for pretty much all your questions.
https://web.archive.org/web/20180902...ionplanes.htmlNothing succeeds like a budgie without a beak.
-
22nd April 2019, 09:13 PM #3
SENIOR MEMBER
- Join Date
- Mar 2018
- Location
- Sydney
- Posts
- 469
Thanks chief,
Is there anything that you have found that differs/ compliments what Alf put on her site, or is this pretty much the bible for all things combi related?
-
22nd April 2019, 10:21 PM #4
Butcher of wood
- Join Date
- Jun 2010
- Location
- Bundaberg
- Age
- 54
- Posts
- 3,427
There are many, many online articles about setting up and using combination planes and they all pretty much say the same things. ALF�s site just sort of condensed all the useful info into one site that covers all types, rather than concentrating on a specific model or models.
Answering your questions:
For keeping the plane upright I like the idea of the vertical skewer although I�ve never actually tried it. My preference is for a deeper fence or just taking extreme care to keep the plane vertical. Whenever I find a need to produce a groove and can get away with a more sloppy or rough finish I offer the tool to someone else to have a go (I am a member of the Bundaberg Woodworkers Guild and try to demo hand tools as much as I can), there is a knack to keeping the plane vertical and it isn�t hard to learn.
Depth stops are set from the beginning to the desired depth, I make set up blocks or do dummy cuts to set them accurately.
Stopped grooves are usually simply avoided in the first place, but if they are essential then the end part is cut with a chisel FIRST, giving the front of the skates somewhere to land. I�ve never actually needed to cut one but if I did I would chisel it out slightly undersized and finish off the sides of the groove with a side rebate plane.
Nickers are only used across the grain, personally I use a marking knife to score the sides instead.
Start the cut a few inches from the far end and gradually lengthen each stroke until you are cutting full length.
What I will add here is sharpen the blades with a repeatable jig to ensure the edge is square to the sides, and take as deep a cut as you feel comfortable. Fettling and setting planes to give one thou cuts is good for smoothers and... well, smoothers. Ploughs and combis are more utilitarian, only beads really need fine finishing cuts right at the end, unless the woodgrain is really cranky.
Have a read of some articles, watch a couple of you tube videos and HAVE A GO! Get some straight grained boring pine and make some shavings.Nothing succeeds like a budgie without a beak.
-
22nd April 2019, 10:41 PM #5
Member
- Join Date
- Nov 2006
- Location
- Ireland
- Posts
- 84
I agree with Chief Tiff about Alf's site, the best starting point for anyone new to plough or combination planes. Only thing I can to the suggestions above is to always check that the fence is square and parallel to the skates,. a binding fence can mess up the cut once it gets beyond the first few strokes. Regards. Jim
-
22nd April 2019, 10:52 PM #6
SENIOR MEMBER
- Join Date
- Mar 2018
- Location
- Sydney
- Posts
- 469
Thanks again chief,
I've had a good read through Alf s site, very much liking her writing style.
The skewer trick is perfect to help get the vertical issue corrected , that plus changing my hand grip per Alf s advice.
Regards,
Adam
-
22nd April 2019, 11:44 PM #7
Be inspired. Be creative. Be bold.
- Join Date
- Apr 2001
- Location
- Perth
- Posts
- 10,820
Adam, when you use a plough plane (or similar) often enough, you develop a sense of vertical. It is the same with other tools, such as sawing or jointing an edge. What you can do to help this process is stand a square alongside, and gauge whether the side of the plane is vertical. I use shoulder planes for fine tuning rebates. This is an easy plane to slide a square against, move it away, and then push the plane forward. Practice.1. What tricks do you use to keep the plane upright?
Nickers are ONLY for cross grain work. NEVER for ripping. They will dig in and make the process so much extra hard work. Nickers are unnecessary when planing with the grain as the edge of the blade does this work. Of course, this is easy enough when planing with the grain. If you plane a groove against the grain, score the sides with a cutting gauge. You can also score them a little deeper with a knife. One you are below the surface, and the side walls have been protected against spelching, the evenness of the floor of the groove is irrelevant.2. Nickers. Do you use them only on cross cut grooves/rabbets or do you use them when ripping too? If yes, is this only for the initially scoring the groove or for longer?
Note: "Dado" runs across the grain, and "groove" runs with the grain.
Stopped grooves and stopped dados may be planed. However it is much easier to simply use a chisel, saw and router plane for dado.3. Stopped grooves. Is it the case of planing as much as possible then reaching for a router plane to bring the groove to the correct stopping point? The front skate on the plane marks the wood for a good two inches in front of the blade.
The trick is to remove waste from the beginning and end of the dado/groove. This is needed for the skate to drop lower. I will demonstrate this with a rebate plane - no skate, but the principal is the same. Here I was created a stopped rebate ...
This is where the rebate will go �

The plan is to use a rebate plane. Those who have tried this are aware that planing from one end to the other will create a curve, with the depth deepest in the centre of the side, and tapering off to the ends. Eventually the plane will stop cutting ..

To plane this successfully, first remove enough waste from each end to enable the rebate plane to continue planing to depth ..


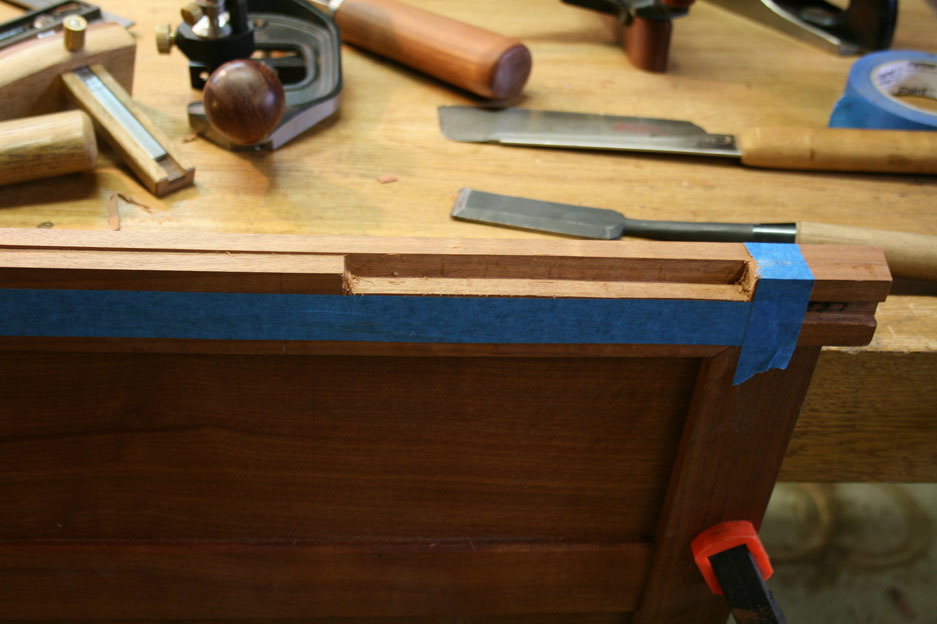
Do the same at the other side �

Now you can plane with confidence as the rebate can be taken to full depth along the whole length.

Those familiar with the Veritas Skew Rabbet Plane will notice that the front knob has been removed (as well as fitting a deeper sub-fence). The knob seems superfluous to me since I cannot find a reason to use it. There is far more control pushing the plane into the rebate, that is from the side.

What I have discovered is that the place where the knob went makes a handy position for the thumb � better than the fence alongside the edge of the blade � where inevitably I cut myself!
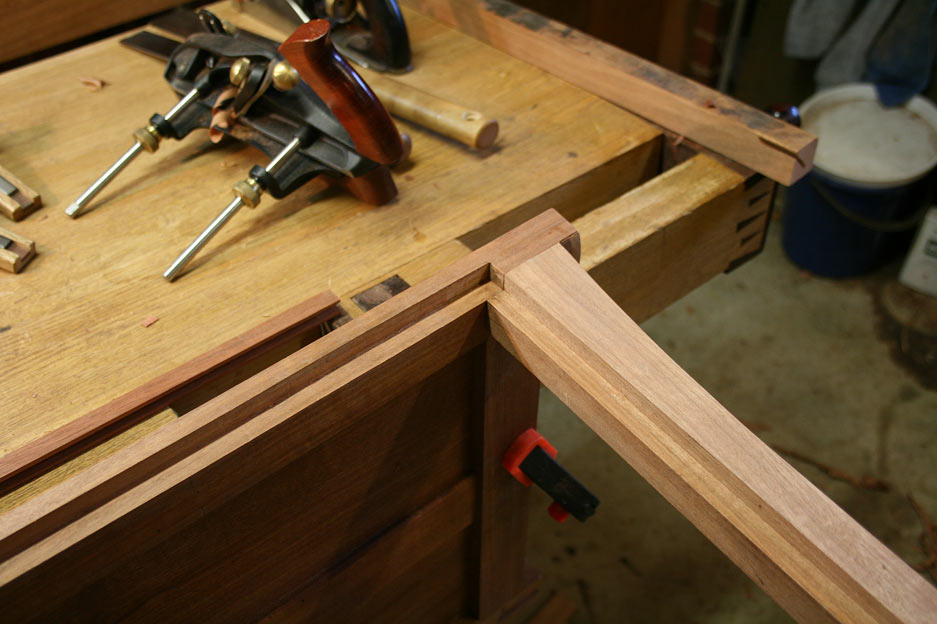
This is the completed rebate. The rear panel will sit in a frame that fits in the rebate. The sizing of this rebate enables the rear sliding dovetails to be sawn inside it and then hidden behind the frame.
4. Do you start planning at the front or back of the grove? Is there proper technique for this or is this just a personal preference?
Start at the far end and move back. That way you are always planing downhill, which will minimise tearout.
Set the depth stop to full depth of cut at the start. They do not work the same way as a power router - the plane limits how far you can go by the cutting one shaving at a time. The depth stop is to stop this process at the depth you want.5. Depth stops. Do you set these at full depth at the beginning or do you treat these just like a power router and reduce these to full depth as you go along?
A few tricks here with the Veritas combination plane (essentially the same as a Stanley) ...
http://www.inthewoodshop.com/ToolRev...ane-dados.html
http://www.inthewoodshop.com/ToolRev...oDadoMore.html
http://www.inthewoodshop.com/ToolRev...e-grooves.html
Regards from Perth
DerekVisit www.inthewoodshop.com for tutorials on constructing handtools, handtool reviews, and my trials and tribulations with furniture builds.
-
22nd April 2019, 11:46 PM #8
Be inspired. Be creative. Be bold.
- Join Date
- Apr 2001
- Location
- Perth
- Posts
- 10,820
Duplicate post
Visit www.inthewoodshop.com for tutorials on constructing handtools, handtool reviews, and my trials and tribulations with furniture builds.
-
23rd April 2019, 12:02 AM #9
SENIOR MEMBER
- Join Date
- Mar 2018
- Location
- Sydney
- Posts
- 469
Hi Derek,
Thank you for the very thorough answer.
I will definitely have a read of your website posts you listed.
Best regards,
Adam

 Reply With Quote

Similar Threads
-
Anyone using a Stanley 45 or other combination planes?
By dubrosa22 in forum ANTIQUE AND COLLECTABLE TOOLSReplies: 5Last Post: 3rd November 2017, 03:54 PM -
Stanley 12-030 12-052 12-250 13-030 13-052 13-050 Plough and Combination Planes
By Graham1509 in forum HAND TOOLS - UNPOWEREDReplies: 15Last Post: 14th July 2011, 04:17 PM -
Stanley 45 and combination planes
By Tiger in forum HAND TOOLS - UNPOWEREDReplies: 15Last Post: 27th June 2011, 07:33 PM -
Advice please - Replacement for Combination Planes
By emailwedgy in forum HAND TOOLS - UNPOWEREDReplies: 6Last Post: 5th June 2010, 04:43 PM -
Picture framing with combination planes.
By JDarvall in forum HAND TOOLS - UNPOWEREDReplies: 27Last Post: 16th June 2007, 01:30 PM
