

 Thanks:
  Likes:
  Needs Pictures: 0
 Picture(s) thanks: 0
Results 1 to 15 of 27
-
25th March 2019, 09:03 PM #1
 The prize lies beneath - hidden in full view


- Join Date
- Oct 2010
- Location
- 1017m up in Katoomba, NSW
- Posts
- 10,662
 OH YEAH! Nova Voyager electronic DP, Compound Table and custom top
The last proper Drill Press I owned was about 25 years ago. I think it may have been a Waldown. In 2011 I created a bit of a Frankenstein because it was the only way I could get some of the features that I want (like a decent amount of quill travel for a start). Also, as it was going to be bench mounted, the available range was rubbish.
So I created this, which has served me well in its various incarnations, but hasn't really got enough grunt for large forstners which I seem to be using more and more (got three around 3" dia on their way to me).
DD 0017.jpg
I have had a terrible bulge in me apron ever since I saw videos of the Nova Voyager DP "World's first Smart DP". No belts to slowly fool around with for speed changes, auto depth control, self starting, braking, and on and on the feature list goes. The biggest thing is the 150mm quill travel - yer gotta have it! Drilling a duplex hole with a long bit first and then a short bit is a giant PITA if you only have a miserable 80mm travel. It means lowering the table, buggering the hole alignment in the process, blah blah. You begin to understand why I really dig the 450mm travel I have with the old rig (and I could have about 700mm out of that 1 metre column if I really wanted to).
I was working towards acquiring one around the middle of the year, and suddenly NCArcher sent me a msg to say they were $550 off at Carbatec for a couple of weeks.
This cannot be ignored.
It caught me on the hop because I knew I would have to put much thought into shed rearranging and modification (primarily a large 3.6m built-in rusted-on bench that needs the top replaced- probably problematic), and I'd also just put in a new compressor a few days beforehand, so that took a sizeable chunk of budget.
(yes yes, get on with it.....)
So I bit down hard and picked up the finest bit of machinery I've owned for $2250 (down from $2800). That makes it about $150 more than the Jet beltless jobbie (which I'd previously had my eye on "one day" until the Voyager smacked it out of the park).
Borrowed NCA's trailer (thanks mate), brought it home in inclement weather (aka hissing down rain) unloaded what I could by myself (errr, nothing at all - took the lid off under the trailer tarp) and later in the day Tony assisted (errr, directed - thanks maaate) with carrying and a bit (a lot) of assembly. Getting the one piece head on is challenging - somewhere around 30 or so kgs to go up to 1750mm on the column. He's strong that Tony lad....thanks a lot maaaaaaate...)
1. Voyager DP.jpg
That's the spot that the old tooth-rattling Taurus air compressor used to live in. (it was like having a jack hammer in the shed esp when I'd forget it was still live and slowly leaking.....
  ...I got sick of cleaning up the floor..)
The new super quiet Chicago Hush 50L lives out on the deck in an even quieter cabinet. Very fortunately all that compressor work had been completed last week.
(on the left of the door)
AC, Table saw, 2nd Vac.jpg
In a strange coincidence, Hare & Forbes had a 17�% off sale of the Compound Table that I had identified as the desirable unit. Every DP needs a Compound Table (I have one on the Wabeco rig). You haven't lived until....
3. H&F Compound Table.jpg
Now that's 23kg of cast iron and gears right there.....and I'm yet to make the Tallow Wood Deck for it at this point. I know that's going to add another maybe 8kgs. Yikes! Will it be ok??? 30kg permanently on the table.....a very substantial table.....but....
Well once I saw the Compound Table on there I knew I had to crack on with making the deck for it. Now I've made a few of these in my time, and I think I finally know what I want (but I'll bet it changes again...). This is the first one built around a Metabo Drill Stand (so pre-Wabeco rig):
DD 12 - overall Deck showing Dog Holes.jpg which was followed by Copy of DD 0004.JPG and then New Drill Deck polarised.jpg
This time I finally realised that lateral T-Track is the go, and pretty much nothing else matters. The clamp I use the most is this Bessey Auto-adjust Toggle.
4. Tallow Wood Drill Deck & Fence.jpg
I have a pretty decent stash of �sawn Tallow Wood down in the wood shed. Not a pretty timber and I couldn't give a hoot - it's for a bench build that seems to be inching, nay, millimetreing closer to reality. Its strength and stability is fantastic - it's a little bit "chippy" but largely well behaved under tools. I'm as yet undecided as to putting a finish on it which would probably be HMWOP, or just enjoying the natural slip and greasiness of it.
Rightio, more on clamping and stuff in the next couple of posts.
-
25th March 2019 09:03 PM # ADSGoogle Adsense Advertisement
- Join Date
- Always
- Location
- Advertising world
- Posts
- Many
-
25th March 2019, 09:26 PM #2
The prize lies beneath - hidden in full view
- Join Date
- Oct 2010
- Location
- 1017m up in Katoomba, NSW
- Posts
- 10,662
 Sub-fences
About 7 years ago I laid in several different types of T-Track, including one whopper from Woodpeckers. I think they bought a job lot or summink. It's 100mm wide with 3 tracks on one side and two on the other as well as a track on both edges. A substantial bit of kit! (that takes ages to cut with a waxed blade on the mitre saw). For this project I used some of that, and also a smaller brother to it (2 on one side, 1 on the other). I have a feeling I'm going to enjoy these sub-fences immensely!
The lower fence, also showing a home made clamp (I've been fooling around with them for ages).
5. With low sub-fence and Home made clamp low.jpg
That clamp is pretty quick to get on and off the fence. Half or so of a rotation on the speed nut and I can slide it up, slip off the clamp and slide out the middle bolt (that had the speed nut on it). That take less than 5 seconds all up, but adjusting it to the thickness of the job is slower, so I employ a trusty purchased for purpose Taurus Drill, which must get up to ....phwoar... around 1� rps at least!
A good supply or Rare Earth Magnets is also super-useful to have. Fool around with sizes until the Goldilocks strength is reached.
16. REM to the rescue.jpg Ok She's slow and steady as she goes, but much quicker than me.
8. Quick Height adjustment.jpg
I also use it for traversing the Compound Table.
15. Quick Table Position adjustment.jpg
-
25th March 2019, 09:40 PM #3
The prize lies beneath - hidden in full view
- Join Date
- Oct 2010
- Location
- 1017m up in Katoomba, NSW
- Posts
- 10,662
Tall sub-fence
6. With high sub-fence and Home made clamp higher.jpg
Not long after I cut this monster T-track I realised how useful it will also be on the Kapex mitre saw. Sometimes it just takes me a while. This time it was only 7 years to work out a use for this T-track (and yes, I had the Kapex since before the track). Pretty quick really.
40. Kapex sub-fence.jpg 41. Kapex with stop block.jpg
I need some special clamping bits machined by a metal worker, so more on this in a separate thread in due course.
There are various feet for the clamps, depending on distance from the fence required, shape of the job etc.
7. Home made clamp feet.jpg
-
25th March 2019, 09:55 PM #4
The prize lies beneath - hidden in full view
- Join Date
- Oct 2010
- Location
- 1017m up in Katoomba, NSW
- Posts
- 10,662
The clamp that I have used the most so far is the Bessey variable Toggle.
9. Bessey Variable Toggle clamp.jpg
It just has a piece of T-track under it, and I can very quickly raise it by the thickness of the T-track without losing any strength at all.
10. Bessey VT with quick 15mm boost.jpg 11. Bessey VT with quick 15mm boost.jpg
It does not need to be tightened up - just take up the slack.
For taller jobs I use a Woodpeckers Knuckle Clamp.
12. Knuckle clamp for high jobs.jpg
You can also see a Woodpeckers Stop Block there. They can be used in different ways.
14. Stop Blocks.jpg
The last type of clamping is a piston action for very tall jobs.
13. Piston Toggle Clamp.jpg
-
25th March 2019, 10:32 PM #5
The prize lies beneath - hidden in full view
- Join Date
- Oct 2010
- Location
- 1017m up in Katoomba, NSW
- Posts
- 10,662
So all up I arrived here.
20. Voyager DP with table completed.jpg
The last job to do was secure it to the wall to limit some movement.
17. Top of column secured.jpg
That stops back and front movement (it's a yellow tongue floor on top of dodgy stuff with a 140kgs of top-heavy mother on it) so I may have to add one to stop the sideways movement, but I'll see how it goes.
Speaking of weight and stuff, the base of this thing is HUGE, at 550x400mm. The table is also large and I would actually prefer a smaller one so that I could spin it on it's axis better without hitting the bench. I will be doing that so that I can project longer jobs out the door (that's why the table is on that slightly jaunty angle).
As far as the operating of the Voyager is concerned - it's absolutely unreal, but I'll get to that in a bit more detail. For the moment I'll relate a tale of the first coupla days. On the day of delivery I had it up and running in the evening and was just marvelling at how quiet it was, how easy to change speeds. I stood there fiddling around for a while until I really needed to get some sleep.
Next morning, last Tuesday, I turned it on and after perhaps 15 seconds, it went BANG! and I went "%�&k me dead!". The 32A circuit tripped, the GPO outlet that it was in was fried (and continued to fry anything I plugged into it). I managed to finally pull out the half of the fuse in the removable bayonet with long nose pliers, and the other gazillion pieces of the (glass) fuse in the tube (inside the head) had to be vacced out. After much back and forth between Carbatec (who were very helpful I must say) and calls to NCA we still don't know what happened, but after going to the third shop (jaycar) to get a fuse, I managed to score and got it back up and running.
Until....
2. Voyager DP High Load Spike.jpg
So I pressed any key, as directed, and it hasn't skipped a beat since. Dunno what caused that either.
That's the thing with electronic stuff as opposed to analogue. When an analogue machine breaks down or refuses to start you know it's pretty serious, but then it doesn't happen too much. With electronica - as seductively gorgeous as they are - they are programmed to have minds of their own, and clearly some dickhead programs in aggravating things on purpose. Things like "You know what? Think I'm just gunna stop for an inexplicable reason - or maybe even for no detectable reason - and refuse to say why. Then, a couple of minutes later, I'll pretend nothing ever happened."
-
25th March 2019, 11:51 PM #6
GOLD MEMBER
- Join Date
- Jun 2005
- Location
- Helensburgh
- Posts
- 7,696
I fully intended to buy one of these but went another way instead for one simple reason. When CT were demonstrating it to me the guys did not know what they were doing and this quickly showed up another problem for me, others won't have the same issues. Why in the hell did they not join the 21st century and put a decent control screen on it such as a small tablet like TFT screen with a decent menu structure beats me. if they wanted to use the screen they have used then why not put a port on it so I can put a decent screen on to make using the menus much easier. I love the drill, I was going to buy one but the menu management put me off. I bet it is the same screen they have been using on the lathes for how many years? It is simply the best DP for a hobbyist that can be bought IMHO let down by the screen. I am sure Brett will enjoy his for many years.
CHRIS
-
26th March 2019, 07:29 PM #7
Novice
- Join Date
- Aug 2016
- Location
- Perth
- Posts
- 17
Thanks for posting. My Nova is on order so I'm interested in what others are doing.
Cheers
Simon
-
26th March 2019, 08:30 PM #8
The prize lies beneath - hidden in full view
- Join Date
- Oct 2010
- Location
- 1017m up in Katoomba, NSW
- Posts
- 10,662
Yes, a better screen would be good, and being able to port it to a tablet would be even better (say, via Bluetooth - there's a thought). I mean it does have a USB port, so it wouldn't have been all that hard. Originally Posted by Chris Parks

One thing I'd like to see upgraded is the Self Start choices. The default is "Look at me for 2 seconds and then beep a few times, and then start" which I'm quite sure everybody eschews in favour of "go down 6mm and then start". However, there is a problem with this if you have restricted the movement of the head to sit just above the job - self start is useless because it has already gone well below the 6mm, and just doesn't work.
I would like a third self-start option of "any downward movement, let's go", and stop when I return to that position. For example, the other day I had the whole head restricted to about 30mm travel so that the countersink bit was sitting about 5mm above the T-Track that I was putting 30 or so C/S holes into. I had to actually leave it running or press On/Off far too often for efficiency. It wasn't a big deal and I didn't feel exposed to danger at 250 rpm, but there's a simple remedy of that 3rd choice.
With the Auto-Depth stop I always imagined that there would be a line across the bottom of the hole when using a forstner because it just comes to a stop and the shaving isn't removed completely. This has proven to be the case, so if the bottom of the hole has to be clean you either have to clean it up manually, or better still transfer that depth to the conventional depth stop scale on the left. To do that you drill a hole in a dummy piece using the electronic depth control, hold the head there (you can lock it down), then lock the manual depth stop to that. No big deal, but something to be aware of.
Another thing to be aware of is that if you don't clamp the job down, and you are using Auto Depth Control, after the drill has stopped and you release the handle pressure, it will pull the job up because the drill bit will be slightly jammed in the hole. This does not happen using manual depth control because the drill bit is still spinning. (don't worry, I love the Auto, but it's not perfect)
I'd also like to see a weaker clock spring because the one supplied is VERY strong, which can lead to operator fatigue. Bearing in mind that there is also 150mm quill travel, that is the main reason for restricting the travel, and losing the Self Start, as documented above. Actually, I'd be happy with no return spring at all, which can probably be arranged. I've been operating like that for years with the Wabeco stand, and it is second nature for me to wind back out of the hole. I actually think any DP is safer without a return spring to potentially flick a spinning bit up out of the job, with no control - say when you lose your grip due to fatigue.....
The last potential mod I can think of at the moment, and this may well just be me, is that I would like to be able to remove the three spoked handle and replace it with a handled wheel. Without the clock spring, or at least with a weaker one, I could put a wheel on with a smaller diameter than the current handles, and getting the revolutions happening for that excellent 150mm travel would be really easy. As it is, because the spring is so strong it is a bit tricky going all the way down hanging onto the same knob and rotating your hand around it, fighting the overly strong spring at the same time. Remembering of course that my other hand has a dust extraction hose in it and cannot therefore be used for winding down.
-
26th March 2019, 08:58 PM #9
The prize lies beneath - hidden in full view
- Join Date
- Oct 2010
- Location
- 1017m up in Katoomba, NSW
- Posts
- 10,662
Just going back to this original pic, you can see the manual depth control on the left of the head with the yellow sticker running up it. HIDEOUS IMPERIAL! AND in coarse 1/8" increments! That (paper) scale got whipped off almost immediately and replaced with one of my Lexan Metric scales that I got from Incra a long time ago (pays to have these things in stock). Originally Posted by FenceFurniture
The point being, Mr Teknatool Marketer, that there are no countries with 240V electrickery that are not metric, AFAIK. And if there are, they probably are a target for such a DP.......
It also gave me the opportunity to set the scale to the proper zero point, rather than being 0.5mm out, as it was with the paper scale.
-
3rd May 2019, 09:13 AM #10
GOLD MEMBER
- Join Date
- May 2012
- Location
- Melb
- Posts
- 1,544
I'm lusting after one of these so badly, how's it traveling now?
That coin on the top video clinched it for me, my current (Ozito) DP sounds like a bucket of bolts in a blender and has side play measured in mm. That is when the stupid MT chuck doesn't fall out!
cheers, Ian
-
3rd May 2019, 09:37 AM #11
The prize lies beneath - hidden in full view
- Join Date
- Oct 2010
- Location
- 1017m up in Katoomba, NSW
- Posts
- 10,662
A quiet 2-3 weeks for the shed to attend to other things, but it's still a cracker!
-
13th December 2019, 04:32 PM #12
GOLD MEMBER
- Join Date
- Feb 2003
- Location
- back in Alberta for a while
- Age
- 68
- Posts
- 12,006
You'd be surprised. I think you might be the only DP user who mixes imperial (expressed as 4 digit decimal metric) and metric bits on the same graduated shelf. Originally Posted by FenceFurniture
others are content to use either one or the other standard. 3/8" is 3/8", not 9.525 mm.
 regards from Alberta, Canada
ian
-
13th December 2019, 09:25 PM #13
GOLD MEMBER
- Join Date
- Jun 2005
- Location
- Townsville. Tropical Nth Qld.
- Posts
- 1,244
Interesting that it had Imperial markings. About 2 years ago I bought a new Metal Milling machine from Hafco and I asked them to get me one with Imperial markings. The reason being that I work on old lathes with Imperial markings, so not to confuse myself, I asked them to get the same. I was willing to wait until they got it in. Oh no sir, we can't do that, it's Illegal to import any Imperial machines. Originally Posted by FenceFurniture
HoHum,
Rgds,
Crocy.
P.S. I fixed the problem by getting a kid to draw new dials in CAD and then had them printed out in 3D.
-
13th December 2019, 09:50 PM #14
The prize lies beneath - hidden in full view
- Join Date
- Oct 2010
- Location
- 1017m up in Katoomba, NSW
- Posts
- 10,662
That's a WILD exaggeration. Two decimal places is plenty in metric - I can't detect any difference (by eyeball) between 0.01 and 0.02 mm anyway. I need to use my fingers to be more accurate - failing vision is a PITA! Originally Posted by ian


I rest my case (old pic, drills have changed, anal retention still the same):
Two dp only.
-
13th December 2019, 11:23 PM #15
Be inspired. Be creative. Be bold.
- Join Date
- Apr 2001
- Location
- Perth
- Posts
- 10,820
I took these pics today ... Originally Posted by ian
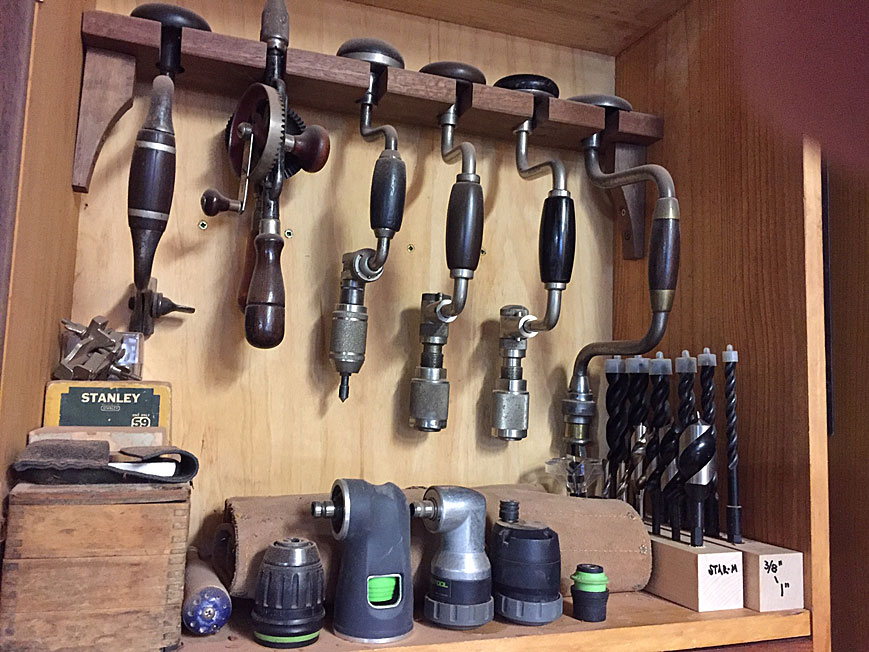
Far right are Imperial Wood Owl bits for the brace. To their left are Metric 3 x Star-m Super Clean and 3 x Star-M F-Type (also by Wood Owl).
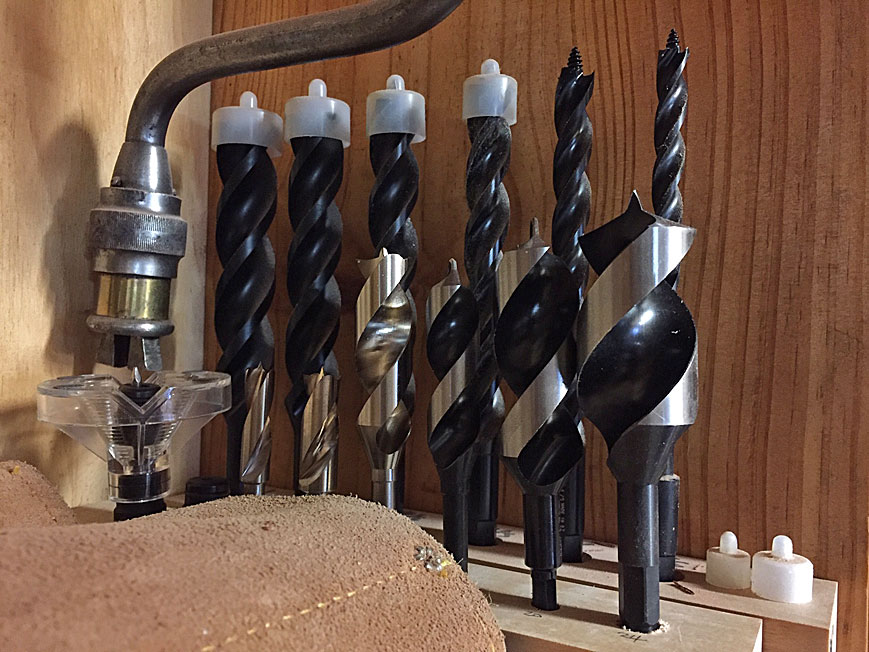
The Wood Owl are for the hand braces, and the Star-M for the drill press.
Regards from Perth
DerekVisit www.inthewoodshop.com for tutorials on constructing handtools, handtool reviews, and my trials and tribulations with furniture builds.


 Reply With Quote

Similar Threads
-
Custom vac switch for table saw
By notdjp in forum TABLE SAWS & COMBINATIONSReplies: 9Last Post: 18th July 2018, 12:22 PM -
Custom computer table top with curved edges
By stebbo in forum CNC MachinesReplies: 23Last Post: 6th June 2016, 02:25 AM -
Teknatool Nova Comet II Electronic Variable Speed Midi Lathe
By Wood Collector in forum WOODTURNING - GENERALReplies: 8Last Post: 11th February 2016, 09:04 PM -
Voyager Scandal
By Baz in forum HAVE YOUR SAYReplies: 11Last Post: 2nd November 2005, 05:07 PM -
Router table in custom stand
By finnster in forum TRITON / GMCReplies: 17Last Post: 23rd November 2002, 05:27 AM
