

 Thanks: 0
 Likes: 0
 Needs Pictures: 0
 Picture(s) thanks: 0
Results 1 to 14 of 14
Thread: Inspect my welding please?
-
25th September 2009, 07:58 PM #1
 Member


- Join Date
- Sep 2008
- Location
- Brisbane
- Age
- 36
- Posts
- 78
 Inspect my welding please?
Don't know if this is allowed but I guess there is only one way to find out..
I'm learning welding at home, TIG welding, and I've been doing a bit of practice. I've watched a few short videos online, and read some stuff, but nothing really beats practice. The only problem is I've never been shown, or had any criticism to let me know i'm on the right track.
Here are some pics of mild steel I welded.
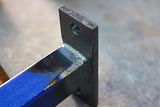
My tig welder is very cheap, so I don't know how accurate the settings were, but I used roughly 100amps for the T-join for the 5mm plate to the 20x20x1.6 RHS using 1.6mm filler rod.
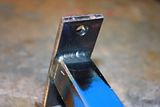
The other is (don't know the name of the join) but its 3mm plate steel welded onto the side of the same RHS 20x20 to reinforce the join (is this the right way to do this, reinforcement for an end join?). This was welded with 60-80 amps i forget..
So I hope some more experienced people can give me some strong critisism (maybe not too harsh) but let me know what I can improve on, what looks crap, what actually is bad about the welding and how I can improve it... Especially what to look for in a weld and why... I'd like to know the reasons behind why its bad etc. Also, anything that is "good" can you please tell me too!
Some things I did and know already:
- The join with the plate reinforcing the RHS on either side, I know its a bit wobbly, I welded that on the ground squatting ontop of it and had nothing to rest my hand on...
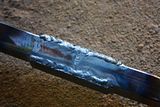
- I know there are some "holes" or porosity I suppose in the same weld, maybe I didn't clean the end of the flat bar steel and it bubbled away?
- I tried to clean the steel as much as I could. Bought some flapper discs yesturday and they work pretty well to remove paint and stuff until I get pure bare metal and the welding is so much better. I didn't use any metho or cleaning stuff to clean after that..
Thanks in advance for everyones help.
By the way, this is nothing structural and wont be carrying any weight its just practice.
John
 I'd rather build it than buy it......
-
25th September 2009 07:58 PM # ADSGoogle Adsense Advertisement
- Join Date
- Always
- Location
- Advertising world
- Age
- 2010
- Posts
- Many
-
26th September 2009, 12:38 AM #2
GOLD MEMBER
- Join Date
- Aug 2004
- Location
- Lost in Space
- Age
- 53
- Posts
- 2,406
Gidday

Is great to see another Tigkid getting into it for what its worth the kind of results you are getting are exactly the same as mine when i was at the same stage of the learning kerb as you ................. Well done for having a go (Hopefully we have a flegling Tigmaster here )
)
Tigs the DArkside skill of welding undoubtedly the hardest to master But if you persevere with the learning Kerb the rewards are well worth the Effort. The best advise I can give if you want to learn Tig is to do night classes and practice practice practice n then some..............
Books videos n forums just aint gonna cut the mustard like getting 1st hand experience from a TAFE teacher or Welder who can watch what your doing while you Tig and hopefully guide you to practice solid foundation skills that will help you become good at Tig Welding. Once you master the foundation skills its up to u how far you wanna go?
Heres what I do n find what works for me ............ The stuff I practice to work towards sitting my pressure vessel ticket
1. I try to know my stuff so regularly read watch listen n learn about anything i can get my hands on to do with Tig: Forums, Dedicated Websites, Books, Videos, Talking to Welders Etc etc etc
2. HAve Filler Rods Placed round my house so i can pick them up and muck around with; play with, n practice exercises with @ my leisure. The purpose of this is to make manipulating the filler rod feel as natural as using a pen or pencil at school
3. As much as possible practice feeding filler rod in the Flat horizontal and Vertical positions. Firstly do this bare handed until youve nailed it then progress to practicing with the gloves you Tig in (Yes there is a difference)
4. Ive got my footpedal Under my Computer Desk N Tig Torch on my puta Desk so when im not practicing with my Rig I muck round with my pedal n torch at my leisure while browsing forums Blah Blah Blah .................Why? Once again I want these processes to feel natural and comfortable to me
5. To do great Welds consistently u need to be comfortable and be able to see your weldpool clearly. Learn to watch your weldpool and practice describing what you see so that you get an understanding of what metal does when its Tig Welded, how your weldpool reacts to different amps n how your filler rods feeding into the weldpool...........
6. As a YArdstick Aim to make your welds perfectly straight the size of your weld beads no bigger than 1-2 mil the thickness of the material your welding. Did I say practice practice practice................
Good Luck with your Tig Voyage n keep us posted on your progress!
Regards Lou
Just Do The Best You Can With What You HAve At The Time
-
26th September 2009, 09:57 AM #3
Member
- Join Date
- Sep 2008
- Location
- Brisbane
- Age
- 36
- Posts
- 78
Thanks a lot Lou for the reply
Lots of info there
Would you mind saying what is bad about my welds though - so I can improve on that?
I'll get to a TAFE teacher one day, I want to do a short course, even in introductory welding just to know the basics and it would look good on my resume anyway.
Do you know of any good videos to download to watch tig welding, i've seen a few but they dont really explain what they're doing, its just videos of the welder and you can hardly see what they're doing anyway. I want some educational videos. If you know of any.........!!?
Regards
JohnI'd rather build it than buy it......
-
26th September 2009, 10:34 AM #4
GOLD MEMBER
- Join Date
- Aug 2004
- Location
- Lost in Space
- Age
- 53
- Posts
- 2,406
Gidday
Mr Collins is the best man to do a critique on your runs so hopefully he'll drop in and say Hi.............................
From what i can see you may have a little undercut so reduce your Amps a bit & work on tidying things up.
What to aim for:
1. Weld Beads no more than 2mm larger than the thickness of the material your welding
2. No undercut or other weld defects
3. Straight Uniform consistent weld runs
Practice this n your well on your Way.................
Heres some of my favorite welding websites:
http://www.weldingtipsandtricks.com/...ding-tips.html
http://www.millerwelds.com/
You want online lessons n training videos then check out here:
http://www.tonywelding.com/2008/04/t...deos_5309.html
http://www.youtube.com/profile?gl=AU...ad&view=videos
Hope this is what your after ..............................
REgards Lou
Just Do The Best You Can With What You HAve At The Time
-
26th September 2009, 10:39 AM #5
Member
- Join Date
- Dec 2008
- Location
- Sydney
- Age
- 51
- Posts
- 86
Take my advice with a grain of salt, John. I'm still completing my TIG course at TAFE.
It's looking nice and consistent on the T Joint. Well done.
As Lou said though, you want the width of the weld within 2 mm of the thinner material thickness, the 1.6mm SHS. i.e. under 4mm. From the pic, it looks like it's wider than the 5 mm plate. You could adjust your settings downward and use exactly the same technique as you did before.
As for the reinforcing plate, you really should practice in a comfortable position. I think it's only going to require more practice to get the weld looking better. You want it right in the middle of the pieces being joined. Stuff like squatting down and not resting your hand is just adding more variables. Weld width looks good at 60-80 amps. Just a matter of placing it in the middle and adding the right amount of filler.
-
26th September 2009, 11:25 AM #6
Member
- Join Date
- Sep 2008
- Location
- Brisbane
- Age
- 36
- Posts
- 78
great, thanks guys
So the width of the weld must be related to the THINNER piece of metal you're joining. And when you say the "width" is that the Longer part of the triangular weld (hypotenuse), or the two equal shorter lengths, I forget the proper terms we've learnt this in my degree.
And yes, I really should have welded that reinforcement join on the table, i was just being careless...
Thanks for the websites lou
Wait for grahame to come alongI'd rather build it than buy it......
-
26th September 2009, 03:47 PM #7
Member
- Join Date
- Dec 2008
- Location
- Sydney
- Age
- 51
- Posts
- 86
John, good question.And when you say the "width" is that the Longer part of the triangular weld (hypotenuse), or the two equal shorter lengths, I forget the proper terms we've learnt this in my degree.
I believe each of the equal shorter lengths should be approx. the same as the thickness of the thinner material.
The tolerances for TAFE assessment for a fillet weld were -1mm to +2mm weld size.
-
26th September 2009, 05:20 PM #8
 Super Moderator
- Join Date
- Jan 2004
- Location
- Mackay Qld
- Posts
- 3,466
Hi John,
The boys have got it down pat about rod manipuation
All I could add is about rythm of feed .
That is to say the frequency and spacing of dips of the filler rod into the arc pool. Lineal movement and dip speed must be consistent to get that smooth even appearance.
The other thing is being able to "read" for settings.It too is practice thing.
My "read" of the last pic weld is that a bigger diameter tungsten and more amp settings would have helped. The goal would be to fill the valley created by the edge of the reinforce plate and the rolled edge of the rhs.
A cheats way around this could be a heat up with a torch.
A little tip here is to tack right the corners as you are able to finish into them.
That helps over come the craters left in a few places.
Also with cleaning.the job has to be spotless.A wire buff is a good investment.
Cleaning the filler wire as it does pick up corrosion if not stored in a proper container. A wad of unsoaped steel wool does the trick.
Clean gloves are often ignored - people skimp on proper gloves and use the general ones which they contaminated by materials handling. A bit of dirt or grease on the glove used to handle the wire and contamination occurs.
Hope this helps you
Grahame
-
27th September 2009, 12:35 AM #9
Intermediate Member
- Join Date
- Jul 2009
- Location
- Bayswater Nth Melbourne
- Posts
- 35
Im not any good with computers so I couldnt blow up your photos to get a better look at the welds(can someone tell me how to do this please?
 ) but I think I can see the heat effected zone looks a bit large so I would drop the amps down on the first weld.
Part 2: Grahame, have you got a diagram/terms of a weld so people know leg,throat etc.? I'd do it if I knew how, maybe I should be on a chat site for 'puter dummies!
-
27th September 2009, 01:42 AM #10
Super Moderator
- Join Date
- Jan 2004
- Location
- Mackay Qld
- Posts
- 3,466
Yes Col
I have the diagrams but will be a while posting them. I have got a new computer and diffrent O/S -Avista - i hate it -can,t use scanner until I get the right driver for the navigating section of it.Everything is in wrong places or hard to find
-
27th September 2009, 11:34 AM #11
Member
- Join Date
- Sep 2008
- Location
- Brisbane
- Age
- 36
- Posts
- 78
if you mean just by clicking on the photos, they're "thumbnails" which mean they are small on your screen so it doesn't take long to load, but if you WANT to click on them, then it takes you to a larger version. This is for uploading lots and lots of photos so if you might only want to look at a few of them, it doesn't take all day for your computer to load all the other photos. So just click on one of the above photos to get a larger view, its still not very large though....
I'd rather build it than buy it......
-
27th September 2009, 09:59 PM #12
Skwair2rownd
- Join Date
- Nov 2007
- Location
- Dundowran Beach
- Age
- 76
- Posts
- 19,922

JJ, I have not done any TIG or MIG welding but have done TAFE course in oxy and "stick" welding.
The same general pricipals apply to all types of welding, And these have been amply spoken of above.
I always found that a comfortable position to weld in was paramount, even if it took time to set up. Practice your technique, get the amperage right. It looks to me on you welds that the T weld has had too much juice as it is slightly undercut- A neat weld, however.
The other weld may have been the result of uncomfortable positioning, lack of good technique or too much Johnny Walker ( ).
).
Still, I'd be well pleased with progress so far.
-
27th September 2009, 10:56 PM #13
Member
- Join Date
- Sep 2008
- Location
- Brisbane
- Age
- 36
- Posts
- 78
thanks artme
what is "undercut"? I see it used a fair bit, i suppose I could look it up but its also useful to get another definition in ordinary terms.I'd rather build it than buy it......
-
28th September 2009, 10:58 AM #14
Skwair2rownd
- Join Date
- Nov 2007
- Location
- Dundowran Beach
- Age
- 76
- Posts
- 19,922
 That is where the level o your weld is below he level of the welded material.
 Originally Posted by johnjohnmulley


Similar Threads
-
Welding SHS
By Karlval in forum WELDINGReplies: 6Last Post: 15th April 2009, 09:19 PM -
Gas Axe Welding Set
By watson in forum METALWORK FORUMReplies: 14Last Post: 30th May 2008, 05:52 PM -
welding gas
By China in forum Links to: WEB SITESReplies: 4Last Post: 11th January 2007, 10:47 PM -
new to welding.
By Bluegum in forum WELDINGReplies: 8Last Post: 24th October 2006, 09:22 PM -
welding tip
By mako in forum WELDINGReplies: 4Last Post: 7th July 2006, 04:59 PM
