

 Thanks: 0
 Likes: 0
 Needs Pictures: 0
 Picture(s) thanks: 0
Results 1 to 15 of 24
Thread: Paper Clock
-
6th November 2008, 10:36 AM #1
 Intermediate Member


- Join Date
- Aug 2008
- Location
- Melbourne
- Posts
- 33
 Paper Clock
Hello everybody
I have wanted to make a wooden geared clock and been unable to find baltic plywood as per the American plans. I haven't found out anything about whether local plywood is suitable or what readily available hardwood I could use.
Then I decided to make it out of acrylic sheet (perspex, plexiglas) and was checking out what kind of blades I would need for my scrollsaw and where to buy the acrylic. The next day on the good old Internet I came across plans for making a weight driven fully geared clock out of PAPER. The instructions don't say how durable it is, but all the traditional components are there. It uses an anchor escapement.
I had intended to keep this under wraps until I finished as there is not much to show for my efforts so far. It is a very slow and laborious process. I have spent WEEKS cutting, scoring, folding and glueing bits of paper. If I share this with you now, and all you good people know what I'm doing, I'll have some incentive to keep going.
I would imagine cutting gear teeth on a scrollsaw is a scary thing. No margin for error. At least I don't have that problem. So far, it seems to me that most of the work in this project goes into making the structural frame. I could just cut up a few bits of wood and have saved a lot of time. When I finish, if I love this clock, I will want to make another one. I'll know a lot more then about how clocks work and will probably scrap a lot of the paper and use wood instead.
You can see in the pictures that all I have at the moment is a pile of paper sticks. You can see the plans for yourself by going to
http://papercraft.wdfiles.com/local--files/papercraft:working-paper-clock/Working_Paper_Clock.pdf
And here is a link to a video on youtube showing assembly of the clock. [ame="http://au.youtube.com/watch?v=ROuPRs_rJi0"]http://au.youtube.com/watch?v=ROuPRs_rJi0[/ame]
It is not a how to, but an artistic showcase.
I will, of course, keep you updated.
Yeebla
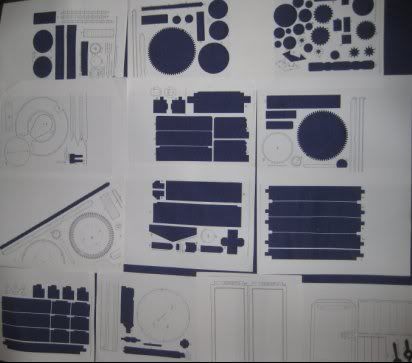
This is the print outs. I have cut out most of the parts. I used a craft knife to keep it all neat.
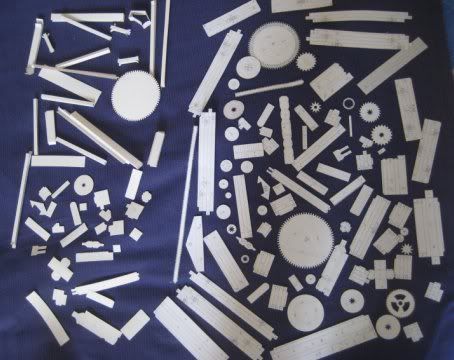
The cut out parts from the print outs are on the right. Then I drew around them on card and cut those out. They are on the left. As you can see, it is a much smaller pile. I still have a lot of tracing, cutting, scoring, folding and glueing to go before I can even think about assembling it.
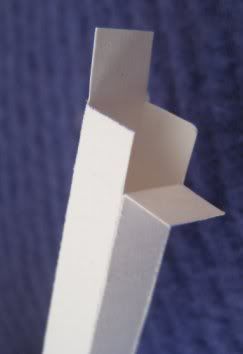
This is a detail of one of the cut, scored, folded and glued paper 'sticks.'
Bye for now
-
6th November 2008 10:36 AM # ADSGoogle Adsense Advertisement
- Join Date
- Always
- Location
- Advertising world
- Posts
- Many
-
6th November 2008, 05:53 PM #2
 SENIOR MEMBER
- Join Date
- Mar 2006
- Location
- Mildura, Victoria
- Posts
- 1,407

What a task you've taken on! I've had a little experience attempting creations with papier-mache - a madening process for anything large-ish.
-
12th November 2008, 10:45 AM #3
Senior Member
- Join Date
- Apr 2005
- Location
- New Zealand
- Age
- 83
- Posts
- 201
Yeebla,
Some 15 years ago I bought a copy of the book "Making Your Own Working Paper Clock" in the USA with all of the drawings on cardboard and I had intended to make the clock up, however I was very reluctant to actually cut the book up on the basis that once cut it is gone forever. It now just sits on my bookshelf....pretty dumb I know!!
I have since then built a grandfather clock and two with wooden movements and just perhaps it is time to sacrifice the book and make it up. I even went so far as to search out another copy on Amazon in order that I still retained at least one copy!!
Good luck with your build.
Incidently I have seen Baltic Birch ply for sale ar www.rockler.com and they do post overseas. The sizes were about 12" X 30" and the prices were pretty good.
Rhys
-
14th November 2008, 08:12 AM #4
Intermediate Member
- Join Date
- Aug 2008
- Location
- Melbourne
- Posts
- 33

Hello Rhys
That's great that you've preserved your book. Cutting books has got to be bad karma.
That pdf link I have provided is to the very same book that you've got. If I owned a printer I would have printed up the plans on card. But I did it at the library and just had to use their standard printing paper. That's why I have doubled up on the amount of work as now I have to trace around the paper onto card. I don't mind as I can use my little paper cutouts again for another clock if I wish.
I didn't know how thick the card should be but used what I had. Anyway, I won't have all the working lines and labels on my finished clock so it should look better.
I'm going to assemble the frame in the next few days. I will check out that rockler link. Thanks.
Yeebla
-
17th November 2008, 03:44 PM #5
Senior Member
- Join Date
- Jan 2008
- Location
- Perth
- Age
- 60
- Posts
- 240
Hi Yeebla,
I just had a look at the link, wow, that looks like it will require a lot of patience! But the end result should be good. We've seen wooden and metal clocks before on this forum, but this is the first time I have seen a paper one! I guess you'll need to be pretty careful where you put your cup of tea while making it . At the end of it you should have a pretty good understanding of how clocks actually work - I sure don't! - great educational piece also.
Best of luck with it! CheersSwifty
-
17th November 2008, 11:08 PM #6
Sum ergo cogito (Cogito)
- Join Date
- Oct 2006
- Location
- Tallahassee FL USA
- Age
- 82
- Posts
- 4,650
How about a photocopier to avoid destroying the book? And spray adhesive to alleviate problems printing onto card stock.
I've often drawn complex shapes in CAD, and attached the print to whatever material was needed. On cardboard shapes, I leave the print attached. The print may in fact include textual information or hole centres. On metal or wood, I scribe the outline before cutting, to preserve the cut line, because the heat of cutting may cause the print to shift. After cutting such materials, I remove the print with lighter fluid (naphtha) or rubbing alcohol.
JoeOf course truth is stranger than fiction.
Fiction has to make sense. - Mark Twain
-
20th November 2008, 07:26 PM #7
Intermediate Member
- Join Date
- Aug 2008
- Location
- Melbourne
- Posts
- 33
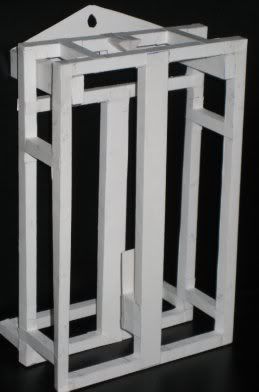
Thanks very much Swifty for your encouragement. I have assembling the frame and have added a photo. I put the frame on my computer chair for the picture and then almost sat on it!
Joe, you've sorted out all the problems any future paper clock makers might have. Pasting the photocopies onto card is a great idea. I wish I had done it. I was obsessed with minimising the appearance of working lines on the finished clock and wouldn't even have done it if I had thought of it. But now I have to draw those lines in myself. So, in hindsight, I would definitely recommend Joe's way. Or if you have a printer, print the pdf plans straight onto the card. I have doubled up on everything and it is ridiculous.
As you can see from the photo, the frame could easily have been made from wood, but you've pretty much got to make it from paper the first time to get the measurements. I'm quite happy to measure them up some time, but I think I should finish the thing first.
Yeebla
-
20th November 2008, 08:29 PM #8
SENIOR MEMBER
- Join Date
- Mar 2006
- Location
- Mildura, Victoria
- Posts
- 1,407
Yeebla, wow, you are doing fine, and I look forward to more wip pictures.
soth
-
28th November 2008, 12:40 AM #9
Skwair2rownd
- Join Date
- Nov 2007
- Location
- Dundowran Beach
- Age
- 76
- Posts
- 19,922
Stick with it Yeebla!!

I wonder if it would be a good option to have some HSS router bits made for cutting the gear teeth?
My School principals father´made o wooden clock and he had bits made for the tooth cutting.
-
28th November 2008, 04:58 PM #10
Intermediate Member
- Join Date
- Aug 2008
- Location
- Melbourne
- Posts
- 33
Thanks artme, I needed a boost. That's why I started putting my progress reports on here. I read your comment and got motivated and did some more work.
Using a router for gear teeth would be sweet. I think I'll be just using my scroll saw when I make a wooden geared clock though as I don't have a router and find them a bit scary.
In my paper clock instructions this next part is called the motor wheel. This photo is before I put the 'lid' on.
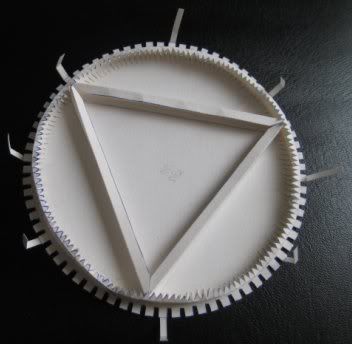
The next photo is with the 'lid' on and 48 out of 72 tabs glued over the teeth.
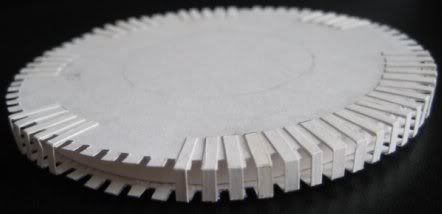
I see little things that aren't quite perfect or lined up and wonder how much it will affect the final performance of the clock. I did read somewhere about a couple who made it. They said the clock was very inaccurate. The book says it keeps perfect time. I'd say I've got more chance of accuracy than those other people as they made theirs in a weekend. I'll actually be very happy if it just works.
Yeebla
-
28th November 2008, 05:35 PM #11
Senior Member
- Join Date
- Apr 2005
- Location
- New Zealand
- Age
- 83
- Posts
- 201
Yeebla, your tenacity and patience are becoming legendary....I am beginning to feel very inadequate..
Rhys
-
30th November 2008, 09:53 AM #12
Intermediate Member
- Join Date
- Aug 2008
- Location
- Melbourne
- Posts
- 33
Rhys, I've been chuckling out loud about your comment since I read it yesterday. Tenacity and Patience? Well I suppose I've got a bit of them. With a finicky project like this it pays to only do it when you're in the mood and stop when the brain starts to wander.
I just hope one day I can make wooden clocks as beautiful as the ones you have posted pictures of. I can see it becoming a bit of an addiction. Even with this current project it is VERY satisfying to see these scraps of paper come together. That motor wheel pictured above is extemely strong.

These pictures are of a little gizmo that gets glued to the motor wheel pictured in my previous post. The first pic is before assembly. In the second pic you can see the tadpole like object is placed on the star. In the final pic when the pulley wheel is placed over it, it forms a one way turning thing. The book says that when the pulley is turned clockwise the little gizmo above will spin freely allowing rewinding. When it is turned the other way the tadpole spring will lock up and act as a driving force on the motor wheel pictured above. It's all pretty clever. This James Smith Rudolph bloke most be pretty close to being a genius. The preface to the book is a pretty good endorsement as it was written by Isaac Asimov. Haven't read it though as it was not included in the online version.
YeeblaLast edited by Yeebla; 30th November 2008 at 10:05 AM. Reason: Typo
-
30th November 2008, 10:03 AM #13
Intermediate Member
- Join Date
- Aug 2008
- Location
- Melbourne
- Posts
- 33
Decided to try to find out something about the creator of the paper clock. Found this neat story three quarters down the page of this site:
http://heijenga.nl/papermodels.html#instruments
Working paper clock, by James Smith Rudolph. This model was discovered by Isaac Asimov in 1947 in ¨a dusty old paperback in a dusty old Paris bookstore¨. The bookseller told Asimov he had found it long before World war II, and that the person responsible seemed to have disappeared. Thirty-six years later Asimov revised the model and had it published by Harper and Row. In 1995 I bought two copies at the Greenwich Observatory giftstore in London
The other paper models on this page are amazing. I don't know who made them. When I chopped off the paper models bit from the site name, it was all written in Dutch.
Yeebla
-
30th November 2008, 03:31 PM #14
Senior Member
- Join Date
- Apr 2005
- Location
- New Zealand
- Age
- 83
- Posts
- 201
Yeebla, yes it does become addictive!!
Apart from the satisfaction in completing a working clock the historical aspects of clocks and clock making over the 650 years since they were first developed are a real fascination to me. I have begun my next one which was designed by Clayton Boyer and is called Inclination. I really don't know what I will do with it when it is up and running....my lounge already has 4 clocks and the boss is not at all enthusiastic about a 5th!!
I am really enjoying watching the progress of your clock and look forward to your reports when it is happily ticking away.
The website with the paper models etc is quite amazing....a paper sextant??
Rhys
-
1st December 2008, 05:57 AM #15
Intermediate Member
- Join Date
- Aug 2008
- Location
- Melbourne
- Posts
- 33
I had a look at the Inclination at
http://www.lisaboyer.com/Claytonsite...ationpage1.htm
Press F11 on the keyboard to go fullscreen as the pictures are tall. Press F11 again to go back to the normal screen size. That drum rolling along a track in the last picture looks clever. Is it the 'weight' part of the clock? Rhys, I can see the unorthodox look of this clock tipping The Boss over the edge. It certainly looks to be a marvellous piece of engineering. A Boatie would love it as it looks like a boat sail.
Yeebla


 Reply With Quote


Similar Threads
-
Sanding paper everywhere
By niki in forum HOMEMADE TOOLS AND JIGS ETC.Replies: 8Last Post: 17th April 2007, 12:16 AM -
JAC Paper
By masoth in forum NOTHING AT ALL TO DO WITH WOODWORKReplies: 9Last Post: 25th April 2006, 09:32 AM -
rice paper????
By timberpassion in forum WOODWORK - GENERALReplies: 14Last Post: 18th February 2006, 03:27 AM -
Sand paper got you down?
By MathewA in forum WOODWORK - GENERALReplies: 0Last Post: 18th March 2005, 04:25 PM
