

 Thanks: 0
 Likes: 0
 Needs Pictures: 0
 Picture(s) thanks: 0
Results 1 to 15 of 18
-
13th June 2011, 04:33 AM #1
 SENIOR MEMBER


- Join Date
- Oct 2007
- Location
- Poland
- Age
- 67
- Posts
- 805
 BETH "YuanFen" - first layer of varnish on deck
Hi,
Today I have applied first layer of varnish on deck.
As you remember my sailing canoe BETH "YuanFen" was launched on May 28 2010. She was not varnished but only coated by epoxy. She was not exposed for UV permanently because she returned to the garage after each sailing day. Exception was the two-week stay in Gdansk during Raid Poland 2010. Now she looks well again.

-
13th June 2011 04:33 AM # ADSGoogle Adsense Advertisement
- Join Date
- Always
- Location
- Advertising world
- Age
- 2010
- Posts
- Many
-
13th June 2011, 06:01 PM #2
SENIOR MEMBER
- Join Date
- Oct 2007
- Location
- Poland
- Age
- 67
- Posts
- 805
Just second layer applied!

My examination of the interior of the cockpit saying - it probably need to work.
Last edited by robhosailor; 13th June 2011 at 06:03 PM. Reason: my English :-(
-
13th June 2011, 09:30 PM #3
GOLD MEMBER
- Join Date
- Mar 2007
- Location
- Adelaide
- Posts
- 2,139
Robert shouldn't you be sailing not varnishing.
 Mike
Mike
"Working to a rigidly defined method of doubt and uncertainty"
-
14th June 2011, 06:30 AM #4
SENIOR MEMBER
- Join Date
- Oct 2007
- Location
- Poland
- Age
- 67
- Posts
- 805
Of course, but I intend to carry my BETH towards a larger waters. Originally Posted by m2c1Iw

There she might be a longer period of time exposed to UV etc.
-
17th June 2011, 12:30 AM #5
Member
- Join Date
- Aug 2006
- Location
- Perth, Western Australia.
- Posts
- 87
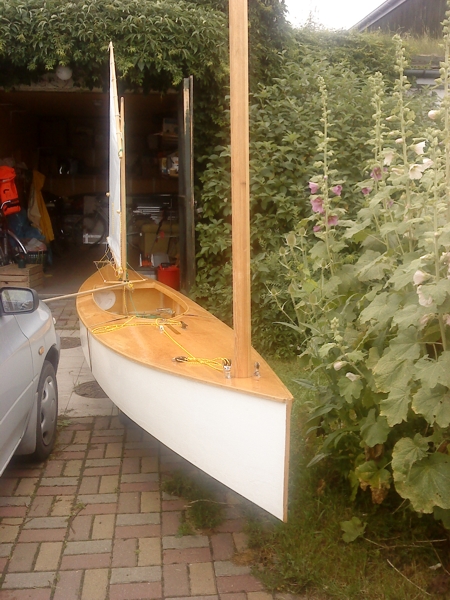
One (just one!) of the things I enjoy about the photos in your posts is how they show your (beautiful!) boat at home in her domestic context. She fits in, amongst the washing and the car, there's a place for a nice boat. That's good stuff. Originally Posted by robhosailor

-
17th June 2011, 03:31 AM #6
SENIOR MEMBER
- Join Date
- Oct 2007
- Location
- Poland
- Age
- 67
- Posts
- 805
Ha ha! Originally Posted by MichaelB
For this reason: two another photos from my picasa


Two armchairs (historic furnitures since before 2WW) in the background - demaged few weeks ago and waiting for repair...
-
17th June 2011, 05:39 AM #7
SENIOR MEMBER
- Join Date
- Oct 2007
- Location
- Poland
- Age
- 67
- Posts
- 805
Knees/bottom joint demage
There are two photos of cockpit details - joint of knees to the bottom was demaged on launch day (May 28 2010) - tiny cracks. The boat was exposed to rain etc. circa 2 weeks permanent. Water permeated cracks. Originally Posted by robhosailor
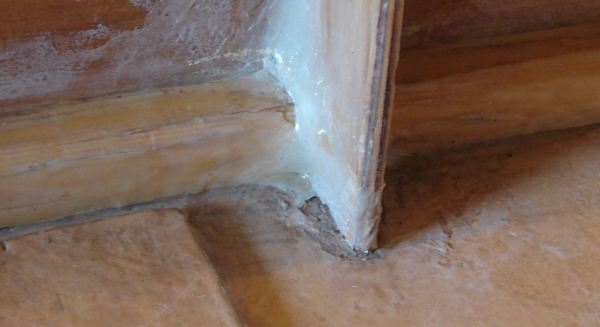

I'm going to clean the weld and make new glass fiber reinforced, but I wonder if not only clean and protect against water penetration, because there was a natural compensation for rigid and elastic components of the hull bottom plating.
???
What do you think?
-
17th June 2011, 07:57 PM #8
SENIOR MEMBER
- Join Date
- Oct 2007
- Location
- Poland
- Age
- 67
- Posts
- 805
My Polish friends, amateur and professional boatbuilders, said the reason was that I used hardener. There are 3 different kinds of hardeners for epoxy resin used by me. I have used such one which makes a strong but brittle as glass joint... Originally Posted by robhosailor
...and use different kind of hardener - which makes strong and elastic joint! Originally Posted by robhosailor
-
17th June 2011, 11:05 PM #9
GOLD MEMBER
- Join Date
- Mar 2007
- Location
- Adelaide
- Posts
- 2,139
Robert, a little surprising that joint failed being so close to the butt joint would not have thought the bottom panel would not move much in that area. Did you wet out the ply before filleting perhaps the epoxy was sucked into the ply staving the fillet.
Anyway as you say a fibreglass repair should see it right.Mike
"Working to a rigidly defined method of doubt and uncertainty"
-
17th June 2011, 11:19 PM #10
SENIOR MEMBER
- Join Date
- Oct 2007
- Location
- Poland
- Age
- 67
- Posts
- 805
Really wetted by epoxy area before filleting. Originally Posted by m2c1Iw
Reasons - in my opinion:
1. Hardener made to brittle fillet.
2. Mechanically - sides with knees, chine logs, sheer logs, side decks, coamings etc.are a rigid/stiff indeed, but bottom plate wide for 80 cm flexes a bit. I heard the crack of the first to put my feet in the cockpit. There are two cracks - shown on the photos worse one.
-
19th June 2011, 12:58 AM #11
SENIOR MEMBER
- Join Date
- Oct 2007
- Location
- Poland
- Age
- 67
- Posts
- 805
The same place, showing in advance of the total cleansing - now has been cleaned and sealed by epoxy resin with an elastic PAC hardener. And a thin, invisible layer of glass fabric.


Interestingly, with these photos I noticed two small air bubbles under the glass fabric and has removed them with a stick for skewer - the brush makes fabric stands up and form new bubbles, so be careful with this!
As far as I added the correct amount of hardener then per 24 hours and I will could sand and varnish inside the cockpit
-
19th June 2011, 05:41 AM #12
Yacht Designer & Builder
- Join Date
- Feb 2008
- Location
- Eustis, FL, USA
- Posts
- 2,270
The reason it failed has nothing to do with the hardener, but everything to do with the fillet application and general epoxying techniques.
The shape of the fillet in those images did not remove the stress riser(s) in the area, which is what ultimately broke out the joint. This is the reason you need to use the proper proportions in every structural fillet application.
Generally, the fillet should be 3 times the thickness of the plywood in both directions away from the joint. So, a 6 mm panel, filleted to a perpendicular 6 mm panel, should have a minium of 18 mm of fillet material riding up on both pieces, for a total width fillet of 36 mm. Of course the fillet also needs enough goo in the fillet and it should gradually taper out, onto each joined piece. This element of the fillet is very important, as it's what disperses the stress risers.
If the fillet gets a fabric covering, this is so much more important to insure it's shaped properly or the stress risers will test it every time you use it, eventually breaking out the joint. In regard to the fabric covering, it's width should be at least 6 times the thickness of the panels being joined, meaning the same 6 mm panel joint I described above would have at the very least 72 mm of fabric on each side of the joint, preferably with considerable overlap if using more then one piece of fabric to span the area.
These general guidelines are the minimums folks and the images above show nothing close to these dimensions and proportions.
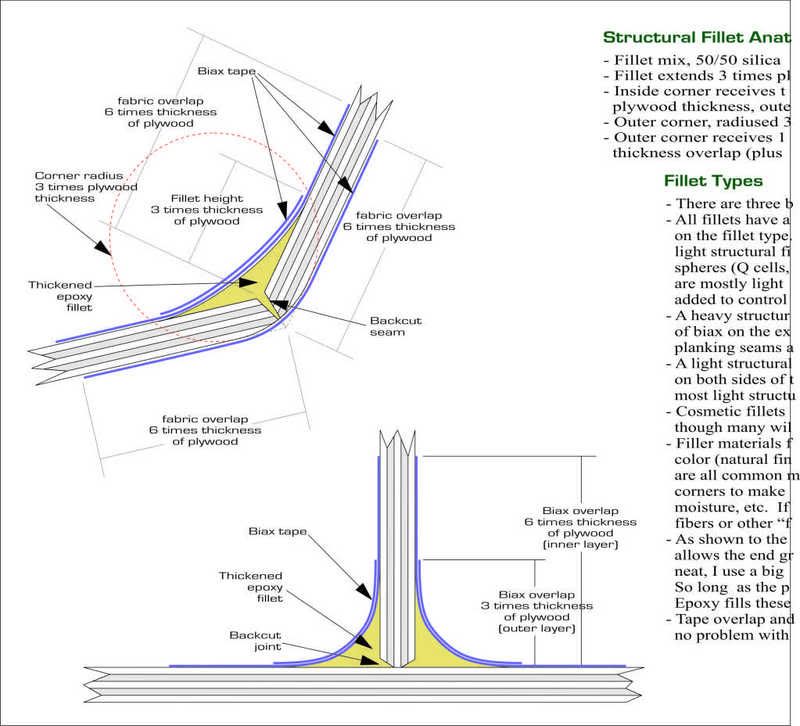
This is a screen capture of part of a fillet, epoxy technique and butt joint sheet that goes with all my plans. It shows the relationships between the fillet, the tape or fabric and the shape of the fillet. It's very important to get good, smooth shape, so stress risers don't rear up and break stuff. With structural fillets, I use nothing but knitted fabrics (biax, etc.), but on light structural fillets or where looks are important, regular cloth is acceptable, though much weaker.
-
19th June 2011, 05:41 PM #13
SENIOR MEMBER
- Join Date
- Oct 2007
- Location
- Poland
- Age
- 67
- Posts
- 805
Thank you PAR.
You are right - fillet done by me was not good and this new one is not good too, but...
It is really uncomfortable to do it in this corner and mechanically this point is stressed by flexible wide 80 cm bottom than I have just used tight and flexible juncture by epoxy with glass and flexible hardener.
***
There are 3 kinds of hardeners for epoxy (EPIDIAN) which I have used:
1. Z-1 - which makes strong, hard and brittle as glass joints
2. TFF - which can be used at higher atmospheric humidity - it makes strong and hard joints
3. PAC - the joint flexibility can be adjusted by changing its proportions in relation to the epoxy resin.
Previously I have used the first one and lately for repairs I have used the third one.
It just hardened with expected flexibility!!!
***
By the way I have a suggestion for Michael to make a change in shape of knees - so that they stiffened a bit the bottom of the boat: see attachement!
-
19th June 2011, 09:32 PM #14
SENIOR MEMBER
- Join Date
- Oct 2007
- Location
- Poland
- Age
- 67
- Posts
- 805
Therefore, I am not an advocate of building itself monuments for eternity, by means of amateur boat building - just put in the cockpit of the first layer of varnish! I am sure that this boat (exploited its intended purpose) and so will live me, unless it will be smashed on some rocks.


-
4th July 2011, 07:45 AM #15
SENIOR MEMBER
- Join Date
- Oct 2007
- Location
- Poland
- Age
- 67
- Posts
- 805
That's truth! Originally Posted by robhosailor
Few of last days I have sailed dry - in front of my garage


I intend to do new system of reefing which I've seen on Duckworks Magazine months ago. I have no link, but as an attachement is my own sketch of it.


 Reply With Quote


Similar Threads
-
BETH "YuanFen" May 13 (Friday) 2011 - launch for new season
By robhosailor in forum Michael Storer Wooden Boat PlansReplies: 5Last Post: 16th May 2011, 03:32 AM -
"Quasi leaning plank" for Beth?
By robhosailor in forum Michael Storer Wooden Boat PlansReplies: 29Last Post: 18th September 2010, 09:51 PM -
BETH -YuanFen- Building a wooden sailing canoe in Poland - Budowa drewnianej kanadyjk
By robhosailor in forum Michael Storer Wooden Boat PlansReplies: 326Last Post: 14th July 2010, 09:48 AM -
Links for "Build a Deck" wanted please
By cmart7 in forum WOODWORK - GENERALReplies: 1Last Post: 25th July 2009, 09:11 PM
