

 Thanks: 0
 Likes:
  Needs Pictures: 0
 Picture(s) thanks: 0
Results 61 to 75 of 94
Thread: Building the PDRacer in Slovenia
-
15th September 2012, 09:36 PM #61
 Sawing hack


- Join Date
- Oct 2007
- Location
- Sydney
- Posts
- 178
 This is possible. I had accidentally purchased an additional normal block with a Beckett before I started reading about the ratchet blocks. I will attach a little roller to the top, turn it all upside down, and that should work.
 Originally Posted by Boatmik

I'll take a picture when it's all rigged to show you what I ended up with.
Cheers,
Mark
-
15th September 2012 09:36 PM # ADSGoogle Adsense Advertisement
- Join Date
- Always
- Location
- Advertising world
- Posts
- Many
-
17th September 2012, 01:17 AM #62
Sawing hack
- Join Date
- Oct 2007
- Location
- Sydney
- Posts
- 178
The sun has come out so I had a chance to trial fit the spars and sail. Unfortunately I don't have all the ropes (is there a technical term for ropes used on a boat? I just can't remember it atm) yet, so I had to dig out some scrap pieces around the workshop for the downhaul and securing the blocks. However I do have the proper ropes for the halyard and so I was able to hoist the sail. It went up without a hitch.
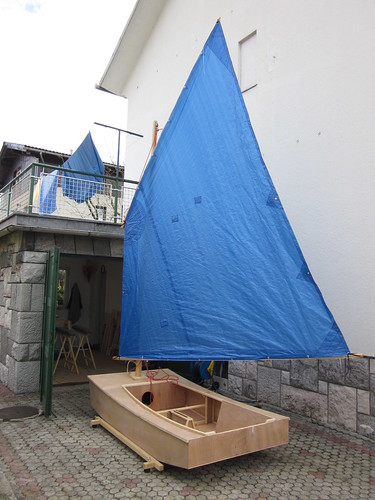
Sail Rigging Test by mrgroombridge, on Flickr
My first question for today (see photo below) is whether one of these blocks on top of the mast (is that the mast head?) is redundant? I think I may get rid of the block attached to the mast as the rope should pull through the loop without trouble. Secondly, should I pull the halyard down on the other side of the yard attachment?
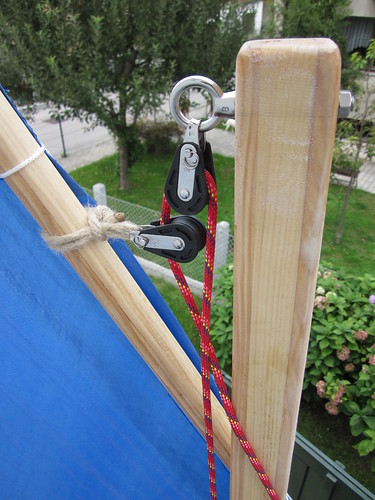
Mast head blocks by mrgroombridge, on Flickr
This week I hope to get the 4mm dyneema for lashing blocks and other things. Then I have to get onto that epoxy coating. These spars need varnish too!
Cheers,
Mark
-
17th September 2012, 07:19 AM #63
SENIOR MEMBER
- Join Date
- Aug 2010
- Location
- New Jersey, USA
- Posts
- 767
Yes, the block on the yard is not necessary. There is little to no movement of the line* through that block once you thread it from the end of the yard to that attachment point and up to the mast head. The block on the mast can be useful because as you haul the halyard up, it is running past that ~180* turning point. You could omit the block on the mast too if you think the eye bolt loop doesn't present much friction. In the GIS world, folks have gone the other way from a simple deadeye to a block. But that rig is larger/heavier and taller. Your mileage may vary. Originally Posted by Theodor
No, you should run it the way you show here. If it put it to the outside, it will try to tighten against itself as you haul up the rig. The way you have it now there is no binding, just a straight run from the block down to the deck.Secondly, should I pull the halyard down on the other side of the yard attachment?
Nice aerial photography by the way. You have a trained hummingbird I take it?
Mast head blocks by mrgroombridge, on Flickr
*rope is the raw material. When it is given a purpose, it becomes a line. Even a coiled and stowed dock line is a line because it will be placed into operation when called upon. I suppose a boat can carry a spool of rope as cargo, or as spare supplies onboard.Dave
StorerBoat Builder, Sailor, Enthusiast
Dave's GIS Chronicles | Dave's Lugs'l Chronicles | Dave's StorerBoat Forum Thread
-
17th September 2012, 10:13 AM #64
SENIOR MEMBER
- Join Date
- Jul 2008
- Location
- Fenwick, Michigan
- Age
- 75
- Posts
- 908
Interesting, I run my halyard to the outside and it doesn't bind. Next time out, I'll try it this way to see if there is any notable difference. Originally Posted by davlafont
Building Gardens of Fenwick, a Welsford Parthfinder
Gardens of Fenwick
Karen Ann, a Storer GIS
Goat Island Skiff - Sacramento
-
17th September 2012, 01:01 PM #65
SENIOR MEMBER
- Join Date
- Aug 2010
- Location
- New Jersey, USA
- Posts
- 767
I occurs to me Bob that binding or not might depend on where the deck hardware is located. If the block/deadeye/cleat is directly aft of the mast on the centerline, then binding could occur. If the deck hardware is off to the side of the mast (starboard in the case above) it could alleviate the issue. I assumed centerline, but many Goats are not set up that way. Originally Posted by BobWes
-
17th September 2012, 02:06 PM #66
SENIOR MEMBER
- Join Date
- Jul 2008
- Location
- Fenwick, Michigan
- Age
- 75
- Posts
- 908
Well, that explains it... My halyard cleats off on the starboard side of the mast (not lead aft, so no deck hardware; not hoisted/dropped from the cockpit). Not all Goats are set up the same way.
Building Gardens of Fenwick, a Welsford Parthfinder
Gardens of Fenwick
Karen Ann, a Storer GIS
Goat Island Skiff - Sacramento
-
17th September 2012, 03:58 PM #67
Sawing hack
- Join Date
- Oct 2007
- Location
- Sydney
- Posts
- 178
Thanks for your help. I had noticed that the yard block did not pull any line yet it might have been limiting any possible chaffing on the line. I'll remove that one for sure now. Originally Posted by davlafont
My halyard cleat is on the starboard side of the mast.
The photo of the mast head was taken from the balcony. As I have scoured through other people's rigging photos, I've realised there aren't too many close up shots from on high. Since I was looking for confirmation on that area, it made sense to use the available sighting location.
Thanks again,
Mark
-
18th September 2012, 02:44 AM #68
SENIOR MEMBER
- Join Date
- Aug 2010
- Location
- New Jersey, USA
- Posts
- 767
Well, my comments above are actually null and void because I now see that Theodor's halyard is not threaded the way I thought it was.
I'm setting up my hardware thus: no hardware on yard, only a wrap of line incorporating a loop; a cheek block on the aft face of top of the mast to reduce friction and avoid flopping around (chaffing); a deck block directly below at the aft face of the base of the mast to direct the halyard aft toward the cockpit. I want my halyard to thread the space between itself where it passes the (starboard) side of the mast and yard.Dave
StorerBoat Builder, Sailor, Enthusiast
Dave's GIS Chronicles | Dave's Lugs'l Chronicles | Dave's StorerBoat Forum Thread
-
20th September 2012, 12:15 PM #69
Happily receives emails.
- Join Date
- Jul 2005
- Location
- 'Delaide, Australia
- Age
- 65
- Posts
- 8,138
Do you mean a cheek block flat on the top of the mast for the halyard block? Originally Posted by davlafont

If it is as I am thinking then make sure that you are allowing for all the different angles the halyard will be at - running reaching etc. If it is a cheek block it won't rotate and the halyard will be going across the cheeks of the block for both more friction than the standard or even a cutting action on the rope or wearing action on the block cheek.
I used a block on a deckeye/saddle on beth but found that the halyard would jam between the block and the mast when tension was on without some reshaping of the deckeye - the tension pulls the block down so the inside face of the sheave is in contact with the mast ... trapping the halyard between itself and the mast.
you can take a saddle/deckeye and squeeze it up a bit in a vice and readjust the eye angle to keep the block further off the surface of the mast and then use the self amalgamating electrical tape on the saddle to stop it from pulling inwards against the mast. I thought about this a lot an then decided a deadeye was a good cheap failsafe method. There are other ways too but I was concerned that they might be hard to explain.
MIK
-
25th September 2012, 07:19 PM #70
Sawing hack
- Join Date
- Oct 2007
- Location
- Sydney
- Posts
- 178
Epoxy, Undercoat, Primer and Paint clarification sessions
Last week I managed to get a morning free and I put epoxy on the bottom of my PDR. I'm glad to reach that milestone. On Sunday afternoon I started to give the bottom a light sanding in order to identify the areas where I had highs/runs of epoxy. For example, I didn't think that the epoxy would run out of the fibreglass and down the sides as much as it did. Gravity - who would have thought! I expected to have an edge along the fibreglass, which makes what looks like a dip beside it because the sander isn't sitting flat on the surfaces. Like this:
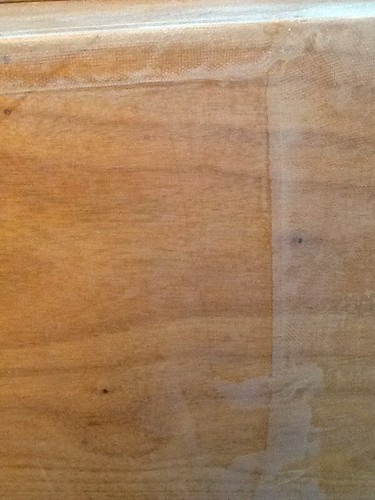
Fibreglass edges in epoxy (fibreglass runs along the top edge and down the right side)
I had a chat with fellow PDRacer builder Peter (Koala). He mentioned that in the past he has sanded down the edges and also used epoxy filled with a light powder which is easy to sand. Both these options are doable.
I had started to consider the whole undercoat, primer and painting thing, but I was just totally confused by the terms, the process, and the range of products available to me. I sent PAR an email and he has given me an excellent reply (worthy of a forum sticky amongst the basic tutorials for beginners section). My questions were:
Here is his helpful reply: Originally Posted by Theodor
For a first timer boat painter that is solid gold. Equipped with a renewed understanding, I have read through a few forum threads (e.g. MIK's FAQ and here) and think I understand what to do: 3-4 coats of primer with sanding, then 3-4 coats of paint with sanding. Originally Posted by PAR
My clarification question is for the glassed surfaces (I put some cloth on the bow which runs under the boat a little to protect the surface from expected rock abrasion) like this one:
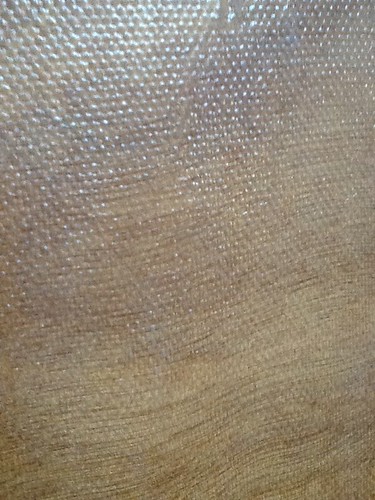
Fibreglass mesh in epoxy
As you can see, the surface is extremely rough. I have lightly sanded it and sanded out any larger clumps of epoxy sitting on top of the glass. So the question is: do I add another 1-2 layers of epoxy to flatten out this surface (adding weight) or do I go straight to a primer which will eventually fill these bumps and then I can sand that down fair and smooth?
Another question: has anyone used the Hempel range of primers? Which of their products would you recommend for this particular job?
Cheers,
Mark
-
26th September 2012, 12:09 AM #71
SENIOR MEMBER
- Join Date
- Aug 2010
- Location
- New Jersey, USA
- Posts
- 767
(Warning: amateur comments follow. Follow professional advice if it counters anything I say!) Originally Posted by Theodor
I think the texture is too great for primer to fill without using a vast amount. You could have continued to coat with epoxy to fill the weave (MIK's "wet-on-wet" method). Now that it's hard, a fairing compound is probably in order. That might be epoxy mixed with an additive, or a ready-made product. In either case, it will have some solids that will help fill the weave without weighing quite as much as straight epoxy. Primer is loaded with solids too, but I suspect that would be heavier and more expensive too (I think...). That same fairing compound can help blend the edge of the glass too.Dave
StorerBoat Builder, Sailor, Enthusiast
Dave's GIS Chronicles | Dave's Lugs'l Chronicles | Dave's StorerBoat Forum Thread
-
27th September 2012, 02:56 AM #72
Sawing hack
- Join Date
- Oct 2007
- Location
- Sydney
- Posts
- 178
Thanks for the reply. To clarify, the fibreglass cloth is filled, but the surface is extremely bumpy. I think the best method, which you suggest, will be using epoxy filled with light microfibres, and using it like a fairing compound. This will hopefully smooth the edges as well. I think I had been thinking this when I wrote that last post, except the word 'epoxy' was dulling my brain. Originally Posted by davlafont
I am still interested in any recommendations for an appropriate Hempel product as an undercoat/primer for OzRacers.
Another question: What do people use to wipe down their spars before varnishing? White spirits on a clean rag?
Cheers,
Mark
-
4th October 2012, 05:59 PM #73
Happily receives emails.
- Join Date
- Jul 2005
- Location
- 'Delaide, Australia
- Age
- 65
- Posts
- 8,138
Howdy,
I am in transit at the moment heading to SAIL OKlahoma.
Microfibres are terrible to sand. Microballoons or Q-cels or the WEST lightweight filler are much nicer to sand.
Wiping down spars - I generally dust them off then vacuum raw wood.
If have some coats of epoxy already I sometimes wash them down with water with just a very small amount of washing up detergent in it.
Then let them dry properly.
MIK
-
4th October 2012, 10:28 PM #74
Sawing hack
- Join Date
- Oct 2007
- Location
- Sydney
- Posts
- 178
Thanks Mik. I did a test wipe down on my paddle (my project's test piece for everything so far). The white spirits didn't get rid of the fine sanding dust any better than water. It just dried faster. The varnish didn't seem to be affected by the white spirits either.
At the moment I am waiting for my test piece of fairing filler to dry. I got some light filler powder and a new type of epoxy yesterday. Once it is dry I'll see how it goes for providing a smooth surface before slapping it on areas of concern on the bottom of the boat. I've sanded the inside of the boat so it's ready for its pox coats.
Cheers,
Mark
-
1st June 2013, 04:09 AM #75
Sawing hack
- Join Date
- Oct 2007
- Location
- Sydney
- Posts
- 178
Next disaster...
So the boat has come along a fair way since I last checked in. The mast, boom and yard are varnished. The whole boat has been epoxy coated. The bottom, sides and deck have been filled and sanded flat. Last week my father-in-law put two layers of Weatherfast Pri-Coat Primer (as recommended by Alex) on the bottom, sides, and deck (with the second coat being thinned, rather than the first coat - I believe the first layer may have used too much undercoat, so you know, the second was thinned).
We picked up some paint today and started to put some white on. Before we had finished we noticed that some sections of the paint were lifting in a flaking sort of way...
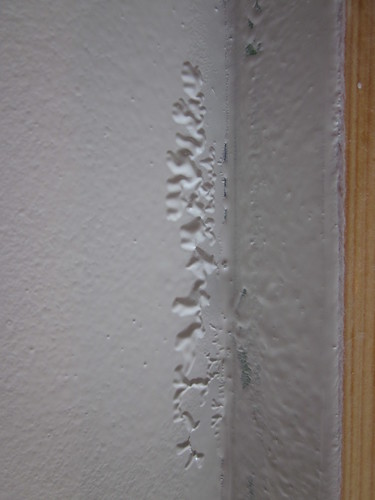
IMG_3701 by mrgroombridge, on Flickr - this paint is lifting rather than cracking - an optical illusion it seems.
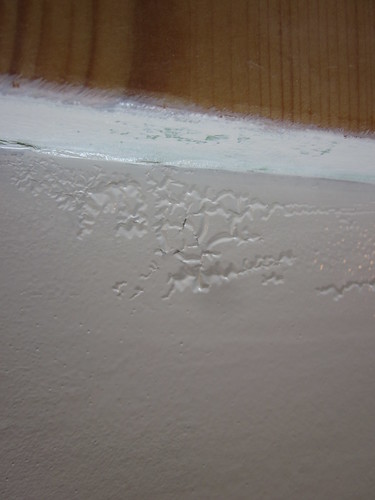
IMG_3702 by mrgroombridge, on Flickr
As you can see, it appears the new paint has lifted from the surface. The current humidity is 76% and 15 deg C.
The primer had been lightly sanded with 320 grit paper. It was then cleaned with a light cleaning solution and then I think a tack cloth was run over it. I cannot fathom the reason for the 2 spots where this has occurred. It isn't a consistent issue over the entire surface.
The question is how to I repair the area for painting? Do I sand back down to the wood layer, redo the undercoat and then paint it again?
Thanks in advance!


 Reply With Quote


Similar Threads
-
New Queensland PDRacer Build
By duncang in forum Michael Storer Wooden Boat PlansReplies: 71Last Post: 26th April 2012, 08:30 AM -
GIS built in Slovenia? Marking waterlines
By koala in forum Michael Storer Wooden Boat PlansReplies: 31Last Post: 31st December 2009, 07:08 PM -
OZ PDRacer Vids
By Boatmik in forum Michael Storer Wooden Boat PlansReplies: 0Last Post: 13th September 2008, 11:55 PM -
Storer Paddles (the free plan ones) and wood in Slovenia
By Theodor in forum Michael Storer Wooden Boat PlansReplies: 15Last Post: 7th July 2008, 08:31 PM -
Eureka V's PDRacer?
By Walesey in forum BOAT BUILDING / REPAIRINGReplies: 3Last Post: 2nd April 2007, 12:36 PM
