

 Thanks:
  Likes:
  Needs Pictures:
  Picture(s) thanks:
Results 496 to 510 of 724
Thread: GIS - Sacramento
-
21st February 2010, 03:07 PM #496
 SENIOR MEMBER


- Join Date
- Jul 2008
- Location
- Fenwick, Michigan
- Age
- 75
- Posts
- 908

Archie,
That is a good looking installation.
Maybe I'll double up with 6mm ply.
Thanks.Building Gardens of Fenwick, a Welsford Parthfinder
Gardens of Fenwick
Karen Ann, a Storer GIS
Goat Island Skiff - Sacramento
-
21st February 2010 03:07 PM # ADSGoogle Adsense Advertisement
- Join Date
- Always
- Location
- Advertising world
- Age
- 2010
- Posts
- Many
-
23rd February 2010, 07:00 AM #497
Happily receives emails.
- Join Date
- Jul 2005
- Location
- 'Delaide, Australia
- Age
- 65
- Posts
- 8,138
6mm is fine. The loads are very slight compared to other rudder systems. Originally Posted by BobWes

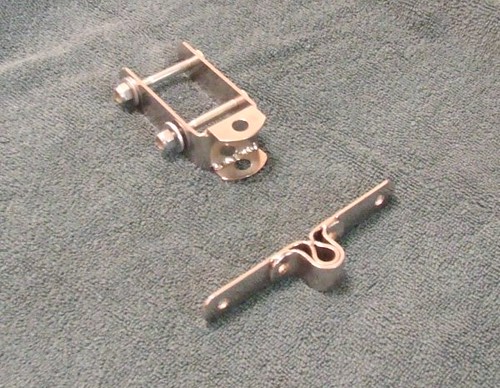
the rudder fittings look to be a strange colour. Is it the photo? What are they made of?
Best wishes
Michael
-
23rd February 2010, 07:19 AM #498
Senior Member
- Join Date
- Jul 2006
- Location
- Portland, Oregon, USA
- Posts
- 334
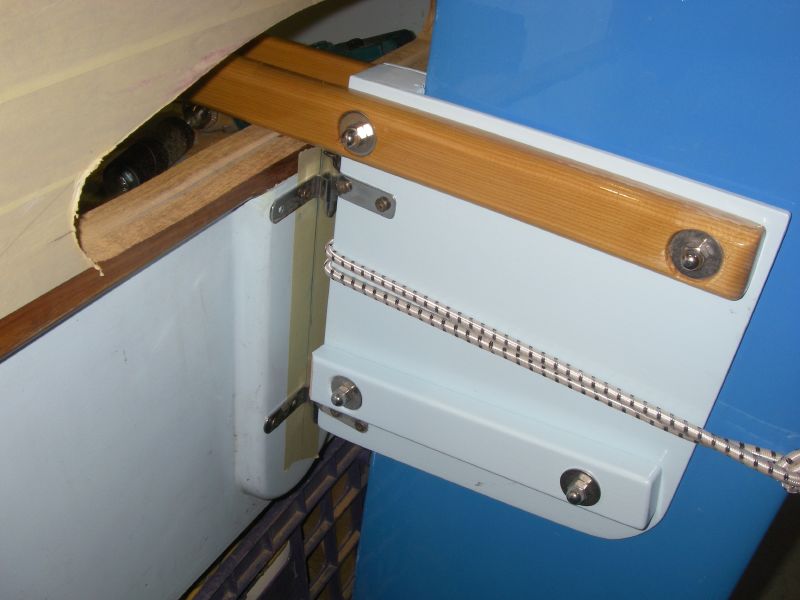
We did ours externally, as shown below. A 3/4" thick piece of cherry, painted the hull color. The cherry's not that heavy, it's rot-resistant, and plenty stout. I guess that's why Mik didn't rip the gudgeons off last Fall when he tore up our rudder box

The rest of the story (for those who haven't heard it before) is that those screws shown attaching the pintles to the rudder box are "temporary" too-short, steel, flatheads... which were never replaced. They were an accident waiting to happen, and when Mik was wringing it out at Timothy Lake, they failed
"There is nothing so permanent as a temporary solution"
-
23rd February 2010, 01:27 PM #499
SENIOR MEMBER
- Join Date
- Jul 2008
- Location
- Fenwick, Michigan
- Age
- 75
- Posts
- 908
Mik - thanks for the comment re 6mm for the backing plate. The fittings are stainless (from DuckWorks) and it is the lighting in the photo. Bruce's photo of his rudder fittings (post # 152 of his Building Shesha... thread) has the same color distortion....the rudder fittings look to be a strange colour. Is it the photo? What are they made of?
David - Thanks for the photo. That is a pretty nice installation - one of your deviations, right? Seeing as how I already have the fasteners I'm going to go ahead with the backing plates installed on the inside of the hull. For the record, I had nothing to do with those screws coming loose at Timothy Lake... I was only serving as ballast that day.Building Gardens of Fenwick, a Welsford Parthfinder
Gardens of Fenwick
Karen Ann, a Storer GIS
Goat Island Skiff - Sacramento
-
23rd February 2010, 02:38 PM #500
Happily receives emails.
- Join Date
- Jul 2005
- Location
- 'Delaide, Australia
- Age
- 65
- Posts
- 8,138
did I see a screwdriver in your pocket?
-
23rd February 2010, 02:49 PM #501
Senior Member
- Join Date
- Jul 2006
- Location
- Portland, Oregon, USA
- Posts
- 334
Definitely one more example of our deviancy Originally Posted by BobWes

And wonderfully fine ballast I'm sure you were And I'm sure Mik never let you near enough to the tiller to be able to interfere with the rudder 
-
24th February 2010, 02:49 PM #502
SENIOR MEMBER
- Join Date
- Jul 2008
- Location
- Fenwick, Michigan
- Age
- 75
- Posts
- 908
A Pleasant Surprise
One of the guys attending the launching on the 6th sent me this short video clip: (until I can figure out how to embed videos in a post, we'll have to make do with a link to my Flickr account)
wessel launch on Flickr - Photo Sharing!Building Gardens of Fenwick, a Welsford Parthfinder
Gardens of Fenwick
Karen Ann, a Storer GIS
Goat Island Skiff - Sacramento
-
24th February 2010, 03:06 PM #503
Senior Member
- Join Date
- Jul 2006
- Location
- Portland, Oregon, USA
- Posts
- 334
That's nice to see... but... didn't you give anyone a ride?????
-
24th February 2010, 03:13 PM #504
SENIOR MEMBER
- Join Date
- Jul 2008
- Location
- Fenwick, Michigan
- Age
- 75
- Posts
- 908
Morgan wasn't there.

By the time we waited for everyone to get there, quit yakin' and I made my little speech, everyone was freezing. Remember, this is Northern California in February - we exercised our inalienable right to complain about the weather to the point that folks headed to their cars and homes as soon as they could. I mean, it was below 60 that afternoon! And cloudy, too!
.Building Gardens of Fenwick, a Welsford Parthfinder
Gardens of Fenwick
Karen Ann, a Storer GIS
Goat Island Skiff - Sacramento
-
28th February 2010, 09:23 AM #505
Intermediate Member
- Join Date
- Dec 2009
- Location
- Miami, FL USA
- Age
- 77
- Posts
- 26
Bob - the boat is looking great - I believe that in order to make the tape line disappear you need to first fill the weave - try using System 3 clear coat - does not run (reportedly) as much as others. You will want to sand about 1/2 - 3/4 inch of the edge of the taped area on the sides - to blend it into the sides of the hull. Also double check the fillets on your chines inside to insure you don't have any gaps (leak). Looking good!!
-
28th February 2010, 02:30 PM #506
SENIOR MEMBER
- Join Date
- Jul 2008
- Location
- Fenwick, Michigan
- Age
- 75
- Posts
- 908
Rick - thanks for the compliments. I really appreciate them....the boat is looking great - I believe that in order to make the tape line disappear you need to first fill the weave - try using System 3 clear coat - does not run (reportedly) as much as others. You will want to sand about 1/2 - 3/4 inch of the edge of the taped area on the sides - to blend it into the sides of the hull. Also double check the fillets on your chines inside to insure you don't have any gaps (leak). Looking good!!
Thanks, too for the suggestions. I filled the weave with a couple more applications of epoxy. I faired the edge of the tape with a mixture of thickened epoxy. I was pleased with the results - but I had to push my luck just a bit further... After the fairing mix set up I decided to apply a coat of epoxy over the the fairing mix. I applied the epoxy with a roller and watched for runs, smoothing out the occasional one with the roller. After not seeing any new runs in about a 20-minute period, I figured there wouldn't be any more and I went home. I had a bit of a surprise the next day when I found a couple dozen small runs. It's not that they were difficult to remove, it is that removing them took time away from other tasks - and could have been avoided altogether.
The interior is nearly complete. Mostly small details - installing the oarlock sockets; a few bigger tasks - installing the quarter knees and center case gusset; and (for me) a bigger chore - installing the breasthook. I expect to turn the boat over tomorrow or Monday to install the bottom skids, apply one more coat of primer, and be ready to paint.
I am also in the midst of building a set of oars. I'll probably make a "set" of three as the first one, while functional, has its faults.
How is your project coming along?Building Gardens of Fenwick, a Welsford Parthfinder
Gardens of Fenwick
Karen Ann, a Storer GIS
Goat Island Skiff - Sacramento
-
7th March 2010, 11:34 AM #507
SENIOR MEMBER
- Join Date
- Jul 2008
- Location
- Fenwick, Michigan
- Age
- 75
- Posts
- 908
Things have been busy fitting things out following last month's launch. Someone once said building the hull marks the half-way point of a boat building project. They may have underestimated...

At any rate, I have been busy getting Karen Ann ready for next week's outing on SF Bay (okay, the Richmond Inner Harbor - but I can see SF Bay from there!).
Karen Ann received her first color coat today.
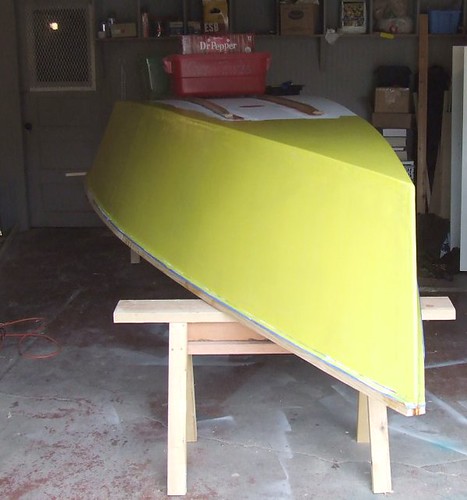
It is bright! I'll be easy to spot on the water!
Another lesson learned: the color coat brings out more flaws and blemishes than the primer. I'll do two more color coats (sanding between) and take her rowing next weekend. After that I will go back and fix those warts, pimples, flaws and blemishes.
I know not everyone thinks this is a good color, but I like it.
Building Gardens of Fenwick, a Welsford Parthfinder
Gardens of Fenwick
Karen Ann, a Storer GIS
Goat Island Skiff - Sacramento
-
7th March 2010, 01:08 PM #508
SENIOR MEMBER
- Join Date
- Sep 2007
- Location
- Savannah GA USA
- Posts
- 583
I like it too!
Great progress.The "Cosmos Mariner,"My Goat Island Skiff
http://s176.photobucket.com/albums/w168/MiddleAgesMan/
Starting the Simmons Sea Skiff 18
http://www.flickr.com/photos/37973275@N03/
-
7th March 2010, 01:18 PM #509
Happily receives emails.
- Join Date
- Jul 2005
- Location
- 'Delaide, Australia
- Age
- 65
- Posts
- 8,138
Looks good. Always liked yellow!
With the painting I use auto body filler to fix the major blemishes before the last two coats of final. Make sure the filler isn't a dark colour though and don't get carried away with it - but that considered it can help quite a bit.
MIK
-
9th March 2010, 01:38 AM #510
Member
- Join Date
- Aug 2008
- Location
- Cranberry Twp, PA
- Age
- 51
- Posts
- 74


 Reply With Quote
Similar Threads
-
Hello from Sacramento California
By Keystonecop in forum G'day mate - THE WELCOME WAGON -Introduce yourselfReplies: 4Last Post: 8th December 2008, 03:34 PM
