

 Thanks:
  Likes:
  Needs Pictures:
  Picture(s) thanks:
Results 46 to 60 of 724
Thread: GIS - Sacramento
-
13th April 2009, 02:57 PM #46
 SENIOR MEMBER


- Join Date
- Jul 2008
- Location
- Fenwick, Michigan
- Age
- 75
- Posts
- 908

David,
A tie-dyed sail... I can barely contain my enthusiasm...
While I may be cutting inwale spacers far in advance of needing them, I am not far enough along to be pondering tie-dyed sails, however, ah, unique they may be! But it's been a while since I've been up that way, so I may have to plan a road trip for early August!
Work progresses on the plane. The sole is just about there as only a hint of a shadow of the marker remains... The blade is coming along, too, but this is seemingly a bit more involved than sanding the sole. I'll get it together pretty soon.
I started shaping the stem this afternoon... I stopped shaping the stem right after learning just how SHARP a new chisel really is... It's okay though, it didn't bleed too long, and I didn't get any blood on the lumber.
Bob
-
13th April 2009 02:57 PM # ADSGoogle Adsense Advertisement
- Join Date
- Always
- Location
- Advertising world
- Age
- 2010
- Posts
- Many
-
13th April 2009, 03:10 PM #47
Senior Member
- Join Date
- Jul 2006
- Location
- Portland, Oregon, USA
- Posts
- 334
BW - I'm confused. Your stem is bleeding? Man... you've got my sincerest condolences. Hope it heals Real Soon!

You're not impressed with the fotoshopped tye-die? To an old hippy like me, it's just like going home
-
13th April 2009, 03:40 PM #48
SENIOR MEMBER
- Join Date
- Jul 2008
- Location
- Fenwick, Michigan
- Age
- 75
- Posts
- 908
I must have lost more blood than I thought... mistaking pronouns that way...
A true hippie wouldn't know he was gone from home...er, "gome"... (Are you typing one=handed, too?)
-
13th April 2009, 03:53 PM #49
Senior Member
- Join Date
- Jul 2006
- Location
- Portland, Oregon, USA
- Posts
- 334
I have absolutely no idea what you are talking about, and I thing that you should apologize for your blatant... uhhh, um, urrrr... I say there... What were we talking about, again? Originally Posted by BobWes


-
13th April 2009, 04:41 PM #50
SENIOR MEMBER
- Join Date
- Jul 2008
- Location
- Fenwick, Michigan
- Age
- 75
- Posts
- 908
Wait a sec... isn't Gome just a little southwest of...
Ah HA! So, that's what an Ah HA moment is like... Wow...
Sorry... but I just put the plane together, clamped a piece of wood in the Workmate... and Ah HA!... darn, that is nice...! So I clamped in the stem blank and, that little Stanley plane is working like a champ! I had no idea I was that close to having a sharp blade, I mean, I followed the directions, but I felt like I was going through the motions without knowing or really understanding what I was doing... I still don't know or understand, and I'm sure there is more to be done, but I am very pleased right now...
-
13th April 2009, 05:31 PM #51
Senior Member
- Join Date
- Jul 2006
- Location
- Portland, Oregon, USA
- Posts
- 334
Chillaska. That'd right.Isn't it past your bedtime?
-
14th April 2009, 10:02 AM #52
SENIOR MEMBER
- Join Date
- May 2008
- Location
- Portland, ME USA
- Posts
- 837
Not only is that the coolest sail but the best picture of a GIS I've seen yet! I love seeing boats taken down at near-waterline level...it really represents the boats lines best! Awesome.
Clint
-
14th April 2009, 11:32 AM #53
Senior Member
- Join Date
- Jul 2006
- Location
- Portland, Oregon, USA
- Posts
- 334
See, Bob, you'd be the envy of all who were honored to look upon your marvelous sail Originally Posted by Compass Project

Seriously, though, how's progress?
-
14th April 2009, 11:56 AM #54
Member
- Join Date
- Jun 2008
- Location
- Sydney, Australia
- Age
- 79
- Posts
- 55

David,
I agree with Clint, that is a terrific photo of the GIS . Really shows off the lines beautifully. Not that I have anything against tie-dye, but is there any chance of posting the original. I'd like to use it as my wall-paper. It's just the incentive I need to make a serious commitment to finishing my boat.
As a child of the sixties I saw enough tie-dye to last me a lifetime. Unfortunately my 18 year-old daughter has re-discovered it and I've started having most disturbing flashbacks . I've even started listening to my Jefferson Airplane LPs again . I'm afraid a picture of a tie-dyed sail would have serious repercussions .
cheers,
clay"The best boats are either small enough to carry home, or big enough to live on." Phillip C. Bolger (1927-2009)
-
14th April 2009, 12:12 PM #55
Senior Member
- Join Date
- Jul 2006
- Location
- Portland, Oregon, USA
- Posts
- 334
Clay - I stole the image from the Grand Poobah. I've already asked about the original. It is a nice shot of a Goat underway in a moderate breeze. Really shows off the sail nicely (now if I'd just learn how to trim it properly, even Mik would be happy)... and the boat scooting along well.
Bob - you sure? No tie-dye???? She'd sure be unique!
-
14th April 2009, 12:26 PM #56
SENIOR MEMBER
- Join Date
- Jul 2008
- Location
- Fenwick, Michigan
- Age
- 75
- Posts
- 908
Last week I started building, although "building" may be a premature description of what I've been doing...
New-to-me tools:
Stanley 9 1/2 block plane purchased on eBay for $29 total
Set of 8 bar clamps purchased on eBay for $35 total
Chisels
Japanese saw
48" metal rule (mainly for the straight edge)
Older tools pulled out of storage:
Stanley Workmate (one of the old heavy ones)
Cordless drill and the charger
Miscellaneous tools (tape measures, C-clamps, combination square, like that)
I spent a good part of last week working on the plane. Here is the sole after the first few minutes of flattening work.
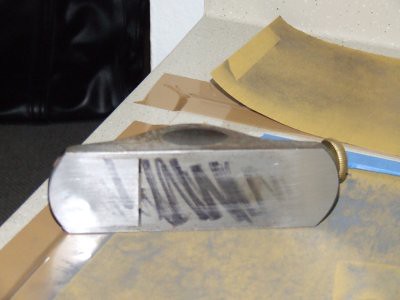
and a couple of nights later, nearly there...
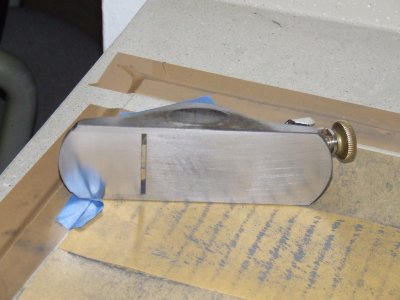
It is getting there but I got tired of taking pictures of the same hint of a trace of a shadow of those marks.
I also worked on honing and sharpening the iron. Despite following directions I had no understanding or appreciation for what I was doing. I wasn't even sure I was doing any good.
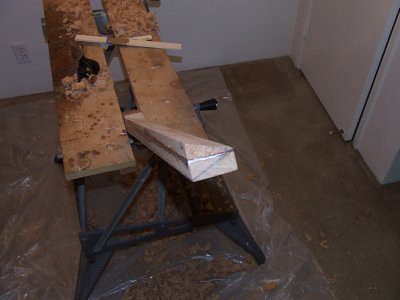
Saturday I laminated (yes, I said laminated) a blank for the stem. On Sunday I began shaping the stem. I used the Japanese saw to cut to reference lines on the blank and began removing wood with a chisel. That's when I learned just how sharp a new chisel is... My finger didn't bleed too long and no blood was spilled on the stem.
I decided it was time to see if I had made any progress with sharpening the plane. So I assembled the plane, adjusted the depth of cut (not very deep!) and ran it over a scrap held in my hand. It worked but it wasn't very impressive. But I decided to try it on the stem blank clamped into the Workmate. Wow! An absolute shocker! Fine shavings began coming off the blank without much effort at all, and the more I worked with it the easier it became. It was one of those rare Ah HAH! moments! I realize there is more work to do on the iron, but I also realize I did do some good with it!
Here's the half-done stem.
!
I've also been using the Japanese saw and a miter box to cut inwale spacers. I am a long way off from installing inwale spacers, but it is part of the project I can do now. They don't take much up much room.
So, not a lot of progress but I feel good about it. With the bar clamps on hand I should be gluing up the foils by the end of the week.
Gosh, I don't know how I'll live with myself, but I'll pass on the tie-dye sail... Jefferson Airplane, huh? It's been awhile since I've listened to them... maybe I should go dig out my old albums...
Bob
-
14th April 2009, 03:57 PM #57
SENIOR MEMBER
- Join Date
- Jul 2008
- Location
- Fenwick, Michigan
- Age
- 75
- Posts
- 908
Enough time spent on the stem this evening to finish it! At least for now. I've taken it down close to the reference lines and, rather than risk that one-too-many pass-taking-out-more-than-I-meant-to, I'll leave it for now. When it is time to attach the hull sides to the stem, I'll make any necessary adjustments.
It isn't necessarily pretty - and goodness knows I'm no photographer - but here it is...
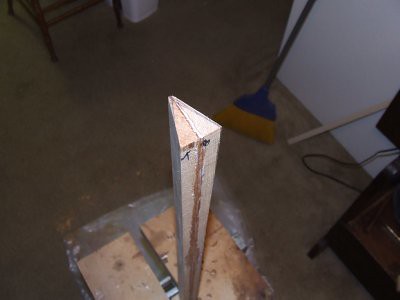
I want to thank those who have gone before and shared their problems, solutions, and triumphs with the rest of us through this forum. Quite frankly, some of those tales of woe intimidated the heck out of me. But I learned from your experiences. I am pleased and grateful that I was able to finish this piece on my first attempt. Thank you all.
Bob
-
15th April 2009, 10:26 AM #58
SENIOR MEMBER
- Join Date
- May 2008
- Location
- Portland, ME USA
- Posts
- 837
Use that hikin' stick and get your butt forward! I sound like a friend who used to race canoes. I'd be hiking out flat as forward as I could go, hard on the wind, all 6'6" of my body flat over the water and he's say...."hike out you wimp!" Originally Posted by arbordg
Clint
-
17th April 2009, 10:36 AM #59
SENIOR MEMBER
- Join Date
- Jul 2008
- Location
- Fenwick, Michigan
- Age
- 75
- Posts
- 908
Laminating the Rudder Blank
After not doing any "real" boat work yesterday (I did some straightening up and studied the plans a bit), today I am setting up to laminate the rudder blank tomorrow evening.
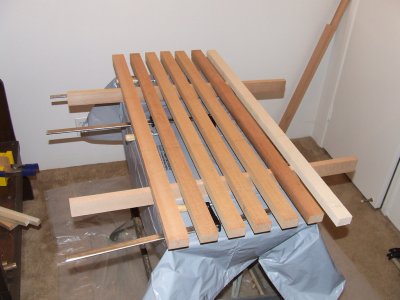
Here is a picture sequence of the dry fit test of the lamination process:
The WorkMate draped in plastic (to catch the excess epoxy squeezed out by clamp pressure) with wood supports in place (to hold the blank off the work surface; allows room for clamping and helps keep the excess epoxy off the bottom side of the blank)

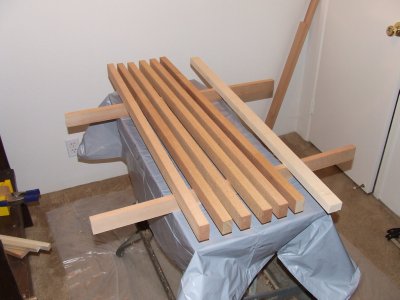
The seven staves to be glued edge to edge to form the blank.
The staves turned up on edge to make it easier to coat the edges with epoxy. Since both long edges of the five inside staves need to be coated with epoxy, I will coat one edge this evening and the other edge tomorrow evening.
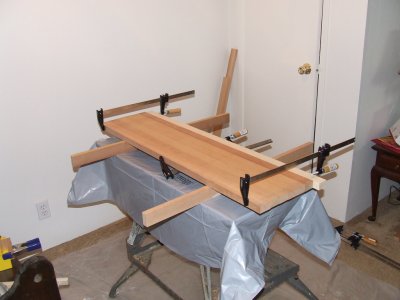
Once the edges have been coated with epoxy - and thickened epoxy is applied to one edge on each stave - the staves will be laid flat and then clamped together
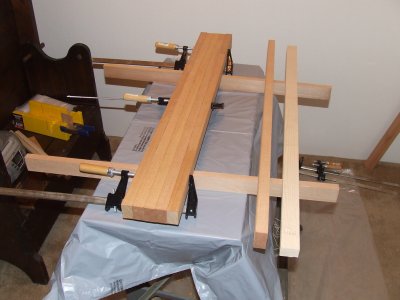
To assure the blank does not twist or warp from the clamping pressure, additional clamps and pieces of lumber will be used as shown to flatten the blank while the epoxy sets up and cures. Jamie, thanks for the reminder this afternoon.

Normally I would paint the epoxy on to the edges with a small foam brush, doing one stave at a time. However, I decided to try something a little different tonight. I will clamp the five inside staves together to create a larger surface and apply the epoxy with a roller or a plastic spreader (haven't decided which yet). If the pieces are clamped tightly together the amount of epoxy dripping down the sides should be minimal. I will remove the clamps before the epoxy cures (becasue if I didn't I would have a rather largish block of wood that would not make a very good rudder!). If that doesn't work very well I will paint each edge individually before clamping the whole thing up. I am planning to use the plastic bag applicator method for the thickened epoxy tomorrow evening.
The epoxy will be applied to the edges of the two outside staves with a brush. Those two pieces are different sizes than the other five staves so they are not easily clamped with the other five staves.
One additional step needs to be done before I start mixing and applying epoxy. I need to tape all of the wooden support pieces with shiny brown packing tape. Epoxy does not stick to the tape which means none of those pieces will became glued to the blank.
Bob
-
17th April 2009, 11:02 AM #60
Member
- Join Date
- Aug 2008
- Location
- Cranberry Twp, PA
- Age
- 51
- Posts
- 74
Bob,
I don't think you want to epoxy inside of the staves prior to using thickened epoxy. The thickened epoxy needs to be able to form a bond with the wood (the way I understand it) which the epoxy could prevent. You will notice in other areas of MIK's directions that where he talks about not laying down epoxy in places where items such as frames get glued to the hull or floor for a better bond.
My post may be confusing - to this point anytime I talk about epoxy I am talking about thickened epoxy applied via plastic bag method.
Applying the thickened epoxy to one side of each stave and clamping it up (taking care not to squeeze it all out) should be more than enough.
I would wait until somebody more experienced replies because I may be wrong (it is one of my specialties), but I would hate for you to do the extra work if you don't need to.
Best,
Jamie


 Reply With Quote
Similar Threads
-
Hello from Sacramento California
By Keystonecop in forum G'day mate - THE WELCOME WAGON -Introduce yourselfReplies: 4Last Post: 8th December 2008, 03:34 PM
