

 Thanks:
  Likes:
  Needs Pictures:
  Picture(s) thanks:
Results 496 to 510 of 513
Thread: GIS Yawl
-
8th August 2012, 02:10 PM #496
 SENIOR MEMBER


- Join Date
- May 2008
- Location
- Portland, ME USA
- Posts
- 837

Hey I am all for functionality. But in this case the water is entering the fwd mast partner and not draining the step and then gets into the fwd tank. Putting a cap on the partner will help, but that doesn't make the tank watertight!
I'll post again when I know more.
-
8th August 2012 02:10 PM # ADSGoogle Adsense Advertisement
- Join Date
- Always
- Location
- Advertising world
- Posts
- Many
-
8th August 2012, 03:41 PM #497
Happily receives emails.
- Join Date
- Jul 2005
- Location
- 'Delaide, Australia
- Age
- 65
- Posts
- 8,138
The Moth Class in Australia used to cut holes for inspection ports but just put clear self adhesive plastic sheet - often used to cover schoolbooks over the hole.
With hull weights around 32lbs for an 11ft long by 15" deep by 4ft something wide hull every ounced counted.
I am not going to rewrite that in metric!
How about 0.7mm ply for the hull and internals and 1.2mm for the deck?
MIK
-
8th August 2012, 04:10 PM #498
i-Sails Australia
- Join Date
- Apr 2009
- Location
- Hunter Valley NSW
- Age
- 69
- Posts
- 1,759
Ouch Clint, but I guess the positives are that you learned something from the experience. For the minor dents on the gunwale you could try rolling them out with a rolling pin. Hardens up the wood in the process as well. In fact, I did this before I varnished mine. An old cricket bat trick to harden up the edges. Anyway, you have the skills to get these things sorted and I guess they are minor compared with the leak issue.
Just be careful with the compressor as a leaky old vacuum cleaner in reverse will be just as good. To find leaks you only need 1 psi and soapy water. I only used lung pressure to find a leak on a club Laser, and that has way more volume than a GIS compartment.
Your experience has reminded me that I have two self-bailers to install. Whenever I have capsized, it has been in quite a big chop and I've found it an almost impossible task to bucket-bail by myself.
-
13th August 2012, 09:33 PM #499
Senior Member
- Join Date
- Mar 2010
- Location
- Queenstown New Zealand
- Posts
- 382
It's going back a bit, but when I first saw this I didn't have a chance to look at the video. It looks like you have a crease from clew to throat at about 17 seconds. I think the solution is to move your halyard attachment point further up the yard (towards the peak). Possibly also a bit more tension along the head as well. I'm more sure about the first change, I had a big clew to throat crease the first time out, moving the halyard attachment point on the yard up fixed it. Originally Posted by CCBB

Ian
-
8th September 2012, 08:29 AM #500
Senior Member
- Join Date
- Mar 2010
- Location
- Queenstown New Zealand
- Posts
- 382
A thought on a quick and possibly cheap way to add a mizzen to a GIS if you can get a free or nearly free laser mast and sail:
The top section of a laser mast is 3.6 - just right for a mizzen.
Take a laser sail, if you measure from the peak 2.6 m down both the luff and the leech, and cut across at that point, the dimensions are almost exactly the same as Clint's mizzen.
There should be lots of laser mast top sections lying around as people change over to the new glass/carbon version.
Come to think of it, would a laser mast top section work as a yard and or a boom?
Woodeneye, do you have a stiffness value (deflection for weight and span) and a weight for a laser top mast, or an idea if it's in the ballpark for what's needed?
Ian
-
8th September 2012, 01:11 PM #501
Happily receives emails.
- Join Date
- Jul 2005
- Location
- 'Delaide, Australia
- Age
- 65
- Posts
- 8,138
YES Ian,
Great observation!
And worth thinking about.
Also good to get a spar deflection comparison for the laser topmast over the same span as the goat yard. Nice idea.
The only problem I can see for the Laser derived mizzen is that the sail will be to full. Mizzens have to be quite flat for two reasons...
1/ The spars are shorter so it is harder to induce a bend to flatten the sail that way.
2/ They operate in the downwash behind the mainsail ... so are sailing in a header all the time.
I started putting a note in my mizzen sailplans to remind professional sailmakers that very small mizzens do need to be flatter ... particularly for reason 1. They will account for reason 2 by themselves.
MIK
-
24th June 2013, 02:04 PM #502
SENIOR MEMBER
- Join Date
- May 2008
- Location
- Portland, ME USA
- Posts
- 837
Getting back to My GIS
Had a glue failure in the aluminum tube used to seal off the mast step area from the fwd tank, so I have re sealed it. Lost the ability for the tube to drain though. Making canvas boots for the masts where they penetrate the tanks.
Also fixing damage from a near knockdown...I got towed in to a dock during rough conditions so cleaning up the gunwale.
Other than that some tweaks in rigging. Same boom as last year, so will try for new boom next winter.
Will post pics at some point.
Cheers,
Clint
-
24th June 2013, 06:28 PM #503
Happily receives emails.
- Join Date
- Jul 2005
- Location
- 'Delaide, Australia
- Age
- 65
- Posts
- 8,138
Howdy Clint, how did you prepare the Aluminium? Was it anodised?
MIK
-
3rd July 2013, 01:03 PM #504
SENIOR MEMBER
- Join Date
- May 2008
- Location
- Portland, ME USA
- Posts
- 837
Hey MIK, I sanded it for sure, but clearly not well enough. But it is possible the larch I used for the step moved a bunch and the check in the grain let water in. I think it was both. Originally Posted by Boatmik
I'm good now, but will have to live with a non draining tube. Like I said, if I were to do it all again, I'd lay up my own fiberglass tube around a piece of pipe that was 4" or so, and use that FRP tube instead of the aluminum. Also would be much lighter.
I'd also use larger drain tubes for the limbers.
At this point I have my starboard gunwale repaired, new oars prepped to get leathered, and the partner/tank tube sealed and reinforced.
I do not have a new box boom yet, but will make that later after I'm back on the water. The important thing is just to get on the water!
-
8th July 2013, 12:24 PM #505
SENIOR MEMBER
- Join Date
- May 2008
- Location
- Portland, ME USA
- Posts
- 837
Mast boots
I made a first attempt at fashioning canvas mast boots for my main and mizzen. The fit was not great, my geometry was off, and the canvas was too stiff.
The photos should show what I am after. You'll see the rings attached around the partner. The bottom of the boot would simply tie off around the ring. The upper part of the boot would seal off inside out to the mast. I anticipate using a SS hose clamp.
I'd like to have it be as waterproof a seal as possible. It also needs to be quick to attach. The idea is to keep the boot attached to mast and make off the draw strings around the ring when mast gets stepped.
Any thoughts and suggestions are welcome. I need to work out how to get the geometry right so when I lay it out and sew the seam on one edge, a nice symmetrically tapered cone results. Then the size 'round the mast and ring needs to be just right.
I'm very new to canvas work and sewing. Try #2 will be next weekend so I'll have this week to find a better material and method.
Then I need to sail.
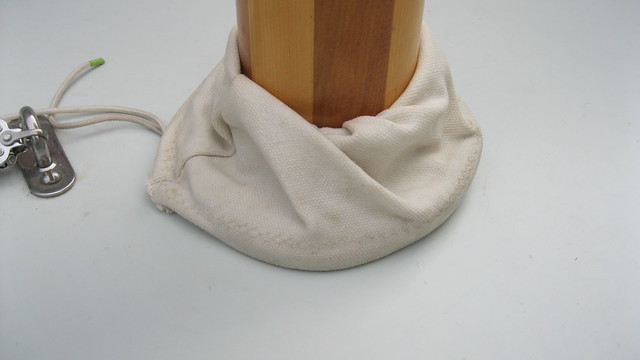
Making a mast boot by Clint Chase Boatbuilder, on Flickr
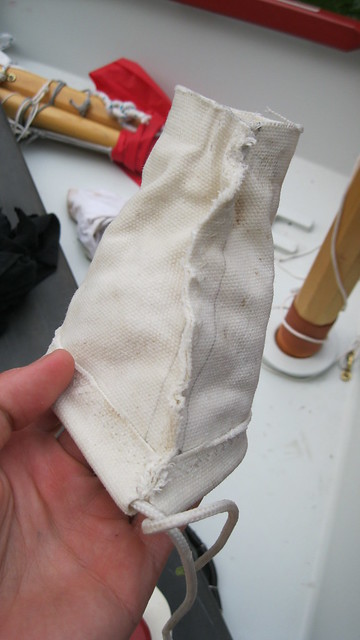
Making a mast boot by Clint Chase Boatbuilder, on Flickr
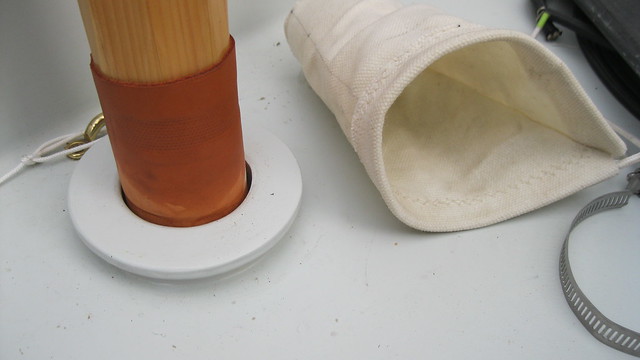
Making a mast boot by Clint Chase Boatbuilder, on Flickr
-
30th September 2013, 12:15 AM #506
SENIOR MEMBER
- Join Date
- May 2008
- Location
- Portland, ME USA
- Posts
- 837
More YAWL adventures
Lots of fun yesterday at the annual Maine TSCA meet up. My first sail in the Goat this year. Made a few tweaks to rig...downhaul is good now, seized the throat of the sail to yard and getting better tension along luff. Work to do: move hatches to tank tops (they are somewhat underwater in a capsize and you really want hatches there to access rudder hardware and inside of tanks...they are an eyesore but so what!); hollow-box boom with revised positions of cleats, line leads, etc.; longer bottom batten for sail; maybe a hollow-birdsmouth yard; rebuild mizzen partner (enclosed tube, more rake to mast); hiking straps.
Here is the link for the YAWL plan.
https://docs.google.com/file/d/0B1Ty...it?usp=sharing
I no longer do the kits for the boat.
The plan needs updating accordingly:
--use fiberglass tube or aluminum tube for fwd partner. Glue Al. tube with 5200 and be sure coating is well removed and scuffed.
--drain mast tube to aft stem through BHD with good size (1/4" min.) tube, or seal it and use a boot like I do in above threads (keeps water out in heavy conditions)
--mizzen mast, more rake needed...another 1" at sheer height
--enclose mizzen with fiberglass or plastic or aluminum tube glued in plus a boot. Don't worry about draining the tube, IMO.
--mizzen sail area...give the mizz some roach up high and add battens. Will help mizzen better keep Goat into wind when hove to
--use cam cleat to sheet mizzen at aft BHD. Sheet will come over top of transom (piece of half-oval or leather tacked to top of transom for chafe)
-
1st October 2013, 10:11 AM #507
SENIOR MEMBER
- Join Date
- Aug 2010
- Location
- New Jersey, USA
- Posts
- 767
Clint, what's the basis for additional rake on the mizzen? Aesthetics or handling?
Sent from my iPhone using Tapatalk - now FreeDave
StorerBoat Builder, Sailor, Enthusiast
Dave's GIS Chronicles | Dave's Lugs'l Chronicles | Dave's StorerBoat Forum Thread
-
1st October 2013, 11:41 AM #508
Better Recognize
- Join Date
- Jun 2009
- Location
- New Hampshire
- Posts
- 960
I got to sail Clint's Goat the other day. It is a sweet ride, I wouldn't be surprised if it could be used as a baseline for other Goats. It is the nicest Goat I have ever sailed (out of two...) I bolded the above comments that I personally noticed/strongly agree with. The mizzen is really nice, but I was surprised that it limited the tiller movement ever-so-slightly. As one that comes charging into the dock and swinging it at the last moment, I'm glad I found out beforehand. Originally Posted by CCBB
During out get-together I forgot the board, rudder, and rudder assembly at home, so I had to reach back and forth in IAZ,P with an oar over the transom. There are some pics out there my buddy Cap'n Jon took. Keep yers eyes out! YAR.
-
2nd October 2013, 06:18 AM #509
Member
- Join Date
- Jul 2013
- Location
- NH
- Posts
- 77
I was wondering how the bottom of your boat is holding up with the graphite coating. Is it something you would recommend doing? I have a can of it from a woodworking project and was considering trying it out on the boat.
-
19th November 2013, 03:15 PM #510
SENIOR MEMBER
- Join Date
- May 2008
- Location
- Portland, ME USA
- Posts
- 837
The graphite-epoxy bottom is nice, but I don't have enough miles to report out on whether it is worthwhile or not. Originally Posted by Beaton1
I have not found an issue with tiller restricted movement due to mizzen. I was worried about it then I realized it was no problem after the first season. I think mine is only 5 1/2" off the center line too.
If I were to do it again, I'd rake the mizz aft a little more, and try to get a little more sail area in the mizzen, preferably in some roach up high.
This winter I get a canvas cover made for my skiff.

 Reply With Quote


Similar Threads
-
BETH (kamikaze canoe yawl) -questions for Boatmik
By robhosailor in forum Michael Storer Wooden Boat PlansReplies: 7Last Post: 18th October 2007, 02:16 AM -
Yellowtail Yawl Update
By Daddles in forum BOAT BUILDING / REPAIRINGReplies: 5Last Post: 26th July 2006, 12:07 PM -
Introducing, the Yellowtail Yawl
By Daddles in forum BOAT DESIGNS / PLANSReplies: 19Last Post: 16th June 2006, 06:31 PM -
Caledonian Yawl Plans
By Donald in forum BOAT BUILDING / REPAIRINGReplies: 1Last Post: 9th February 2004, 10:10 AM
