

 Thanks: 0
 Likes: 0
 Needs Pictures: 0
 Picture(s) thanks: 0
Results 16 to 30 of 404
-
22nd April 2009, 11:10 PM #16
 Grumpy old Bugga


- Join Date
- May 2003
- Location
- South Oz, the big smokey bit in the middle
- Age
- 67
- Posts
- 4,377

I know what you mean Mik.
At this stage, I'd suggest adding the 'guideline' I refer to for the sides, but you need to bear in mind that this is all theory - when I try to assemble things I may realise I'm an idiot, it's happened before.
I'm a bit of a clot when it comes to making things and have learned over the years how to 'fix' mistakes and how to avoid them in the first place. The journey is supposed to be more important than the destination, and emotionally, that's correct, but it's nonsense if the ruddy boat keeps turning to port or is so bad it drives you to drinking too much port. Redback is a case in point, though she's been tamed somewhat.
I will be working as close to your instructions as practical. Partly to test the things, mainly to learn from you and partly because I'm probably not up to too much creativity at the moment.
Richard
-
22nd April 2009 11:10 PM # ADSGoogle Adsense Advertisement
- Join Date
- Always
- Location
- Advertising world
- Age
- 2010
- Posts
- Many
-
22nd April 2009, 11:35 PM #17
Happily receives emails.
- Join Date
- Jul 2005
- Location
- 'Delaide, Australia
- Age
- 65
- Posts
- 8,138
Ah .. the perfect customer!
MIK
hehe
-
23rd April 2009, 02:07 AM #18
Grumpy old Bugga
- Join Date
- May 2003
- Location
- South Oz, the big smokey bit in the middle
- Age
- 67
- Posts
- 4,377
Daddles to control Originally Posted by Boatmik

Daddles to control
Complete surprise has been accomplished
-
23rd April 2009, 02:21 PM #19
Grumpy old Bugga
- Join Date
- May 2003
- Location
- South Oz, the big smokey bit in the middle
- Age
- 67
- Posts
- 4,377
Thursday morning's effort (don't you love school holidays ... when you get to have them as well).
The first thing to report is that we finally have RAIN! That's right, the dog's wet and world smells wonderful. The problem with that is that I have to work with the shed door shut ... which means I have even less room.
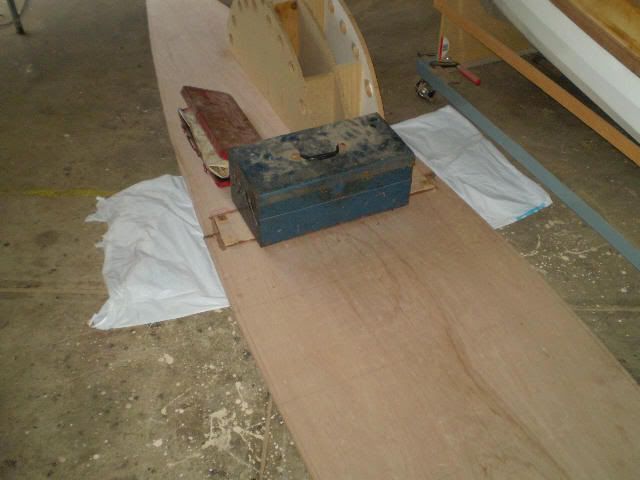
Marking out the bottom this morning. I tried to set things up on saw horses (as shown yesterday) but apart from it being too floppy even with supporting boards underneath, I just couldn't move around the sheets without shoving them around. The mark up stretches across two sheets, that have to be kept in their proper position relative to each other, so I had to move to a more stable work surface ... the floor
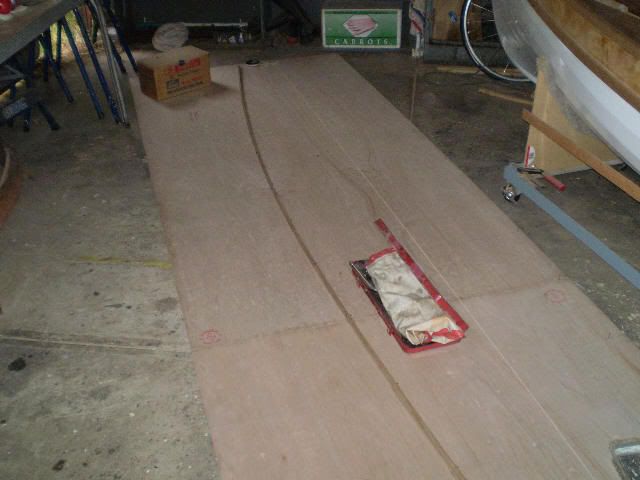
The first shot is towards the stern, the second towards the bow.
You'll note the long batten. This old girl was bought from Bunnies about 8 years ago and still works well as a fairing batten - just a bit of tassie oak. The batten is long enough to stretch well into the second half of the boat though not long enough to do the full boat. The method used was to pin it down, drawn to the half way line, then move it to the other sheet. The overlap is important in that it helps you get a nice, smooth curve with no kink across the join in the middle - if my batten had been shorter, I would have done the job in three bites.
You'll also note the string line up the middle. The two sheets of ply aren't joined and I used this to ensure that everything is lined up properly.
The weights are there to keep the sheets flat on my wonky floor
As discussed above, the line shown on the plan is to the inside of the planking and you need to allow an extra 12mm of timber. The method was to draw the inside line accurately to the batten, then, to get the cut line, draw around the outside of the batten - the batten isn't 12mm thick (as I'd hoped) but by running the wood of the pencil (rather than the point) along the batten, I was able to get the required width. Cutting the bottom isn't critical because it'll be glued to the sides and then planed to fit (I hope, please tell me if I'm wrong Mik).
The plans proved to be beautifully accurate with the batten lying along the nails without a wiggle - such a relief after the dramas getting Redback to work. You can't see the nails - there's one at every station along the inside of the curve with only enough nails on the outside to keep the batten steady - if you place a nail on the outside at every station, you run the risk of putting kinks in the curve.
Although you can't see it in the photos, it's now I can see the size and shape of this monster. Man, what a fine entry she has - she won't cut through the water, she'll split molecules
Now it's lunch, then back out to do mark out a side ... unless my daughter decides she's had enough playing in the shed and wants me to be a daddy for a bit
Richard
-
23rd April 2009, 05:53 PM #20
Grumpy old Bugga
- Join Date
- May 2003
- Location
- South Oz, the big smokey bit in the middle
- Age
- 67
- Posts
- 4,377
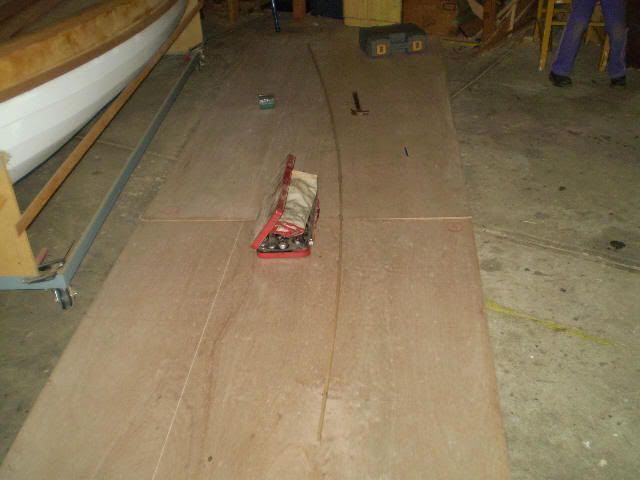
Right. Afternoon shift. Marked out one of the sides - all pretty similar to the above. Thanks to the rain making the grass all wet, my plywood now has paw prints on it **turns to glare at family dog**
Now it gets exciting, I get to fire up something destructive and turn my sheets of plywood into bits of boat
Richard
-
24th April 2009, 01:03 PM #21
Grumpy old Bugga
- Join Date
- May 2003
- Location
- South Oz, the big smokey bit in the middle
- Age
- 67
- Posts
- 4,377
Friday - Morning shift.
I got all destructive
Yup, fired up the trusty jigsaw and assaulted the ply
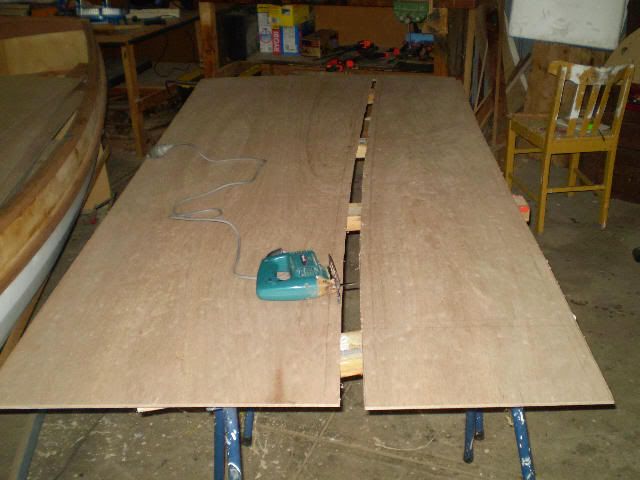
Not having a work table large enough **glares enviously at Midge**, you'll notice I used 4 sawhorses. Spaced out along a sheet of ply, these offer plenty of support, particularly if you're willing to move them around as you cut. I use a 'plywood' blade in my jigsaw and this gives a beautiful, clean cut.
Mik, you can tell Ted that this batch of Pacific Maple is a lovely stuff to work with - I've worked with worse that cost me over half as much again.
So now I have two bottom panels, two stern panels and two bow panels - yes, I carefully checked to make sure I didn't wind up three of something
There won't be much of an afternoon shift because the lad has his driving test and then I have to get the kids off to their 'other' parents.
Richard
-
25th April 2009, 05:09 AM #22
SENIOR MEMBER
- Join Date
- May 2008
- Location
- Portland, ME USA
- Posts
- 837
Daddles...it'd be cool if you wrote to my students and asked a few questions that they could respond to. The link is obvious..."MSD skiff in Maine -- Compass Project". I want them to see that others are watching them from half way around the world! And others should feel free to throw some questions at them...good for them to be thinking about things rather than just following what I say.
-
25th April 2009, 10:22 PM #23
Happily receives emails.
- Join Date
- Jul 2005
- Location
- 'Delaide, Australia
- Age
- 65
- Posts
- 8,138
A fine opportunity for you to express your pedagogical impulse Richard! I've always liked the way you explain things to your kids!
MIK
-
2nd May 2009, 07:12 PM #24
Grumpy old Bugga
- Join Date
- May 2003
- Location
- South Oz, the big smokey bit in the middle
- Age
- 67
- Posts
- 4,377
Right, after battling a major uni assignment, a dose of gastro courtesy of my little princess (who had no more than a funny tummy) and starting a new job, I've finally been able to get some more work done ... a very little bit of work.
And here 'tis.
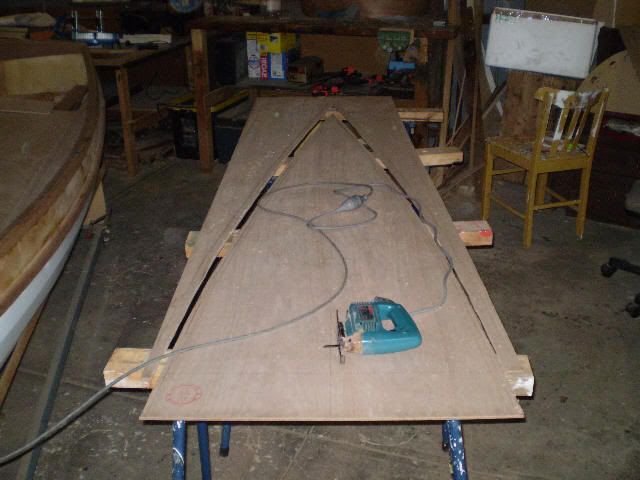
Firstly, the two parts of the bottom have been joined. Not much to report, especially as I haven't lifted them yet to see how bad a job I did. Pretty easy actually.
Then to shaping the sides. I screwed the parts together in pairs (if you look closely, you'll see the three screws with their cleats). This enables you to make two panels that are identical for the effort of shaping only one panel. The downside is that you now have holes in the panels that will need to be filled later but it's worth it.

I took a deep breath and used Mik's belt sander method and man, does it work well. Because the panels are so narrow, I was able to stand on the side opposite where I was grinding, pull the panel against my thighs to stabilise it, reach across the panel and use both hands to support the belt sander. Quick and efficient - I did the two sets (fore and aft) in half an hour including setting up and packing up. The belt sander did a lovely job though it's not as satisfying as using a weapon that you've lovingly sharpened. I did do a bit with my block plane but it can't compare with the sheer brutality of the belt sander. Good tip Mik, I'll be using it again.
Richard
-
3rd May 2009, 10:08 AM #25
Happily receives emails.
- Join Date
- Jul 2005
- Location
- 'Delaide, Australia
- Age
- 65
- Posts
- 8,138
haha ... not where I would have dared to use the belt sander Richard.
So you have outdone me with my favourite tool.
It is my favourite ... not because I use it a lot .. but because you can sometimes look at something and wonder just how to get it done and think how much work it will be to plane and cut it.
And then think "belt sander" and BANG ... problem is gone.
Risk of catastrophe is great too.
But with great power, comes great responsibility!
MIK
-
3rd May 2009, 05:04 PM #26
Grumpy old Bugga
- Join Date
- May 2003
- Location
- South Oz, the big smokey bit in the middle
- Age
- 67
- Posts
- 4,377
Hmm, that surprises me Mik, this is exactly the sort of job I would have thought you'd use it for. Originally Posted by Boatmik
Risk of catastrophe? I see what you mean though in this case, I kept the timber solid, used the flat of the sander not the rounded tip, worked a longish area at a time (ie, not in one spot) and had the two thicknesses of timber to work with. I think all these lessened the chances of disaster, that and a watchful eye and making sure I kept the job clean of dust so I could see the lines. Further thinking has me remembering all the times I've shaped parts using a bench sander (big, solidly mounted disk sander to you push the timber against) so although it was the first time I'd used the belt sander for this job, I'm probably no novice at the game. I also knew exacly what I was trying to achieve which certainly isn't the case for a first time boat builder (surprisingly, but I remember my early mistakes).
Incidentally, who do I blame when I glue the halves together and they look horrid?")
I am now going to consume a pint of fortifying fluid and then venture into the shed to see if I can seperate my boat bottom from the shed floor
Richard
-
3rd May 2009, 06:28 PM #27
Grumpy old Bugga
- Join Date
- May 2003
- Location
- South Oz, the big smokey bit in the middle
- Age
- 67
- Posts
- 4,377
The shed floor seperated from the boat bottom successfully. Man is this boat long. I took the bottom outside and stood it up on the transom - snow formed on the top

Plenty of epoxy had oozed out of the joint on the underside. Knowing that this stuff is relatively sandable if you get it early and knowing (from hard experience) that it's like rock if you leave it a month, I put a rough disc on the random orbital sander and cleaned up the bottom.
Then it was time to tackle the side panels ... and seeing I'd have to cut two buttstraps out of the centre of a new sheet, and seeing it was getting cold and darkish, and seeing I was feeling tired and blue, I decided cowardice was the better part of valour and came inside for a nice mug of coffee
Richard
-
4th May 2009, 09:24 AM #28
Happily receives emails.
- Join Date
- Jul 2005
- Location
- 'Delaide, Australia
- Age
- 65
- Posts
- 8,138
I just checked Richard,
Those side buttstraps are in a really silly place. Sorry about that.
There should be enough offcut down the narrow side of the bottom panel to get them out - providing you have cut out providing you have cut out BHD#3 already .. or marked it.
I just had a good play with the plan and that will work OK. Now looking for an elegant place to put them ... accessible rather than in the middle of the sheet.
MIK
I tried
-
31st May 2009, 04:43 PM #29
Grumpy old Bugga
- Join Date
- May 2003
- Location
- South Oz, the big smokey bit in the middle
- Age
- 67
- Posts
- 4,377
Is anyone following this build?
Well, I am, though it's been awhile since I was able to get out and do some work. Uni assignments and a new job have kept me indoors I'm afraid ... but I finally got out to join the sides.
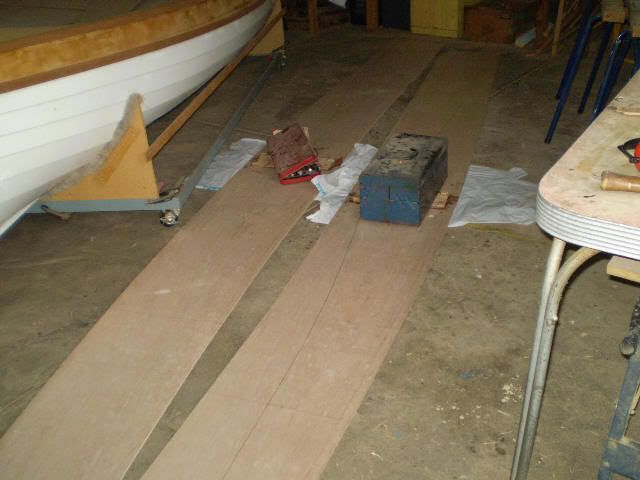
Mik, I didn't even try to get the buttstraps out of the ply for this boat - I woosed out and just grabbed some gaboon left over from Redback (never throw away scrap ... though my daughter keeps making raids on my scrap box)
I did use the string line to align the sides. This has to be done after you've slatherd glue all over everything and before you fit the buttstraps. It worked well on the side shown on the left in the photo because the floor is flat there. That side went together without a drama. Unfortunately, the floor isn't as flat as I'd like for the other side (the right hand one in the photo). The side lined up alright but I'm not convinced it didn't shift while fitting the butt strap ... but I wasn't convinced enough to go pulling things apart to check. It looks okay which is all I could have achieved without the string line.
I can't say I'm a fan of this butt joint buisiness with long, skinny planks though you see it used a lot, particularly with kit boats. Having built boats with both butt joints and scarf joints, the purist in me prefers to use scarf joints to make one mega sheet, then to cut the planks out of that in one piece - I'm not comfortable with this business of trying to join two long, skinny bits in the hope you'll get the shape right, regardless of whether you use a butt or scarf joint to do so. This is probably a hang over from my aeromodelling days where precision building is everything. I don't have any doubt about the strength of the butt joint with butt strap as done here, though it's not as elegant as a scarf joint. And before you ask, yes, I have cut scarf joints and I cut them by hand using a No 7 plane ... but did prefer using the power planer and then the No 7 to finish off But that's just me. I'm not criticising the choice of joint in this build, just making a general comment.
Uni tomorrow.
House work tuesday.
Work wed - fri.
No kids next weekend. I should be able to lift the sides, discover I've cocked up one of them, work out a bodge that'll horrify Mik, then set about the next stage ... which I think is the making of more bits.
Richard
-
31st May 2009, 04:45 PM #30
Grumpy old Bugga
- Join Date
- May 2003
- Location
- South Oz, the big smokey bit in the middle
- Age
- 67
- Posts
- 4,377
And before any cheeky sod asks, I did NOT build two starboard sides ... I hope
Richard


 Reply With Quote
Similar Threads
-
Oz PDR build in Adelaide - sexy black PDRacer
By m2c1Iw in forum Michael Storer Wooden Boat PlansReplies: 39Last Post: 27th April 2009, 06:30 PM -
Wherry style rowing boat
By Arron in forum BOAT DESIGNS / PLANSReplies: 30Last Post: 20th April 2009, 09:56 PM -
Two Foot Skiff
By bitingmidge in forum BOAT DESIGNS / PLANSReplies: 26Last Post: 24th May 2007, 12:28 AM -
Forward Facing Rowing System
By dopeydriver in forum MISC BOAT RELATED STUFFReplies: 7Last Post: 28th January 2007, 11:15 PM
