

 Thanks:
  Likes:
  Needs Pictures: 0
 Picture(s) thanks:
Results 1,591 to 1,605 of 3347
-
17th April 2010, 02:55 PM #1591
 Grumpy old Bugga


- Join Date
- May 2003
- Location
- South Oz, the big smokey bit in the middle
- Age
- 67
- Posts
- 4,377
 Oh good. There was a period there when I feared we'd be stuck with him
 Originally Posted by AlexN


He was even polite about my boat
Good to meetcha mate. Had fun chatting. Didn't really get a chance to flesh things out much. Pity you don't live closer, it'd be fun buildin boats together.
Richard
**suppressing jealousy about the Chipmonk flight**
-
17th April 2010 02:55 PM # ADSGoogle Adsense Advertisement
- Join Date
- Always
- Location
- Advertising world
- Age
- 2010
- Posts
- Many
-
17th April 2010, 10:53 PM #1592
GOLD MEMBER
- Join Date
- Jan 2009
- Location
- Blaxland, Australia
- Age
- 65
- Posts
- 2,551
Little Black Dog is a lovely-looking boat (although I would have trouble hauling her about - which is advanced warning re the Goat!). And Sixpence is looking great, too
 . Wish I had one
  .
.
I wouldn't feel too jealous of me (although I was jealous when I found that my nephew had been up in it) - I started the day with a bad headache which wouldn't go away, and I only managed to concentrate on "flying" the thing because the alternative was much worse! If I'd remembered to take the "Kwell" tablets that I should have before setting out, things may have been a lot better. At least I didn't chunder all over the rear cockpit! Had a much quieter day on Friday looking at the Adelaide Zoo's two newly-arrived pandas - fascinating animals, although I didn't get to see their "thumbs". Maybe they'll appear in some of the close-ups that I took. And had a nice time looking at the meerkats .
It's a pity about the tyranny of distance: once in Adelaide I saw more people in four days than I'd seen in about four months, as it's such an easy place to get around in. Oh well...
-
17th April 2010, 10:58 PM #1593
GOLD MEMBER
- Join Date
- Jan 2009
- Location
- Blaxland, Australia
- Age
- 65
- Posts
- 2,551
By the time that I'd got stuff sorted, I realised that I was too tired to do anything useful on the foils blank. I scratched away a bit at the remaining filler in the "trenches", but decided to leave it until tomorrow as concentration was a bit lax.
-
19th April 2010, 07:36 PM #1594
GOLD MEMBER
- Join Date
- Jan 2009
- Location
- Blaxland, Australia
- Age
- 65
- Posts
- 2,551
Courtesy of jmk89, I now have a nicely thicknessed foil blank that is 22 mm thick on the dot :).
1. Foils blank coming out of the thicknesser: jmk89's hands can be seen competently guiding the board through :). Some of the thicknesser's chips can be seen on the board. That is one very good, heavy duty device there. Thanks, Jeremy!

2. Close-up of foils blank after a pass through the thicknesser. It was run through about half a dozen times, getting thinner on each pass. I unfortunately lost track of which side was up until one pass too late, and a low spot caused by my heavy-handed belt-sanding missed the cut. I am currently scratching my head as to what to do wiht it, as it is either at the bottom end of a foil, or it means cutting the board before shaping to avoid a hollow in a foils tip. Unless I attempt to fill the hollow with clear resin and patch of glass cloth: a strategy that I haven't completely ruled out yet yet, although it will make one of the foils heavier than it would have been. I seem utterly determined to make this process as difficult as possible...

3. Thicknessed foils blank back home and awaiting the next step...whatever that is!

4. Close-up of one end of the thicknessed foils blank

5. Trying to decide which is the straighter of the two long edges. Both of them have a bit of a bow outwards, suggesting that the clamping wasn't terribly even all t he way along the board. The two ends of the blank have been marked out for trimming off square, measuring 2000 + 3 mm from the end nearest the camera (the 3 mm is to allow for the Triton kerf). You can just see the pencil line marking the cut-line for the end of the board closest to the camera. The funny wiggly orange thing is a pair of ear-muffs, acquired at Duck Flat during my visit there. Also saw them being worn by staff at Adelaide Airport. They are so light that I keep forgetting that I've got them around my neck (when they're not stuffed in my ears, that is ;)...

Follow this link to see the enormous number of photos in my Flickr account, and keep Flickr's Lawyers quiescent...
Rather than press on and muck things up again, I left the board in the state in photo 5 above, and got on with sanding the foredeck and port side deck, removing the "filler pools" and sanding them as fair as possible - without making more holes in the resin coat. That just leaves the starboard side deck (it's actually rather blobby) to sand in the same wise, and I'll be ready to start masking up the decks for the colour scheme. I did have a thought about alternating the colour/varnish patches, but I think that it would look too weird. Another thought was to paint the area around the cockpit yellow and leave the outer part of the deck in bright finish, but I decided against that too. Painting the entire deck area yellow was also briefly considered then knocked on the head. Once I've put the primer on I may change my mind and either paint the whole thing or sand it back to clear...
-
20th April 2010, 10:53 PM #1595
GOLD MEMBER
- Join Date
- Jan 2009
- Location
- Blaxland, Australia
- Age
- 65
- Posts
- 2,551
Sanding of the remaining side deck is finished, and I have traced out the colour line onto the decks using the template, and run a couple of strips of blue tape on the inboard side of the pencil line.
I'm really not sure that it will look OK. The Boss suggested "photoshopping" one (or more) of the photos that I took after putting the tape on, to see what it will look like. I'll try that, but I think I can see what it will look like already, and I'm not convinced.
I'll post this evening's photos and the fiddled results tomorrow.
Back to the foils blank once MIK sends me the resized foils template for the most recent printer (the old - correct - printouts were mislaid or lost when I moved out of my study; they could be anywhere, including the recycling depot ;).
-
21st April 2010, 12:39 PM #1596
GOLD MEMBER
- Join Date
- Jan 2009
- Location
- Blaxland, Australia
- Age
- 65
- Posts
- 2,551
Spent some time filling in outboard of the tape line with yellow in one of the photos that I took yesterday. The result is both indicative and salutary. I have change my mind! I'll bright-finish to deck with no colour at all - and I'm now leaning towards a(nother light) colour that will be more sympathetic with the decks and cockpit, e.g., Inter "Brightside Cream". After some browsing on the Akzo Nobel website, and subsequent fishing around on the Wikipedia (which is always right and never wrong ;), I found that 1. ICI is now owned by Akzo Nobel, which in fact Dutch; and 2. Orica was ICI Australia and was spun off as an apparently separate entity before AN swallowed up ICI. Now here's an interesting point: AN owns the "Dulux" trademark, but so, apparently, does Orica, which latter entity has no detectable affiiation with AN. So, who really "owns" "Dulux" in Oz? Who really owns Orica? What really, really important questions...
Back to slightly more mundane and less rarefied subjects, such the alex's 'Duck painting conniptions. Some photos:
1. Taping down the slightly-tweaked paper template to the starboard decking, as viewed from the bow. The "active" side of the template is taped down using small "nibs" of tape so as not to eat up too much of the line. Once the line had been drawn in, the bits of tape on that edge were removed piece by piece and the missing part of the line drawn in sequentially

2. Stern view of "starboard" paper template looking forward. The curve was tweaked a bit near the coaming, where it was rather sharp. The curve on the fordeck is really just a straight line (see also previous photo), and needs more "plumping out". Note also how the curve cuts rather too close n to the coming as well as being too sharp at that point

3. The resulting starboard side's masking line, foredeck segment. Paper offcut on the left indicates how much I took (or rather, didn't take) off the curve

4. Lining up the "port" template on the port side (of course ;). The alignment mark was made before turning the template over and redrawing on the "new" upper face. Note the ragged paper edge and the rather lumpy pencil line, caused by one of the recent tweaking cuts: the blue tape happily ignored that :)

5. "Port" template partially taped in place, bow view

6. "Port" template fully taped down, stern view: note the angle of the tape pieces on the inboard side of the template: this was to allow a nice small triangle that was just sufficient to anchor the template firmly, while allowing maximum "real estate" for the pencil on the first pass

7. Both masking lines, foredeck region. The template method was really successful :))))

8. That forward "curve" is actually straight, and really needs rounding out/fairing

9. "Hard" nature of the foredeck line even more apparent once the tape is on
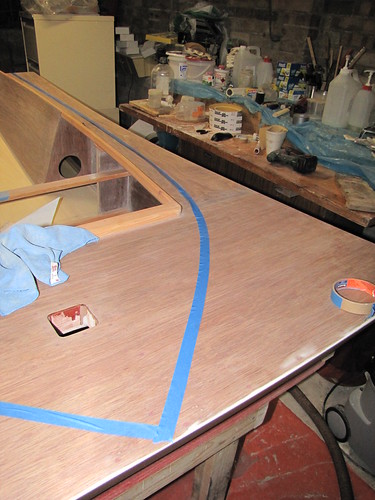
10. Full mask, bow view looking aft. Note that the coloured region is/was on the outboard edge of the mask...

11. Full mask, looking forward from the stern

12. This is what it will look like - more or less - when painted. Apologies for the outbreak of "measles" on the starboard side - I got bored! The colour is solid enough(!) at any rate, to show what it will look like. The "Brightside Yellow" is not quite as day-glo garish as this, but as I say, indicative. I really want a colour that is more sympathetic with the carefully worked cockpit and decking, not some arbitrarily "quasi-rule"-based idea of someone else's. I also don't like the aesthetics of the shape, either - just a bit too weird (the Boss agreed with both points ;). If I do decide to go ahead and ditch the coloured decks, I'll have to remove the resin coat and the primer patches from the bow edge and re-fill/re-coat with resin...

Follow this link to view the above collection o' hphotos and many, many, many more on my Flickr account. Watch out for prowling lawyers, though!
I suppose I really ought to have applied the yellow fill to the view forward to be fair to the whole thing, but as I said, I had decided by then to ditch both the yellow and the shape. On the other hand, I might try the infill using as close a colour to "Brightside Cream" as I can get (which won't be nearly close enough, but hopefully helpful) - it might look better than the yellow. I don't think so, though. Well, I hope not - just think of the amount of time, effort and paints that not painting that deck will save!
-
21st April 2010, 01:14 PM #1597
Senior Member
- Join Date
- Mar 2008
- Location
- Rockhampton, Australia
- Posts
- 227
Its going to look GOOD, I love these curved paint jobs...
 Nick
Nick
Fair Winds and Following Seas
------------------------------------------------------------
PD Racer #276 - "Duck's Nuts" - Oz MkII with Lug rig
Storer Eureka 155 - unnamed
-
21st April 2010, 01:49 PM #1598
GOLD MEMBER
- Join Date
- Jan 2009
- Location
- Blaxland, Australia
- Age
- 65
- Posts
- 2,551
Hi Nick,
I love the model :). Thanks for the kind words - I like 'em too, but not with my shape/colour combo! I'm aware that the yellow as portrayed above is tending to the lurid side of shocking, but I don't think I'll like it even when toned down. In fact, I've had misgivings about the whole thing since generating the template.
I'm going to play about with colours if and only if GraphicConverter sees that yellow as one block (which it probably will), as I don't want to spend the whole afternoon clicking away with the "fill bucket".
On the other hand, perhaps creating a single-click colour-fill outline on another layer in the image would be a lot more efficient. And I could also play about with the shape. And estimate some offsets ;).
Hmm...
Cheers,
Alex.
-
21st April 2010, 01:54 PM #1599
Senior Member
- Join Date
- Mar 2008
- Location
- Rockhampton, Australia
- Posts
- 227
Thats not a model, its a real boat! And yellow is a cool colour for a cool boat!
Nick
Fair Winds and Following Seas
------------------------------------------------------------
PD Racer #276 - "Duck's Nuts" - Oz MkII with Lug rig
Storer Eureka 155 - unnamed
-
21st April 2010, 02:26 PM #1600
 Deceased
- Join Date
- Nov 2008
- Location
- Maylands, Perth, Western Australia
- Age
- 58
- Posts
- 218
 Paint schemes - simple can be great too.
Hi Alex and Nick,
I intend to go with the simplicity of painting the deck just one colour ( Brilliant White ), the hull ( up to the top of the gunwhales ) a second colour ( Brilliant Red ), and the interior a third colour ( Oche - a Subtle Yellow ), as I do not want to add curves to a boat that is for the most part straight lines, I love the shape and paint it to show it off, without the disguise of curves, this is of course just my opinion, and curves obviously look great on a PDRacer too.
-
21st April 2010, 03:21 PM #1601
GOLD MEMBER
- Join Date
- Jan 2009
- Location
- Blaxland, Australia
- Age
- 65
- Posts
- 2,551
Hi Nick, Originally Posted by nickpullen
Oops, so it is. My apologies! I must have been suffering from this morning's colour-filling. Sounds like a good excuse, anyway ;).
I'm fairly certain that the yellow as I've got it set up on the decks is really not what I want. I'm currently patching the colour fill so that it will respond to "single-click colour changes", then start playing about with the colours. At the very least, that foredeck "curve" needs rounding at any rate. So back to it...
Cheers,
Alex.
-
21st April 2010, 05:13 PM #1602
GOLD MEMBER
- Join Date
- Jan 2009
- Location
- Blaxland, Australia
- Age
- 65
- Posts
- 2,551
Hi David, Originally Posted by dhgomm
If one wanted, one could say that I'm somewhere between your and Nick's approaches - I like curves on 'Ducks' decks, but I want simplicity as well: and my curve is not simple, or rather, it's too fussy: in the sense that the colour/shape combo takes up neither the full deck nor no deck at all (halfway in between, in fact ;) and as a result is neither one thing nor the other.
I've been playing about with the "single-click colour-change" version, and have eight different colours to look at now, but I still keep coming back to the fact - to me - that that shape needs either tweaking some more or dropping.
Back to scratching my head...
Cheers,
Alex.
-
22nd April 2010, 01:32 PM #1603
GOLD MEMBER
- Join Date
- Jan 2009
- Location
- Blaxland, Australia
- Age
- 65
- Posts
- 2,551
Here's a "photo" of what several different coloured version of the 'Duck - at present combo - might look like (a bit).
Coloured foredeck samples: screenshot of nine coloured foredecks. The orange deck was the hardest - the rest were a single-click snap ;). "Original" (un-retouched) timber "version" is at bottom right

Follow this link to my Flickr account to see this in many other sizes - and oh so many other delightful happy-snaps...
I put the first patch of glass cloth (2 oz.) and resin in the depression at one end of the foils blank: another piece of cloth (6 oz.) to go in on top, then the remaining hole will be filled up gradually. Photos when I've taken them ;).
-
22nd April 2010, 02:24 PM #1604
Senior Member
- Join Date
- Mar 2008
- Location
- Rockhampton, Australia
- Posts
- 227
Alex.
Ive been thinking about your comment about the paint scheme just not looking right. To me the stripes down the side desk split the decks in half and make them look thinner. This throws the proportions of hull out visually. It makes it so that you have a big fore deck and small side decks. I think thats why the ones that are painted with single colour side decks matching the foredeck, look more like a boat and visually balanced. Make sense?
In saying that, I think a PDR would look cool like this:
 Nick
Nick
Fair Winds and Following Seas
------------------------------------------------------------
PD Racer #276 - "Duck's Nuts" - Oz MkII with Lug rig
Storer Eureka 155 - unnamed
-
22nd April 2010, 03:43 PM #1605
GOLD MEMBER
- Join Date
- Jan 2009
- Location
- Blaxland, Australia
- Age
- 65
- Posts
- 2,551
Hi Nick, Originally Posted by nickpullen
Ah, yes indeed! I think you're right. Probably better to chop the side deck colour off completely, the way that you - and in a slightly different way m2c1Iw - have done.
As for the WWI camouflage, the UK flying boats of the time (the Felixstowe F.2 in particular) had some similarly wild schemes - sort of a cross between Paisley and Psychedelia (although the former were greatly admired by the latter, man... Hey, wow...). Unfortunately I couldn't find any photos of the camouflaged planes, but I have some line drawings somewhere, no doubt copyright Roden Kits). They would be truly gob-smacking on Sydney Harbour - no doubt the chop isn't big enough for the camouflage system to have a chance of working ;). I'll see if I can dig up the drawings - I know I've got them somewhere!
I've just been tweaking the foredeck curve to a rounder form - but maybe I'll dispense with the pattern altogether, as I mentioned yesterday...
Cheers,
Alex.


 Reply With Quote

Similar Threads
-
New Queensland PDRacer Build
By duncang in forum Michael Storer Wooden Boat PlansReplies: 71Last Post: 26th April 2012, 08:30 AM -
Oz PDR build in Adelaide - sexy black PDRacer
By m2c1Iw in forum Michael Storer Wooden Boat PlansReplies: 39Last Post: 27th April 2009, 06:30 PM -
OZ PDRacer - Dylan's build in the Philippines
By Boatmik in forum Michael Storer Wooden Boat PlansReplies: 16Last Post: 23rd February 2009, 05:50 PM -
Brisbane Timber and Working with Wood. Boatmik/PDRacer
By Boatmik in forum Michael Storer Wooden Boat PlansReplies: 1Last Post: 11th April 2007, 08:06 PM -
Flawed wood on the TS --DUCK!
By Robert WA in forum WOODWORK - GENERALReplies: 7Last Post: 19th February 2004, 11:42 AM
Tags for this Thread
balanced lug,
boatmik,
build,
dacron(tm),
douglas fir,
duck,
enamel,
epoxy resin,
fibreglass,
hoop pine,
interminable,
lug,
machinery,
materials,
michael,
oregon,
oz racer mk 2,
ozracer,
paint,
paulownia,
paulownia/glass mast,
pdracer,
plywood,
polytarp,
primers,
really simple sails,
sail-making,
sailmakers thread,
sanding,
storer,
sydney,
timber,
tools,
varnish,
verbose,
western red cedar,
wood,
wood duck,
wrc
