

 Thanks:
  Likes:
  Needs Pictures: 0
 Picture(s) thanks:
Results 1,621 to 1,635 of 3347
-
26th April 2010, 01:24 PM #1621
 Intermediate Member


- Join Date
- Oct 2008
- Location
- Vermont, USA
- Posts
- 29
 Destroy the Hard drives...
Alex,
Destroy the Hard drives...
Alex, Originally Posted by AlexN

To be on the "safe side" destroy the hard drives before you recycle them... I hit them with a big hammer until they are flat. That way the "discs" inside them are shattered and the data can no longer be retrieved. You would be surprised what can be retrieved from hard drives that were considered dead. (credit card numbers and personal details for stealing someone's identity) Wear eye protection and gloves etc.
Steve
-
26th April 2010 01:24 PM # ADSGoogle Adsense Advertisement
- Join Date
- Always
- Location
- Advertising world
- Posts
- Many
-
26th April 2010, 01:35 PM #1622
GOLD MEMBER
- Join Date
- Jan 2009
- Location
- Blaxland, Australia
- Age
- 65
- Posts
- 2,551

Hi Steve,
Thanks for the advice :). I was contemplating drilling right through the casings at various points using the drill press: but maybe I'll do both - then melt 'em down in my mini-forge :).
Cheers,
Alex.
-
26th April 2010, 07:03 PM #1623
GOLD MEMBER
- Join Date
- Jan 2009
- Location
- Blaxland, Australia
- Age
- 65
- Posts
- 2,551
The hand was much improved today, after Cliff's good advice :). Still quite a bit puffy , but somewhat less so than yesterday, and definitely less itchy.
After doing some work on the wall-plastering job, I trimmed up the blank-slots on the router guide sides using a (correctly set) Triton and a couple of Perma-Grit tools, cut a pair of blocks to stick the sides to. The blocks were slotted using the TS, a chisel and a Perma-Grit file, to allow clearance for the router bit at the extremes of the guide. Glued and clamped the set-up, getting an engineers' square nice and grubby in the process of making sure that the alignment was correct (I seem to have forgotten about the use of screws). I remembered to clean the square this time ;). Will check the assembly after dinner once the glue has started to go off a little bit.
Also cleared the milling bench and cleaned off all the pools of resin remaining from coating the hull - and discovered that the bench is nowhere near as flat as I was hoping :E. I guess I can either wedge up the blank or move the operation back onto the floor...
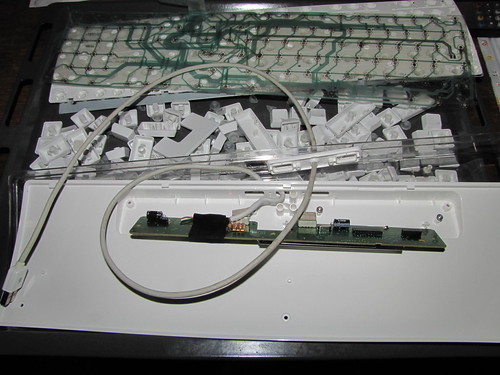
Most of the weekend, however, has been spent dismantling (my favourite thing :) the soused Apple keyboard mentioned recently, and thoroughly cleaning all parts, including the three pieces of circuit-printed mylar that do the magic that makes the keys talk to the controller inside the keyboard. The innards of the kbd - especially the tray under the keys, were truly revolting: I'm very mean to my computer keyboards, especially the ones that I don't like to use (which, unhappily, is most of them). I really want the latest Apple kbd, but I'm afraid that the Boss is on to me and I have to make do with - or fix - what I've got ;).
I have uploaded some snaps to Flickr, but keep forgetting to caption and post them - so next post will have pretty colour piccies courtesy of my Flickr pro (i.e., I pay money for it, don't I Flickr) account.
-
26th April 2010, 11:10 PM #1624
GOLD MEMBER
- Join Date
- Jan 2009
- Location
- Blaxland, Australia
- Age
- 65
- Posts
- 2,551
Some recent photos, dealing with the router guides used for shaping the 'foil shape on the 'foils blank.
1. Triton sanding disk, coarse side up, resting on the two taped pieces of ply for the 'Duck foils router guides
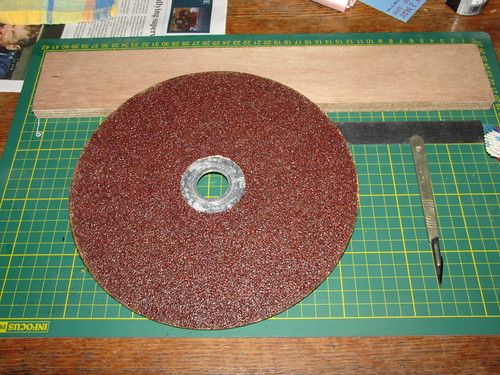
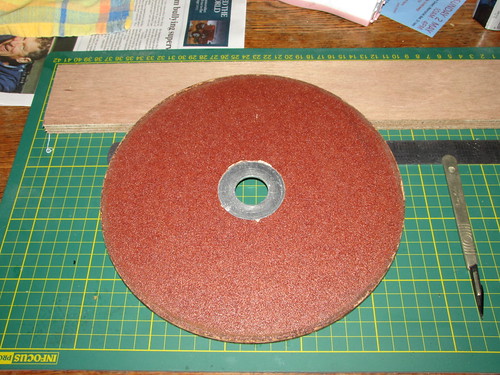
2. Triton sanding disk, fine side up. The scalpel on the RHS was used to scratch off some residual (burnt) sawdust stuck to the rim of the disk. The side in the previous photo had a similar treatment to areas in the body of the disk
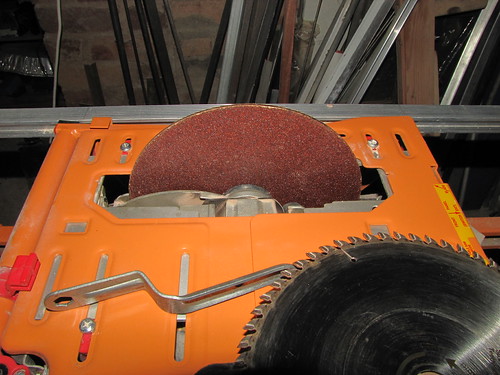
3. Saw blade removed and sanding disk installed on the Triton's circular saw. Cranked tool is the saw's arbor-nut spanner
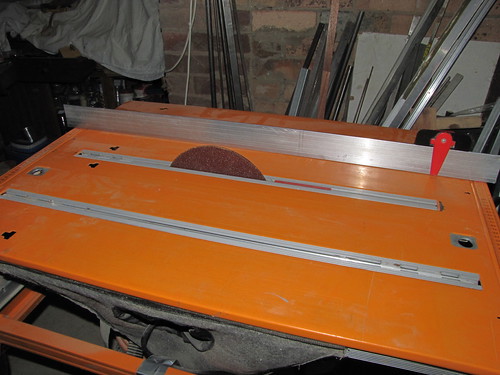
4. All set up, ready for sanding
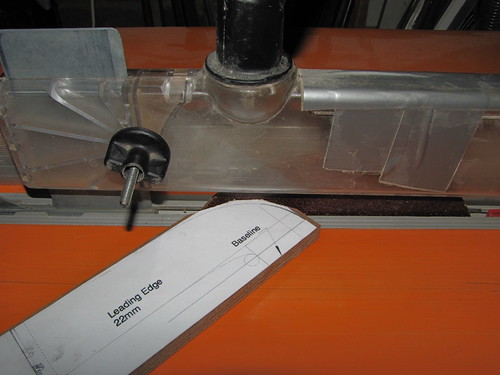
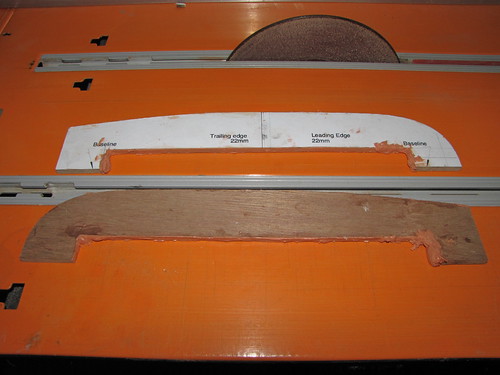
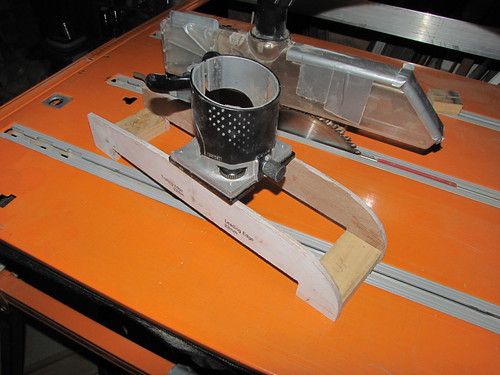
5. Setting the fence for sanding the top of the blank's slot. This is actually not how to do it!
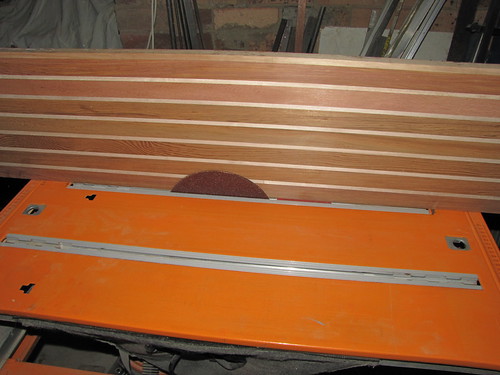
6. Foil blank up against the fence
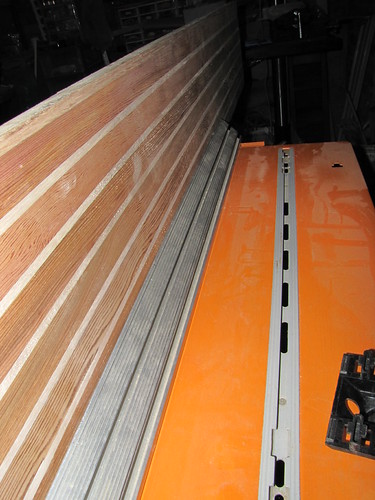
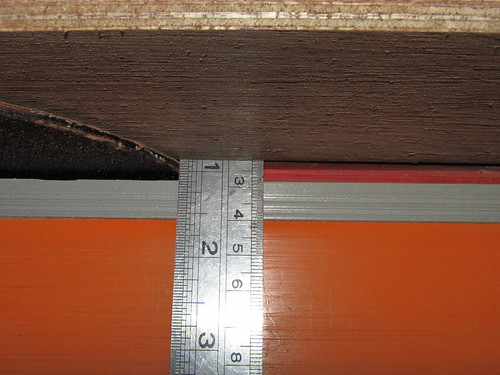
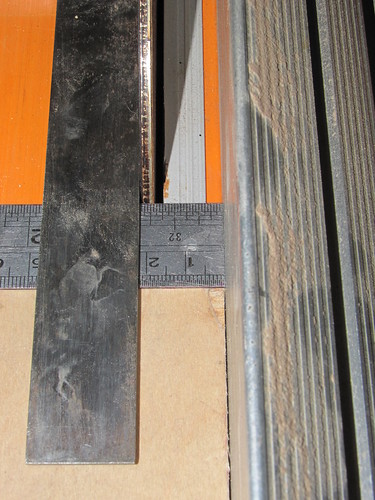
7. The gap between the disk and the fence is 22 mm...
8. The ruler here shows that the distance is 22 mm, but there is one important and really obvious factor that I've overlooked...
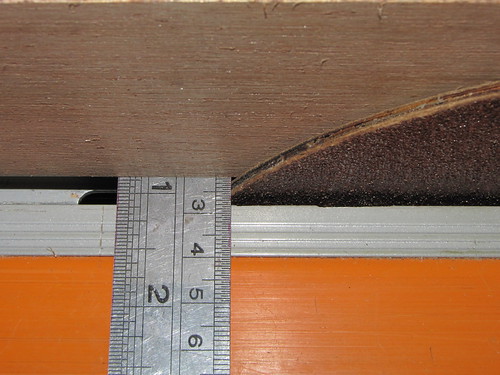
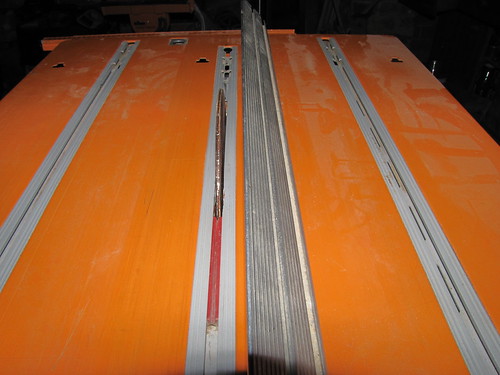
9. The front of the disk is at exactly the same - wrong - distance as the rear: the fence is parallel with the blade, but at the wrong distance. This is because I forgot to take into account the thickness of the sanding disk! Fortunately, I woke up to the error before I started hacking into the rest of the guide. In actual fact, a gap above the guides wouldn't matter very much, as long as the guides at the ends of the slots rested on the blank (and possibly not so much even then). Most important is that the ends of the slot are a good fit with the blank and in the right position(s) in relation to the foil shape; and that the 11-mm line above the base of the guides lines up exactly with the blank's (thickness) centre line. But it is better to have every neat than not...
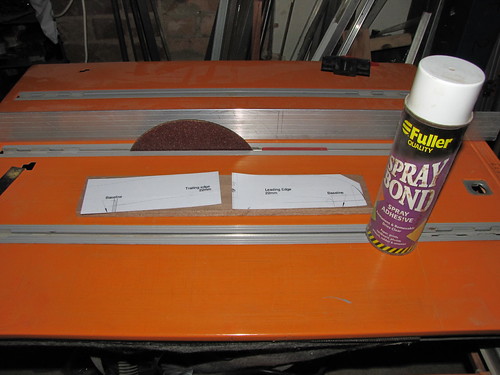
10. Bits and pieces of the router guide ready to assemble. The ply parts are already taped together and cut to size/shape; the paper template pieces are to be stuck on with spray adhesive from can on right
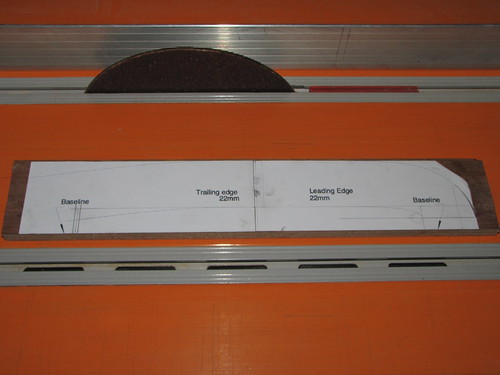
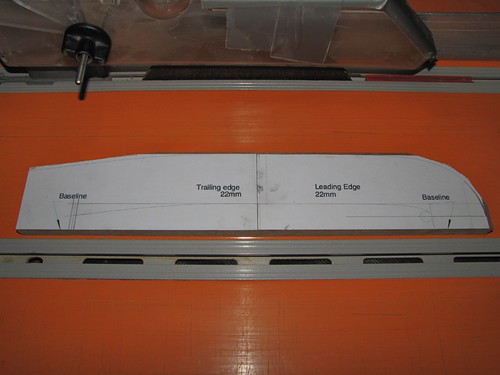
11. Paper templates fixed in place on the ply. Guide blank awaiting trimming and sanding to shape
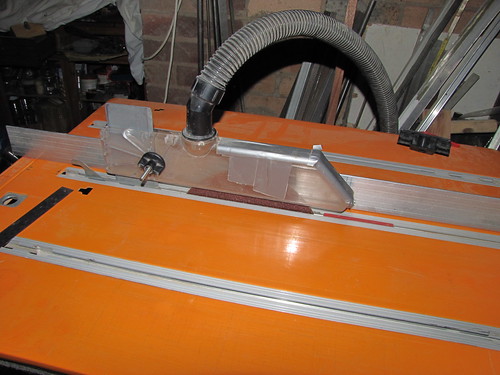
12. Dust extraction hood/blade guard re-installed back on the Triton. OK for the curved side of the guides, but not so much for the slot - although I could have moved the riving knife back a little bit and the plywood would have fitted. But then I probably wouldn't have seen the mistake with the fence setting until too late...
Follow this link for these photos and many others in their wild state on my Flickr account...
But wait, there's more...possibly even a set of steak knives or similar. Well, more photos, anyway.
-
27th April 2010, 12:44 PM #1625
GOLD MEMBER
- Join Date
- Jan 2009
- Location
- Blaxland, Australia
- Age
- 65
- Posts
- 2,551
Some more recent photos, dealing still with the 'Duck router guide construction:
1. Templated and taped blanks trimmed and ready for the sanding disk
2. Proto-guides posing against the sanding disk that will tear it into shape. The dust-extraction equipment only remained in operation until I'd done the lesser amount of sanding. When it came time to do the slot, I took the hood off. There was far more dust created in this part than the actual 'foil-line shaping, although I did try to keep the vacuum nozzle draped over the fence to suck up some dust. Wasn't amazingly successful, although there's now so much dust blanketing the workshop that you wouldn't notice the difference. Lucky I was wearing the Heavy Duty Snout Protector...
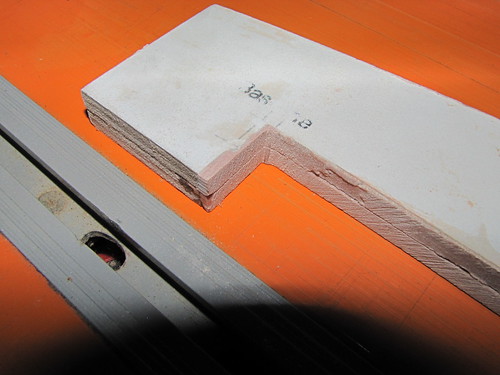
3. The pair of shaped guide plates sitting nicely on the foils blank, BUT...
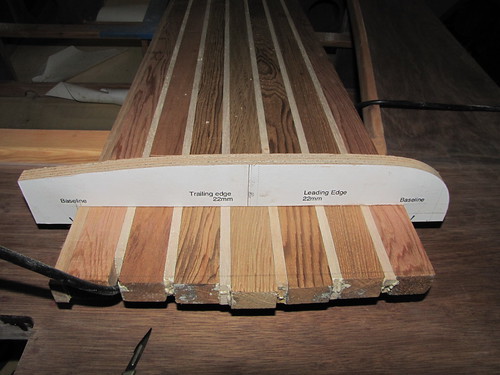
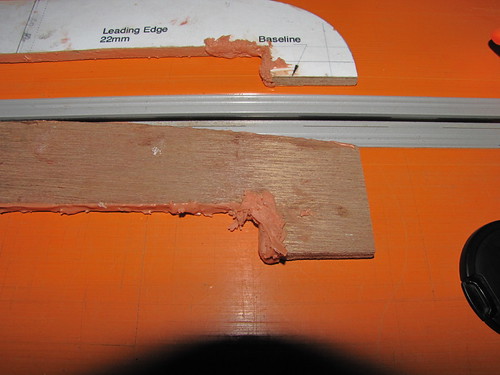
4. Looky here - the fool operator has sanded up to the wrong line! Luckily for the fool, he couldn't sand the entire slot-end as that would have meant cutting a (non-consequential) groove in the top ot the slot. As a result, there is some of the correct slot-end still left as a guide for rebuilding it with car bog... The guides would have been usable for both sides of the blank, but I wanted to be safe rather than sorry - well, sorrier...
5. Router guide plates separated, tape removed and hacke-up slot end(s) patched with car-body filler. I considered using a mixture of plywood flour from the TS's dust bag and Purbond, which I made up and then decided not to use as I wanted something that I thought would be more durable, after a bit of thought. The Purbond fluffs up quite a bit, whereas car-body filler is relatively stable, and also sets *much* more rapidly and gives a much more accurately sandable substrate. Which is why, of course, my model aircraft cowling mould-plugs are covered in the stuff: you can put back what you take off!
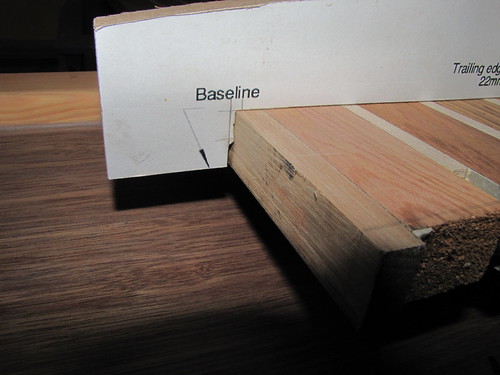
6. Close-up of the slot-end patching, early stages. I ran a rather messy bead of bog right around the slot perimeter, to take into acount and slips with the incorrectly set fence - not that it would really matter: the slot's ends and its centreline height are the critical "points"
7. Router guides sanded flat on their "inside" faces, then taped back together and the slot re-ground to correct size/position. Adding the auto-filler with the guide plates taped together wouldn't have been a smart move, as getting them apart again would have been a wee bit problematic. As it happened, the filler started to pull away from the plywood of the lower guide (in this photo) as I had tried out some Purbond filler on that end before scrapping the idea. I thought that I'd removed it all, but obviously not, as the filler hadn't quite taken. So before getting the (re-taped) blanks back near the TS, I applied a few drops of thin CA (super glue) to the cracked, and that fixed it good and proper :). I took a calculated risk that the CA wouldn't stick the two bits of filler/ply together: happily, I was right in this instance! This photo and the following one show the blank just before the sanding-to-size...
8. Fore end of router guide plates showing filler sanded down on flour sides of the platesNote also that I ran some filler around the top edges of the guides, to fill in some nicks that I accidentally put in at one point. Those edges were sanded clean and fair after taping the blanks back together but before dealing with the blank-slot
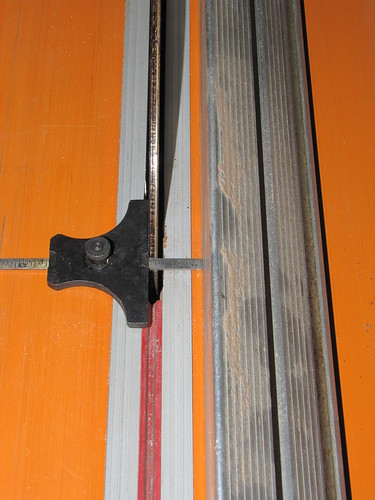
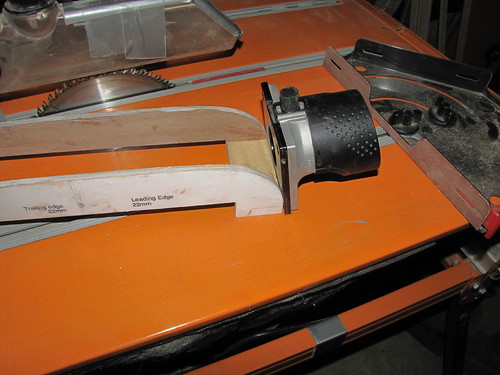
9. Checking the correct fence position for sanding the top edge of the guides' blank-slots. Rather a cumbersome way of doing it when you can do this...
10. Using a depth gauge to set the fence distance for final slot-shaping. The gauge was set on the foil itself, and transferred immediately to the TS. As it is indefinitely repeatable, both edges can be set at *exactly* the same distances without fear of slippage and other errors
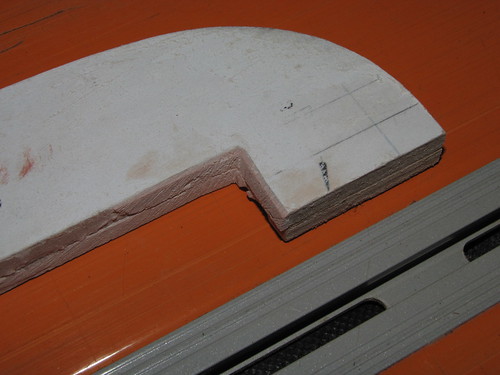
11. Re-shaping of the slot complete

12. Guide sides with tandem-cut spacer blocks. The blocks were a couple of pieces of P. radiata scrap, sail-taped together and whacked through the Triton with the saw blade re-fitted
Follow this link to view all of these photos, all the rest of my photos on this thread, except those stored on this Forum and which the Flickr lawyers happily have no jurisdiction over, plus many, many more in glorious revolutionary digital 24-bit or higher colouration. You will be...you will be... you will...I dunno, you might be delighted, you might sick up, who knows...
But wait, there's more photos to come on the sorry saga of the sagging folis! A set of steak knives (I lie), a set of cheese knives (I'm still lying), and a set of kitchen knives (I'm still lying and haven't got up yet). Stay tuned...
-
27th April 2010, 06:06 PM #1626
GOLD MEMBER
- Join Date
- Mar 2007
- Location
- Adelaide
- Posts
- 2,139
Alex maybe you should pop in on the CNC forum the foils would make an interesting project for those blokes. Sit back and watch the dust fly while you sip a beer.

-
27th April 2010, 06:33 PM #1627
GOLD MEMBER
- Join Date
- Jan 2009
- Location
- Blaxland, Australia
- Age
- 65
- Posts
- 2,551
As promised - or threatened, take your pick - even more photos on how to get oil over your new uncoated foils blank. Actually, there aren't any photos of the oily blank - yet - but sadly, yes, klutz-fingers struck again while trying to make the bench an oil-free zone for the foils blank while in too much of a hurry... It was an oil-turps mixture, so it will have gone even deeper into the board and quicker, than just oil. So I can probably kiss goodbye to a permanent epoxy coating on it :(. Stupid fool isn't even in it.
I got onto the spill straight away with meths followed up by vast quantities of acetone, so I may get some oil out - but even if a bit is left is is still going to repel the epoxy. I don't believe it. And yet I do... As I've said before, I shouldn't be let near good tools and fine work.
Photos:
1. Spacer block posing with aft ends of router guide plates, showing the sanded filler in the slot-end holes

2. Quick mock-up of the router guide assembly: still some work to be done on the spacer blocks before glueing the whole thing up
3. Mocked-up router guide with router base
4. Mocked up guide with router base around the front of the guide
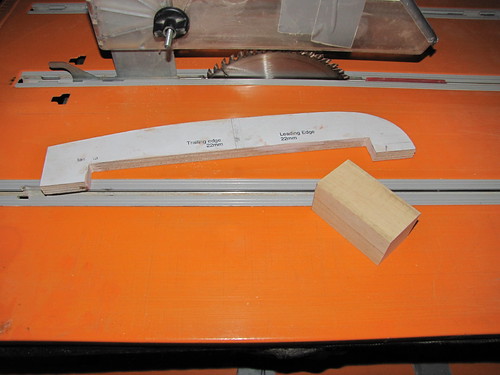
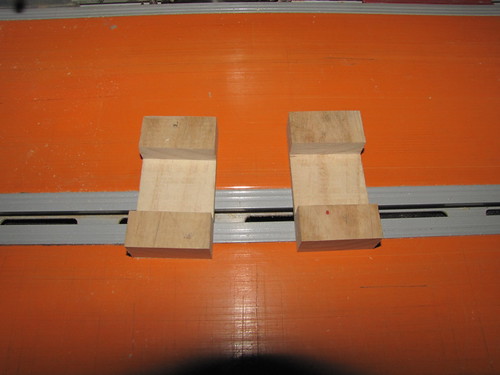
5. Spacers with router-bit relief for when the router is at the ends of the guide - particularly the front thereof. The front spacer block will also act as a sort of stop for the router
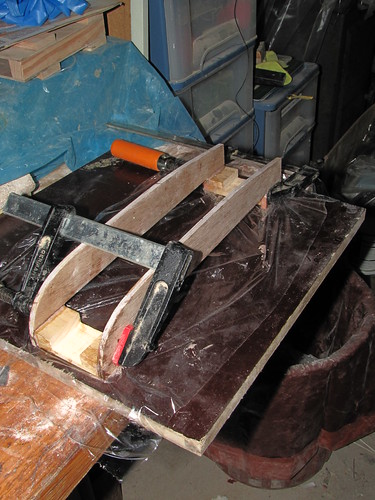
6. Guide assembly glued and clamped. I used HS powder and epoxy rather than, e.g., CA, as I wanted to be able to make sure that the thing was properly aligned and square. The form ply is flat, and the cling film is extra insurance against the glued-up guide sticking to the form ply. I later replaced the F-clamps with a couple of the black-and-yellow ratchet clamps, with the tails alternated. I placed a couple of weights on the guide plates (at either but opposite ends) to make the whole thing sit flat. the end result was nice and square :)
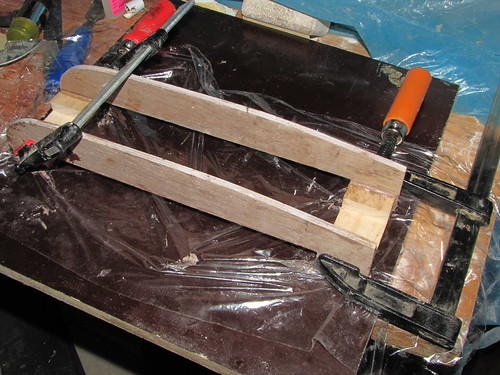
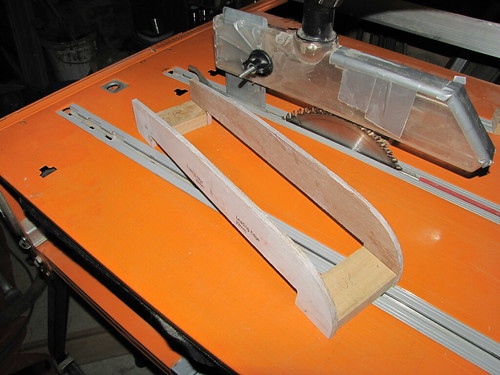
7. Another view of the assembled guide
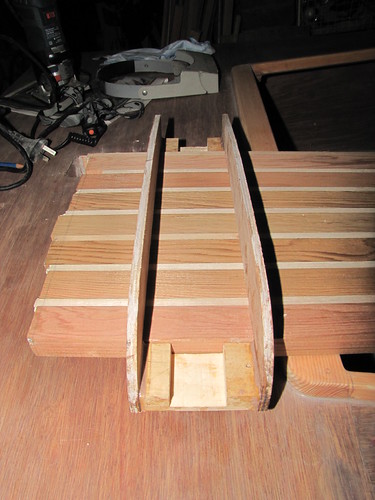
8. The finished guide in place on the foils blank. This end of the blank no longer looks like this, unhappily - it is a much darker, oilier colour :(... The guide assembly itself looks a lot like the internals of the (wing) centre-section a large-ish sclae model aircraft
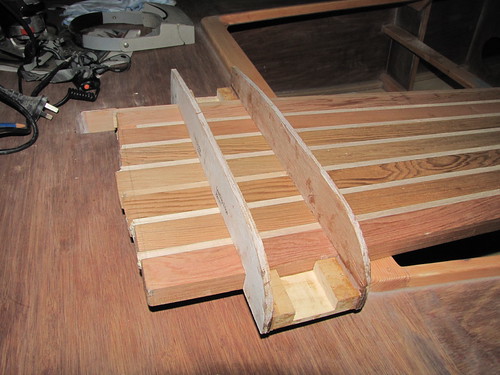
9. Another view of the guidesitting on the (still clean) foils blank
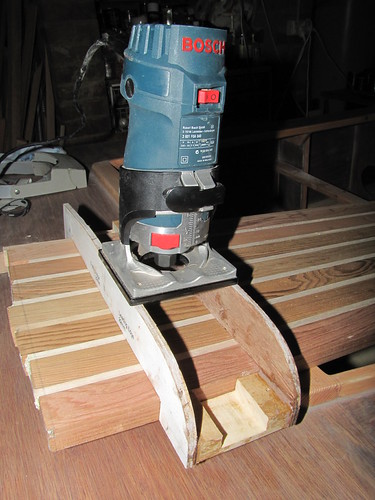
10. Bosch "palm" router sitting on the newly-finished guide. Actually, it's a "laminate trimmer" - I think that palm routers are smaller again...
11. View of the straightened benchtop. I screwed up-curved the ends of the top down onto the frame, then whacked some wedges in to bring the remaining dips up to level. Quick, neat and effective. A few minutes after this the "good" (i.e., unpatched) end of the folis blank was swimming in oil...
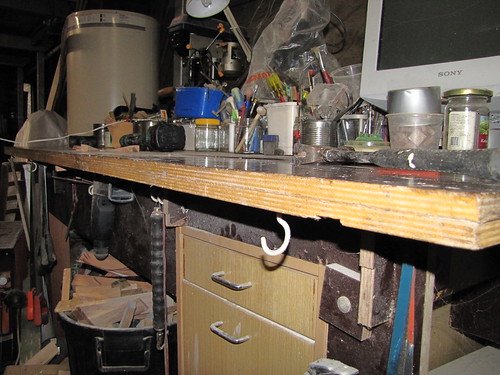
12. Dismantled Apple keyboard... Just to show that - unsurprisingly - it's not just the boat that gets things spilled on it and otherwise clumsily maltreated. At least I was able to clean this device, unlike the poor foils blank
Follow this link to my Flickr account see lots more photos of these and similar bungles by Mr Hamfisted the Idiot. A guaranteed laugh a minute!
What am I going to do now? I really don't know. I should have been routering the floils blank, or getting close to it, but now I'm back at the drawing board - or banging my head repeatedly and hard on it <ouch>. It really is enough this time to make me give up.
-
27th April 2010, 07:03 PM #1628
GOLD MEMBER
- Join Date
- Jan 2009
- Location
- Blaxland, Australia
- Age
- 65
- Posts
- 2,551
On the other hand...most of the region that copped the oil will be removed in the shaping process. Maybe I'll be able to get the timber off before the residual oil soaks too far. Won't be today, though.
-
27th April 2010, 07:12 PM #1629
Grumpy old Bugga
- Join Date
- May 2003
- Location
- South Oz, the big smokey bit in the middle
- Age
- 67
- Posts
- 4,377
Flippin heck **scratches head**
Mate, this is the way done mine. I know you're going to love using your jig and router, but you'll probably need this method to finish off anyway ... I just use it for the whole job.
Basically, you cut our your template - yes, I use contact adhesive to hold the paper plot onto your piece of plywood just as you did.
Cut out the template - just the inside shape - jigsaw and file work nicely with some sandpaper to make yourself feel like you're being really precise.
Assault foil with hand plane to knock down obvious high points (eg, both edges when starting from a rectangular blank).
Run template along foil - use a pencil to scribble where the high points are.
Use plane to knock down high points.
Run template along foil - use a pencil to scribble where the high points are.
Use plane to knock down high points.
etc.
Obviously, at the start, you're taking off a lot and the thing is pretty rough but as it gets closer to the final shape, you take off less and less and eventually, you reach a point where that final swipe of the plane takes off too much and you swear at the sodding thing
If I remember rightly, I had the centreline marked on the edges of the foil and the centreline marked on my template wo I knew how deep to go.
I must confess I liked the idea of Rob's router and template method, but having seen the amount of work involved, I'm kinda liking my old rough method as well
Richard
-
27th April 2010, 07:21 PM #1630
GOLD MEMBER
- Join Date
- Jan 2009
- Location
- Blaxland, Australia
- Age
- 65
- Posts
- 2,551
Hi Mike, Originally Posted by m2c1Iw
Funny you should mention that - the bench that I'm working currently working on the foils blank on "houses" the mini-mill that was supposed to have been converted to CNC well over 9 months ago - but the boat took over! It would have made an interesting project for me, had I got the electrics soldered up before starting the boat: I've got all the parts lined up, and it's "just" a matter of "glueing" them all together ;). Although I had to dismantle my soldering station when I moved out of my study, and the new one will have to wait until the workshop is re-jigged. The table itself is being used to support the monitor, keyboard, mouse and camera that I use to produce this thread. And the computer that was to drive the unit literally fell to bits (the CPU's daughterboard fell out of the mainboard socket after the el-cheapo plastic clips failed from the heat inside the box - a nearby fan failed first, I suspect).
As to the CNC forum, Imay well startwill be infesting it once I start soldering the wrong bits together and the thing unaccountably blows itself - and the workshop - to bits. Thanks in advance for the heads-up :).
Apologies for not having noticed your post or replied sooner - I was busy trying up loose photographic ends and trying to come to terms with my inveterate and incorrigible clumsiness :(. The Boss suggests that it might have something to do with my new and not-entirely-suitable glasses, although I think that it's more the neural pathways in the brain, not the bits of glass in front of the optic nerves...
Cheers,
Alex.
-
27th April 2010, 07:37 PM #1631
GOLD MEMBER
- Join Date
- Jan 2009
- Location
- Blaxland, Australia
- Age
- 65
- Posts
- 2,551
Hi Richard, Originally Posted by Daddles
By the time I've finished walloping myself upside the head with a lump o' 4 x 2, I may be in no condition to do anything else at all on the jolly thing.
In actual fact - well, theoretically, knowing my (well known and notorious) hamfistedness (see above) - the guide is supposed to allow the (properly set, ha ha) router bit to just miss the board along its straight mid-section, and cut to the exact depth at any point along the 'foil curve. That way I should to plane down just shy of the grooves without having to stop and check. BUT - well, you know me: I'm likely to forget and got hacking down past the point of no return, so any amount of fine checking will be in vain.
:(.
But I do need to make up a checking template for the final process...
Cheers?,
Alex.
-
27th April 2010, 10:40 PM #1632
GOLD MEMBER
- Join Date
- Jan 2009
- Location
- Blaxland, Australia
- Age
- 65
- Posts
- 2,551
After some dinner and allowing the shock, rage and gloom to die down a bit, I went back to the scene of the crime and decided to run the router through the affected area using the new guide, starting from the TE, which area will mostly be sawn off for the end taper anyway. Two encouraging things of note: the guide and bit produced a beautiful smooth aerofoil-like curve up the back of the board (so the guide is a success so far); and the oil doesn't appear to have penetrated very far into the wood thank goodness. The routered areas were certainly light and clean-looking, like the original pre-mishap surfaces. I did find that I needed to put the fence on the router to keep it tracking straight along the guides, so the preliminary test on the expendable part of the foil blank (oil notwithstanding) was useful for that reason as well.
Somewhat heartened by these discoveries, I then started tinkering with other parts of the foil that needed things doen on them prior to bolting down the blank and routng the stuffing out of it. This included sanding back the resin/glass path that is filling the depression in the other end of the board, getting it flat and level with its surrounds, and marking out the various lengths for the separate foils (again), plus the offsets for the curves of the end-tapers. The new flexible batten that I made on the Triton this arvo out of a piece of Tas. oak quarter-round was clamped onto the offsets (two offsets are 0 mm ;) and the lines for the taper curves of the rudder and centreboard drawn on.
I even got enthusiastic enough to get out the new Japanese saw, tirm the rudder end of the blank to length (more or less) and slice off the wood on the outside of the rudder's bottom taper curve (on the TE: the LE is straight except for the rounding curve at the tip) to within about 5 mm. Some fun was then had with my block-plane-like surform (the long-suffering and blunt block plane having skedaddled somewhere out of harm's way!) reducing the remaining excess to about 3 mm. I think I'll do the curve on the centreboard end with the jigsaw. Maybe. If I feel confident enough. So probably not...
As I'm still twitching somewhat over the oil incident, I didn't take any photos this evening, but may do so tomorrow. Probably.
Anyway, tomorrow's another day (as they say in at least one classic) - and hopefully a less fraught one!
-
27th April 2010, 11:05 PM #1633
GOLD MEMBER
- Join Date
- Jan 2009
- Location
- Blaxland, Australia
- Age
- 65
- Posts
- 2,551
Hi Richard, Originally Posted by Daddles
Thanks for taking the time to walk me through that - apologies for a not-terribly-sane response initially, 'coz of you-know-what. Hopefully the router/guide combo will mean that there will be little tweaking to do - but what there will be will be at the tapers towards the foils' tips. There wasn't an awful lot more work than producing the checking template - all right, I lied, there ws quite a bit more, but it was simple to do and a bit like making up a wing centre-section ;). So I enjoyed it! <gasp> <ducks>. I am now in a much more stable frame of mind and have actually read what you wrote, so once again, thanks - it will be very useful :).
Cheers,
Alex.
-
28th April 2010, 05:55 PM #1634
 Deceased
- Join Date
- Nov 2008
- Location
- Maylands, Perth, Western Australia
- Age
- 58
- Posts
- 218

Hi Alex,
It is possible to do all of the tapers with the guide too.
You just need to work out how much packing is needed under one end of the blank to tilt it to the right angle, then as you work towards the raised end the slots will become sligtly deeper at each interval, giving you a perfect taper guide.
Where the foil shape gets tapered towards the tip ( from front to back ), just start by cutting the straight sided half of the cross-section first, then allign the guide with the narrowing edge and do the other half of the taper at the same intervals ( these cuts will be at 90 degrees to the tapered edge but will be at the correct depth and profile !!! ).
-
28th April 2010, 07:07 PM #1635
GOLD MEMBER
- Join Date
- Jan 2009
- Location
- Blaxland, Australia
- Age
- 65
- Posts
- 2,551
Hi David, Originally Posted by dhgomm
I've just this minute got up from using the router guide to do the "rudder" end of the blank. After having finish the tapers on the TEs, that is. I also ran the router along the leading edge of the "rudder" taper, but left the TE portion while I thought about it. And you have come up with the answer :).
Thanks! Although I still have to fully nut it out (I skimmed the post and will now go back and read it properly - or rather will, once I've dealt with a recalcitrant printer and some junk (although not cheap) paper.
The oil seems to have been removed sufficiently from the surface too, which is a good thing :).


 Reply With Quote


Similar Threads
-
New Queensland PDRacer Build
By duncang in forum Michael Storer Wooden Boat PlansReplies: 71Last Post: 26th April 2012, 08:30 AM -
Oz PDR build in Adelaide - sexy black PDRacer
By m2c1Iw in forum Michael Storer Wooden Boat PlansReplies: 39Last Post: 27th April 2009, 06:30 PM -
OZ PDRacer - Dylan's build in the Philippines
By Boatmik in forum Michael Storer Wooden Boat PlansReplies: 16Last Post: 23rd February 2009, 05:50 PM -
Brisbane Timber and Working with Wood. Boatmik/PDRacer
By Boatmik in forum Michael Storer Wooden Boat PlansReplies: 1Last Post: 11th April 2007, 08:06 PM -
Flawed wood on the TS --DUCK!
By Robert WA in forum WOODWORK - GENERALReplies: 7Last Post: 19th February 2004, 11:42 AM
Tags for this Thread
balanced lug,
boatmik,
build,
dacron(tm),
douglas fir,
duck,
enamel,
epoxy resin,
fibreglass,
hoop pine,
interminable,
lug,
machinery,
materials,
michael,
oregon,
oz racer mk 2,
ozracer,
paint,
paulownia,
paulownia/glass mast,
pdracer,
plywood,
polytarp,
primers,
really simple sails,
sail-making,
sailmakers thread,
sanding,
storer,
sydney,
timber,
tools,
varnish,
verbose,
western red cedar,
wood,
wood duck,
wrc
