

 Thanks:
  Likes:
  Needs Pictures: 0
 Picture(s) thanks:
Results 1,666 to 1,680 of 3347
-
2nd May 2010, 10:22 PM #1666
 AJ
AJ


- Join Date
- Jun 2007
- Location
- Aberfoyle Park SA
- Age
- 63
- Posts
- 1,787
 Easy.
Easy. Originally Posted by AlexN

Rushing the work to get it finished in a tight time-frame, and trying to minimise the
anticipated cost of getting them thicknessed.
I fed all five through a power planer.
Then a fine set jack plane until they were (for me) really flat & square.
By which time they only needed two 0.5mm passes through the thicknesser each
side to achieve flat. But finished at 19mm instead of 22mm.
In retrospect, getting them thicknessed at DFWB was so cheap (I was embarrassed
to be asked for so little money ) I should have desisted at about 25mm instead of
my target 23mm-ish.
Acquiring the twist... I screwed the nice square target blank to a nice square second
blank, then clamped the second blank in the Workmate. The Workmate's grip wasn't
perfectly secure, and it slipped up a bit at one corner.
Also, some chips & shavings worked their way between blanks.
And I meant to, but forgot to, mark a Big Black Centreline around the blank perimeter...


 etc.
etc.
-
2nd May 2010 10:22 PM # ADSGoogle Adsense Advertisement
- Join Date
- Always
- Location
- Advertising world
- Age
- 2010
- Posts
- Many
-
2nd May 2010, 10:28 PM #1667
GOLD MEMBER
- Join Date
- Jan 2009
- Location
- Blaxland, Australia
- Age
- 65
- Posts
- 2,551
After a very busy afternoon finishing off the No. 4 plane blade (again), and a lot of vigorous planing - mostly with the quite heavy No. 7 - and sanding, I've finished off the second after section of the foils board - it is now no longer a blank! There's a bit of fine tuning to do on the TE where I couldn't reach around to see the far end of the board (the floor at that end of the bench is cluttered with junk). I also have to work up the LE after having planed 2 mm off it this arvo. The wood where I planed it is as smooth as glass, which suggests that I've got the sharpening right at last :).
Overall, I'm pretty happy with the result: the second side is a lot better than the first, although that is to be expected given that I'd learnt a few things on side one... We'll see if I'm just as happy once I've had to deal with the leading edge; I may be singing a different song tomorrow!
If I have got to grips with plane sharpening it will make doing the spars a lot easier than I was anticipating earlier, although it won't pay to get complacent. Photos tomorrow after the usual sorting and captioning (ran out of battery charge right at the end of the last session, and had to wait for the set to charge back up - the other set of batteries got lost somewhere on the recent Adelaide trip).
-
3rd May 2010, 02:20 PM #1668
GOLD MEMBER
- Join Date
- Jan 2009
- Location
- Blaxland, Australia
- Age
- 65
- Posts
- 2,551
Hi AJ, Originally Posted by b.o.a.t.
Commiserations ;).
My mistakes with the foils were also based in haste, or to be precise impatience to see the board glued up:
the glue-up wherein the paulowina strips popped up irregularly above the WRC;
my not checking which side we were on when thicknessing and thus doing the better side of the blan a few more times than the worse side (had I checked, the badly-belt-sanded bits would have been totally erased);
walloping into the first side of the blank - the crook one - with the router and guide withougt practicing first, and toally stuffing up the leading edge...
At least with the planing I was more circumspect and slower - but the damage to the "crook-side" LE had been done.
So now it's thinking time... Having too good TEs, and one almost OK LE half - where to next?
There are three options:
1. ignore and proceed (no way)
2. router off the crook half of the LE and splice in another piece of WRC;
3. slice off the entire LE stave on the Triton and glue on a new stave.
The LE is currrently so wildly assymetric that there's now way that I'd contemplate suing either foil. Unless, of course, the assymetry, which in use would be on opposite sides of the foils would work against itself - I doubt it); I have more than sufficient WRC in one form or another for partial or full replacement, especially if I use some of the salvaged wall-cladding from the study ;).
The replacement of "stave 1" is predicated on the assumption that the forward foil shape behind the LE is OK, or almost OK. It is pretty well on the money on the second-side LE (as is the LE itself for most of the length, except for either tip), but I'm not so sure about "LE No. 1", which I will have to check. Cutting off the first two set of WRC staves and attendant paulownia strips is getting towards being very silly.
So I'm going to have some lunch and ponder this. Rather than getting on with making a mess of the yards or the sail (again) while it sorts itself out in my head, I think I'll post some photos of various sorts.
Cheers,
Alex.
-
3rd May 2010, 08:57 PM #1669
GOLD MEMBER
- Join Date
- Jan 2009
- Location
- Blaxland, Australia
- Age
- 65
- Posts
- 2,551
How I proceed with the foils LE largely depends on how much extra work I want to do shaping; the removal of a half or a full stave is probably about the same time/effort once things are set up. Doing two sides will be extra practice for doing the Goat foils ;).
Here are a few photos of the shaping of second side of the foils board. I'm only posting those which show an interesting or instructive difference from those posted previously, or something new.
I feel that I should once again give credit where credit is due - to m2c1Iw, for the pinstriping idea. Daddles mentioned a few days ago that my foils had inspired someone to get on with theirs - but as I've said before, it was Mike's idea that I copied!
Let's see what we have here (as it says on a lot of web-stores that use a particular set of handy startup templates ;)...
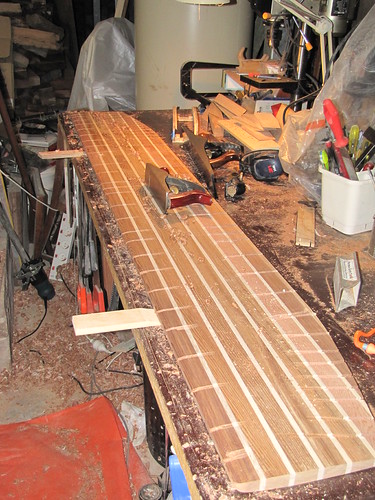
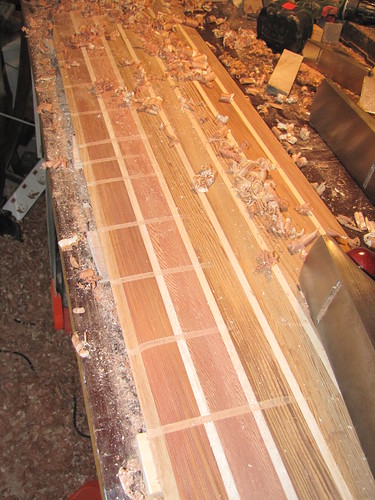
1. Foils blank screwed down onto the bench, unshaped side up

2. Router sitting on the bulked-up guide: 6 mm balsa scrap CA-ed to the plywood sides. Not that the bit has chewed through the relieved area and made a large hole...

3. View of spiral up-cut bit in working situation. This time the cutting went without a hitch - and I avoided going too far down the front of the guide

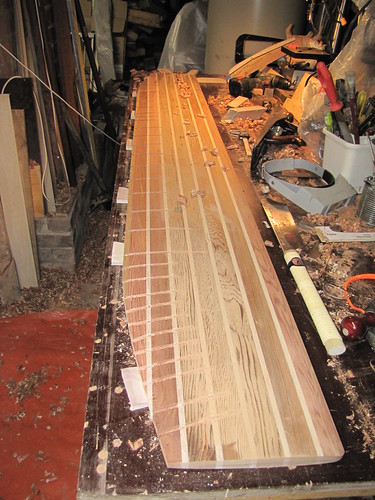
4. Routered board after a small amount of planing; No. 4 plane used on the LE. Wedges placed under LE for support
5. TE of foils chocked with wedges to provide support to a rapidly thinning area. LE has been partially worked, but needs substantial work right at the front. Routered channels around the taper curve of the TE visible here
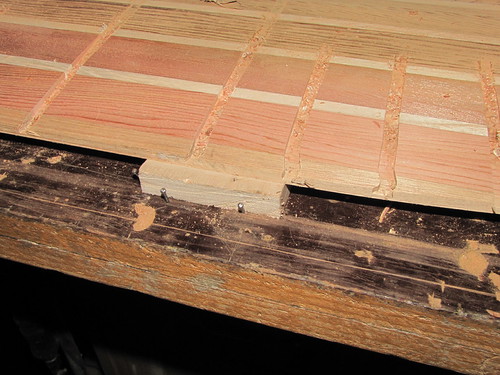
6. Close-up of one of the TE chocks; nails holding the wedge in place against the force of the plane; nails have been driven down so that they are out of range of the plane. Several nails had to be whacked down a bit more once I'd got down to the bottom of the routered channels.
7. Bit further down through the board. On this side, I halved the number of channels, to give the plane blades a break from too many shock loads
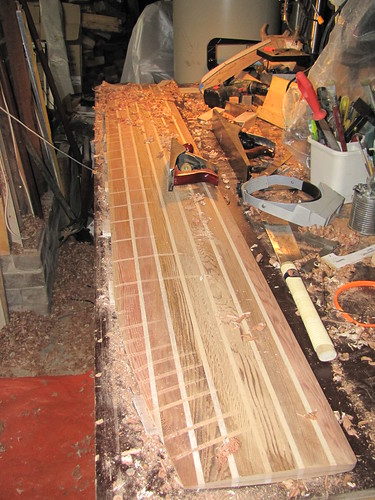
8. Close-up of planing: getting down to the bottom of the channels now
9. One end of board, showing asymmetric shapes at leading edge, before working on the upper LE
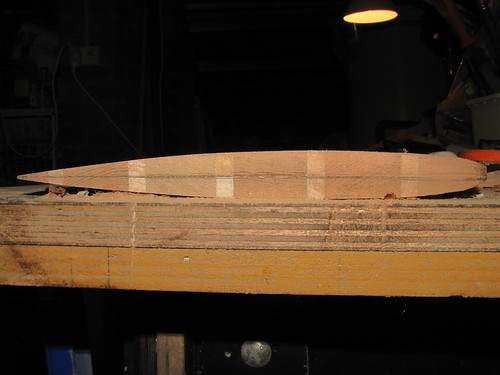
10. Other end of board: same asymmetric foil shape. Again, before shaping the upper LE. Note that being the tip, you aren't seeing 1 and 2/3 WRC/paulownia sets because of the TE taper

Follow this link to see these photos and more - although I think that the fwuffy bunny wabbits might have been eaten by the savage guard dog...
I'm still think about the LE business - I need to go back and check how far back any replacement timber needs to be patched in. Just having checked the faulty side with the template, it's either going to be two sets, or two sets and one extra WRC stave. I'll sleep on it and check it again in the morning and see if it's changed ;). Or rather, if I've changed my mind...
-
3rd May 2010, 10:25 PM #1670
GOLD MEMBER
- Join Date
- Jan 2009
- Location
- Blaxland, Australia
- Age
- 65
- Posts
- 2,551
The reason that I'm fussing a bit over the LE is that it's the bit that MIK says has to be got right most of all - at least that's how I've interpreted the instructions. And the leading edge is most definitely not right...
-
3rd May 2010, 10:44 PM #1671
Grumpy old Bugga
- Join Date
- May 2003
- Location
- South Oz, the big smokey bit in the middle
- Age
- 67
- Posts
- 4,377
Yes, it's important and a good sailor can make the most of it, but remember that this is a PDR for recreational use by a novice sailor - you could put a flat plate in there and still have fun (though not as much). Just get it symetrical, that's more important, though the closer to the plan shape the better of course. Originally Posted by AlexN
Richard
-
3rd May 2010, 10:59 PM #1672
GOLD MEMBER
- Join Date
- Jan 2009
- Location
- Blaxland, Australia
- Age
- 65
- Posts
- 2,551
A flat plate would probably be a whole lot better than the foil the way it is at the moment...
-
3rd May 2010, 11:06 PM #1673
GOLD MEMBER
- Join Date
- Mar 2007
- Location
- Adelaide
- Posts
- 2,139
Ah Alex if I could chime in here, you are overlooking the fact that the width of the foil that is LE to TE is not super critical. DO NOT CUT anything off.
Make another template use a piece of chalk to mark the high spots and take the LE back with your plane until you have the desired curve, just a little bit at a time ie set the plane for transparent shavings as long as you are reasonably consistent along the length of the foil all will be well. Throw away your router jig, the reason I say that is you are working with softwood and a relatively thin foil unlike Robs brute it is too hard to manage around the relatively tight curve.
For the last little bit of refinement a torture board with some 80 grit and a good old eyeball then a final going over with some 120 then 240 if you want to be extreme.
Use the force Luke the force will be with you always. Actually I found this link when looking up this quote seems to fit the circumstances rather well. Use The Force, Luke
BTW I think you foil looks very good already just a wee bit of finessing is all that's needed.
Cheers
Mike
-
3rd May 2010, 11:38 PM #1674
GOLD MEMBER
- Join Date
- Jan 2009
- Location
- Blaxland, Australia
- Age
- 65
- Posts
- 2,551
Hi Mike and Richard,
Thanks for for your useful comments. I'll let it all simmer overnight and see what's what in the morning :).
Thanks also for that link, Mike, that article was particularly interesting. Pattern-matching is in fact one of my "hobbies", and mismatch-detection is apparently part of that... Hmm... I'll reread that link tomorrow. Looks like a good site overall, too :).
Cheers,
Alex.
-
4th May 2010, 12:00 AM #1675
GOLD MEMBER
- Join Date
- Jan 2009
- Location
- Blaxland, Australia
- Age
- 65
- Posts
- 2,551
Hi Mike,
Did you mean make a new template from the "thinner" LE curve and take down the "thicker" one using it?
Cheers,
Alex.
-
4th May 2010, 12:28 AM #1676
GOLD MEMBER
- Join Date
- Mar 2007
- Location
- Adelaide
- Posts
- 2,139
No I don't think so. Originally Posted by AlexN
Your middle and trailing sections look fine and assuming the foil thickness at the centre is OK I would use the LE section of a new template to first check the thinner side. That is the one that looks to be good to the centre line in the pics. If it is out refine as necessary till you are happy.
When doing my foil I didn't screw it to a bench I just moved clamps around but I did have it clamped securely to a fairly flat bench so I could confidently register the template off it.
Having got one side looking good all the way across the section then attack the other side (thicker) bringing it down bit by bit.
Now this also assumes you leave flats on the centre section of the foil so you have a consistent reference. If you are attempting a true Nacra shape it will be difficult the way I have suggested.
I guess if you can somehow ensure the centre line is perfectly aligned with the benchtop somehow when doing the second side all will be well. I can't think of a solution and I somehow think wedges may not be reliable.
I can't really tell from your pics if you still have flats to work off, if not um perhaps screw a brace to one end shape the other up to as close as you can get to the brace then do the balance by eye. Hope that makes sense.
-
4th May 2010, 12:41 AM #1677
GOLD MEMBER
- Join Date
- Jan 2009
- Location
- Blaxland, Australia
- Age
- 65
- Posts
- 2,551
Hi Mike,
Once again, thanks for the comments. The rather thinner LE is the one that's wrong: the thicker one is no longer as thick as I had planed it down to the template shape, but had neglected to take a photo of it when finished. This leaves me with the quandary of whether to take down the thicker one to match the thinner one, hack the LE back to a point where I can get enough thickness for a "full" LE on both sides, or do some slicing.
I did try to keep the parallel sections - one side is slightly better than the other, and in any case the "flat" section on the "crook" side still has some dips in it from the heavy-handed belt sanding to remove excess glue before thicknessing (see my reply to AJ above ;).
At any rate, I'm not going to fret about it, and see what the morning will bring.
Thanks again for the clarification :). And you're right, the wedges aren't the most reliable of supports (but I happened to have some to hand ;). A brace is a good idea - I've got plenty of scrap wood to choose from!
Cheers,
Alex.
-
4th May 2010, 12:52 AM #1678
GOLD MEMBER
- Join Date
- Mar 2007
- Location
- Adelaide
- Posts
- 2,139
OK all is good I still think you should refine the thinner side to a new template while this will mean you will loose some overall width it will make little difference IMHO. Time to toddle off me thinks.
Oh and don't feel bad I just found the stuff up fairies visited me tonight, why can't I read a rule.
-
4th May 2010, 12:58 AM #1679
GOLD MEMBER
- Join Date
- Jan 2009
- Location
- Blaxland, Australia
- Age
- 65
- Posts
- 2,551
Thanks
 .
.
A.
-
4th May 2010, 08:19 AM #1680
Grumpy old Bugga
- Join Date
- May 2003
- Location
- South Oz, the big smokey bit in the middle
- Age
- 67
- Posts
- 4,377
Just remember the golden rule - measure twice, cut once, swear, reach for another piece of timber Originally Posted by m2c1Iw
Richard
have a look at Mike's username


 Reply With Quote


Similar Threads
-
New Queensland PDRacer Build
By duncang in forum Michael Storer Wooden Boat PlansReplies: 71Last Post: 26th April 2012, 08:30 AM -
Oz PDR build in Adelaide - sexy black PDRacer
By m2c1Iw in forum Michael Storer Wooden Boat PlansReplies: 39Last Post: 27th April 2009, 06:30 PM -
OZ PDRacer - Dylan's build in the Philippines
By Boatmik in forum Michael Storer Wooden Boat PlansReplies: 16Last Post: 23rd February 2009, 05:50 PM -
Brisbane Timber and Working with Wood. Boatmik/PDRacer
By Boatmik in forum Michael Storer Wooden Boat PlansReplies: 1Last Post: 11th April 2007, 08:06 PM -
Flawed wood on the TS --DUCK!
By Robert WA in forum WOODWORK - GENERALReplies: 7Last Post: 19th February 2004, 11:42 AM
Tags for this Thread
balanced lug,
boatmik,
build,
dacron(tm),
douglas fir,
duck,
enamel,
epoxy resin,
fibreglass,
hoop pine,
interminable,
lug,
machinery,
materials,
michael,
oregon,
oz racer mk 2,
ozracer,
paint,
paulownia,
paulownia/glass mast,
pdracer,
plywood,
polytarp,
primers,
really simple sails,
sail-making,
sailmakers thread,
sanding,
storer,
sydney,
timber,
tools,
varnish,
verbose,
western red cedar,
wood,
wood duck,
wrc
