

 Thanks:
  Likes:
  Needs Pictures: 0
 Picture(s) thanks:
Results 1,681 to 1,695 of 3347
-
4th May 2010, 11:08 AM #1681
 GOLD MEMBER


- Join Date
- Jan 2009
- Location
- Blaxland, Australia
- Age
- 65
- Posts
- 2,551
 I wish? Thanks, Richard, I have been racking my excuse for a brain over the last 12 months or so wondering what that meant. Well, I could have just asked him, of course, but that would have been too easy
 Originally Posted by Daddles

 . Then again, it's obvious that that little saying isn't as much to the forefront in my mind as it should be
 .
.
Actually, reaching for more timber was exactly what I was going to do, but Mike may have managed to talk me out of it ... I just wish that I didn't have the habit of trying to think up as many possible different ways of interpreting something 

 .
.
Cheers,
Alex.
-
4th May 2010 11:08 AM # ADSGoogle Adsense Advertisement
- Join Date
- Always
- Location
- Advertising world
- Age
- 2010
- Posts
- Many
-
4th May 2010, 12:11 PM #1682
GOLD MEMBER
- Join Date
- Jan 2009
- Location
- Blaxland, Australia
- Age
- 65
- Posts
- 2,551
Apropos Nick's naval camouflage post (#1604 in this thread), here is the set of side views of the Felixstowe F.2A WWI flying boat (and which, incidentally, subsequent flying-boat hull designs were modelled on).
The colours are a bit patchy (to put it mildy) - a result of "colour-bucketing" the scans of the original half-tone drawing fills in a graphics app - and the blue is no doubt wrong (the crimson may be closer to the box-art of the kit than not, though).
Images may be copyright RODEN Model Kits, Ukraine: if one can copyright the drawing of someone else's design - and colour schemes. I have, at least, given RODEN sufficient attribution and links
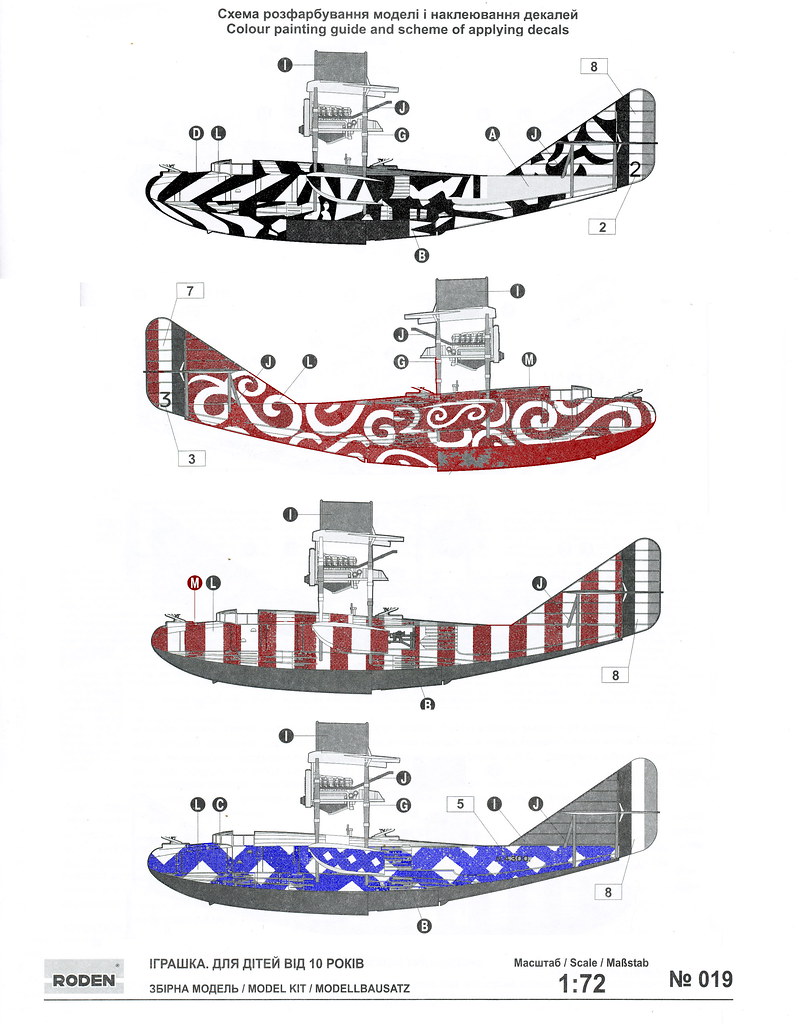
Follow this link to see this image in smaller sizes (this is the "large" size) and one larger one.
You can see what I mean by a sort of Paisley/Psychedelia hybrid in the swirly ship, second from top. The box-art painting is even more dramatic (of course ;).
It has occurred to me to whack some tail-feathers on the foil board (thin LE side down), bolt on the Laser 300 V and let it rip ;). Just kidding, the Laser cost too much - but it has crossed my mind :).
-
4th May 2010, 07:12 PM #1683
Grumpy old Bugga
- Join Date
- May 2003
- Location
- South Oz, the big smokey bit in the middle
- Age
- 67
- Posts
- 4,377
You paint your boat like that and we'll never see you again

Richard
-
4th May 2010, 07:27 PM #1684
GOLD MEMBER
- Join Date
- Jan 2009
- Location
- Blaxland, Australia
- Age
- 65
- Posts
- 2,551
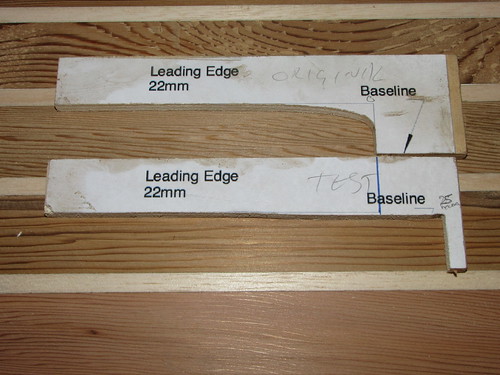
Right. Well. The only thing that I have done on the boat today has been to create a sacrificial forward-section template as suggested by m2c1Iw:
Comparison of foward-section 'Duck foils templates
Follow this link blah blah blah Flickr blah blah blah mindless blah blah blah revolution blah blah blah photos blah blah blah fwuffy bunny wabbits...
The bottom template in the photo is (to insult everyone's intelligence) the test template. Of course.
As you can see, the LE has to be shifted in at least 25 mm towards the flat section to get the template to match the existing curve on the thin foil side. Which means that the width of the foils becomes 255 mm (or less), if the LE is moved accordingly. Note that the foil was sitting on the better of the two flat sections with the 11 mm centreline of the board 11 mm above the benchtop, so the reading of the template is going to be relatively accurate (well, one should hope so).
To my mind, this is a lot, and I might just as well patch in a whole new stave or two to get it right from scratch - and have a standard OZ Mk II foil width.
What do you think, Mike? Daddles? MIK?
-
4th May 2010, 07:29 PM #1685
GOLD MEMBER
- Join Date
- Jan 2009
- Location
- Blaxland, Australia
- Age
- 65
- Posts
- 2,551
Is that wishful finking? Originally Posted by Daddles

A.
-
4th May 2010, 07:42 PM #1686
Grumpy old Bugga
- Join Date
- May 2003
- Location
- South Oz, the big smokey bit in the middle
- Age
- 67
- Posts
- 4,377
Mate, use the foil you've got. It WILL work. If you decide later that you want to make a new one, go for it. It's not as though it's hard to replace a foil and this one will still do good job. Just varnish it and get on the water sooner.
If you can't stomach that option, maybe you could use this for the rudder - I don't know the relevant sizes and shapes so don't know if this is possible, even with reworking it.
Mate, Redback's dagger board and rudder were designed by eye to be 'that big' and 'that long' (that's right, I made it all up because the designed units were miniscule). Sure, I used one of Mik's templates to shape it but gawd knows how close it was to the template (too long ago now). The main point is, THE BOAT WORKS ... and so will yours
Richard
-
4th May 2010, 09:39 PM #1687
SENIOR MEMBER
- Join Date
- Oct 2007
- Location
- Poland
- Age
- 67
- Posts
- 805
Alex - Richard is right! Originally Posted by Daddles
I've used MIK's templates but not seriously... Why??? For material problems I've used timbers of pine only (wihout a hardwood) for my BETH's centreboard and rudder. Pine is to soft wood for tiny leading edge than I've modified my profiles to wider leading edges. It will work similar to original profiles and almost perfect - I think.
-
4th May 2010, 09:57 PM #1688
GOLD MEMBER
- Join Date
- Jan 2009
- Location
- Blaxland, Australia
- Age
- 65
- Posts
- 2,551
Hi Robert,
Thanks for your input too. That's three to one (you, Richard and Mike, all experienced builders/boat people vs me), so I guess I should stop fretting and take the advice.
Cheers,
Alex.
-
4th May 2010, 10:05 PM #1689
GOLD MEMBER
- Join Date
- Mar 2007
- Location
- Adelaide
- Posts
- 2,139
OK you asked...........drum roll
I've changed my thinking slightly since last night.
As well as planing a bit off the leading edge (like about 5mm no more) so you can reform the curve on the thinner side.
Take a mm or two off the bottom of the template, the bit that rests on the bench.
That will take up the lack of wood on the thinner side.
Then cut off the bit of the template that rests on the foil back to about in line with the "O" in original.
These two things will remove any tendancy you may have to cut and shut your shmick foil and let you deal only with the curve at the edge.
Now go back and shape the thinner side turn it over and do the other side with the modified template, just do the best you can to make both sides the same. Then blend in the curve back towards the flat, there done.
We promise not to tell Mik that you have created a new foil profile minor though it may be and I promise you it will work.
As Robert says it is most unlikely any foil made by hand and eye will comply exactly to the profile.
Regards Mike who will show you my little problem (read mistake) later and I do promise you will get a chuckle out of it.")
-
4th May 2010, 10:11 PM #1690
GOLD MEMBER
- Join Date
- Jan 2009
- Location
- Blaxland, Australia
- Age
- 65
- Posts
- 2,551
Hi Richard, Originally Posted by Daddles
Given the conniptions that I've been through wrt the sail, and am likely to go through again once I get back to it (I need to put in some more Dacron patches around the thing), an extra day or so on the foil - if I decided to do any surgery on it, which I haven't - isn't going to signify. And you know how much I love fiddling.
Anyway, the spars are coming out of storage tomorrow, which suggests more forward movement .
.
Cheers,
Alex.
-
4th May 2010, 10:18 PM #1691
GOLD MEMBER
- Join Date
- Jan 2009
- Location
- Blaxland, Australia
- Age
- 65
- Posts
- 2,551
Hi Mike Originally Posted by m2c1Iw
Thanks for that. I think I know what you mean, but I'll re-read your post a couple of times more so that it sinks in (I seem bit slow on the uptake at the moment). Although the gist of it I think I understand.
I'm highly curious about the "little problem". I suspect that I'm not the only one. Perhaps you should leave some "fairy traps" set in your shed overnight . Just don't forget that you've put them there!
Cheers,
Alex.
-
4th May 2010, 10:36 PM #1692
SENIOR MEMBER
- Join Date
- Oct 2007
- Location
- Poland
- Age
- 67
- Posts
- 805
And... Two from my 3 previous boats (and boats of my father and brother too) had ordinary flat metal centreplates and rudders - they was really worse than your profile but... they worked too
Whenever... for racing performances - 0.01 knot of speed and less of angle of close reaching very important too...
-
4th May 2010, 11:45 PM #1693
GOLD MEMBER
- Join Date
- Jan 2009
- Location
- Blaxland, Australia
- Age
- 65
- Posts
- 2,551
Hi Robert,
That extra tiny race-winning percentage is vital when recreationally sailing alone by oneself .
Cheers,
Alex.
-
4th May 2010, 11:49 PM #1694
GOLD MEMBER
- Join Date
- Jan 2009
- Location
- Blaxland, Australia
- Age
- 65
- Posts
- 2,551
Hi Mike, Originally Posted by m2c1Iw
I've worked out what to do now - it's very simple. Thanks for that - very helpful indeed. . I might even get to glassing the foils tomorrow or the day after now. Fingers (and toes) crossed...
Cheers,
Alex.
-
5th May 2010, 10:23 PM #1695
GOLD MEMBER
- Join Date
- Jan 2009
- Location
- Blaxland, Australia
- Age
- 65
- Posts
- 2,551
OK - I chopped back the "original" forward foil template as suggested by Mike - 2 mm (roughly) off the bottom front edge (foot), and the back of the template up to the "o" in "original". I also made up a new forward template out of curiosity to see how it would compare with the cut-down version. The deep router tracks still left in the LE after the original shaping caused a bit unease, as it looked as though the reshaping wouldn't clear them. The LE was then rasped back with the 35 mm-wide Perma-Grit strip to a depth about 5 mm, then the new curve shaped with the same tool. Some sanding with 120-grit paper by hand plus the sanding block used on the board during the initial shaping finished it off. The newly-made template was actually a better fit than the cut-down version. Happily, the router track that I deliberately targeted was completely removed with a margin of safety.
Some photos:
1. One of the deeper router tracks, plus a couple of spots where the router track stopped but the router bit kept going down...
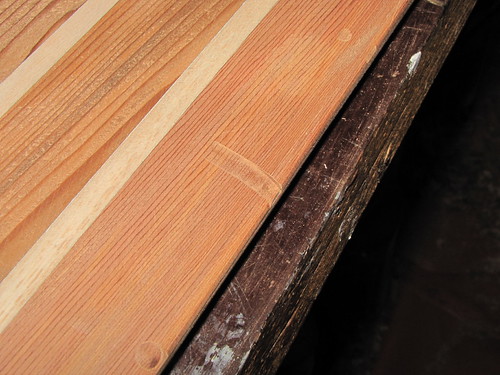
2. Cluster of deep router tracks

3. LE ground back 5 mm or so, and shaped to the original forward section template
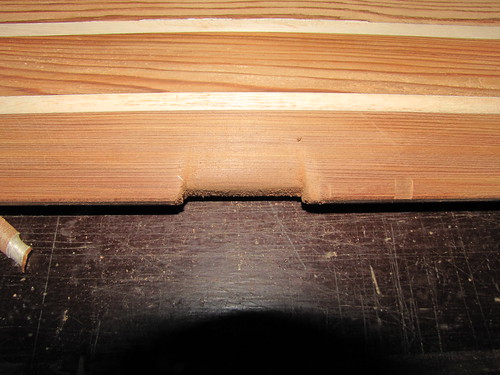
4. Another view of the partially-reshaped LE. Some rather deep sanding scratches from the Perma-Grit plate into the very soft wood, that haven't been sanded out with the 120-grit paper, are quite visible here. Depending on how it all goes I may or may not bother trying to sand them out
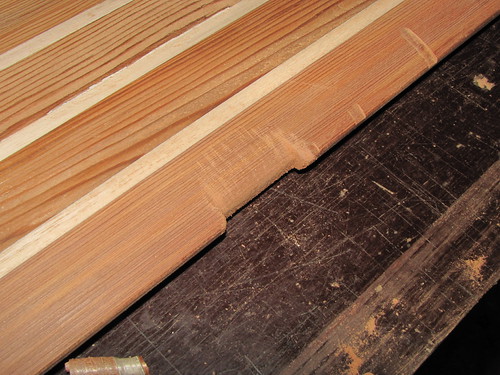
Follow this link to my Flickr account to see all these photos and more...
This all looks very hopeful: the width of the foils reduces to 275 mm down from 280 mm - a reduction of 1.8 % - and the originally-design foil shape is "retained".
So Mike's method (slightly modified in that I'm using an unmodified template) has come up trumps :). Thanks Mike - and Daddles and Robert! All I have to do now is plane back the LE and shape it accordingly on both sides - after scribing on an 11 mm centre-line. Excellent!


 Reply With Quote


Similar Threads
-
New Queensland PDRacer Build
By duncang in forum Michael Storer Wooden Boat PlansReplies: 71Last Post: 26th April 2012, 08:30 AM -
Oz PDR build in Adelaide - sexy black PDRacer
By m2c1Iw in forum Michael Storer Wooden Boat PlansReplies: 39Last Post: 27th April 2009, 06:30 PM -
OZ PDRacer - Dylan's build in the Philippines
By Boatmik in forum Michael Storer Wooden Boat PlansReplies: 16Last Post: 23rd February 2009, 05:50 PM -
Brisbane Timber and Working with Wood. Boatmik/PDRacer
By Boatmik in forum Michael Storer Wooden Boat PlansReplies: 1Last Post: 11th April 2007, 08:06 PM -
Flawed wood on the TS --DUCK!
By Robert WA in forum WOODWORK - GENERALReplies: 7Last Post: 19th February 2004, 11:42 AM
Tags for this Thread
balanced lug,
boatmik,
build,
dacron(tm),
douglas fir,
duck,
enamel,
epoxy resin,
fibreglass,
hoop pine,
interminable,
lug,
machinery,
materials,
michael,
oregon,
oz racer mk 2,
ozracer,
paint,
paulownia,
paulownia/glass mast,
pdracer,
plywood,
polytarp,
primers,
really simple sails,
sail-making,
sailmakers thread,
sanding,
storer,
sydney,
timber,
tools,
varnish,
verbose,
western red cedar,
wood,
wood duck,
wrc
