

 Thanks:
  Likes:
  Needs Pictures: 0
 Picture(s) thanks:
Results 1,711 to 1,725 of 3347
-
11th May 2010, 12:37 AM #1711
 GOLD MEMBER


- Join Date
- Jan 2009
- Location
- Blaxland, Australia
- Age
- 65
- Posts
- 2,551
 Hi Mike,
 Originally Posted by m2c1Iw

Hah! yes, well funny that you should mention that - I was just pondering that very thing earlier this evening (before being distracted - and sent distracted! - by that Facebook thing) :).
I'll measure it a hundred times (with incantations) before even thinking of picking up the saw!
Thanks for your kind words, too. I think it will look very nice with its resin jacket on :). And after all, I have you to thank for your lovely example that inspired it!
Cheers,
Alex.
-
11th May 2010 12:37 AM # ADSGoogle Adsense Advertisement
- Join Date
- Always
- Location
- Advertising world
- Age
- 2010
- Posts
- Many
-
11th May 2010, 12:41 AM #1712
GOLD MEMBER
- Join Date
- Jan 2009
- Location
- Blaxland, Australia
- Age
- 65
- Posts
- 2,551
Hi David, Originally Posted by dhgomm
I don't know where to look, so many nice things everyone is saying about it . Thank you for your nice words too - I will relax a bit and enjoy looking at it fully once I've got the glass on
  .
.
I'm certainly getting the feeling that it won't be too long before launch day - but there is still a fearful to to do on her!
Cheers,
Alex.
-
11th May 2010, 12:43 AM #1713
Grumpy old Bugga
- Join Date
- May 2003
- Location
- South Oz, the big smokey bit in the middle
- Age
- 67
- Posts
- 4,377
Originally Posted by m2c1Iw
Nah, you don't have to mess with this measuring twice carry on, just get in and have a go. It's only wood, grows on trees ya know Originally Posted by AlexN

It's not measuring twice that catches the error, it's creating independent checks
Richard
-
11th May 2010, 12:55 AM #1714
GOLD MEMBER
- Join Date
- Jan 2009
- Location
- Blaxland, Australia
- Age
- 65
- Posts
- 2,551
Heh. That requires a certain intellectual creativity that I wish I possessed! Originally Posted by Daddles
"It's only wood, it only costs money", I think you really meant... Actually, I've got a lot of WRC paneling that came out of the old study. The only problem with it will be removing the layer of waxy protective coating that was applied to it somewhere along the way (not by me, I hasten to add!).
Cheers,
Alex.
-
11th May 2010, 08:17 AM #1715
Senior Member
- Join Date
- Nov 2009
- Location
- GB
- Posts
- 139
Can't wait to see it all shiny, it does look flash.
Col
-
11th May 2010, 08:41 AM #1716
GOLD MEMBER
- Join Date
- Jan 2009
- Location
- Blaxland, Australia
- Age
- 65
- Posts
- 2,551
Hi Col, Originally Posted by colburge
Thanks :). Probably tomorrow, depending on how much resin I've got. I've been hoovering through it recently, but hopefully I've got enough to do the foils before I have to order some more! As there's only the tiller to glue up and coat plus coating the outside of the rudder-box, I may even get away with that :).
Cheers,
Alex.
-
11th May 2010, 09:50 AM #1717
Moderate Moderater
- Join Date
- Feb 2006
- Location
- Lindfield N.S.W.
- Age
- 62
- Posts
- 5,643
Nah, it does grow on trees!
My Dad pointed out to me about 30 years ago or more that doing the same measurement from the same point only guarantees that you will be wrong.
As Daddles says you need two independent ways of measuring. EG measure from two different spots or do two different measuring tests. So measure from one end the rudder length and from the other the centreboard (labelling the two marks). If there is a space between them that's good, choose one or other or somewhere in the middle, but if they overlap, you have a problem.
If it's all good, mark it quick before you get distracted and , if possible, cut the thing apart before you forget what the line means - DAMHIK .
Cheers
.
Cheers
Jeremy
If it were done when 'tis done, then 'twere well it were done quickly
-
11th May 2010, 10:03 AM #1718
Timber Hoarder
- Join Date
- Sep 2002
- Location
- Minbun, FNQ, Australia
- Age
- 66
- Posts
- 12,881
Good advice.
 Cliff.
If you find a post of mine that is missing a pic that you'd like to see, let me know & I'll see if I can find a copy.
-
11th May 2010, 10:31 PM #1719
GOLD MEMBER
- Join Date
- Jan 2009
- Location
- Blaxland, Australia
- Age
- 65
- Posts
- 2,551
Hi Jeremy and Cliff,
Cutting that board in half (oops ;) is the least of my worries at the moment - I've had a bit of trouble with plugs for the screws and "whoops" holes, compounded by feeling as though I was coming down with a cold and "thinking" more fuzzily than usual. So I'm having an early night. I doubt that I'll be glassing the foils tomorrow - however, it will no doubt become apparent that I have done so by the appearance of yet another slew of photos.
I used a Carbatec-acquired plug-cutter to make the plugs this time - an interesting process that was not without problems given the excessively soft nature of WRC. That is to say, I've made a bit of a mess of it all, and hope to cover my tracks tomorrow with filler made up with WRC sanding flour that's I've kept from the shaping process. I had been intending to do the sort of grain-matching that I did with the Frame 1 screw-hole plugs, but didn't factor in the feeble nature of the (current) timber.
A quick estimate indicates that I've got about 500 - 600 ml of resin (a+b) left in the bottles, so I may get to the end of the boat without the need for more. Depending on how wasteful I am with the foils-coating, that is.
I'll see if a solution to my botched attempt to fill the various foils holes presents itself overnight - there are several candidates. More tomorrow...
-
12th May 2010, 01:22 AM #1720
AJ
- Join Date
- Jun 2007
- Location
- Aberfoyle Park SA
- Age
- 63
- Posts
- 1,787
As most of my stuff-ups involve major surgery to recover, either to the boat or my person so, in that mind-set...
how about putting a holesaw clear through the board, & fill the holes with dowels cut
from matching stock using the next size up of holesaw ?
Might be easier than trying to fill shallow routed holes with shallow plugs?
cheers
AJ
-
12th May 2010, 08:46 AM #1721
Senior Member
- Join Date
- Dec 2009
- Location
- Texas
- Posts
- 319
I love that phrase "hoovering". We don't hear it much here in Texas. We are using contrasting plugs to hide some of the screws in our GIS, The plug idea from b.o.a.t. could end up looking very interesting if the boards are clear coated. Originally Posted by AlexN
-
12th May 2010, 11:50 AM #1722
GOLD MEMBER
- Join Date
- Jan 2009
- Location
- Blaxland, Australia
- Age
- 65
- Posts
- 2,551
Hi AJ,
You must have been reading my mind! One of the strategies was to use the router and put in a larger plug; another was to holesaw right through the board and put in a "dowel" :). The third was it leave as-is and pretend it didn't happen (bit hard as there are quite a few of them ;).
The botching comes from an error of judgement yesterday (not the only one - I nearly caused a nasty traffic accident as a result of another lapse of said judgement, and I'm lucky to be alive still) in using a drill hand-held to ream out the holes for the plugs, rather than using the drill press as I oughta. The holes are now quite ragged as a result.
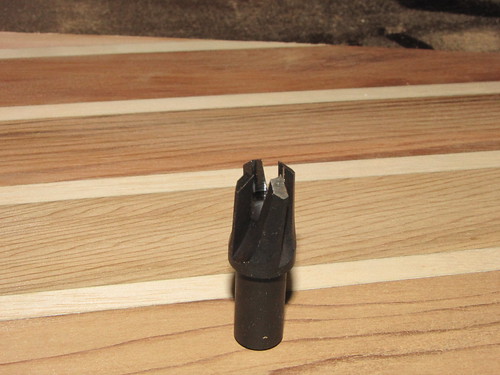
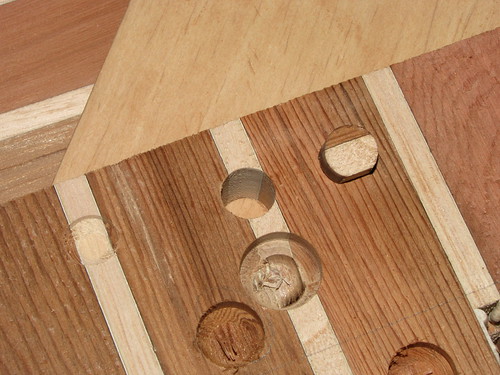
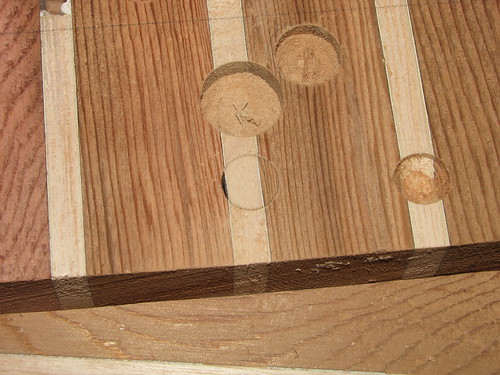
Here are some photos to more adequately show what I've been referring to:
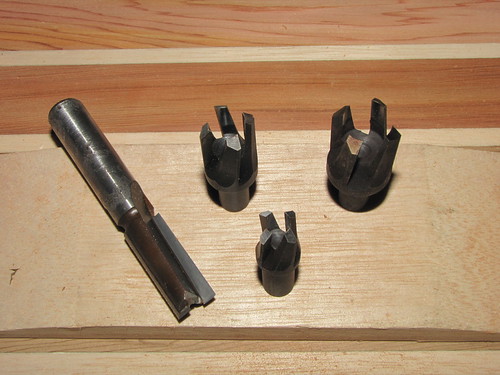
1. New (for me) Veritas "snug-cut" plug bit: it needs very careful use when cutting WRC plugs! The plug gets stuck in the cutter otherwise, and removing the plug tends to wreck it (the plug, not the cutter! ;)...
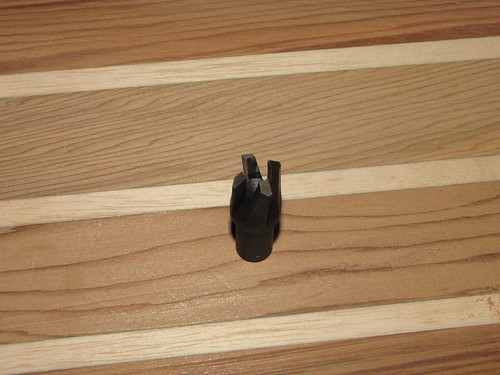
2. Closer-up view of plug-cutter: comes in a set of three common sizes (metric or imperial - I got the imperial set)
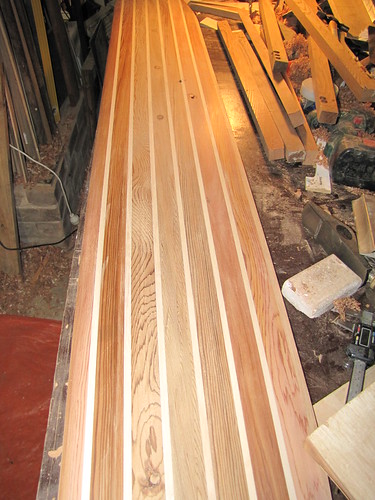
3. Overview of the plugged holes. The darker areas around the plugs are from using superglue to hold the plugs in place for sanding prior to filling. WRC stave-offcuts with plug-cutter holes in them visible on the RHS of the photo
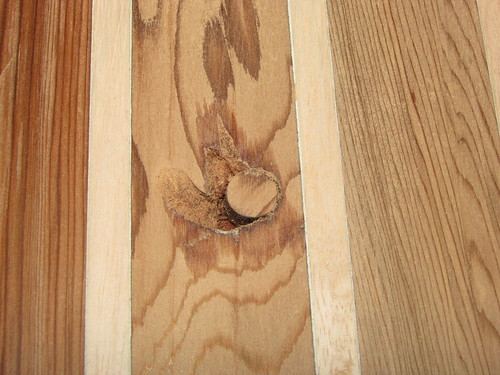
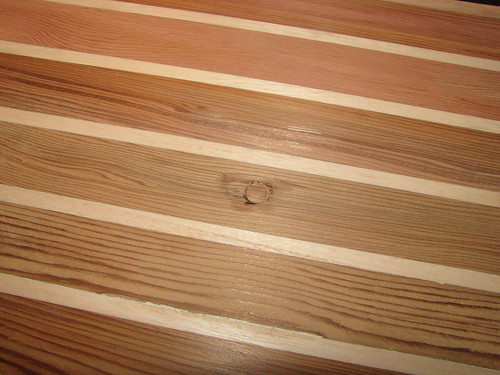
4. Close-up of one of the better plugging attempts: better in that the plug is a better fit to the hole, even if the "borer track" isn't filled in. This is a prime candidate for holesaw treatment given the size of the unfilled "wormhole", although grain matching (which actually isn't too bad here) might be a problem. When next selecting WRC staves to use in foils, I won't be choosing any with the grain-orientation/figuring of the one with the hole in it: that grain is just too hard to work with. Glue-lines highly apparent here even at this image size
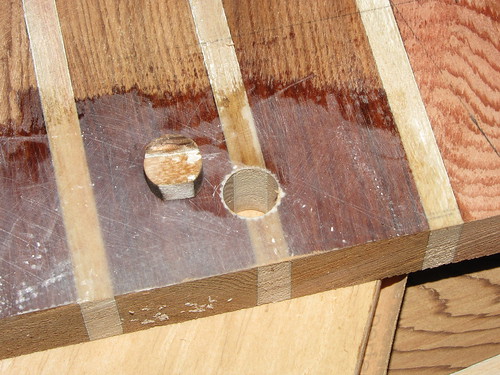
5. Cluster of holes: three are "borer" ("oops") holes, one is a screw - then "oops" thanks to hand-holding the drill - hole. Dark stains from CA soaking into the grain are quite noticeable, but would probably be masked by the resin once the board's glassed
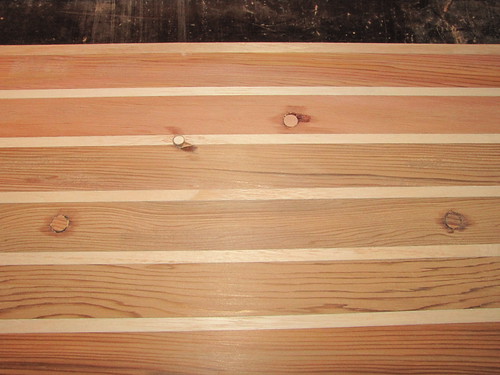
6. Close-up of plugged screw hole. Damage on the LHS of the plug was a chip of wood being split off by the drill bit - and badly repaired by me. Ragged edge of hole cause by the bit racketing about is clearly visible. All holes here are "through-cut" replacement candidates - and doing so would automatically take care of the three screw holes on the other side of the board. The one possible exception to through-cutting is the hole which crosses a WRC-paulownia boundary: this would be tricky to get absolutely right, and some deft(!) work with a sharp cutting implement before one or other of the different coloured fillers that would be used in this instance had set would probably produce a better result. Although the time take in either case might end up being about the same...
Follow this link to my Flickr account to see all these images and more besides...
Still pondering the situation, although I'll sand back yesterday's botches and see what they look like first before making any further decisions - or stuff-ups ;). And if I use any further boring tools, I will be using the drill press, even with the difficulty of the setting-up that will be necessary to prevent the foil from rocking about (even with the "flat" section)!
I'm going to riffle through my "collection" of holesaws (and larger router bits - I've also got a 30-ish mm forstner bit somewhere too, although that's getting a bit bigger than I would like).
Cheers,
Alex.
-
12th May 2010, 01:41 PM #1723
GOLD MEMBER
- Join Date
- Jan 2009
- Location
- Blaxland, Australia
- Age
- 65
- Posts
- 2,551
Hi John, Originally Posted by john goodman
Welcome to the mob of commentators on this thread :). "Hoovering" is one of my favourite words: very evocative - and useful. Like the activity itself ;).
Thanks for the plug idea - at this stage in the proceedings I'll stay with what I've got though. I could always effect a different sort of contrast by turning the grain in the plugs around 90 degrees, I guess ;). The board is going to be clear-coated, btw. Unless I really stuff up with the "repair" work! I still haven't made any decisions as to what to do next, though. Having spent so much time and effort on the foils (should have thought of that yesterday ;), I don't want to have to end up painting the jolly thing!
Cheers,
Alex.
-
12th May 2010, 02:05 PM #1724
GOLD MEMBER
- Join Date
- Jan 2009
- Location
- Blaxland, Australia
- Age
- 65
- Posts
- 2,551
Been sifting through the bits and holesaws: the widest that I can practicably go with any "precision" is 0.5 ". This would also mean (at least for me) using a router bit in the drill-press chuck with the DP going flat out and at a very slow feed rate. I was fortunately able to set up the chuck to a runout of about 0.0005 ", although whether it is still at that setting is probably unlikely. But it may be within the confines of what is necessary to do the job: I will do a test run on some scrap first, at any rate.
I thought that I'd try the WRC-flour filler first, though, and if it looks OK after sanding I'll not bother with any further reaming and plugging. To that end I've sifted the flour through a fine cooking sieve (The Boss did authorise its permament transfer to the workshop - no, really, she did, honest ;) to remove the smaller shavings from the planes, although there are quite a few unavoidable but obvious flecks of paulownina in the mixture. Worth a shot, though. Will report back with happy-snaps in a bit...
-
12th May 2010, 04:29 PM #1725
GOLD MEMBER
- Join Date
- Jan 2009
- Location
- Blaxland, Australia
- Age
- 65
- Posts
- 2,551
A test cut with a 0.5 " diameter router bit run in the DP at a nominal 4200 RPM into an offcut from the foils blank across both WRC and paulownia domains resulted in a nice cleanly-cut hole. Similarly, the 0.5 " plug cutter did a good jog and the resulting plug fitted very smoothly into the hole cut by the router bit. I'll have to run the plug cutter a bit slower to reduce burning, though.
For most of the holes the above method will be both the neatest and quickest one; the large "worm-hole" and the cross-timber hole will be best finished off with filler, but the "worm-hole" can be partially plugged, too. So, I will go over the timber offcuts again and look for reasonable grain-matches.
A photo or five:
1. Sieved WRC sanding flour - and residue. Note the splinters of paulownia in the WRC dust

2. Straight-router-bit hole in WRC/paulownia part of foils-blank offcut. Note also the plug, cut from the adjacent hole. The glue got hot enough to melt while the plug was being cut, and the scrap of WRC on one side of the plug fell off. Note also the burn-mark in the plug-cut hole: the bit was spinning too fast - or the feed rate was wrong
3. View of router-bit hole on bottom side of offcut. You can just see that the sides of the plug are burnt, in this photo. Note the delamination of the glass/resin layer from the timber: this would translate to more severe tear-out than evident here if emerging in plain wood. So the exit side of the hole will need to be clamped firmly to another piece of wood...
4. Plug pressed into place and sanded flush. Note the slight twist and movement "off-centre" - probably caused in part by the missing sliver of wood from the LHS of the plug, plus the turning moment imparted by the sanding block. Also, on inspection the plug's paulownia band is thinner than that of the "host" - the top surface of the plug as sanded is still in the lower part of the conical section, and I haven't driven the plug down far enough. Useful heads-up for the future :). Once again, the relatively thick glue-line is visible. I don't think that the foil would fall apart in a hurry from that point of view if not glassed - but it will be glassed!
5. Full set of snug-cut plug bits, plus a CMT bit that has seen better days - and this is the first time that it has been used to cut anything. Note the rust-eaten holes in the shank: this is what happens when the bits are stored in humid/damp conditions. And it only took a few weeks to cause this damage. This is also one of the better examples; some of the other bits in the set of thirteen 0.5 "-shank bits had their cutting edges chewed by the rust. Beware! Rust *never* sleeps! All cutting bits are now kept smothered in WD-40 when not in use, and live in a sealed container. Even considering what it had been through, the bit cut pretty well, though...
Follow this link to my Flickr account, where you won't find free lollies and ice-creams...
The one catch with the router-bit/plug-cutter method is that I will need to do each side separately, as the plugs won't be deep enough to reach the other side; and the shape of the plug is such that one end is slightly narrower than the hole which it will nominally fit. Them's the breaks.
I've just spent a bit of time doing some tidying (not that much ;) and setting up to chew into the foils with the router bit <gasp>. Bit of a jury rig, but such things alomost always are in my experience, at any rate. A length of 4x in the drill press vice, and the bass guitar blank tightened up (with a protective ply-offcut spacer(!) in a Triton Multi-stand to support the other end of the foils; the whole levelled up using the long spirit level; and some of the wedges used for chocking the foils board while shaping rounded up and placed within a handy distance of the DP (i.e., on the bow of the boat ;). I was going to clamp down the foils and do the cut-outs this evening, but after a > 500 m dash in the cold, smoky air chasing after the Dreadful Dog, who Got Out And Ran Off(TM) as fast as his little legs could carry him - which is a good deal faster than me! - and nearly got us both run over and killed (in my case for the second time in just over 24 hours), I am going to take it easy this evening and not do very much (and try and recover from the wheezing). Dreadful Dog. Nearly a Dead Dreadful Dog...
OK, well I recovered by the time that dinner was over, so I went and set up the board for the first hole; dispensed with the chocks as they kept the board up off the 4x2. I ran the bit though the board - nice clean cut, although there was some tear-out on the exit side with the wild grain of that stave (some photos tomorrow). Heartened by this, I set up and did another hole, moving the clamps a bit closer to the DP head to keep the board as close as possible to its 4x2 support. This hole was better, with less tear-out, although the grain was a bit chewed even so. There is an obvious and simple way to deal with the exit tear-out: set the DP's quill down-feed lock to stop the bit just shy of breaking though, then use the Perma-Grit files to ream out the remaining wafer. So I'll do that for the remaining three or so holes. Started to set up for the third hole after swinging the board around 180 degrees, but decided to quit while I was ahead ;). There's always tomorrow.


 Reply With Quote

 .
.


Similar Threads
-
New Queensland PDRacer Build
By duncang in forum Michael Storer Wooden Boat PlansReplies: 71Last Post: 26th April 2012, 08:30 AM -
Oz PDR build in Adelaide - sexy black PDRacer
By m2c1Iw in forum Michael Storer Wooden Boat PlansReplies: 39Last Post: 27th April 2009, 06:30 PM -
OZ PDRacer - Dylan's build in the Philippines
By Boatmik in forum Michael Storer Wooden Boat PlansReplies: 16Last Post: 23rd February 2009, 05:50 PM -
Brisbane Timber and Working with Wood. Boatmik/PDRacer
By Boatmik in forum Michael Storer Wooden Boat PlansReplies: 1Last Post: 11th April 2007, 08:06 PM -
Flawed wood on the TS --DUCK!
By Robert WA in forum WOODWORK - GENERALReplies: 7Last Post: 19th February 2004, 11:42 AM
Tags for this Thread
balanced lug,
boatmik,
build,
dacron(tm),
douglas fir,
duck,
enamel,
epoxy resin,
fibreglass,
hoop pine,
interminable,
lug,
machinery,
materials,
michael,
oregon,
oz racer mk 2,
ozracer,
paint,
paulownia,
paulownia/glass mast,
pdracer,
plywood,
polytarp,
primers,
really simple sails,
sail-making,
sailmakers thread,
sanding,
storer,
sydney,
timber,
tools,
varnish,
verbose,
western red cedar,
wood,
wood duck,
wrc
