

 Thanks:
  Likes:
  Needs Pictures: 0
 Picture(s) thanks:
Results 1,861 to 1,875 of 3347
-
6th July 2010, 10:56 AM #1861
 GOLD MEMBER


- Join Date
- Jan 2009
- Location
- Blaxland, Australia
- Age
- 65
- Posts
- 2,551

Hi Cliff!
Great to see you pop up again . On further thought, a tape rollback or similar would take a bit longer than the five minutes or so that the Forum was supposedly offline
  .
.
I trust that the weather is a lot warmer where you are.
Cheers,
Alex.
-
6th July 2010 10:56 AM # ADSGoogle Adsense Advertisement
- Join Date
- Always
- Location
- Advertising world
- Age
- 2010
- Posts
- Many
-
6th July 2010, 11:17 AM #1862
Timber Hoarder
- Join Date
- Sep 2002
- Location
- Minbun, FNQ, Australia
- Age
- 66
- Posts
- 12,881
Read this post. Originally Posted by AlexN

https://www.woodworkforums.com/f36/la...ltdown-120370/
18°C windy, watery sunshine, the first since Friday, at least it has stopped raining but it will be back tonight.Cliff.
If you find a post of mine that is missing a pic that you'd like to see, let me know & I'll see if I can find a copy.
-
6th July 2010, 11:45 AM #1863
GOLD MEMBER
- Join Date
- Jan 2009
- Location
- Blaxland, Australia
- Age
- 65
- Posts
- 2,551
Hmmm...a bit warmer than here, but not by much. Curious.
Thanks for the link to Neil' s explanation :).
Cheers,
Alex.
-
6th July 2010, 11:57 AM #1864
Timber Hoarder
- Join Date
- Sep 2002
- Location
- Minbun, FNQ, Australia
- Age
- 66
- Posts
- 12,881
You aren't 865M above sea level. Originally Posted by AlexN
 Cliff.
If you find a post of mine that is missing a pic that you'd like to see, let me know & I'll see if I can find a copy.
-
6th July 2010, 01:02 PM #1865
GOLD MEMBER
- Join Date
- Jan 2009
- Location
- Blaxland, Australia
- Age
- 65
- Posts
- 2,551
Ah - that would explain it :). Originally Posted by Cliff Rogers
A.
-
6th July 2010, 05:17 PM #1866
GOLD MEMBER
- Join Date
- Jan 2009
- Location
- Blaxland, Australia
- Age
- 65
- Posts
- 2,551
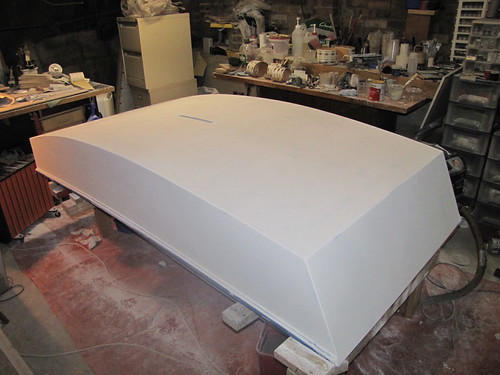
Apart from the upper edges of the bow and stern transoms, the undercoat sanding is complete!
Final undercoat sanding: darker patches are where the undercoat has thinned to a point where it's no longer as opaque as it was - and the grey primer is making its presence felt...
Follow this link to my Funny Flickr Farm <froth froth, foam foam>. Well, to be nice to Flickr - for once - while they've "added" an extra step, they've subtracted three or more, so I am now at least two steps ahead :). Excellent, Flickr. Now leave it as it is anddon't fiddle with it! So as not to test people's patience any more than it is, I'm sticking to the "original" medium sized photos - which is now the "smaller medium" size in Flickr's menagerie of image sizes...
The next photo should show the 'Duck in the first of its yellow coats, albeit most probably spotty where I've gone through into or very close to the grey primer. I'm considering the first coat as a "fill coat" - I get three coats out of the 1 litre tins, so will only need another 500 mL or 1 L tin, depending on what sort of Brightside quantitiy I can scrounge. I've got some dust-removal to do first before any colour-coating, though. Topcoats on future boats will either be International's "Toplac" or BoteCraft's "AquaCote" - I'm curious to see whether the latter is as bad as its reputation would have it.
-
6th July 2010, 11:56 PM #1867
GOLD MEMBER
- Join Date
- Jan 2009
- Location
- Blaxland, Australia
- Age
- 65
- Posts
- 2,551
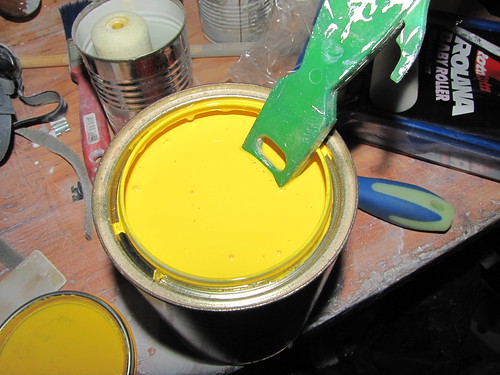
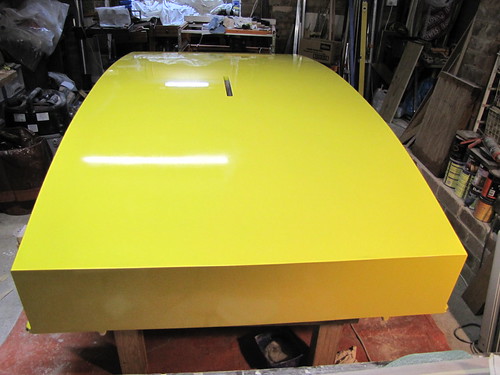
Right, well, I've passed another milestone with the boat today - the first colour coat is on! I have some photos of the event:
1. The paint: one 1 L tin of International "Brightside" Yellow: all stirred up and ready to go :). The next photo is the one with the paint on the boat...
2. Three-quarters of the hull bottom done; my daughter ceremonially put the first rollerful of paint on. Taking MIK's advice to really spread the paint out (to reduce bubbles) worked a treat. Photo taken with flash
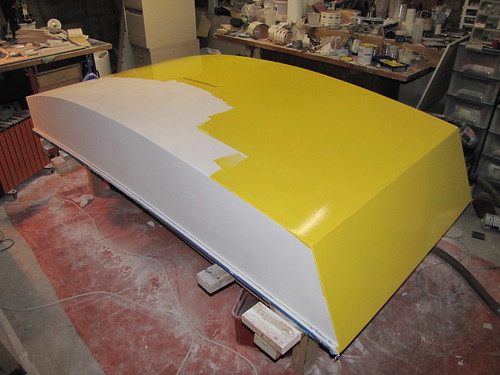
3. Three-quarters painted; without flash
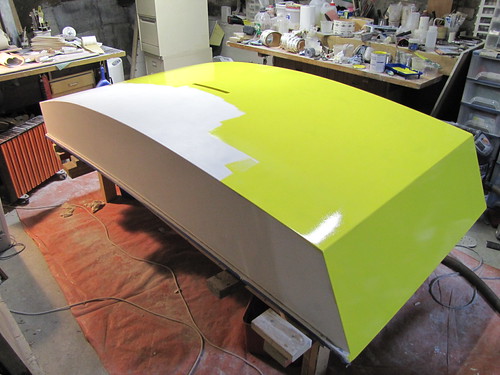
4. Full coat - photo without flash: note the slightly greenish cast courtesy of the fluoro lights. So much for the camera's "automatic white balance". Note also the glossy nature of the finish :)
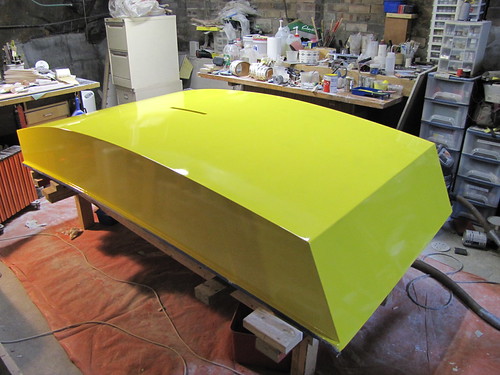
5. Full coat, photo with flash: less green, more red...
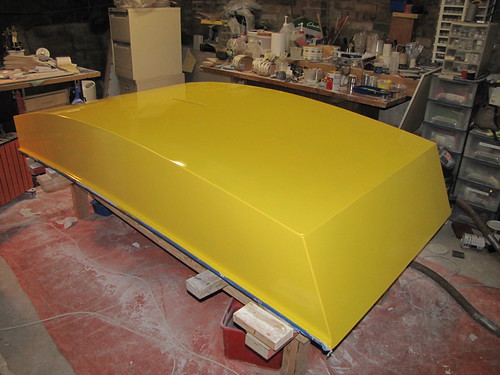
6. Full coat, starboard side with flash
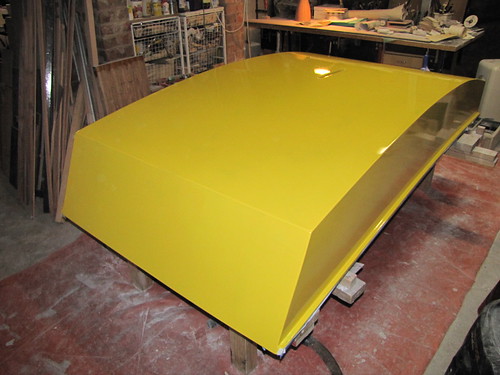
7. Full coat, starboard side without flash. Nice mirror-like surface - from a distance, anyway
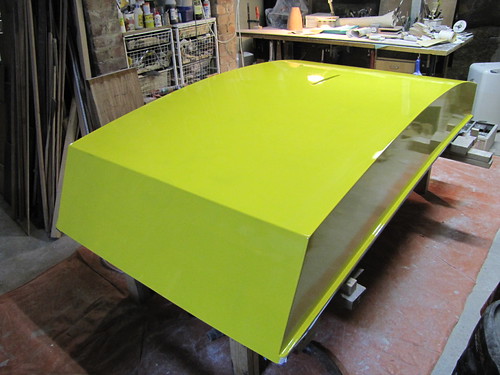
8. Hull viewed from stern, with flash. Look at the nice reflections :)
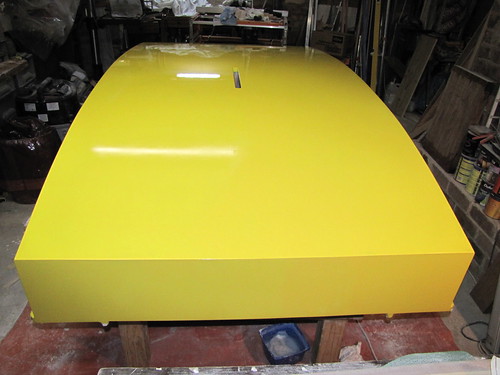
9. Hull viewed from stern, without flash. All the scratches and imperfections that were present at the end of the undercoat sanding were of course painfully obvious after the first top coat - hence my comment about it being a "fill coat" of sorts, in my previous post. This coat will get sanded back using 400-grit paper after 36 hours of curing. Once sanded nice and smooth - i.e., no visible scratches! - the next coat will go on, and the cycle repeated until I am satisfied with the depth of colour, smoothness and gloss...
Follow this link to my Flickr account where you can be blinded by the larger sizes of these bright mostly-yellow photos, and marvel at Flickr's updated look - if the fit takes you
Having followed MIK's advice scrupulously (for once ;) regarding the not-overloaded roller and the spreading out of the paint in order to avoid bubbles (which worked very nicely, thanks MIK :), I only used up a fifth of the tin or less, so in theory I will be able to put on five coats. That is, if I can stand to do such a thing, or if in fact it will be necessary. I think at least three coats to hide the grey patches, and four to bury the scratches, so maybe five won't be so wide of the mark. That makes it about ten days all up to finish the external, but I also have a lot of resin work to do, which will get slotted into the slack times, temperature permitting.
Anyway, I'm very pleased to have got to this point, even if the colour coats are nowhere near complete. It gives me a bit of a kick-along to get other stuff finished as well.
-
7th July 2010, 01:12 AM #1868
GOLD MEMBER
- Join Date
- Mar 2007
- Location
- Adelaide
- Posts
- 2,139
It's at this point Alex that all your patience is rewarded, nice crisp chines and a flawless finish.
Well done but as the Pope kept asking "when will it be finished Michelangelo"
Mike
but as the Pope kept asking "when will it be finished Michelangelo"
Mike
"Working to a rigidly defined method of doubt and uncertainty"
-
7th July 2010, 08:56 AM #1869
Timber Hoarder
- Join Date
- Sep 2002
- Location
- Minbun, FNQ, Australia
- Age
- 66
- Posts
- 12,881
Coupla dayz, coupla dayz, baaa-ute-iful. Originally Posted by m2c1Iw
Cliff.
If you find a post of mine that is missing a pic that you'd like to see, let me know & I'll see if I can find a copy.
-
7th July 2010, 01:32 PM #1870
GOLD MEMBER
- Join Date
- Jan 2009
- Location
- Blaxland, Australia
- Age
- 65
- Posts
- 2,551
Hi Mike, Originally Posted by m2c1Iw
Ahem . The "flawless" finish is yet to come...lots more "patience" will be required to attain that end .
And as I say now when people ask when it will be finished: "when it's finished"

 .
.
Cheers,
Alex.
-
7th July 2010, 01:37 PM #1871
GOLD MEMBER
- Join Date
- Jan 2009
- Location
- Blaxland, Australia
- Age
- 65
- Posts
- 2,551
Hi Cliff, Originally Posted by Cliff Rogers
I wish! I'll get a better idea of when the colour finish will be finished when I've sanded the first coat back (a lot). I checked it this morning and it was still very soft, so the 36 hours (recoat time @ 5 degC) on the label looks like the minimum 'twixt application and sanding. Another check tomorrow morning...
Cheers,
Alex.
-
7th July 2010, 03:41 PM #1872
 Deceased
- Join Date
- Nov 2008
- Location
- Maylands, Perth, Western Australia
- Age
- 58
- Posts
- 218

Hi Alex,
I know the painting isn't finished yet, but it looks fabulously smooth and shiny even now, congratulations.
-
7th July 2010, 04:42 PM #1873
GOLD MEMBER
- Join Date
- Jan 2009
- Location
- Blaxland, Australia
- Age
- 65
- Posts
- 2,551
Hi David, Originally Posted by dhgomm
Many thanks for your kind words :). I was looking at it moderately closely this morning, however, and there is also a pronounced roller stipple remaining in the (albeit bubble-free) surface texture: not as bad as the preceding primers, etc., but still highly noticeable. It likes me not, but apart from spraying, I'm really not sure how to eradicate it. Brush and lay off at 90 degrees? That would likely be worse...
Cheers,
Alex.
-
7th July 2010, 07:39 PM #1874
GOLD MEMBER
- Join Date
- Jan 2009
- Location
- Blaxland, Australia
- Age
- 65
- Posts
- 2,551
On applying a thin resin coat to one side only of the foils this arvo, I decided that I need to sand the board back to the glass and recoat, when the weather is warmer and drier. There are too many opaque/milky patches (most of the board) where the timber is either occluded or "muffled". Given the dodgy nature of the resin in later coats (the one this afternoon was using a good, fresh batch), I'm not fussed about doing this, nuisance though it is. I can leave the sanding till one of the last things to be done, since I don't want the board absorbing any more atmospheric moisture than I can help - it's going to be a while until I get things like painting, varnishing, sail-sewing and hardware fitting done anyway.
To say that I was disappointed when I realised what I was going to have to do - and that I'd wasted another batch of resin - is something of an understatement.
-
8th July 2010, 11:11 PM #1875
GOLD MEMBER
- Join Date
- Jan 2009
- Location
- Blaxland, Australia
- Age
- 65
- Posts
- 2,551
What news of the paint? It's still a bit green even after 48 hours at around 12 degC, and the only way of sanding it effectively at the moment is to use the wet-and-dry wet and with a very light touch. And I'm going to have to sand the whole thing because I've been experimenting with various grades and also used the ROS (the latter was not a good idea) and the thing looks a bit like a patchwork quilt at the moment, especially as the paint layer is so thin. I know, I know, I should have put a few more coats on before sanding, but quite a few bits of fluff fell out of my jumper onto the surface while painting, and I didn't want to leave them embedded. Keeping the six-legged flying animals off is going to be a challenge too, given their general attraction to yellow: The hull is in effect a gigantic sticky trap when that paint is wet.
I didn't get a lot of time to do much on the paintwork today, hence in part the patchy nature mentioned above. I hope to have more of a run at it tomorrow...


 Reply With Quote

Similar Threads
-
New Queensland PDRacer Build
By duncang in forum Michael Storer Wooden Boat PlansReplies: 71Last Post: 26th April 2012, 08:30 AM -
Oz PDR build in Adelaide - sexy black PDRacer
By m2c1Iw in forum Michael Storer Wooden Boat PlansReplies: 39Last Post: 27th April 2009, 06:30 PM -
OZ PDRacer - Dylan's build in the Philippines
By Boatmik in forum Michael Storer Wooden Boat PlansReplies: 16Last Post: 23rd February 2009, 05:50 PM -
Brisbane Timber and Working with Wood. Boatmik/PDRacer
By Boatmik in forum Michael Storer Wooden Boat PlansReplies: 1Last Post: 11th April 2007, 08:06 PM -
Flawed wood on the TS --DUCK!
By Robert WA in forum WOODWORK - GENERALReplies: 7Last Post: 19th February 2004, 11:42 AM
Tags for this Thread
balanced lug,
boatmik,
build,
dacron(tm),
douglas fir,
duck,
enamel,
epoxy resin,
fibreglass,
hoop pine,
interminable,
lug,
machinery,
materials,
michael,
oregon,
oz racer mk 2,
ozracer,
paint,
paulownia,
paulownia/glass mast,
pdracer,
plywood,
polytarp,
primers,
really simple sails,
sail-making,
sailmakers thread,
sanding,
storer,
sydney,
timber,
tools,
varnish,
verbose,
western red cedar,
wood,
wood duck,
wrc
