

 Thanks:
  Likes:
  Needs Pictures: 0
 Picture(s) thanks:
Results 2,551 to 2,565 of 3347
-
29th March 2011, 10:48 PM #2551
 GOLD MEMBER


- Join Date
- Jan 2009
- Location
- Blaxland, Australia
- Age
- 65
- Posts
- 2,551
 I knew I'd seen that name somewhere - they are indeed the crowd I was thinking of, but the actual product was "Bondcrete" (my italics).
 Originally Posted by MichaelB

A.
-
29th March 2011 10:48 PM # ADSGoogle Adsense Advertisement
- Join Date
- Always
- Location
- Advertising world
- Age
- 2010
- Posts
- Many
-
30th March 2011, 09:53 AM #2552
GOLD MEMBER
- Join Date
- Jan 2009
- Location
- Blaxland, Australia
- Age
- 65
- Posts
- 2,551
The varnish has happily dried overnight :). It is also a wee bit harder than I expected it to be, so that's a bonus. I will let it set up further before I put the next coat on, however: probably tomorrow, giving the stuff 48 hours. As a result it will get a light going-over with the ScotchBrite pad and tack cloth beforehand.
Looking good :).
-
30th March 2011, 04:39 PM #2553
Senior Member
- Join Date
- Dec 2008
- Location
- McAllen, Texas, USA
- Age
- 64
- Posts
- 154
The entire northern hemisphere lets out a sigh of relief.

-
30th March 2011, 06:07 PM #2554
GOLD MEMBER
- Join Date
- Mar 2007
- Location
- Adelaide
- Posts
- 2,139
Originally Posted by dkirtley
 Cheeky bugga.
Mike
Cheeky bugga.
Mike
"Working to a rigidly defined method of doubt and uncertainty"
-
30th March 2011, 11:35 PM #2555
Senior Member
- Join Date
- Dec 2008
- Location
- McAllen, Texas, USA
- Age
- 64
- Posts
- 154
Hey, I would have felt really guilty as I was the one who suggested Le Tonkinois to him. Originally Posted by m2c1Iw
Last edited by dkirtley; 31st March 2011 at 02:29 AM. Reason: I can't spell
-
31st March 2011, 01:41 AM #2556
AJ
- Join Date
- Jun 2007
- Location
- Aberfoyle Park SA
- Age
- 63
- Posts
- 1,787
Can Le Tonk be built up, chemically keying with wet on slightly 'green' like epoxy & Goldspar can?
Or does it have to be allowed to fully cure then mechanically keyed to the next coat ?
AJ
-
31st March 2011, 02:29 AM #2557
Senior Member
- Join Date
- Dec 2008
- Location
- McAllen, Texas, USA
- Age
- 64
- Posts
- 154
Their advertising for original recipe says that it only needs sanding for the beginning and that subsequent layers will stick to itself. Intended for multiple thin layers.
Seems the newest formulation has added a requirement for light sanding or cleaning between layers due to them having to not use some solvent or another.
Don't know if it is hype but places where it is written about seem to be uniformly positive. Simple linseed and tung oils with some magic sauce thrown in.
-
31st March 2011, 11:34 AM #2558
GOLD MEMBER
- Join Date
- Jan 2009
- Location
- Blaxland, Australia
- Age
- 65
- Posts
- 2,551
Hi David, Originally Posted by dkirtley
I was going to make some comment or other about you being the one who drew my attention to this brew, but you have made it for me :). So far still so good.
I was wondering about the discrepancy that I noted between stuff I'd read about sanding not needed and what I'd seen on the net and what I read on the sheet that Brain M sent me. Brian's instructions say to sand between coats. I was a bit disappointed at that, but I'm going to merely give the surface a quick swipe with the ScotchBrite and see what happens. The Euro Chemical Police(TM) must have detected ausefuldangerous substance and made them delete it. Delete. Delte. Delete.
At any rate, it's still looking good: the second coat on the boom this arvo or tomorrow.
-
1st April 2011, 10:53 AM #2559
Happily receives emails.
- Join Date
- Jul 2005
- Location
- 'Delaide, Australia
- Age
- 65
- Posts
- 8,138
That's good news Alex.
Does the adhesion seem fine?
MIK
-
1st April 2011, 06:47 PM #2560
GOLD MEMBER
- Join Date
- Jan 2009
- Location
- Blaxland, Australia
- Age
- 65
- Posts
- 2,551
It certainly seems to be sticking OK to the 'pox - I don't know about itself yet as I lost a whole day yesterday to a hideous headache which was still hanging around this morning. Not as bad as what people describe as a migraine but bad enough. I think it was caused by eating too many sulphur-preserved sultanas and apricots on Wednesday, silly me. I am hyper-sensitive to sulphur in many things, but especially sulphur-based preservatives. ANd it was really hard to find sulphur-free wine that I liked, so it was something of a relief from that point of view when I had to stop drinking alcohol for medical reasons.
I've sanded the boom a bit: le Tonk dusted off quite easily even early on, so that's another mark in its favour. I would like to say that it sanded better earlier than Goldspar, but I'm not absolutely sure. There were a few lumps and bumps to deal with, cause unknown, could have been insects and unlikely to have been itself as the stuff looked perfectly clear of such things in the transfer pot. The (very expensive) dark red Selley's brush was new straight out of the packet, too.
Second coat of le Tonk will go on the boom tomorrow, and I may even get enthusiastic and do the hull - but only if I'm feeling up to it.
As an aside, I have detected four other sailors apart from myself at the flying club (there may even be more). Interesting...
Cheers,
Alex.
-
2nd April 2011, 09:43 PM #2561
GOLD MEMBER
- Join Date
- Jan 2009
- Location
- Blaxland, Australia
- Age
- 65
- Posts
- 2,551
Not sure what happened yesterday, but I didn't get to painting the boom. Or today, either. Maybe tomorrow.
I do have an observation of interest to make (well, I find it interesting), however. I used a plastic scoop (thoroughly washed) from a box of OMO washing powder in an attempt to meter out a small amount of varnish for the first coat on the boom - and forgot to clean the varnish off. The stuff has set - and set sufficiently hard that it is very hard to scrape it off (the plastic is polypropylene). There are a couple of small spots that are easier to remove than others, but they are the exceptions that prove the rule, so to speak. The varnish layer on the boom shows a similar resistance to the fingernails.
I'm very pleased with that :). And reassured, too.
-
3rd April 2011, 12:48 AM #2562
Member
- Join Date
- Apr 2010
- Location
- Oklahoma USA
- Posts
- 90
Good to hear the new varnish is working well.
-
3rd April 2011, 05:05 PM #2563
GOLD MEMBER
- Join Date
- Jan 2009
- Location
- Blaxland, Australia
- Age
- 65
- Posts
- 2,551
Hi Brad,
I think I'll go out on a limb here and say that the varnish is going very well :). Which is, of course tempting Fate.
I'e just completed the first le Tonk coat on the hull cockpit and decks: it went on smoothly an without too many glitches, although I still have a tendency to miss very small patches on the relatively large area (to paint) of the decks. These were towards the end of the session went my concentration was starting to flag. The new varnish seemed to go on quite well over the sanded old varnish, although there was a slight tendency to fish-eye in spots. I managed to catch the ones that I saw before the wetness of the new stuff had dissipated.
Speaking of the wetness of le Tonk, it stays wet quite a long time (at current temperature and humidity) - long enough to make sure that the next brush-full is patched in smoothly without ridges or gaps (but see above ;). In this respect it seems smoother to apply than the Goldspar. Towards the end of the session, however, the stuff had started to thicken in the pot quite noticeably as air from the brush and sides of the pot got to it. I'll use less next time and top up halfway through.
The boom got its second coat of le Tonk after I'd done the hull: I'm hoping that it wasn't too thick by that stage to allow the brushmarks to flow out. I'll have a look in the next couple of hours - "Sec à deux heures", don't forget ;). They may be right this time as the weather is quite a bit warmer and drier than when I put the first coat on the boom.
I may have some snaps to show later.
-
3rd April 2011, 05:42 PM #2564
Happily receives emails.
- Join Date
- Jul 2005
- Location
- 'Delaide, Australia
- Age
- 65
- Posts
- 8,138
If the varnish or paint starts getting thicker in the pot, I often pause when I can and put some thinners in the thinners cap and just shake a few drops onto the surface of the varnish in the tin.
But only a few drops. Overdoing it is a real pain!
MIK
-
3rd April 2011, 11:12 PM #2565
GOLD MEMBER
- Join Date
- Jan 2009
- Location
- Blaxland, Australia
- Age
- 65
- Posts
- 2,551
Hi MIK,
That doesn't take into account the fumble-fingeredness of the Fumble Fingered Fool. I shudder to think of the damage that I would be likely to inflict doing something as simple as that. Doesn't bear thinking about, in fact!
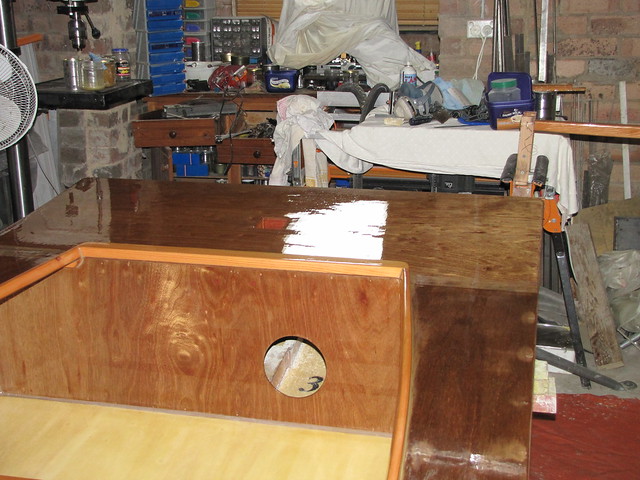
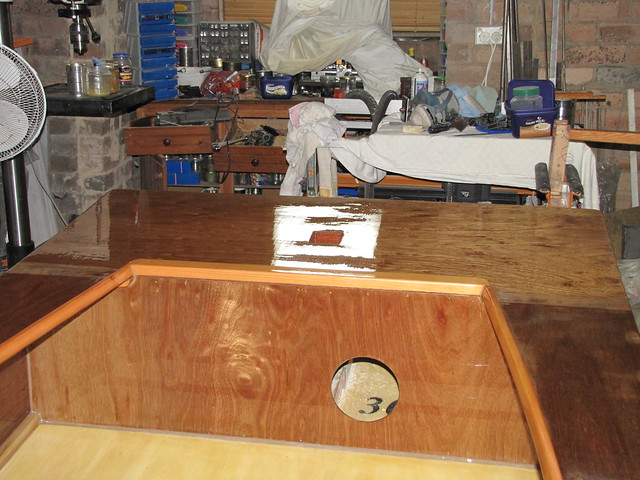
OK, here is some snaps of today's work:
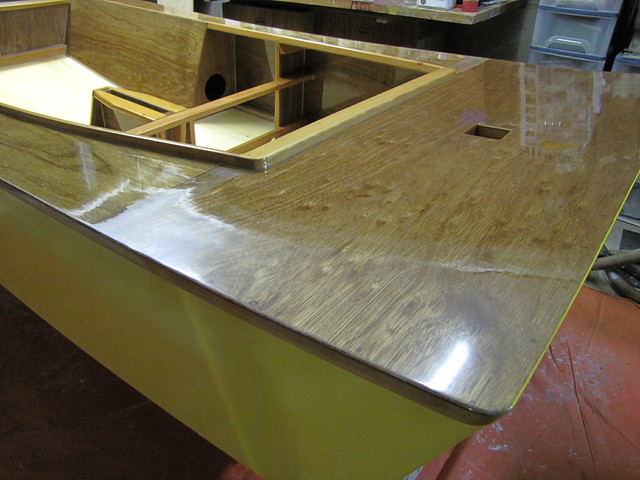
1. Hull: 1st coat le Tonk varnish, photo no. 1. Note the shiny, reflective nature of the finish :). Note also the opaque, refractive nature of the thicker patches of BoteCote :(
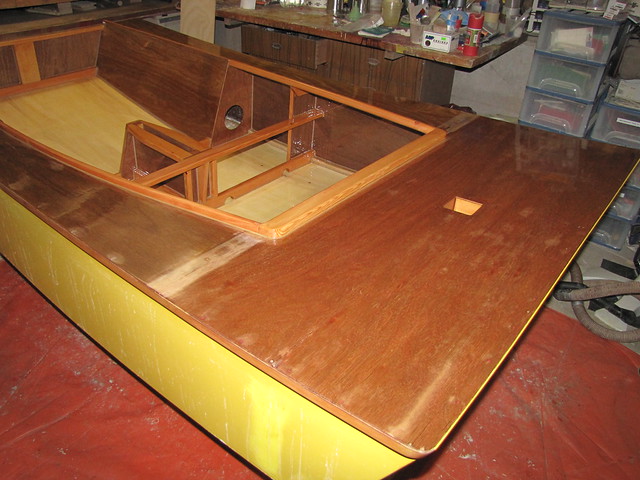
2. Hull: 1st coat le Tonk varnish, photo no. 2. Shiny :)
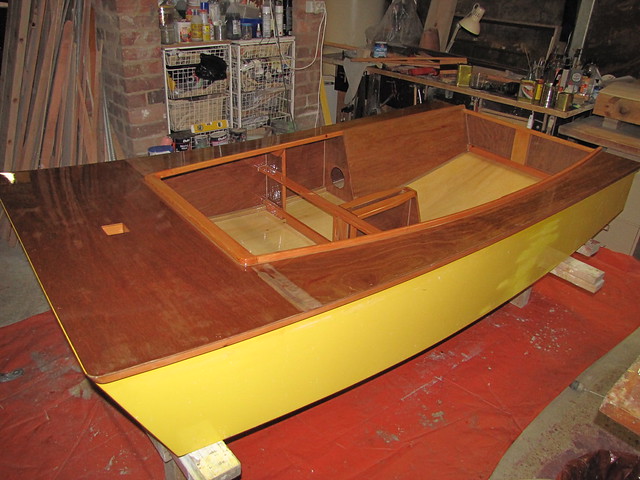
3. Hull: 1st coat le Tonk varnish, photo no. 3. Glossy :)
4. Hull: 1st coat le Tonk varnish, photo no. 4. More or less the same as photo no. 3 directly above

5. Hull: 1st coat le Tonk varnish, photo no. 5. Lots of lovely, even reflections :)
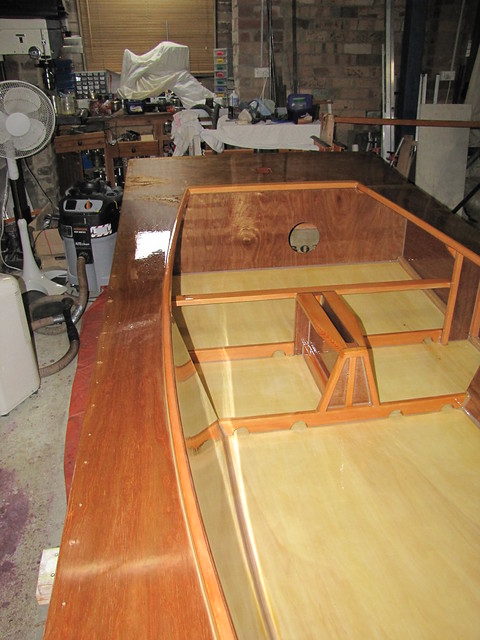
6. Hull: 1st coat le Tonk varnish, photo no. 6, featuring a nice shiny foredeck. Note the nice shiny glinting off the boom in the background :)
7. Hull: 1st coat le Tonk varnish, photo no. 7: another view of the shiny foredeck :)
8. Hull: 1st coat le Tonk varnish, photo no. 8. Reflets dans le vernis
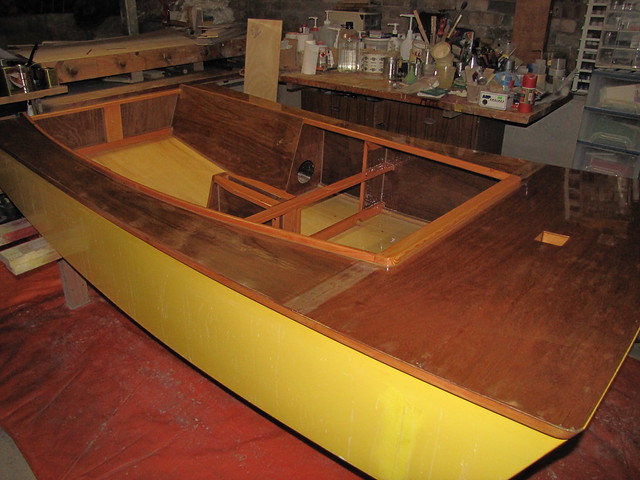
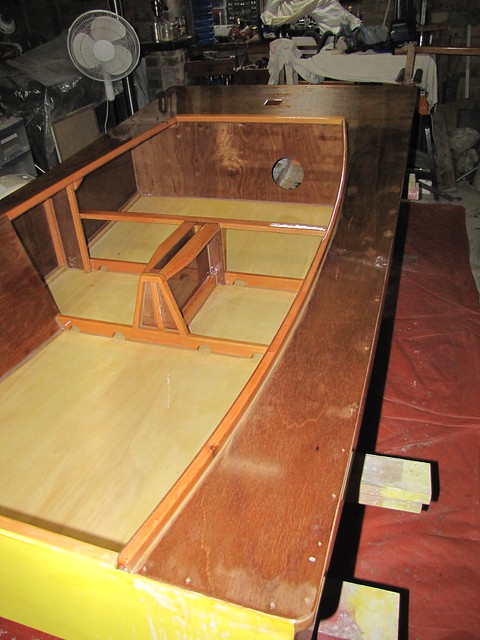
9. Hull: 1st coat le Tonk varnish, photo no. 9. Photo taken without flash, to show up the shiny, glossy nature of the stuff on the side deck :)
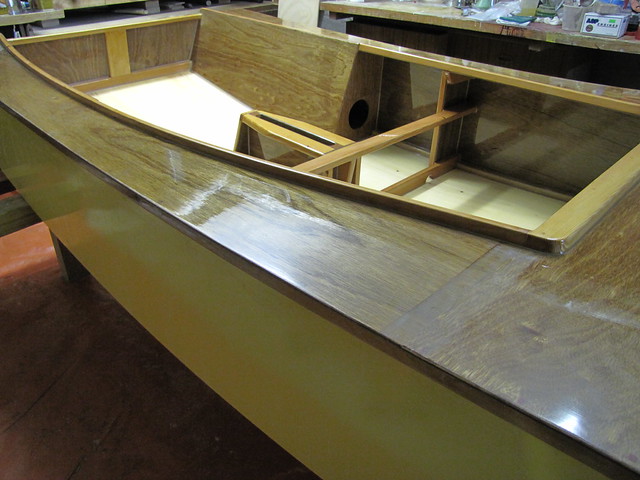
10. Hull: 1st coat le Tonk varnish, photo no. 10: similar flash-less snap - lots of reflections in the smooth, shiny coat :)
Follow this link to my Flickr account, where there is currently great rejoicing, balloons and streamers. Well, great rejoicing, anyway ;).
You might guess - correctly - from the plethora of smilies scattered around the place in this post, that I am quite pleased with the result of the first coat of le Tonk on the hull. Extremely pleased, in fact. I will reserve an ecstatic reaction for later if I find that the bulk layer of varnish sets up and hardens adequately: something that I won't know for about 48 hours. It has started to show signs of losing its tackiness about five hours after application, so I'm hopeful of Good Things.
As I keep on saying, however, we'll see.
Looking good at the moment :))))).


 Reply With Quote


Similar Threads
-
New Queensland PDRacer Build
By duncang in forum Michael Storer Wooden Boat PlansReplies: 71Last Post: 26th April 2012, 08:30 AM -
Oz PDR build in Adelaide - sexy black PDRacer
By m2c1Iw in forum Michael Storer Wooden Boat PlansReplies: 39Last Post: 27th April 2009, 06:30 PM -
OZ PDRacer - Dylan's build in the Philippines
By Boatmik in forum Michael Storer Wooden Boat PlansReplies: 16Last Post: 23rd February 2009, 05:50 PM -
Brisbane Timber and Working with Wood. Boatmik/PDRacer
By Boatmik in forum Michael Storer Wooden Boat PlansReplies: 1Last Post: 11th April 2007, 08:06 PM -
Flawed wood on the TS --DUCK!
By Robert WA in forum WOODWORK - GENERALReplies: 7Last Post: 19th February 2004, 11:42 AM
Tags for this Thread
balanced lug,
boatmik,
build,
dacron(tm),
douglas fir,
duck,
enamel,
epoxy resin,
fibreglass,
hoop pine,
interminable,
lug,
machinery,
materials,
michael,
oregon,
oz racer mk 2,
ozracer,
paint,
paulownia,
paulownia/glass mast,
pdracer,
plywood,
polytarp,
primers,
really simple sails,
sail-making,
sailmakers thread,
sanding,
storer,
sydney,
timber,
tools,
varnish,
verbose,
western red cedar,
wood,
wood duck,
wrc
