

 Thanks:
  Likes:
  Needs Pictures: 0
 Picture(s) thanks:
Results 91 to 105 of 3347
-
11th March 2009, 04:11 PM #91
 GOLD MEMBER


- Join Date
- Jan 2009
- Location
- Blaxland, Australia
- Age
- 65
- Posts
- 2,551

Btw Nick, I just stumbled across the Duck with the foils constructed from alternating timber types - you were right, it wasn't yours! It was in fact the Duck built by m2c1Iw :). The link in question was on the Duckworks site, in an article by Michael on said boat. The foils also appear, resplendent, on Mike's "Sexy Black PD racer" thread (same pics).
Nice :).
Query to Mike - which timbers did you use in the foils, or is that a secret? I couldn't find a mention anywhere.
-
11th March 2009 04:11 PM # ADSGoogle Adsense Advertisement
- Join Date
- Always
- Location
- Advertising world
- Age
- 2010
- Posts
- Many
-
11th March 2009, 09:24 PM #92
GOLD MEMBER
- Join Date
- Jan 2009
- Location
- Blaxland, Australia
- Age
- 65
- Posts
- 2,551
A quiet evening, this one. I spent the allotted time selecting bits of oregon and where to cut them for various "ancillary" bits such as mast step/partners, frame 1 & 2 parts, centrecase (still got two 19 x 45 pieces to find), cockpit coaming, and rudder box stiffeners. Will have to do another sort and possibly cut for the carlins. The wood that I have may have too many unavoidable (i.e., large) knots. Also went through the bits of ply for the rudder box and tank ends (frame 2 outer parts), checking that I'd got the right measurements and the grain pointing in the same direction for the bits (all horizontal, in fact), and the right labels on the right bits! Labelled everything measured this evening (in pencil) to save time later.
No sawing of anything today as I got home from work too late, and the 235 mm de Walt saw that I use in the Triton makes a fearsome racket (9000 rpm). Not the thing to inflict on the neighbourhood at dinner time or later!
Sanded back the coated sides of two of the twelve lengths of WRC cladding using 120 grit paper on a cork block (I don't like using the ROS - I find the vibrations and decibel level too distracting, even stih heavy gloves and earmuffs on, plus even with the vacuum extraction running the dust seems to spread far and wide from it). The coating on the cladding seems to come off quite easily, and hasn't penetrated too deeply into the timber, which means more usable wood :). I did up a quick test-glue a couple of (sanded) offcuts and have left it lightly clamped up in the Super Jaws for 24 hours or so to test bonding strength of Purbond and efficacy of coating removal. I'll have a serious go at busting it up tomorrow evening. The Purbond was foaming up nicely 15 minutes after applying it (well, that's when I looked at it). It is raining a bit at the moment and we apparently had quite a lot of it today already, so the air is nice and humid for it.
-
11th March 2009, 09:45 PM #93
GOLD MEMBER
- Join Date
- Mar 2007
- Location
- Adelaide
- Posts
- 2,139
The lighter wood is Oregon or Douglas Fir darker stuff is American Red Cedar at least that is what I was told it is like western red cedar but darker. Originally Posted by AlexN

Why you ask? I recall as a kid admiring the foils laminated from different coloured wood at our yacht club so when my Uncle kindly supplied me the AMC (he used it on model yachts) I couldn't resist.
I reckon making the foils was the best part really satisfying to see the shape develop using hand tools.
Have fun
Mike
-
11th March 2009, 10:54 PM #94
GOLD MEMBER
- Join Date
- Jan 2009
- Location
- Blaxland, Australia
- Age
- 65
- Posts
- 2,551
Hi Mike,
Thanks for that. I asked because I was wondering what the lighter timber was: the darker one looked like WRC, and the lighter did look a bit oregon-like in a closeup, but I wasn't at all sure.
I'm setting up to make the Duck (and Goat) foils out of WRC/Paulownia sandwiches. The WRC is being salvaged from some 9 mm interior wall t&g-ed cladding boards from my study (which is gradually being turned into a new bedroon for our daughter). I've trimmed off the tees and gees and am in the process of removing the waxy clear protective coat that the room-side of the boards had been painted with. These will be glued together three to a stack with Purbond, then sawn into roughly 25 x 30 mm x 2.2 m lengths, then interspersed with Paulownia pairs trimmed to around 25 x 35-ish mm, with a piece of Tas Oak capping on the back edge (not Vic Ash as previously mentioned - my mistake). The glue used on the Duck foils will be Purbond; on the Goat foils it will be BoteCote + lightweight sanding filler.
Having seen how lovely your foils looked, I couldn't resist making my own variegated foils (albeit somewhat ligher in overall colour)!
Cheers,
Alex.
-
12th March 2009, 09:49 PM #95
GOLD MEMBER
- Join Date
- Jan 2009
- Location
- Blaxland, Australia
- Age
- 65
- Posts
- 2,551
Well, that was interesting. The port side panel now looks like a cross between a swiss cheese and a Pearly Queen (or a punk). Why? Having looked at my "handiwork" for a while, and having a lot of other stuff (measuring) out of the way and also discovered that the Purbond glue joint on the sanded WRC was stronger than the surrounding wood <grin>, I decided that I could do better with the alignment of the sheer clamps and chinelogs on both side panels.
I got stuck into the chinelog on the port panel first, unstitched it from one end to just past the midpoint, and re-fastened it working from the midpoint forward (using different screw positions, hence the "swiss cheese" effect) so that the outer edge of the log was a good right on the the bottom hull line. I did this mostly by feel, with occasional checks with the square to make sure that what I was feeling was in fact real. Then repeated the process working back to the stern. In both instances I used the unfastened length as a lever to get the bit that I was fastening exactly in postition (which meant working left-handed when working towards the bow). Extra screws (hence the Pearly Queen/punk look) were added to ensure that the log was following the hull line as closely as possible. I also marked the new positions clearly in case to avoid getting confused when under the stress of glueing up. This will hopefully lead to less planing (which I am not good at) when evening up the hull bottoms. I think I might stick sandpaper to my heavy duty straight edge, or a suitable piece of angle iron, when I get to this stage...
The whole process got repeated all over again for the sheer clamp with its notorious (for me) dip forward of the cockpit bulkhead. I think I've got it right now. I'm going to have to be more careful with the starboard sheer clamp in the foredeck section, but it really should be quite easy to replicate the shape of the port panel simply by taking depth measurements of the port panel at prescribed distances, exactly in the same way that the offsets for the hull sides and side decks are used to generate the hull shape. Well, in theory, at any rate :). I cut my losses early tonight rather than start on the starboard panel - quit while I was ahead ;).
I also "moved" some of the measurements from the Frame 2 tank framing from oregon over to the Paulownia. These elements won't be subjected to the wear and tear that the exposed parts of the frames can expect under general sailing conditions (or at least I hope not ;), and so only need to carry glue to bind the bits together. And this will save a bit of weight. Having decided not to use Paulownia on frames 1 & 2, the weight went up again, and I felt that I needed to take measures to curb it a bit. Especially as I'd changed my mind about using Paulownia for the mast-step sructures and had put oregon back in these positions. I've also dug out some (7-ply?) birch aricraft ply from my aircraft stash, which will be used as the stiffening and anti-split plates on the mast step structure. I'll probably also use the (3.8 mm) A/C ply (and an oregon "plug") in the tow-ring support assembly - not sure what I'm going to use for the 19 mm sq. elements, though (I'm going for the "belt and braces design ;).
I was pleased with the latching of the PU glue onto the WRC cladding, as I was not certain that I'd got enough of the rather slippery coating off the outside faces of the boards. It seems that I did, and I can proceed with more confidence in sanding the rest of them, without being tempted to sand them too much or for too long. Now I will have to go looking for my collection of house bricks (glueing weights) in amongst the mess!
-
13th March 2009, 02:07 PM #96
GOLD MEMBER
- Join Date
- Jan 2009
- Location
- Blaxland, Australia
- Age
- 65
- Posts
- 2,551
I've just been looking at various photos around the place of the Bolger "Brick". The 'Duck really does show its influeneces, although this article reveals the many differences, with handy comparision table :). Reading around on Shorty Routh's site is a useful thing to do, and I found his article on the rocker very interesting.
This page here is also extremely useful for people like me who will be putting their Duck on top of their car to haul it about. While the OZ 'Duck is way lighter than the Shorty's Brick shown, I'm also much more lightly built myself, so any "free" help getting the 'Duck onto the roof is welcomed! And it's such a neat, simple solution - although I don't think I'll be putting wheels on the Duck's stern unless I can work out a way of detaching them in an easy, waterproof way. Anyway, the OZ Duck is be carted about single-handed by many, so I should be in with a chance there - at least on level-islh ground.
Might edit this later (or remove it ;).
-
13th March 2009, 02:57 PM #97
Senior Member
- Join Date
- Mar 2008
- Location
- Rockhampton, Australia
- Posts
- 227
Hi Alex,
I cartop my duck, but its not easy getting it on the roof, even with 2 people... Ill try make up some sort of system... Or, I'm thinking of getting a box trailer.
As for on the ground, I'm just wating for those red super cheap trollys to go on special again and Ill grab one to chop up and make some sort of dolly for the Duck.
Cheers
-
13th March 2009, 03:49 PM #98
GOLD MEMBER
- Join Date
- Jan 2009
- Location
- Blaxland, Australia
- Age
- 65
- Posts
- 2,551
Hi Nick,
I thought Shorty's "ladder" elevator system was really neat :). But he is a lot more strongly built than I am!
After posting the above I started to have ideas about weel stes that clipped on - or otherwise rested under - the upper transom cleat. Bit fuzzy still, but something seems to be trying to suggest itself.
Cheers,
Alex.
-
13th March 2009, 07:34 PM #99
SENIOR MEMBER
- Join Date
- May 2008
- Location
- UK
- Posts
- 848
Thanks for raising the subject of car topping Alex. I have a 600 mile journey to bring Trim home and would prefer to car top her. I find listening to a light boat bouncing around at every pothole when on a trailer does my head in.
Car topping suits these little light boats so well worth sorting out. In the 1950's there was a clever lifting design made of wood. I will try and find the article that's still some where on the web. That design has now been engineered into a system sold by Kari-Tek in the UK. Both Chris and I have one and they work really well.
http://www.karitek.co.uk/ELRRIntroMulti.html
http://ukhbbr.wordpress.com/how-to-d...e-built-boats/
Will search for home made version.
Brian
-
13th March 2009, 07:40 PM #100
SENIOR MEMBER
- Join Date
- May 2008
- Location
- UK
- Posts
- 848
Found the article
http://web.mac.com/robertwagenvoort/...rtop_Lift.html
It was called the Dobler Rolon Car Top Carrier in 1946 !
http://www.amateurboatbuilding.com/P...ght/Chap17.htm

Brian
-
13th March 2009, 07:45 PM #101
GOLD MEMBER
- Join Date
- Jan 2009
- Location
- Blaxland, Australia
- Age
- 65
- Posts
- 2,551
Hmmm - looks like a pair of (land-bound) davits! Intresting. Looks expensive, though. Shorty's solution appeals because of its ultra-cheap, simple, and appraently effective attributes. I'll follow up the links, although in some ways I'm putting the cart before the horse again ;).
For those alarmed by my finicky tinkering, I'm intending to be be doing same again this evening with the starboard panel.
For some reason I was completely oblivious of the racket from the Fleet Review this morning - weird, because I was more or less right under parts of it.
Maybe glueing tomorrow...
-
13th March 2009, 07:55 PM #102
GOLD MEMBER
- Join Date
- Jan 2009
- Location
- Blaxland, Australia
- Age
- 65
- Posts
- 2,551
Cool. I think Nick will like this one too. I'll follow up the links when I've emerged from the workshop...
Any word from Chris about Trim's bottom?
Cheers,
Alex.
-
13th March 2009, 08:01 PM #103
SENIOR MEMBER
- Join Date
- May 2008
- Location
- UK
- Posts
- 848
Yes, the Kari-Tek is expensive but top quality kit, I bought mine on eBay second hand. I think the wooden home made version would be cheap enough.
The great thing about this style of lifting is that the boat is always under control. Just a short lift to the hanging lifter and strap in place hanging on the low side of the car. Then lift the bar all under control and slide along and fix. Same unloading. First time ever that I could easily load and unload my sailing canoe without always feeling some thing or some one was going to get damaged.
If we are going to sail a single handed boat it seems only right that we can load and unload singlehanded. Think Shorty's system will also do that as well.
Brian
-
13th March 2009, 08:32 PM #104
SENIOR MEMBER
- Join Date
- May 2008
- Location
- UK
- Posts
- 848
Alex, wonder if we could talk a certain designer we know into drawing up the wooden version. You could be the prototype builder. Got a name as well
"Duck Lifter" Would work as a RAID41 lifter too. A lot of Ducks out there could use a Duck Lifter!
Imagine, you get the plans for the boat, how to make the sails, free oars plan plus a carrying system (err possibly)!
Brian
-
13th March 2009, 09:09 PM #105
GOLD MEMBER
- Join Date
- Mar 2007
- Location
- Adelaide
- Posts
- 2,139
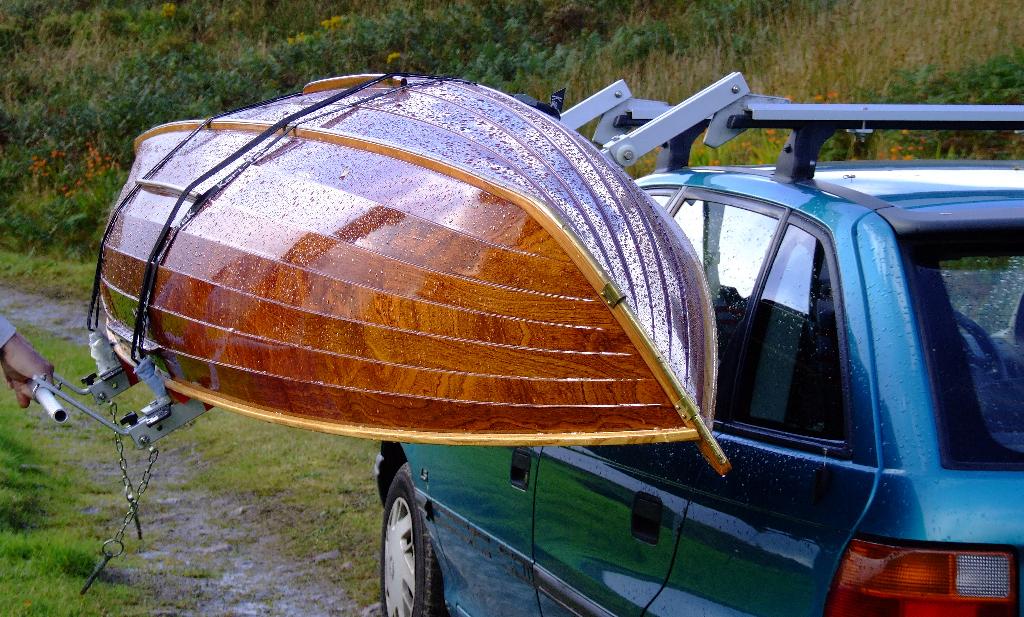
Something like this set up looks like the ducks......but xe, check out the video link


 Reply With Quote

Similar Threads
-
New Queensland PDRacer Build
By duncang in forum Michael Storer Wooden Boat PlansReplies: 71Last Post: 26th April 2012, 08:30 AM -
Oz PDR build in Adelaide - sexy black PDRacer
By m2c1Iw in forum Michael Storer Wooden Boat PlansReplies: 39Last Post: 27th April 2009, 06:30 PM -
OZ PDRacer - Dylan's build in the Philippines
By Boatmik in forum Michael Storer Wooden Boat PlansReplies: 16Last Post: 23rd February 2009, 05:50 PM -
Brisbane Timber and Working with Wood. Boatmik/PDRacer
By Boatmik in forum Michael Storer Wooden Boat PlansReplies: 1Last Post: 11th April 2007, 08:06 PM -
Flawed wood on the TS --DUCK!
By Robert WA in forum WOODWORK - GENERALReplies: 7Last Post: 19th February 2004, 11:42 AM
Tags for this Thread
balanced lug,
boatmik,
build,
dacron(tm),
douglas fir,
duck,
enamel,
epoxy resin,
fibreglass,
hoop pine,
interminable,
lug,
machinery,
materials,
michael,
oregon,
oz racer mk 2,
ozracer,
paint,
paulownia,
paulownia/glass mast,
pdracer,
plywood,
polytarp,
primers,
really simple sails,
sail-making,
sailmakers thread,
sanding,
storer,
sydney,
timber,
tools,
varnish,
verbose,
western red cedar,
wood,
wood duck,
wrc
