

 Thanks: 0
 Likes: 0
 Needs Pictures: 0
 Picture(s) thanks: 0
Results 31 to 45 of 206
-
23rd December 2009, 05:59 PM #31
 SENIOR MEMBER


- Join Date
- May 2008
- Location
- UK
- Posts
- 848

I am sure there was an article years ago in Water Craft about using Sikaflex for a boat build quickly at a Dutch Show. I will try to find it.
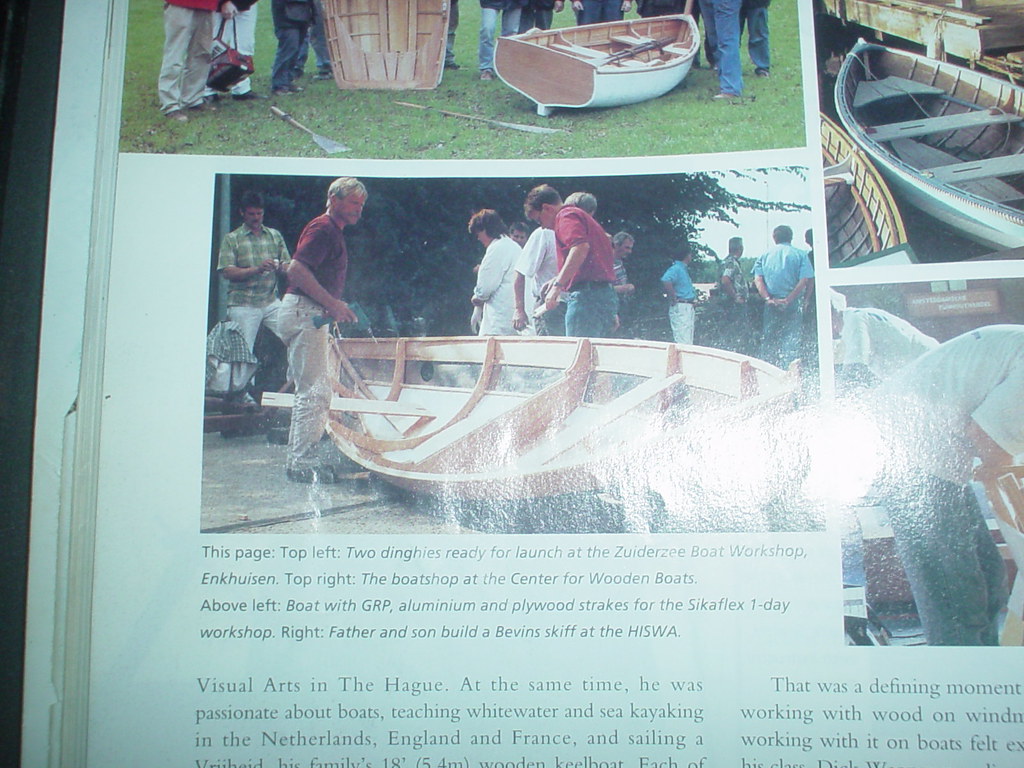
Ok, it was in water Craft No 25 Jan/Feb 2001. designed by Kees Prins, to be built in one 9 to 5 day. It has three strakes, one grp, one aluminium and one plywood.
My carbon tubes have the sail track glued with sikaflex onto the tubes, no mechanical fastenings.
There is no way you could fly to a destination with a two part liquid that you mix together to get a reaction in your bag! A tube of Sikaflex might be ok.
It seems to me this canoe should be built using standard materials from the local hardware store, in our case B&Q, or Homebase.
Thinking about gaffer tape. It would be nice if you could buy fibreglass tape with a sticky back! Stick it on and cover in epoxy!
Also, Carl at Wooden Boat has posted a piece about looking for design suggestions for their family boat building days.
http://woodenboat.com/boat/ I suggest they watch the progress of this new design.
As for a name, Oneday keeps rolling around my head.
Oneday I am gonna build a boat, let it be this OneDay
Oneday I am gonna make that trip, make it in this OneDay
Oneday, and your afloat
Mind you if you cannot build it in one day, oneandahalfday does not work so well!
Brian
-
23rd December 2009 05:59 PM # ADSGoogle Adsense Advertisement
- Join Date
- Always
- Location
- Advertising world
- Posts
- Many
-
23rd December 2009, 11:46 PM #32
Happily receives emails.
- Join Date
- Jul 2005
- Location
- 'Delaide, Australia
- Age
- 65
- Posts
- 8,138
That definitely got a grin out of me Brian and Woodeneye!
MIK
-
23rd December 2009, 11:49 PM #33
SENIOR MEMBER
- Join Date
- May 2008
- Location
- UK
- Posts
- 848
I suppose TwoDay is not TooBad.
Start a Twoday, today and paddle TwoMorrow
I'm gonna start my TwoDay today and be journeying TwoMorrow
Building a TwoDay in my TwoDay weekend
sorry - gone mad - must be Christmas soon
Brian
-
24th December 2009, 10:02 AM #34
i-Sails Australia
- Join Date
- Apr 2009
- Location
- Hunter Valley NSW
- Age
- 69
- Posts
- 1,759
Nice to see the eggnog is flowing Brian! Well done Originally Posted by keyhavenpotter


-
25th December 2009, 07:36 AM #35
SENIOR MEMBER
- Join Date
- May 2008
- Location
- UK
- Posts
- 848
The idea of using some kind of caulking product in a standard caulking gun to make the fillets between hull side and bottoms might be possible.
I recently used a builders product for embedding bolts into a wall. It was a polyester resin, mixed in the nozzle as it is pushed out of the tube. A similar epoxy could be just the job.
West Systems has brought out ust such a product called Six10. It is a thickened epoxy, although it might not be thick enough for filleting. It is described as non sagging. It will wet out a fibreglass tape. Cartridge is $20.

NEW Six10 Epoxy Adhesive
http://www.aircraftspruce.com/catalog/cmpages/s10.php
Quote
Six10 Adhesive gives you the strength and reliability of a two-part WEST SYSTEM epoxy with the convenience of a single part product. Six10 is dispensed with a standard caulking gun. Non-sagging Six10 bonds tenaciously to wood, metals, fiberglass and concrete. It cures in temperatures as low as 50°F. Working time is 42 minutes at 72°F. Cures to a solid in 5–6 hours and will take high loads in 24 hours. Cure time is faster at warm temperatures and slower in cool temperatures. The Six10 cartridge holds 190 ml of resin and hardener. To use Six10 Adhesive, replace the retaining nut and plug on the West System Six10 dispensing cartridge with the 600 Static Mixer that comes attached to the cartridge. Dispense mixed 2 part epoxy adhesive using a standard caulking gun. The efficient internal geometry of the 600 Mixer thoroughly blends resin and hardener in a short mixing length for good application control and a minimum of waste. Place high-strength, non-sagging epoxy exactly where it’s needed in less time and with no mess. Additional 600 StaticMixers are available in packages of two.
Brian
-
25th December 2009, 08:14 AM #36
i-Sails Australia
- Join Date
- Apr 2009
- Location
- Hunter Valley NSW
- Age
- 69
- Posts
- 1,759
Ideal I think. The important thing I reckon is that materials should be readily available from hardware stores. Most hardware stores stock the Sikaflex products or similar, but hardly any sell epoxy, or at least in boat building quantities. Even glass tape is hard to find in a hardware store. Originally Posted by keyhavenpotter
Have a Merry Christmas everybody. It's shaping up for a day in the 30s here in the Valley. The girls are still asleep and it's very quiet. My darling Mrs Claus has to work today (she's a RN) so she went off at 7am. It's the first time she's had to work Christmas day in 11 years at this hospital, so it had to happen...

-
25th December 2009, 08:23 AM #37
Happily receives emails.
- Join Date
- Jul 2005
- Location
- 'Delaide, Australia
- Age
- 65
- Posts
- 8,138
I am hopeful that because the panels of this boat are so relaxed (very little twist) that it might be possible to hold it together with duct or gaffer or brown packaging tape or something.
If that IS possible then it makes applying whatever is used to seal and join much easier.
The thing about a lot of the caulking materials is that if they are applied thickly they take some time to dry/evaporate.
This is the advantage of something that chemically cures of course - that strength is much less time dependent.
MIK
-
25th December 2009, 09:25 PM #38
SENIOR MEMBER
- Join Date
- May 2008
- Location
- UK
- Posts
- 848
Interesting bit about Duck tapes here
Duct Tape Comparison
Duct Tape Comparison
By Tim Carter
©1993-2009 Tim Carter
Summary: Duct tape is a powerful tool. Duct tape projects work much better with tape that has plenty of adhesive. Not all duct tape brands are the same. Some less expensive duct tapes have very little adhesive.
DEAR TIM: I have a love affair with duct tape and have found hundreds of uses for the product. But lately some of the duct tape I buy just doesn't seem to be like the duct tape I remember using five or ten years ago. Some rolls of tape seem less substantial. Plus, duct tape never seems to hold well to things like rough lumber, brick, concrete and other slightly rough surfaces. Why is that? Is there a really great duct tape you know of? Steve L., Altadena, CA
DEAR STEVE: Duct tape has rapidly gained a positive reputation for fixing things much like the image I have in my head for bubble gum being used as a repair compound in radios during WW II. Duct tape's design that combines a reinforced backing with wide pieces of tape allows it to really perform well when you compare it to traditional masking or clear cellophane tape. These lightweight tapes simply do not have the same characteristics that strong duct tape possesses.
Rolls of duct tape my be the same size and look alike, but believe me there is an enormous difference in performance and durability. PHOTO CREDIT: Tim Carter
Once you start to look closely at different duct tapes, you quickly learn there is a big difference between products. Common duct tape consists of three layers. There is a protective shell that you see once the tape is applied. The middle layer is a reinforced backing that often has threads of fiber going in two different directions. The final layer is the actual rubber-based adhesive.
Although most duct tapes have all three components, they are by no means the same. In fact, the difference is striking if you actually look at pieces of duct tape while they are held in front of a flashlight. The light allows you to actually see the number of reinforcing threads in the backing of the tape. Some tapes have far more threads more closely spaced than others.
Some manufacturers have stated they do make different duct tapes that are of different grades and quality. This may explain why you are finding duct tapes that seem thinner and less substantial. When taken into a lab, different brands or grades of tape reveal what you have discovered. The thickness of the adhesive layer on the tapes can range from 7.5 to 12 mils. That may not seem like a big difference unless you get out a calculator. The tape that has 12 mils of adhesive has 60 percent more glue than the cheaper tape!
Traditionally duct tapes have adhered very well to smooth surfaces. This happens because there is just enough adhesive to stick to the smooth surface area. But when traditional tape encounters an object that has a rougher texture, the dynamics change. The rougher surface presents a surface area far greater than what the adhesive on the tape can handle.
But those days are over as there is a new duct tape that in fact sticks very well to both smooth surfaces, concrete, brick, stucco, rough lumber and steel. This new wonder duct tape achieves this goal by boosting the amount of available adhesive on each strip of tape. There is plenty of adhesive to fill the small gaps and surface irregularities in these rougher objects.
There is 50 percent more adhesive on this new tape than the current best duct tape on the market. The new tape has 153 percent more adhesive than the low quality tapes you can find at the home centers. It is no wonder it sticks to so many things since there is an abundance of adhesive.
Keep in mind that the tapes must resist failure if you are really stressing them. Common duct tapes that you have been using for years often have tensile strengths of anywhere from 20 to 35 pounds per square inch of tape. The new high-performance duct tape boasts a tensile strength of 58 pounds per square inch.
Tesa Silver Gaffer Duct Tape, 50 mm x 25 m: Amazon.co.uk: DIY & Tools

Now you know what to get for Christmas. Plus some super strong Spectra / kevlar / Aramid fishing line to sew the hull together and hold it together.
http://www.fishermansoutfitter.com/p...yd-Spools.aspx
Brian
-
25th December 2009, 09:41 PM #39
Happily receives emails.
- Join Date
- Jul 2005
- Location
- 'Delaide, Australia
- Age
- 65
- Posts
- 8,138
I've been chatting in the background with Chuck of Duckworks. He was suggesting sticking it together and using duct tape to permanently make it waterproof. At least for the purpose of the trip.
I think, I don't personally like being too creative with how to make a permanent boat ... but if the structure is simple enough it does open up a whole bunch of other possibilities. The broader Puddle Duck group has done a lot of experiments with alternative construction. Maybe this canoe will be a focus for such processes as well.
Particularly if they paddle OK.
MIK
-
25th December 2009, 11:19 PM #40
AJ
- Join Date
- Jun 2007
- Location
- Aberfoyle Park SA
- Age
- 63
- Posts
- 1,787
Nothing wrong with a boat glued up with Sikaflex.
Plenty of rough'n'ready competition boats do more than just around the buoys on the
day. I knew of a few that, painted, were in regular use 2 or 3 years later.
I seem to recall a AABB article of a two week camp with teenagers - week 1, each
participant built a simple approximation of a sea kayak. Week two was a trip in said
kayaks.
cheers
AJ
-
26th December 2009, 07:35 AM #41
SENIOR MEMBER
- Join Date
- May 2008
- Location
- UK
- Posts
- 848
One of the nice things will be how quick feedback will be. Short simple build and on the water trying her out. Good opportunity to learn more about small light box hulls.
Vertical sides seems to remove so much of the designers freedom to control the distribution of primary and secondary stability. Must be challenging to make it work. (And a hard chine which might be a bit grabby.)
If the load is light, very little secondary stability possibly takes place. I guess 90kg paddler will need to give some immersion so the secondary stability can occur ? Raid's secondary stability was great with increased water ballast load. Without it there was secondary stability but it sort of disappeared quickly beyond a precise angle.
Really interested to see how the solo version feels.
Brian
-
28th December 2009, 09:17 AM #42
Happily receives emails.
- Join Date
- Jul 2005
- Location
- 'Delaide, Australia
- Age
- 65
- Posts
- 8,138
Rick and I have been having long discussions in the background. What way to build the boat.
Do we go with wooden chine logs, glass tape, epoxy fillets, PL Premium (a really thick polyurethane glue) or what.
Rick will be taking pics that will go in the plan ... so we want to reflect the way the boat will be built by most.
Hi MIK;
Yes I did, and I picked up the ply and material for the chine logs and gunwhales today. I should be starting on it Wednesday.
RickCOOOL,
I am working on the detailed building procedure today. I am having trouble between going cheap with the construction (chine logs with PLP (ie cheap in materials) or to go with epoxy fillets (cheap in time).
I guess I will focus on epoxy - but suggest not epoxy coating the whole thing as that is the part that costs. Epoxy glass tape on the outside (polyester would be the lower cost option).
If you do the timber chine log direction ... if the chine logs are prebevelled then when they glue in it will only be a little bit of planing to get a flat surface for the whole bottom near the ends of the boat. I can give you an angle if you like. Actually it also means that the edge of the chine log can be set flush with the ply over the whole length rather than making an overhang allowance - that would be less confusing!
Best wishes
MIK
-
28th December 2009, 09:20 AM #43
Happily receives emails.
- Join Date
- Jul 2005
- Location
- 'Delaide, Australia
- Age
- 65
- Posts
- 8,138
There has been some frivolous conversation in the background too. But the ideas keep flipping back and forward.
Hi MIK;
The angle would be nice, if you have it. If you don't I can guesstimate it for you by installing it square, and running my electric planer over it until the bottom fits, then measuring the angle. Not a big deal either way. I was actually thinking of building it like a Gloucester Light Dory (Bolger/Payson) and installing the stems, inwhales and chine logs on first while the panels are flat and easy to work on, then propping them into place using the seat framing to locate the upper outside dimensions, then plopping the bottom on, pie crust fashion and tracing it out and cutting it exact. Then buttstraping the bottom last from the inside. If it had outside chines (which I think look ugly, and must be awful hydrodynamically) this thing could go together in 2-3 hours tops.
I have also been thinking about duct taping the side panels to the bottom, using autobody bog to make a fillet, then following the inside joint with 45mm fiberglass tape and polyester resin. Then once its cured, taking the duct tape off the outside, rounding the edge some, then more tape and polyester on the outside. That would be lightning fast, and cheap, and relatively foolproof.
For now, this first one will be with timber chine logs mounted on the inside, because I think it is the cheapest, most reliable way of proving the design.
Wednesday afternoon is when I am ripping down the 19x19 and smaller material, and hopefully cutting up the plywood as well. Then Christmas Eve morning, I hope to go 3D and let the glue cure until the 27th, when I have some more time to varnish it (I found some 1 step polyeurathane stain/sealer/varnish that is supposed to dry in 4 hours) I will keep a photojournal of all the steps for you.
Rick.Howdy RIK )
)
If the chine logs are 19mm thick a 4mm bevel is about right for the maximum. That will make it a lot easier. I agree ... the outside chine logs are just plain ugly and would make the canoes look awful.
Are you tempted at all by doing the superfast glass tape method? Would it be possible to do a demo run of duct taping it together to see if it works and to get some pics of what it looks like to go in the plan. And then go on with the timber frame version.
Buttstrapping is a lot easier off the boat. I would prefab the panels.
That bottom shape I've given you should be pretty accurate.
With preframing the sides on the flat I had issues in the past as the framing can make the side panels go concave as it was bent into place. The small gunwale 19 x 12 might not be a problem. The Chine might be. I don't know. Might be no problem at all.
The seats are not a good part of the formwork because they may need to be moved for different crew weights and heights. So to pin down the shape using the temporary spreaders is ideal They can go in under the gunwale line. Then the seats can be fitted later in the positions desired.
Cheers
MIK
-
28th December 2009, 09:28 AM #44
Happily receives emails.
- Join Date
- Jul 2005
- Location
- 'Delaide, Australia
- Age
- 65
- Posts
- 8,138
would it be better for you if i built it with glass tape instead of chine logs? Can you let me know soon before i go through the work of ripping the chine logs and figuring out the nasty bevel needed at the stems....(where the two chine log ends meet before the stem itself. I think a taper on both sides would be easier than cutting them short and filling in the area behind the stems)
rick.howdy rick,
if the duct tape idea works then i think the glass tape or fillet for the inside is a winner. So would like to go that way if the duct tape holds things reliably and steadily for long enough
if the duct tape doesn't work then i think it is a close call between the chine logs and stitching with cable ties or copper wire and the chine logs. So you may as well go with the chine logs.
Does this seem ok to you. Don't want to make you go a way that you really don't want to go.
Mikhi mik;
i am game for anything. If you thought it would be a nice idea to build it with porridge and maple syrup, i would give it a go...
I also think that if this is the way you want to recommend building it, then i should try to provide you with accurate assembly pictures of the process, otherwise, all we have really done is tested that it will a) look like a canoe b) works like a canoe and c)that the thing tracks reliably with the skeg on the front and back of a flat bottomed boat. If it is successful on all accounts, then it would be nice to know that it can be reliably built using your prefered construction method.
Rick.howdy,
i have been fishing the net trying to find if many are using duct tape. I think if it works it is a huge advantage for this type of boat with relaxed panels. If you are happy to make the panels to size and try them with the duct tape and see if they will work we will have a little bit of a breakthrough. But if it is really fiddly and stoopid we can change over to cable tying or wooden chine logs.
Does that seem ok with you?
The construction is one side of it. However it is constructed in the end just putting it in the water will test the idea of the twin skegs.
The big advantage for me is if the duct tape works and is documented then i can put the pics in the plan. This goes for the alternative method too - if the duct tape doesn't work - we swap over and the plans and photos describe the actual method used to build the boat.
Mikrick landreville wrote:.externalclass .ecxhmmessage p {padding:} .externalclass body.ecxhmmessage {font-size:10pt;font-family:verdana;} no problem, duct tape it is!
If it is too fussy, or if, in my opinion, would be harder to get the accurate shape compared to cable ties or chine logs, i will revert to the best method availible and proceed.
So i guess oatmeal and syrup are out then?
Rick.Need something outside the quotes to be able to post!MIK,
only for breakfast.
Cool. Look forward to results. I think you might have to initially tab the hull together with bits of tape across the chine - if some of it is at 45 deg to the chine it will stop the bits moving forward and aft.
Then go over the whole lot longitudinally. Any probs might be able to be resolved if we put our heads together.
Or maybe not if it is a crap method!
Mik
-
28th December 2009, 09:33 AM #45
Happily receives emails.
- Join Date
- Jul 2005
- Location
- 'Delaide, Australia
- Age
- 65
- Posts
- 8,138
MIK,
No problems. I should be able to get back to you this time tomorrow (7:15pm over here) I have to work tomorrow until 5 or so, then I will dive in after supper and see how far I get.
Get ready!...
Rick.something outsided the quotes.From having done a fair few stitch boats, there are a couple of things that are kinda counterintuitive.
The way I would look at assembling this one is to join the panels with buttstraps. Let the glue cure.
Then put the two side panels inside face to inside face and tape the ends securely together. Use some tape on the 45 degree angle too before taping up the whole stem along its length. Definitely don't want any overhang on the chine end, so trim there.
Then I would hold the sheer apart with some temporary spreaders of about the right length one central (the approx 819mm one) and I would be guessing the ones at the 655 width point will be most useful - use single dry wall screws through the sheer into the ends of the temporary spreaders - but not in tightly so the side panel can find its own angle.
Put the lot on top of the bottom panel and start taping the bottom edges of the chine in towards the bottom panel edges from the middle. Leave the join between the two ends of the panels visible so you can see if the centre joins stay in alignment. The side panels will sit on top of the bottom panel.
This way the duct/gaffer tape will be pulling the side panels inwards to make it all work as the sheer is already set wider than the bottom panel. If the side panels end up too far towards the centre of the boat I don't think the tape will be able to pull them out again as it will tend to come off the surface. So better to start with the boat too wide and pull it in.
Either it will work like a dream or you will be wanting to strangle me (that's why I live in Australia!). HOpe the panels work out right ... I have been very careful with them.
If it works I will probably put the little one together when I get up to Queensland in a few weeks.
Best wishes
MIK

 Reply With Quote


Similar Threads
-
Quick Canoe - Clinton's build in Sydney
By Clinton1 in forum Michael Storer Wooden Boat PlansReplies: 33Last Post: 14th December 2010, 05:18 PM -
Michael Storer - Help - Quick Canoe build
By Clinton1 in forum KAYAK & CANOE BUILDINGReplies: 3Last Post: 19th May 2010, 08:27 AM -
How to build Cardboard Model of Quick Canoe
By JethroT in forum Michael Storer Wooden Boat PlansReplies: 6Last Post: 1st May 2010, 03:02 AM -
Info for Quick Canoe (formally Disposable Canoe) builders - plan change.
By Boatmik in forum Michael Storer Wooden Boat PlansReplies: 8Last Post: 24th February 2010, 07:34 AM -
Thinking of building a canoe
By q9 in forum KAYAK & CANOE BUILDINGReplies: 17Last Post: 27th December 2009, 09:31 PM
Tags for this Thread
boat,
boat plan,
boatplan,
building,
canoe,
canoeing,
canoes,
car,
cheap,
disposable,
eureka,
fin,
handle,
lassie,
pics,
ply,
plywood canoe,
quick,
quick and easy,
quick canoe,
quick canoe 155,
sheets,
simple,
started,
stitch and glue,
stitch and glue canoe,
storer boats,
trip,
wee,
wooden boat plan
