

 Thanks: 0
 Likes:
  Needs Pictures: 0
 Picture(s) thanks: 0
Results 31 to 42 of 42
Thread: Refinishing our Eureka
-
22nd October 2013, 09:12 PM #31
 Senior Member


- Join Date
- Feb 2013
- Location
- New London, Minnesota
- Posts
- 181

It will be a while yet before I paint anything on the GIS, but this discussion has been very valuable. Thanks.
-
22nd October 2013 09:12 PM # ADSGoogle Adsense Advertisement
- Join Date
- Always
- Location
- Advertising world
- Posts
- Many
-
23rd October 2013, 12:49 PM #32
Yacht Designer & Builder
- Join Date
- Feb 2008
- Location
- Eustis, FL, USA
- Posts
- 2,270
Painting can have a bit of art to it and experience really counts. You have to screw up a few to learn the lessons necessary to make a good job of it. Once you get the techniques and feel down, it becomes enjoyable to do a paint job, especially if you don't have to pay for the labor. You should also think about trying to buff out some of the imperfections. I recently "touched up" a guy's roll and tip job. I block sanded most of the brush stokes out with 400 wet, then removed most of my marks with 600 wet. Next I jumped to the silver 3M 1,000 grit pad on a buffer, running real slow and wet. This got 90% of it, then onto the 1500 and finally the blue 2000 grit pad, all wet. After the pad and buffer work, I polished it up with a fine grit polish and waxed with a bonnet. The result look sprayed and though a few slight imperfections remained, you could shave in the reflection of this paint. It was 90% labor, several sheets of 440 and 600 and a pad of each of the 3M products. This can be done on clear finishes too, though you have to real careful about burning through and running too fast, plus you usually have to "sneak up" on it with smaller jumps in grit.
-
24th October 2013, 08:12 PM #33
Senior Member
- Join Date
- Nov 2011
- Location
- Riverina NSW
- Posts
- 211
Northstar, good to hear it's been helpful. I've kept an eye on all the GIS builds for a couple of years in anticipation of starting mine, though I've had the plans for a year now
 . I know I'll sound repetitive but I can't wait to start mine, let alone finish and go sailing. As a beginner I'd say my achillies heel is the inability to be patient. I can do a task slowly and neatly when I put my mind to it, but waiting for things to dry and taking time to prep properly, man that does my head in sometimes. LOL.
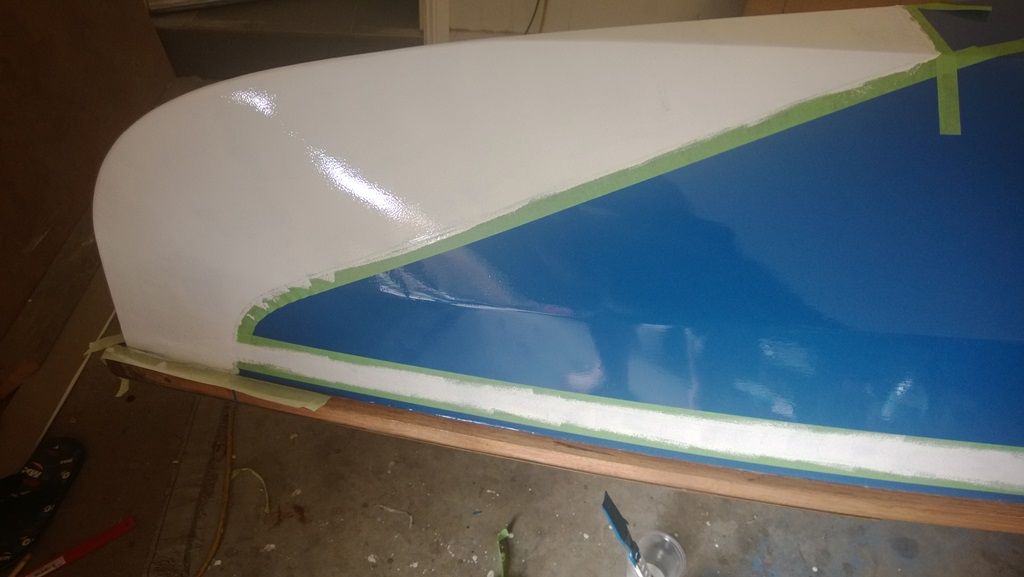
Anyway, that brings me to the need to see a project keep rolling before I loose interest. Yesterday saw me renegging on the claim of not being able to do anything on the canoe for a month or so when my daughter had to stay home sick. I took a day off and happily let the Mrs go to work whilst I spent most of the day in the garage. Time is short and I wont be able to do much over the next month but as I stared at the upturned hull of the canoe I figured I could a) sand back and start fresh on the paint, or b) try my hand at painting the ends and pinstriping. I went with b) which took way longer than expected.
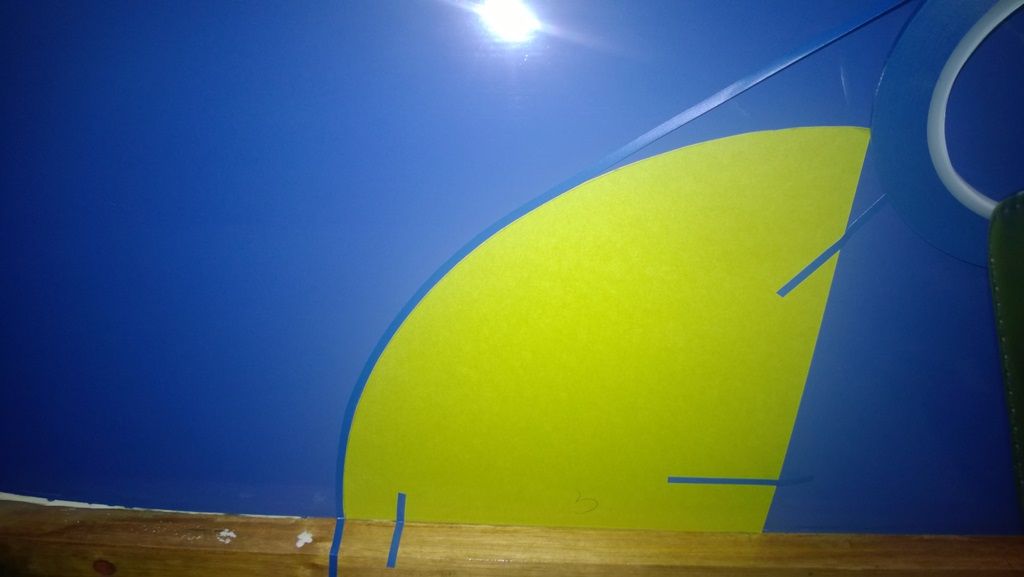
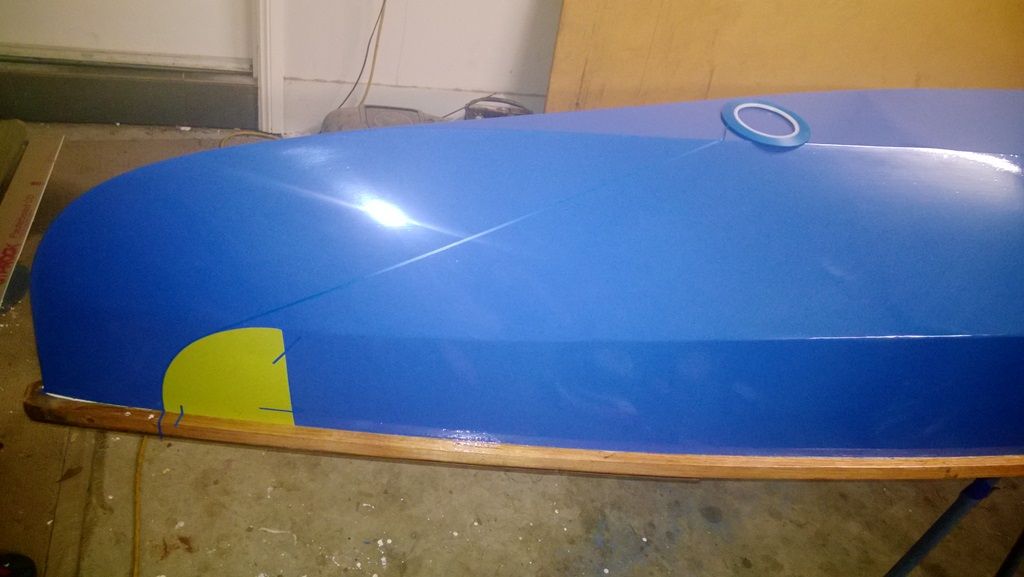
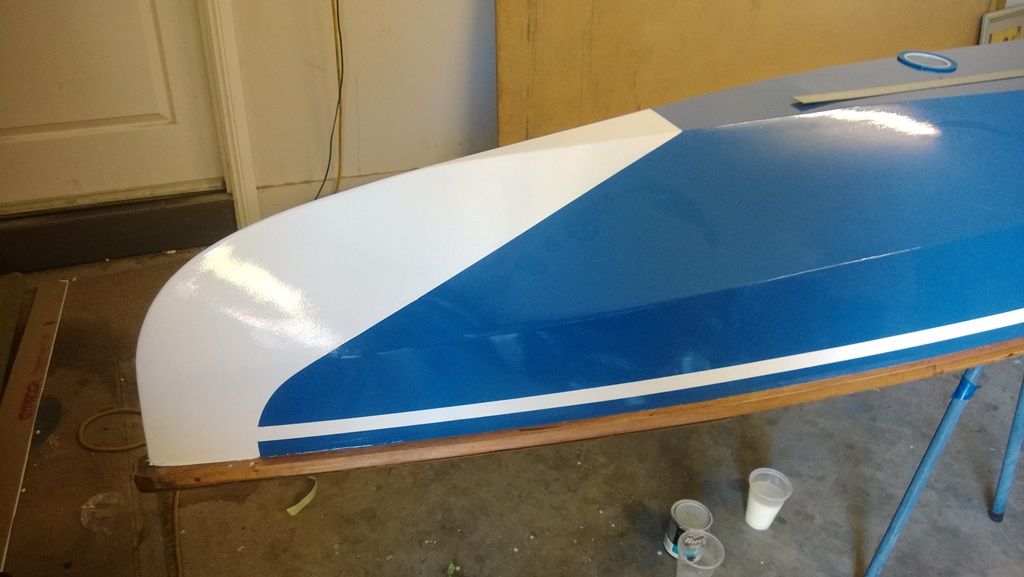
PAR, I found some of the proper flexible sharp edged tape you spoke of earlier, from an auto shop though I could only find 3mm stuff and only in blue. I used that to define the edges for the white ends of the canoe. On cardstock I traced 90deg of a large circle from a pot lid in the kitchen, taped the cardstock to the hull and backed the tape right up alongside the curve then transitioned it to a measured point up to the bottom panel. Painter's masking tape was then added to add protection from overbrushing on to the blue hull.
On the photoshop mock up on the previous page I've got two white parallel lines running the length of the hull above water line. I spent forever trying to get two parallel lines and it wasn't going to work. The impatience kept creeping in and I gave up. More importantly, it just didn't look right. There's no photos of the various incarnations of rows of tape I used to measure out these lines but in the end, two things were evident if I persisted. I would've been left with two wonky white lines of varying widths that weren't equidistant apart along there lengths. Plus, it would've been smarter to plan this from the beginning and do very broad white lines directly on the epoxy, then after sanding and buffing and prior to the blue being applied, pinstriping to cover the white I'd like to remain visible, which would've left two crisp white lines.
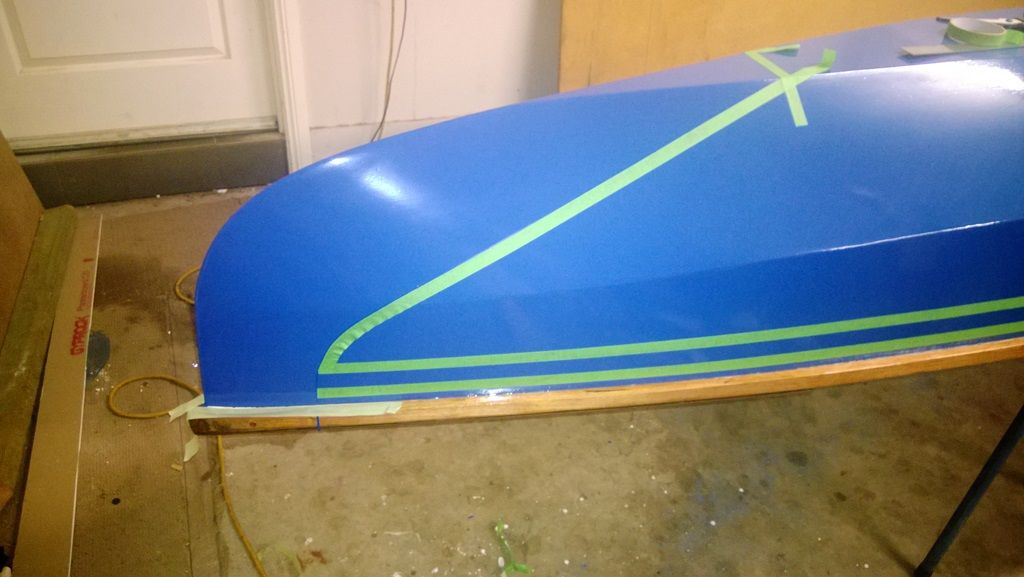
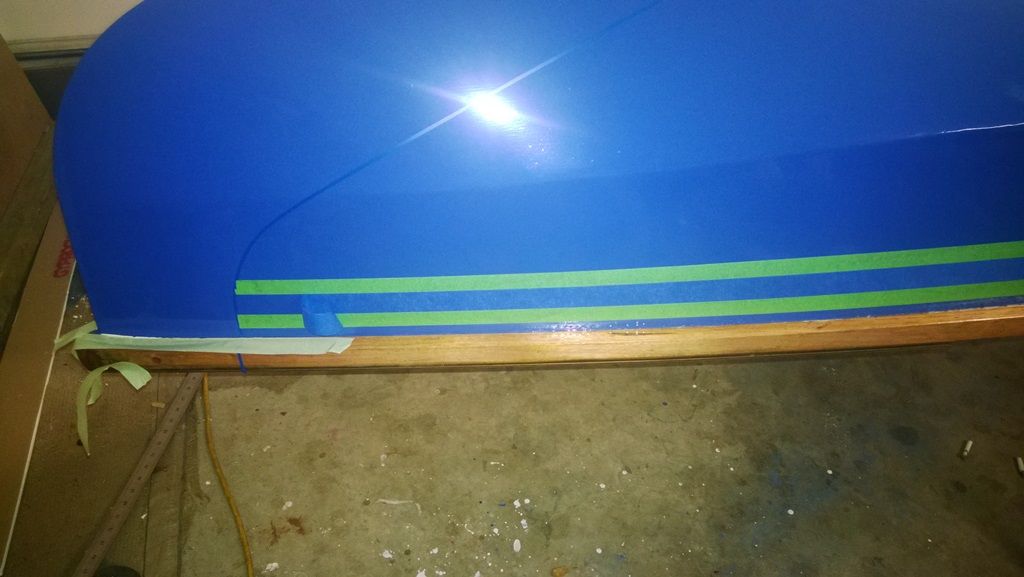
In the end I decided on one wide white line. No pinstripes or GT lines unfortunately. I figured one wide line would disguise tiny width variations plus I found it easy to get the wide tape, that would eventually become the white stripe, on straight. I used a one metre rule sitting on the gunwhale then applied the wide tape carefully to match it's top edge. Slid the ruler along and pushed more tape on. Green tape was then applied to butt up against the top and bottom edge of the wide blue tape then blue tape removed. It's hard to see the wide blue tape but it's being removed from left to right.
Now on to painting. The hull was washed before I started taping, with a bit of dishwashing fluid in some water, then rinsed and rubbed dry with new cloths I tear from a roll. Then areas to be painted got another rub down with fresh dry cloth after masking was finished. My confession - I didn't sand , I dunno if that's a big no no but I went ahead and rolled away. First thing I noticed is that I couldn't tip. The lightest of touches of the foam brush would drag too much of the white away in places and it wouldn't flatten. I think this was because I didn't sand, plus the paint's a bit thick. I figured I wanted to do at least two coats, sand, then final coat, so I rolled the lot, leaving an orange peel pattern but no voids, fisheyes or lint. Some success. I will apply a second coat later tonight when I finish work and may have to wait a week before I can touch it again. We'll see. I figure after two coats there'll be enough thickness to fair the white flat for a final coat.
-
25th October 2013, 05:27 PM #34
Senior Member
- Join Date
- Nov 2011
- Location
- Riverina NSW
- Posts
- 211
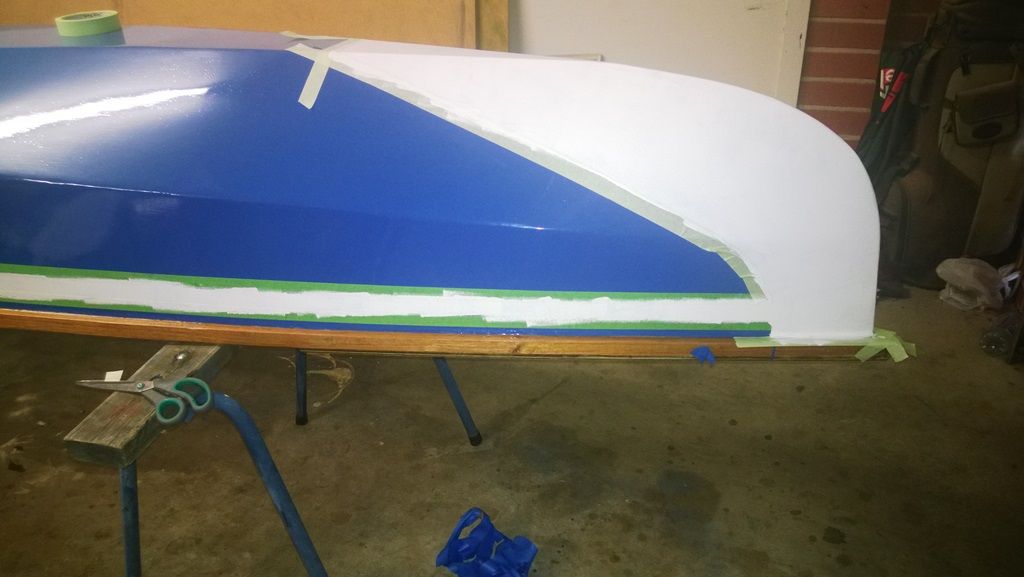
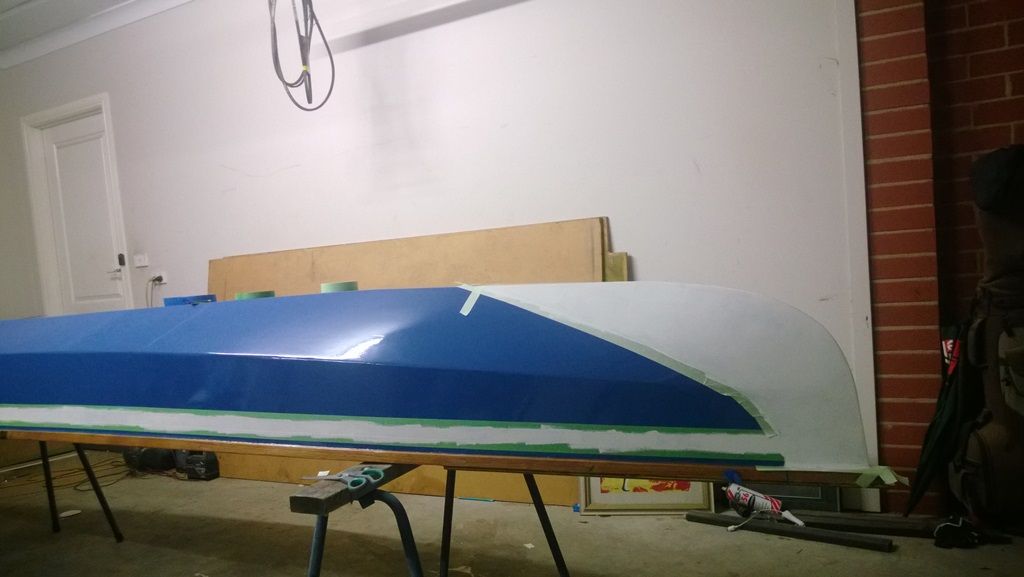
Ok I think we're done. I did a second coat last night which really covered the area quite well. I tipped with foam but on the stripes I used a bristle bush this time because I didn't have a roller with a short enough width. The brushed stripes ended up being smoother than the ends which retained some orange peel and some brush marks. I was worried about sanding these out whilst the tape was in situ, thinking I might damage the taped edges. So I removed the tape and was simply impressed with what was left. Now with the white areas a little raised than the blue, I thought any sanding might feather and blur the crisp edges, plus I didn't want to try masking the edges again so that's it for now. I'm chucking the towel in on trying to improve the paint work. Just seating to do.
PAR, encouraged by your last post I thought about using buffing compounds and the like to smooth all this out a bit. Although it'd improve the smoothness and gloss somewhat I figure it's time to leave it and just go use the canoe as much as possible over summer. In the future when it needs a major touch up I'll strip back to remove fisheyes and have another go at chasing the perfect finish, or getting closer than it is now.
Tape removed
View from either end
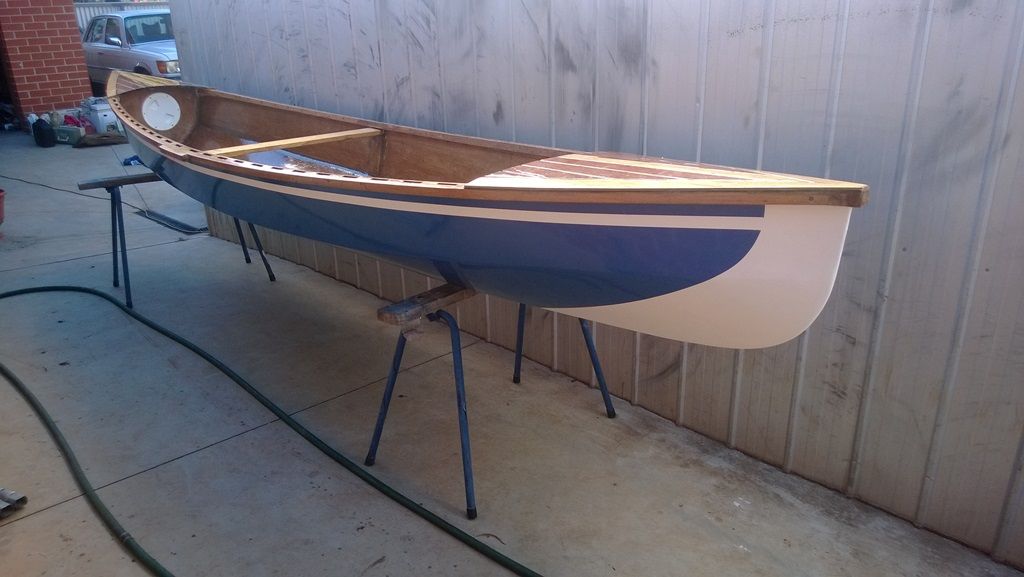
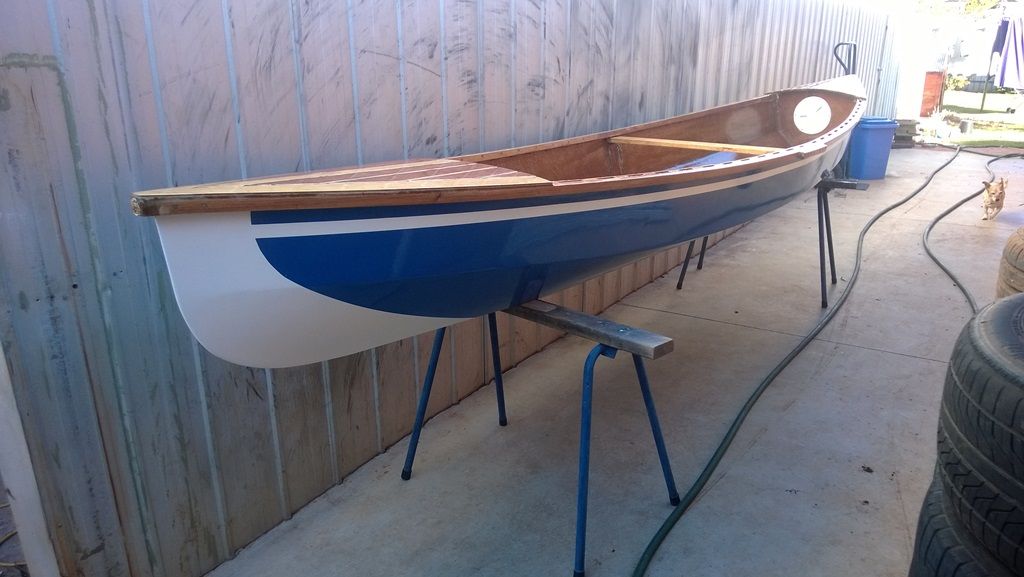
Head on
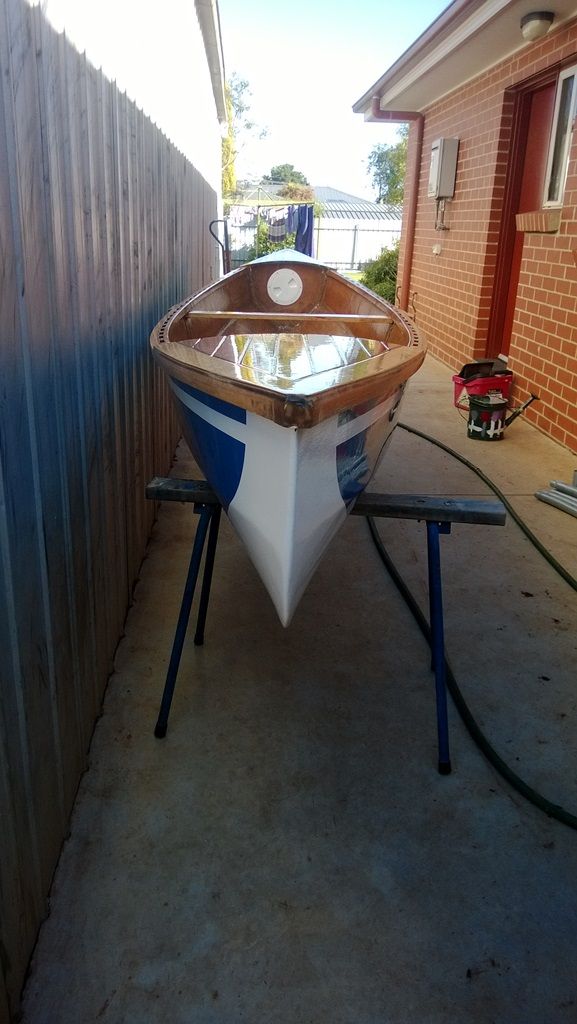
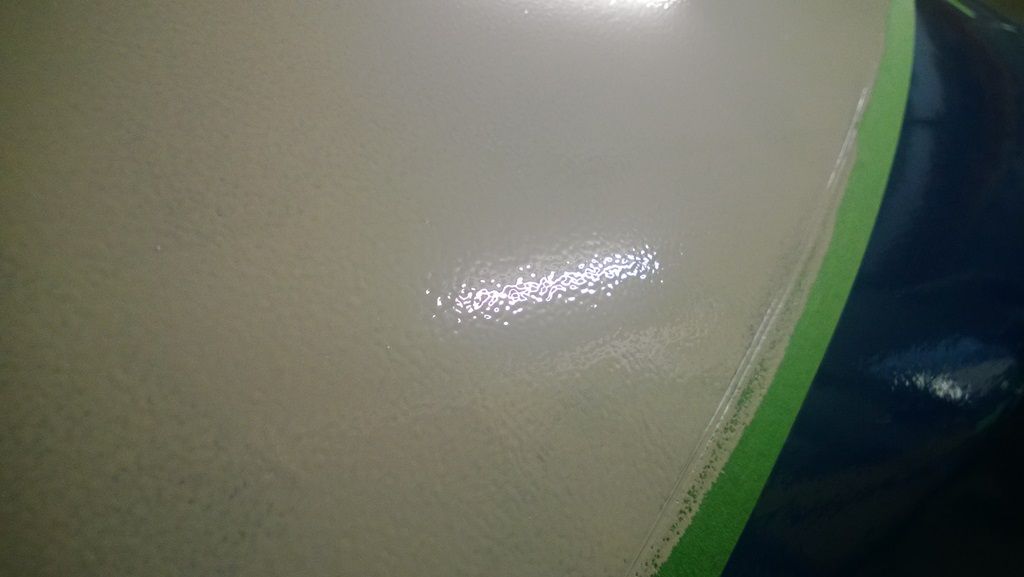
A closer look at the finish, typical for the rest of the hull.

-
25th October 2013, 05:39 PM #35
Yacht Designer & Builder
- Join Date
- Feb 2008
- Location
- Eustis, FL, USA
- Posts
- 2,270
Typically you'll sand away one coat with the method you've described, leveling the stipple in the paint. I always put on an extra coat if I plan on smoothing or buffing the paint, knowing I'll grind through one coat in some places.
If the paint was thick, what temperature was it and yep, you might have needed to thin it. If the temperature is right or on the higher side of recommended, then you can usually use the paint straight from the can. If cold, you have to thin, though this usually means more coats (and more waiting) to build film thickness.
Just wait until you pull off that 3M Fine Line tape. You'll love the results and never want to go back to the usual crape paper tapes.
Boat building is a lot like raising children and no instant gratification should be expected. What should be expected is a fair bit of disappointment, some cussing, maybe a little blood, but in the end, you'll be damned proud.
-
25th October 2013, 08:47 PM #36
Senior Member
- Join Date
- Feb 2013
- Location
- New London, Minnesota
- Posts
- 181
Don't put that thing up for sale. It will be gone in a heart beat. It is beautiful. Now, would you please come do mine?

-
26th October 2013, 01:23 AM #37
Senior Member
- Join Date
- Nov 2011
- Location
- Riverina NSW
- Posts
- 211
Hehe, you're too kind Northstar, thanks a bunch.
PAR, yeah it was on the cool side. Despite having a 38C/100F day the other day it dropped to about 8C/46F on the night I did the second coat. Recommended temp range is between 10C/50F and 30C/86F from memory and to be honest I never gave the temp a thought. I got home late from work and jumped straight into it, started painting about midnight. And despite buying a tin of the same brand thinners I've yet to add any. I've had this fear of thinners dissolving the previous coat and erupting through the new coat, though from those early coats I think we saw my impatience was to blame by applying fresh paint on a touch-dry but not cured previous coat. All the blue is well and truly cured and hardened prior to the white going on. Turps on a rag was used to clean up any bleeding or overpainted spots after the masking was removed and turps didn't affect the blue nor did the fresh white coats on the blue. So in hindsight I can't see why thinners mixed in any subsequent coats should have been a concern on a cured previous coat. I was just too chicken to experiment with adding thinners as the end of the refurb nears completion. Going back to the "art" and "experience" comments from before, I think it would pay to use some remaining ply, epoxy and paint to practise roll n tipping before I attempt another build.
-
26th October 2013, 11:30 AM #38
Yacht Designer & Builder
- Join Date
- Feb 2008
- Location
- Eustis, FL, USA
- Posts
- 2,270
Real turpentine tends to react more so than mineral spirits. Also you might want to consider using a flow promoter like Penatrol, which can decrease viscosity a bit and offer enough tip to tip off. Naturally, you have to be careful with thinners and Penatrol, as they can affect gloss, if you use too much. Lastly, I hope the unsanded previous coat doesn't cause a problem. With some luck, the new coat chemically tied into the unsanded previous coat, to get a good bond. How long was it between coats? Lastly I'll second the good looks of the project. When you do get to the states to finish up Northstar's boat, stop by my place and I'll keep you busy for a couple of weeks too.
-
26th October 2013, 01:08 PM #39
Senior Member
- Join Date
- Nov 2011
- Location
- Riverina NSW
- Posts
- 211
LOL, done!
Regarding time between coats, the blue had five days to cure including two really warm days prior to the first white, then two mild days before the second final white. The canoe's being stored upside down out in the sun at the moment and will probably stay there for a couple of weeks now before I get a chance to hit the water again and see how the white holds up. Though I suspect it will take some time and use before the bonds are tested.
I saw Penatrol at the hardware store a few times but neglected to buy a tin. I think I might buy some to try out on the spare ply. Similarly there's a clear coat available for this enamel paint which I might try on spare ply to see how it performs under the sun and whether it yellows the white. I'm not planning on putting it on the canoe because I'd still like to redo the blue eventually, but I had wondered if this clear could be applied in multiple coats over colour in the same way multiple fine layers of varnish are applied to bright finishes. Fisheyes and stipple would still be visible I'd imagine so I'd presume the colour still needs to flat but it would be interesting to see the depth of gloss and how well it protects the colour coats. Hmm, some experimenting coming up I feel.
-
26th October 2013, 01:29 PM #40
Senior Member
- Join Date
- Nov 2011
- Location
- Riverina NSW
- Posts
- 211
A quick question I forgot to ask - now that the hull is painted, should I use car wash and polish on the paint? This epoxy enamel is typically used on steel, and well suited for external applications such as a wrought iron fence and steel poles so it should fair well in the sun. To aid future washdowns and contaminants affecting the paint I'm thinking car polish might be the go to finish the job. Is that the done thing?
-
27th October 2013, 04:36 PM #41
Yacht Designer & Builder
- Join Date
- Feb 2008
- Location
- Eustis, FL, USA
- Posts
- 2,270
Yep, automotive car wax. If it gets a little scratched up, hit it with automotive polish, then wax it again. The first time you wax it, apply normally, then do it again the next day. I like to do it three times, just to have a lot of protection, but according to the other half, I'm a bit anal anyway.
-
28th October 2013, 10:50 PM #42
Senior Member
- Join Date
- Nov 2011
- Location
- Riverina NSW
- Posts
- 211
Awsome, thanks PAR. I'm out of town still but will get on to it when I get home


 Reply With Quote


Similar Threads
-
Coo Koo Clock Refinishing
By Ken Weekes in forum RESTORATIONReplies: 0Last Post: 10th August 2009, 04:14 PM -
Stripping and refinishing......
By Kea5 in forum WOODTURNING - GENERALReplies: 4Last Post: 28th July 2007, 03:22 PM -
refinishing planes
By kiwioutdoors in forum FINISHINGReplies: 9Last Post: 11th October 2006, 04:36 PM -
Help needed refinishing
By brit_in_oz in forum FINISHINGReplies: 0Last Post: 22nd October 2005, 06:22 PM -
refinishing kitchen
By Ozcruiser in forum FINISHINGReplies: 0Last Post: 6th September 2005, 09:20 PM
