

 Thanks:
  Likes:
  Needs Pictures:
  Picture(s) thanks:
Results 526 to 540 of 799
Thread: Solo "Expedition" Sailboat
-
22nd May 2009, 02:33 AM #526
 SENIOR MEMBER


- Join Date
- May 2008
- Location
- UK
- Posts
- 848

Busy day today, after all my homework chores, epoxy coated the decks, side decks and cockpit floor this morning. Boat has a very jaunty air, must come from the PDR. Please forgive state of car port. Was supposed to be working in garage next door but old car in there is stuck in neutral.

This afternoon had the pleasure of final shaping of the foils from Chris's terrific shaped blank. Really glad I checked with MIK about shaping after cutting out the outline profile. Yes, you do use the template on the lower corner after cutting to shape to bring the back edge to the same shape as the rest of the foil higher up.
Might not look much flat on the floor, but the foil shapes are first class that MIK supplies and Trim will fly upwind with them.
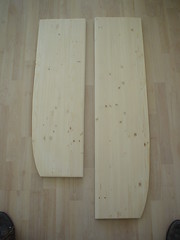
Chris had made the foil blank and extra 100mm long to supply a piece that will work as a short dagger slot blank when sleeping or possibly when rowing. Just needs some rubber mat fixed to the top to keep it in place and some on the bottom to act as a gasket to keep the water out.
Brian
-
22nd May 2009 02:33 AM # ADSGoogle Adsense Advertisement
- Join Date
- Always
- Location
- Advertising world
- Posts
- Many
-
23rd May 2009, 04:14 AM #527
SENIOR MEMBER
- Join Date
- May 2008
- Location
- UK
- Posts
- 848
This morning completed the 3rd epoxy coat to the starboard hull and port cockpit sides. By coating the boat with her on her side the epoxy flattens as it cures and something I have a lot of problems with, slumping and runs as the epoxy cures, is avoided.
The afternoon was spent trying to recover my spars from all the runs and solid drips hanging below lower edges. I epoxied them in a horizontal position ( spars not me) hoping to reduce runs, but of course with 4 sided spars something is going to be vertical.
The mast was the worst with solid drips on the underside face. the epoxy was getting thicker as I did the mast last so perhaps this lead to putting the epoxy on too thick?
Sanding with orbital sander no good, don't have a slow adjustable speed sander, it just filled with wax and soft epoxy, probably sanding too soon? Anyway went back to 500 grit wet and dry, used wet, as we used on the hull bottom. Worked very well, no clogging, took the shine off and most of all the solid drips. Used orbital with wet and dry just wetting the paper to take off the stubborn bumps. Spars now much better, arms not too good though.
I did have an assistant today though. Philip, very handsome. Spent all day showing off and displaying his beauty. Not much use with a sander. Strutted his stuff all day on the roof demanding food while I toiled below.

Brian
-
23rd May 2009, 07:30 AM #528
Member
- Join Date
- Jun 2008
- Location
- Sydney, Australia
- Age
- 79
- Posts
- 55
G'day Brian,
I've found a cabinet scraper much better than sanding for getting the runs and bumps out of epoxy. There's a bit of a trick to sharpening them but they work quickly and only touch the high spots. There was an excellent article in WoodenBoat #165 (April 2002) on using cabinet scrapers. After the scraper I roughened the surface with 3M maroon pads. If you're're interested I can try to scan the article into a email at work on Monday.
cheers,
clay"The best boats are either small enough to carry home, or big enough to live on." Phillip C. Bolger (1927-2009)
-
23rd May 2009, 07:44 AM #529
SENIOR MEMBER
- Join Date
- Jul 2008
- Location
- Fenwick, Michigan
- Age
- 75
- Posts
- 908
Clay,
I'd be interested in that article, please. I'm guessing I'm not the only one...
Bob
-
23rd May 2009, 07:59 AM #530
SENIOR MEMBER
- Join Date
- May 2008
- Location
- UK
- Posts
- 848
Thanks Clay, I would be very interested. Perhaps post here for others as well or PM and I will send my e-mail address.
I actually use a Bahco scraper with a heat gun a great deal when renovating dinghies. I did wonder about trying it but not sure about controlling the blade.

http://www.axminster.co.uk/product.a...23&src=froogle
Brian
-
23rd May 2009, 10:26 AM #531
Happily receives emails.
- Join Date
- Jul 2005
- Location
- 'Delaide, Australia
- Age
- 65
- Posts
- 8,138
Howdy, you do end up with a few drips even with perfect technique ..
... but if a lot ... it usually means you didn't wait long enough before recoating or used a brush instead of the more perfect roller and only finishing with the brush.
They will sand off no problem and it will take a fraction of the time compared to scraping. When there are odd drops or working up to an edge the scraper is the bee's knees. But the sander is the tool for areas.
MIK
-
23rd May 2009, 10:26 AM #532
Happily receives emails.
- Join Date
- Jul 2005
- Location
- 'Delaide, Australia
- Age
- 65
- Posts
- 8,138
Sounds like it was too green for sanding ... give it a little time.
MIK
-
23rd May 2009, 04:19 PM #533
SENIOR MEMBER
- Join Date
- May 2008
- Location
- UK
- Posts
- 848
Got me there on all counts. Used a brush, coated too soon and did not wait long enough! 3-0 to MIK. Although the bumps did come off much easier than if the epoxy was fully cured.
Beginning to get used to the roller and then pulling lightly with the roller held from turning with a finger. Does work really well. On the hull sides, and decks where you can see the surface better it is easy to see just how well it works. Going from a stipple finish to a pretty flat "well laid on with a brush" finish, which then settles to a very flat finish as the epoxy cures on Trim's horizontal surfaces with her on her side.
Think I used a brush on the spars just because I enjoy using a brush to lay the liquid. Roller next time. This morning the spars look good and feel very smooth with the 500 grit wet paper.
Morning off today. We have our Scow Open Meeting. Fairly thick mist and wind between 1.4 and 6 mph so not too hopeful for a heavy weight like me.
Looking at Trim on her side yesterday reminded me of a picture of Paul Gartside in Water Craft weathering out a storm in his rowboat on the Alaskan coast with the hull on her side and a tarp going from the hull topside to the ground. Would work well for RAID41. Sits really well on her side, mast sticking out for support, snugged down while a gale blows it's self out on some tropical beach! Dream on!
Time for thinking caps on. RAID41 has very clean lines. I want to keep the foredeck as clean as possible. I had planned three small clamcleats at the back deck edge to hold downhaul, kicker and halyard lines. Realise these would spoil the clean lines. Now that Trim has a coaming across the back deck edge, my small clamcleats will sit too low anyway to be used. They would be well under the top edge of the coaming. The lines are only 3mm, so three small holes would allow the lines through this coaming, giving a lovely clean look to the foredeck. I can use a bush like these to line the holes. Or epoxy fill and drill.

So, lines need cleating at the back of the coaming. Hayard could be just a small horn cleat, as could the kicker since I will use it just as a preventer to keep the boom lifting too much down wind. So just the downhaul needed an adjustable cleat.
Brian
-
23rd May 2009, 10:00 PM #534
Happily receives emails.
- Join Date
- Jul 2005
- Location
- 'Delaide, Australia
- Age
- 65
- Posts
- 8,138
Have a think about what you want Brian,
Nothing is quite as compact as a CL217mk2 clamceat for the halyard and a CL211mk2 clamcleat for the downhaul. I think they are acceptable on the deck .. but it is up to you and your boat of course!
MIK
-
24th May 2009, 12:48 AM #535
SENIOR MEMBER
- Join Date
- May 2008
- Location
- UK
- Posts
- 848
I have bought the clamcleats. It's just that the coaming at 28mm high will not allow the line down into the cleat. The coaming is good to put foam pipe lagging on to rest the spars on when travelling or storage. Nicely keeps the spars off the decks. Just not sure what to do yet.
The mast feels nice and light for wooden mast. Far lighter than a similar length solid mast. Just swapped battery in the bathroom scales and the mast with three coats of epoxy weighs 5.4kg. Will try to weight the hull soon as epoxy is firmer.
Don't ask about regatta. No wind, strong ebb tides, course too far out in the stream, abandoned. Would have been better working on Trim!
Brian
-
24th May 2009, 11:29 AM #536
Happily receives emails.
- Join Date
- Jul 2005
- Location
- 'Delaide, Australia
- Age
- 65
- Posts
- 8,138
Keep them a bit forward of the coaming. you could screw them down to a piece of wood and see how much space you need if in doubt.
The halyard is no problem because you will be forward when you are using it. The downhaul will need to be right though. Using those particular cleats with 3 and 4mm line is really good - very positive and you don't need to pull exactly in line with the cleat either.
Screw 'em down somewhere and do some trials.
MIK
-
24th May 2009, 08:40 PM #537
AJ
- Join Date
- Jun 2007
- Location
- Aberfoyle Park SA
- Age
- 63
- Posts
- 1,787
This is where my dreadnaught file shines. Got to be a bit careful not to leave tooth- Originally Posted by keyhavenpotter

marks behind, but it takes down drips & sags very nicely. Sort of like a metal-edged
torture-board.
cheers
AJ
-
24th May 2009, 09:35 PM #538
SENIOR MEMBER
- Join Date
- May 2008
- Location
- UK
- Posts
- 848
Hull weight of RAID41 with glassed 6mm hull bottom and floor 4mm glassed top and underneath came out at 56kg on my bathroom scales.
Brian
-
24th May 2009, 11:12 PM #539
Novice
- Join Date
- Mar 2009
- Location
- Newcastle, Australia
- Posts
- 17
Wow Brian - that's pretty impressive, especially considering the glass. Unsurprisingly, Mik was being a tad conservative like usual. Congratulations all round.
I presume an equivalent fit out in the stitch and glue version would be a few kg more?
Steve
-
25th May 2009, 02:01 AM #540
SENIOR MEMBER
- Join Date
- May 2008
- Location
- UK
- Posts
- 848
Sure MIK will be along to answer possible weight differences.
Here is Trim ready for varnishing. Very quick pop out into the sunlight to check my heavy epoxy coating on the mast had not caused a problem with the fit into the mast box. As you can see - no problems. Easy to lift upright and pop into mast box due to MIK's clever mast design and Chris's equally clever mast box wedges that guide the mast into the socket without any struggle at all.

Brian

 Reply With Quote


Similar Threads
-
"I see stupid people!" or "spot the blithering idiot"
By journeyman Mick in forum NOTHING AT ALL TO DO WITH WOODWORKReplies: 46Last Post: 29th October 2010, 07:29 AM -
Difference "Galvanised" and "Primed" Steel
By Fr_303 in forum METALWORK FORUMReplies: 4Last Post: 22nd January 2008, 05:59 PM -
Triangles, "Copy" and "Past"
By niki in forum HOMEMADE TOOLS AND JIGS ETC.Replies: 8Last Post: 14th February 2007, 08:06 PM -
Turned "red Ash", and "Hairy Walnut?"
By cedar n silky in forum WOODTURNING - GENERALReplies: 7Last Post: 25th July 2006, 02:01 AM -
"Shining gum" or "Nitens" - anyone heard of this
By AshleyM in forum TIMBERReplies: 10Last Post: 15th July 2005, 05:46 PM
Tags for this Thread
abilities,
ability,
boat,
build,
comfortably,
conditions,
construction,
cruises,
efficiently,
ejk,
expedition,
gis,
inland,
limit,
pdracer,
plans,
recommend,
remote,
row,
sailboat,
sailed,
simple,
singlehanded,
sleep,
solo,
son,
time,
warrant,
waters,
week
