

 Thanks:
  Likes:
  Needs Pictures:
  Picture(s) thanks:
Results 31 to 45 of 53
Thread: Start to build a GIS in Germany
-
6th September 2011, 07:41 PM #31
 Senior Member


- Join Date
- Jun 2011
- Location
- Melbourne
- Posts
- 107
 When you cut an angle into a piece in this way, it is called "bevelling". A "bevel" is any angle other than 90 degrees cut into a square edge. As in, 'I am bevelling the edges', or 'I am cutting a bevel'.
 Originally Posted by Petermännchen

Sehr gut!
-
6th September 2011 07:41 PM # ADSGoogle Adsense Advertisement
- Join Date
- Always
- Location
- Advertising world
- Posts
- Many
-
7th September 2011, 03:46 AM #32
Intermediate Member
- Join Date
- Aug 2011
- Location
- Germany
- Posts
- 27
@arainox
thanks for teaching me! In context it is easyer to understand. But now when I write for myself, there are more problems.
@all
another day and more work is done.
We sand the spacers (with the electric handplane hurray )
)
We saw the knees (bow and transom)
We masked the GIS for gluing
We bevelling the bulkheads and the transom
And then we glued them all together
Wish to see some pictures Soory,but the digi is lost
Hihi, what a joke Nothing is lost!!
Here are the pictures:
Pic 1: sanding the spacers
Pic 2: spacers in a box
Pic 3: Bowknee
Pic 4: Transom knee
Pic 5: masking the GIS
Pic 6: Transom after gluing
Pic 7: After work
Peter


-
7th September 2011, 06:52 PM #33
Senior Member
- Join Date
- Dec 2010
- Location
- "Old" Hampshire, UK
- Posts
- 105
Wow, this is like watching a boat building video in fast-forward, great to get a daily fix of Goat building.
I think you have yet to add a bevel to the transon sides as the hull is a little distorted here..
http://www.gebittech.de/images/Jolle...som%20knee.jpg
-
8th September 2011, 02:43 AM #34
Intermediate Member
- Join Date
- Aug 2011
- Location
- Germany
- Posts
- 27
Hello Gizzle,
you are right, I have to mount the Inwales. The inwales and now the gunwales too are ready for install.
If you are looking at this picture -click- you can see the bevel at the transom. The passing is now good.
Today we can't finish a lot. But slowly we come nearer to the finish
Peter
Pictures:
Pic 1: Scarfing freehand with handplane
Pic 2: scarfed Gunwales
Pic 3: Spacer on side 2
Pic 4: bowknee again


Last edited by Petermännchen; 8th September 2011 at 05:10 AM. Reason: Wrong link in "click"
-
8th September 2011, 03:29 AM #35
Intermediate Member
- Join Date
- Aug 2011
- Location
- Germany
- Posts
- 27
For the next steps, what do you think is the better way:
- to finish all bulkheads and the transom with epoxyd
- to install the bottom, centercasebox
Thanks
Peter
-
8th September 2011, 03:51 AM #36
SENIOR MEMBER
- Join Date
- Aug 2010
- Location
- New Jersey, USA
- Posts
- 767
Originally Posted by Petermännchen
 What a funny guy Peter is!
At this rate Peter you will finish your boat, use it to death, and either break it or sell it before I have something that even LOOKS like a boat!
Once again, it is great to see your progress. I have no advice on what you should do next. I keep saying you should have a beer next. You do AND you build.
You rock!Dave
StorerBoat Builder, Sailor, Enthusiast
Dave's GIS Chronicles | Dave's Lugs'l Chronicles | Dave's StorerBoat Forum Thread
-
8th September 2011, 05:24 AM #37
Intermediate Member
- Join Date
- Aug 2011
- Location
- Germany
- Posts
- 27
Hey all together,
that's to much accolade (?)!!
I'm in a hurry, because next month the job will explode so it should be that I have no time for nothing. And ( a little selfmotivation) I planned a time of six weeks.
I'm shure your work is much more detailed and better in beveling (is my best word of the week) than mine. Look at the scarfing of the inwales and gunwale. Good is not the right word. In German we say "schlampig" (hope "frouzy" is the right translation).
And more: look at my terrible try's for the frontknee and the knee's for the transom. There are three try's for garbage! And the Bow What a desaster. Shure, we don't see this after mounting, but I know this in my mind
  .
.
Please don't ignore me for this speed! Wait for a wile and you will see, althoug my project becomes slowly.
Have a nice evening
Peter
-
9th September 2011, 04:38 AM #38
Intermediate Member
- Join Date
- Aug 2011
- Location
- Germany
- Posts
- 27
Today I was busy, so there is no great result.
Tomorrow I have to go to holiday so the next step will follow at monday.
Pictures:
Pic 1: completed bowknee with spacers and inwale
Pic 2: inwale
Pic 3: nice curve
Peter
-
9th September 2011, 04:57 AM #39
SENIOR MEMBER
- Join Date
- Apr 2008
- Location
- Tilburg, the Netherlands
- Age
- 51
- Posts
- 519
Hello Peter,
What about the chinelogs? I don't see them attached yet.
Best regards,
Joost
-
9th September 2011, 06:27 PM #40
Intermediate Member
- Join Date
- Aug 2011
- Location
- Germany
- Posts
- 27
Hello Jost,
thank you for your tip! You are right, I've forgot this damned chinlogs.
The Inwales are only dry mounted so I can build and mount the chinelogs first.
This are the next steps:
- building and mounting the chinelogs
- epoxyd at all bulkheads and the sidepanels three times wet in wet
- mounting the inwales
- mounting the knees
- mounting the gunwales
The gunwales and inwales are from the same wood. Do you think it will be better to bate the inwale and the gunwale in mahonie?
Peter
-
9th September 2011, 06:52 PM #41
SENIOR MEMBER
- Join Date
- Apr 2008
- Location
- Tilburg, the Netherlands
- Age
- 51
- Posts
- 519
Hello Peter,
I would indeed install the chinelogs first before moving on to the inwales and gunwales (rubbing strips).
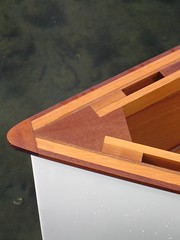
Oregon pine / douglas fir should be fine for the inwales (I have the same on my boat). I would cap the rubbing strips (gunwales) with a hardwood strip like mahogany (mahonie).
Attached picture shows the construction of the breasthook / gunwales / inwales on my boat:
- breasthook and outer rubbing strips - mahogany
- inwale spacers - western red ceder
- inwales and inner rubbing strips - oregon pine
Some more pictures here that may help:
Flickr: joostengelen's Photostream
Best regards,
Joost
-
9th September 2011, 07:08 PM #42
SENIOR MEMBER
- Join Date
- Apr 2008
- Location
- Tilburg, the Netherlands
- Age
- 51
- Posts
- 519
Hell Peter,
Some thoughts concerning the assembly process (from the top of my head as I don't have the building manual in front of me). The sequence of the basic steps detailed in the building manual is the following:
- Normally the chinelogs go on first on the side panels.
- second step is to assemble the side pannels and the bulkheads
- third step is when the bottom is attached (make sure everything is level and straight before this step)
- fourth step is to turn the hull and to glue the centercase in place
- fifth step is to turn the hull and to glue the seats in place (again, make deadsure that all is straight and level)
- sixth step is to glue the first layer of the gunwales (rubbing strips) in place
- seventh step is to glue the inwales spacers, inwales, breasthook and knees in place
- eighth step is to glue the second layer of the gunwales, the hardwood capping, in place.
The basic boat is then finished. Please note that through steps 3 - 5, the first layer of the gunwales are temporarily attached to ensure that the shape of the boat is what it should be.
Of course other building sequences can lead to the same result.
Best regards,
Joost
-
13th September 2011, 04:16 PM #43
Intermediate Member
- Join Date
- Aug 2011
- Location
- Germany
- Posts
- 27
Hello Joost,
thats a wonderful GIS you've build! Wow! I hope my GIS will bee so beautiful too!
Thanks for your links, there I can have a look for details
Greetings
Peter
-
18th September 2011, 01:44 AM #44
Intermediate Member
- Join Date
- Aug 2011
- Location
- Germany
- Posts
- 27
I've installed the chinelogs, planed the bottom, painted the inside space three time with epoxyd, build the bottom and the centercase
The centercase was build only with handtools. I think for this little jobs they are the better choice.
Here are the pictures to document the actual state.
Peter
Pictures:
Pic 1-3: Build the space for the chinelog
Pic 4: planed Bottom
Pic 5-7: Painted inside
Pic 8-9: Centercase
Attachment 181977
Attachment 181978
Attachment 181979
Attachment 181980
Attachment 181981
Attachment 181982
Attachment 181983
Attachment 181984
Attachment 181985
-
18th September 2011, 03:45 AM #45
Intermediate Member
- Join Date
- Aug 2011
- Location
- Germany
- Posts
- 27
@all
how to sand the epoxyd? I think at first with 120 then with 180 and at last with 240?
I'm right with this steps?
Thanks
Peter


 Reply With Quote
Similar Threads
-
turners in germany
By joevan in forum WOODTURNING - GENERALReplies: 7Last Post: 23rd June 2010, 07:37 PM -
Hello from Germany
By movay_2008 in forum WOODCARVING AND SCULPTUREReplies: 6Last Post: 20th August 2009, 05:39 PM -
New Build - start from scratch
By bassbuilderman in forum MUSICAL INSTRUMENTSReplies: 45Last Post: 17th December 2008, 04:14 PM -
We're off to Germany
By neilb in forum TRAVELReplies: 15Last Post: 27th October 2007, 05:35 PM -
We're Hoff to Germany
By Geoff Dean in forum WOODIES JOKESReplies: 2Last Post: 18th November 2005, 09:41 AM
