

 Thanks: 0
 Likes: 0
 Needs Pictures: 0
 Picture(s) thanks: 0
Results 1 to 11 of 11
Thread: Aquarium stand / cabinet
-
27th June 2012, 08:58 PM #1
 Intermediate Member


- Join Date
- Jun 2012
- Location
- Brazil
- Age
- 43
- Posts
- 27
 Aquarium stand / cabinet
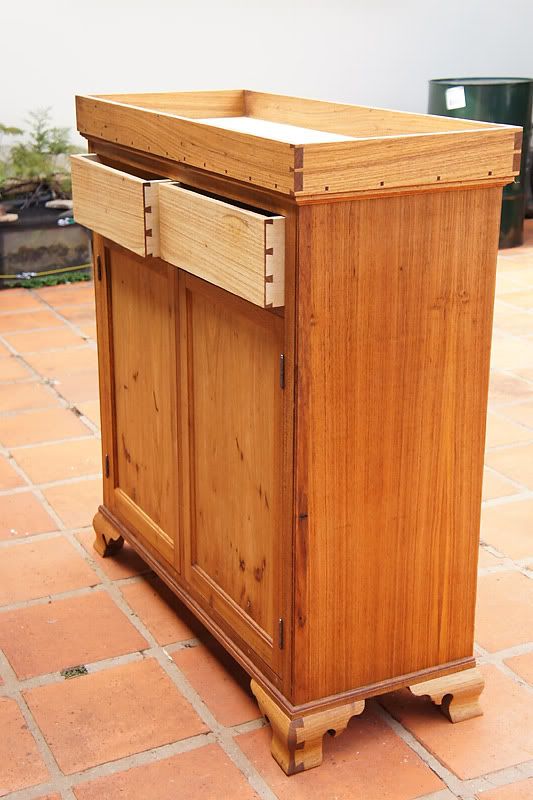
This is my last big project, a aquarium cabinet that I made for a friend. It is a 200 L tank, with 100 x 40 x 50 cm (L x W x H). The cabinet is already finished, but I have some WIP pictures.
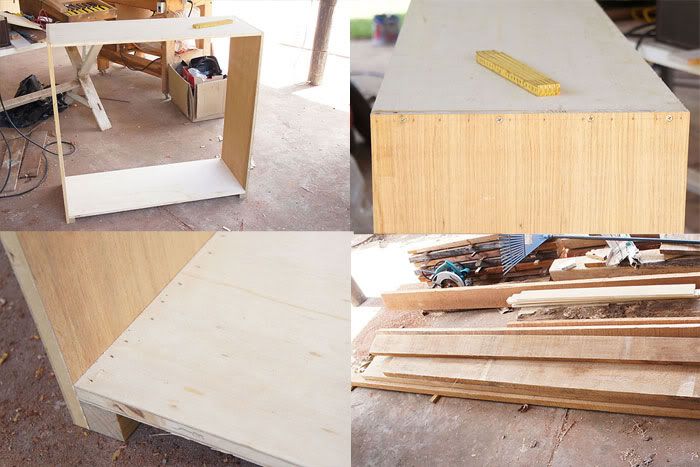
I made the carcase with simple plywood for top/bottom and veneered plywood for sides, joined with brad nails (18 gauge - F nails) and screws. Screws and nails will be posteriorly covered with a molding. The rest of the cabinet will be made with the wood know here as Freijo, Cordia goeldiana Huber. I read that this wood is internationaly know as Brazilian Walnut in some places, but I am not sure. It is agood wood to work, well stable and gentle for the hand tools.
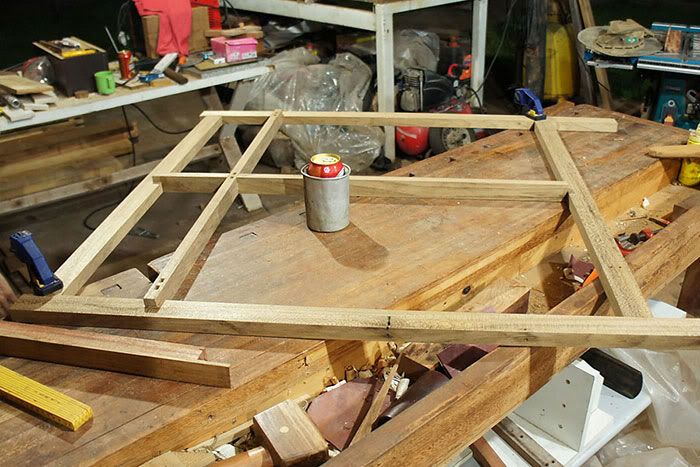
Then I make the face frame and dividers, using mortise and tenon joints.
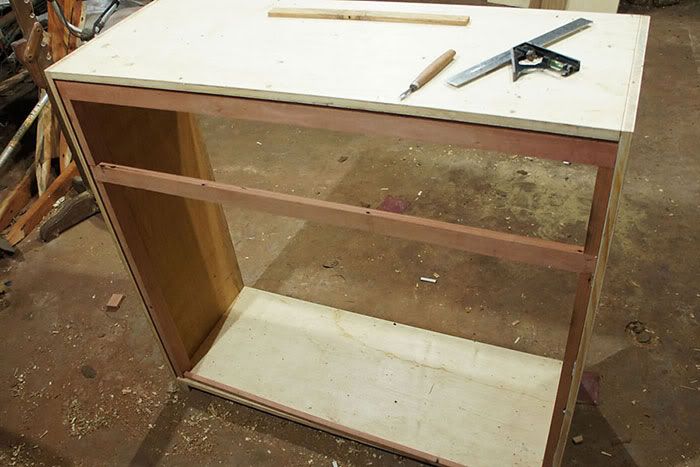
I make a second frame inside the carcase with a strong hardwood to add strenght, recessed from the rear to receive the back panel.
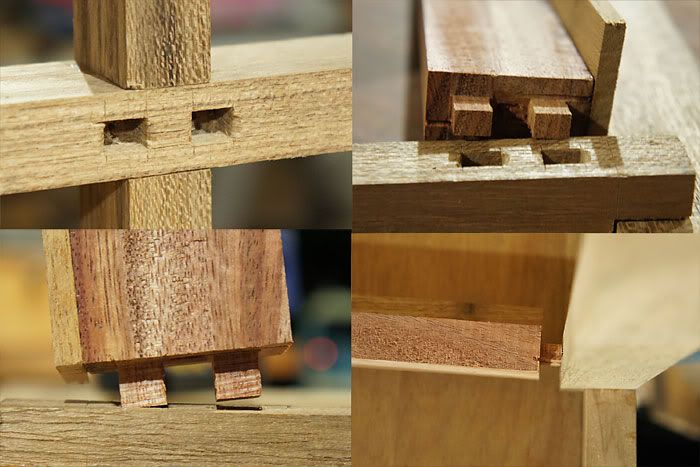
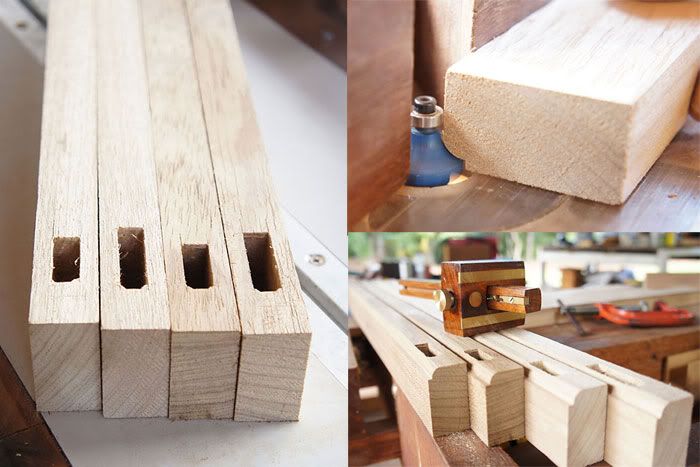
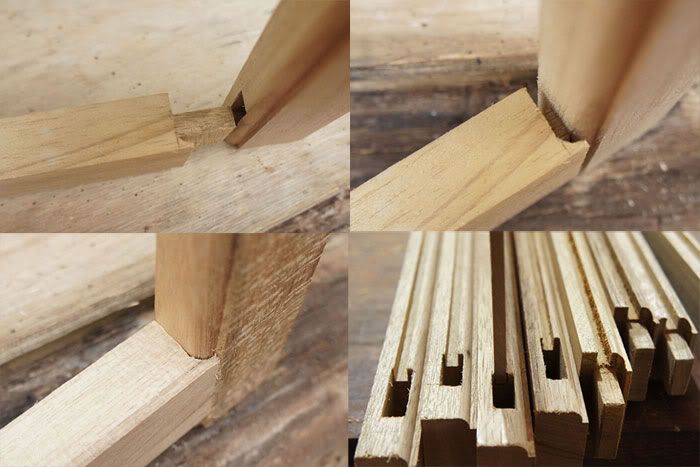
Before assembly the face frame I made the drawer runners and side guides, jointed to horizontal divider with double mortise and tenons.
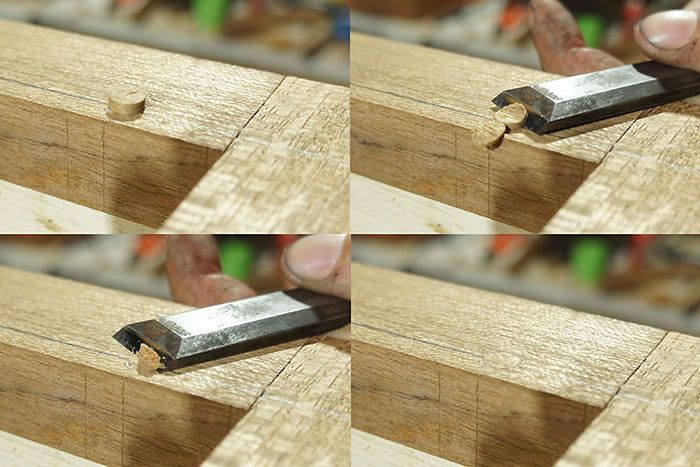
I glued and screwed the face frame to carcase, and then used some plugs to fill the holes, removing most of the excess with a chisel, and finally with a block plane.
Then I worked in the doors, making first the mortises, then routing the inside profile in the stiles.
I worked then in the rails, making the tenons and coping the profile on the bandsaw. Finally I rout the profile in the rails and make the groove for the panel.
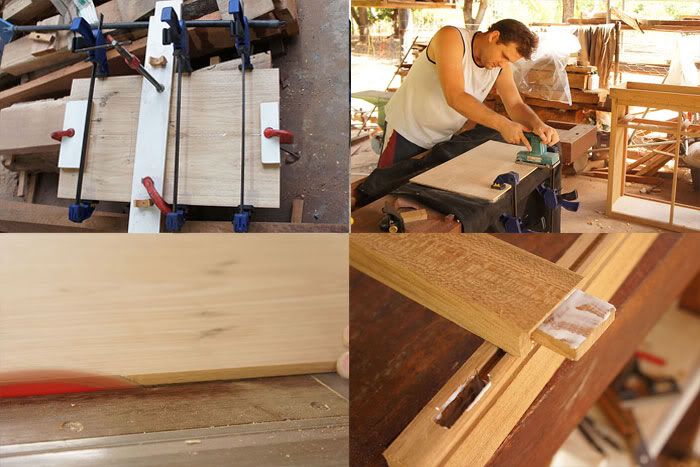
Now I glued the panel, a simple flat panel. After glued I put my friend to sand the panel, a good oportunity for slave labour. I trimmed the panel for its final size and glued the door, making sure to use glue only on the tenons, leaving the panel floating.
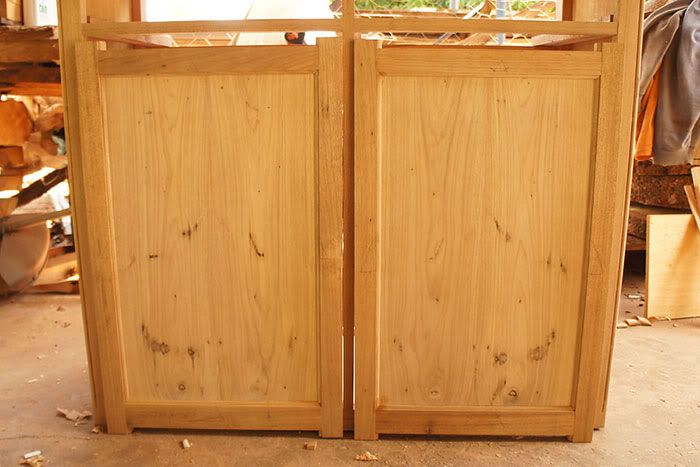
Here the doors already glued, missing only saw the horns. As I resaw the panels wood on the bandsaw, I got a book match effect.

I made some decoration on the stiles, a bead profile with gentle transitions. It is hand made with a simple tool that I made from an old scraper, showed in the picture: http://i37.photobucket.com/albums/e9...bookcase26.jpg
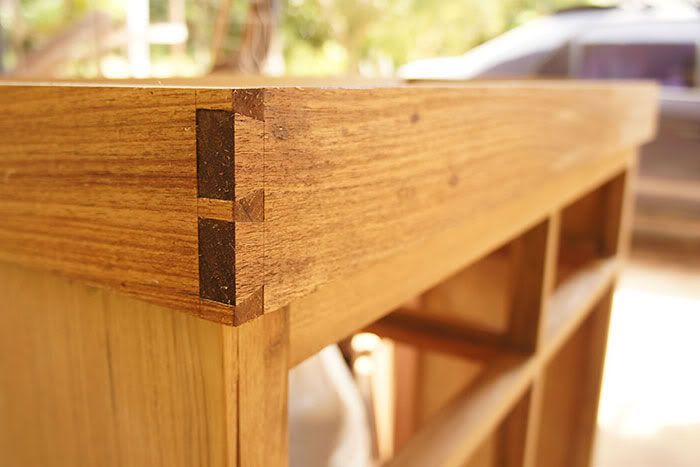
Now I worked in the skirt, where the tank will fit inside. I've used dovetails in corners.
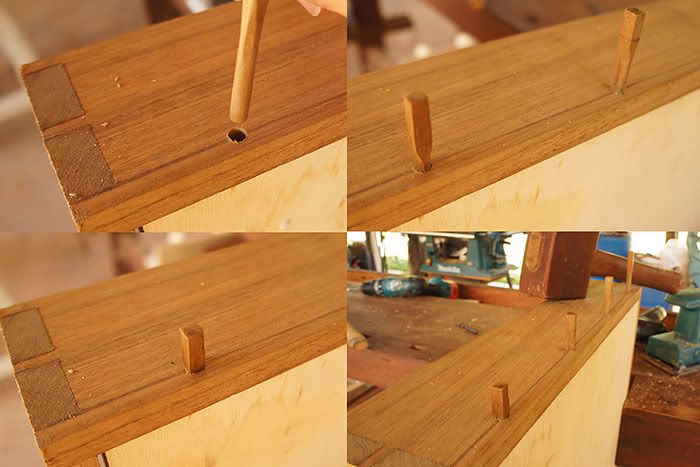
To fix the skirt to the plywood base I've used wood pins in front and sides and screws in the back. The wood pins are long grain, rounded but with the top yet square. I drive the pins, with some glue, taking care to maintain the squares in correct position.
On next message I will post the rest of the work.
-
27th June 2012 08:58 PM # ADSGoogle Adsense Advertisement
- Join Date
- Always
- Location
- Advertising world
- Age
- 2010
- Posts
- Many
-
27th June 2012, 09:31 PM #2
SENIOR MEMBER
- Join Date
- Jan 2008
- Location
- Blue Mountains
- Age
- 61
- Posts
- 866
Hi Tomazelli, and welcome. Some interesting joinery there, and nice photography too!
 The time we enjoy wasting is not wasted time.
-
27th June 2012, 09:33 PM #3
Intermediate Member
- Join Date
- Jun 2012
- Location
- Brazil
- Age
- 43
- Posts
- 27
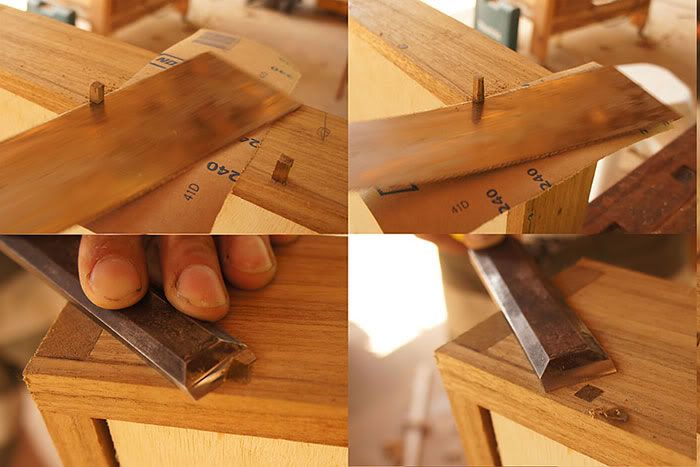
Then I saw the excess with a ryoba, using something to not mark the wood, and trim with a chisel.
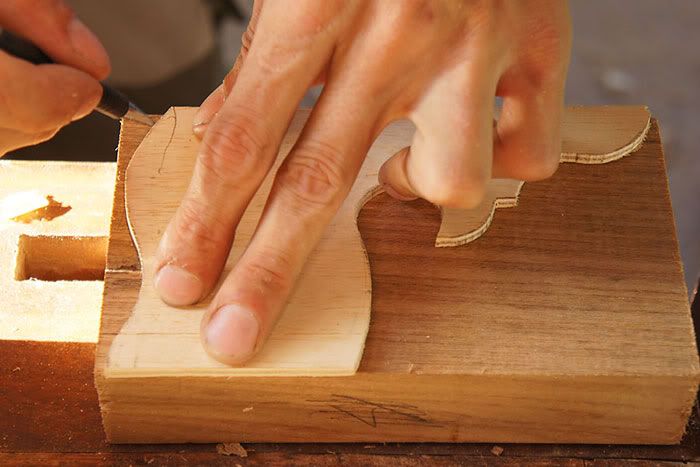
I've used ogee and bracket feet, in the picture I am marking the bracket curves.
[ame=http://www.youtube.com/watch?v=8rvmkzJvbYA]Ogee Bracket Feet.MP4 - YouTube[/ame]
I cutting the bracket curves on the bandsaw. After assembly the two pieces of the foot I cut the ogee profile on the bandsaw, supporting them vertically with a simple jig, but I do not took pictures.
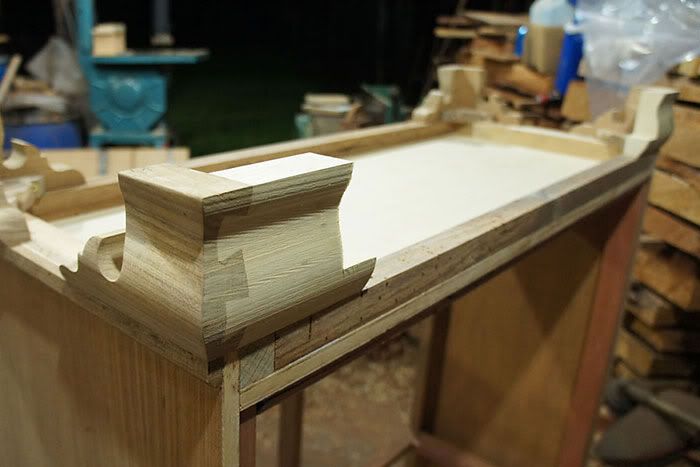
The feet are glued and screwed to the carcase. In the picture is also seen the molding around the cabinet base. In the back I've used some secondary wood for the feet.
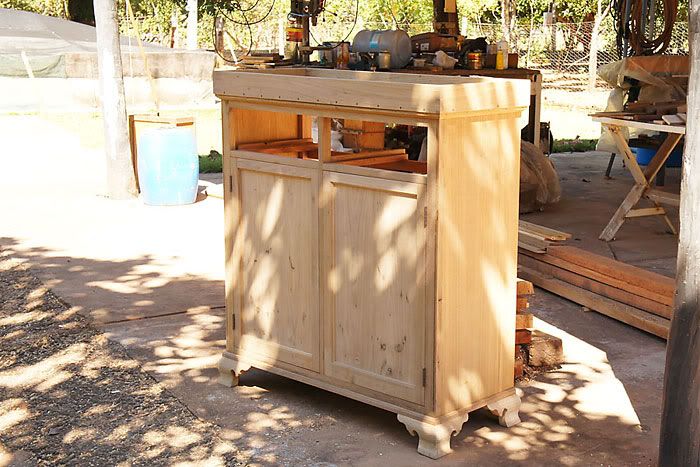
And the cabinet is almost ready, missing only drawers and the lid of the tank. I don't take pictures from the rest of the work, but I made a short video showing some tips for marking and cutting dovetails pins, to the joint fits snug. I've made the video for my woodworking friends here, so the audio is in portuguese.
[ame=http://www.youtube.com/watch?v=bsv5VXwqBug]Dovetail - YouTube[/ame]
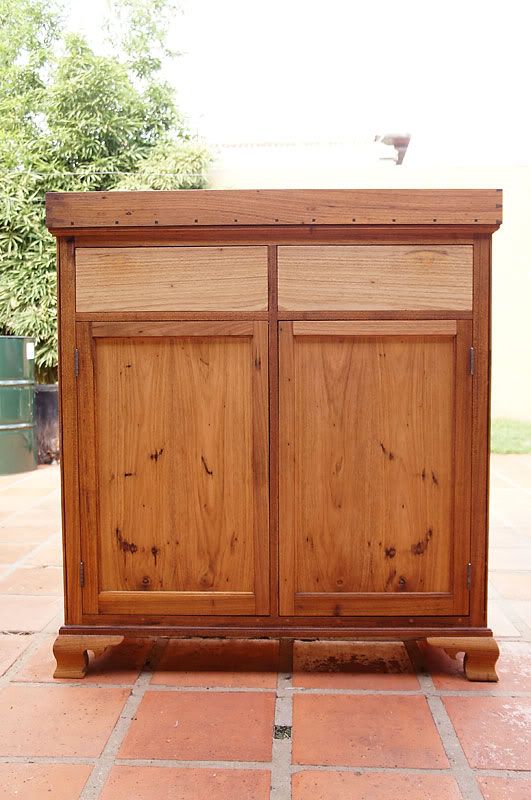
Here the cabinet is completed. The finish is some coats of polymerized tung oil and finally a coat of wax (carnauba and bee wax mix).
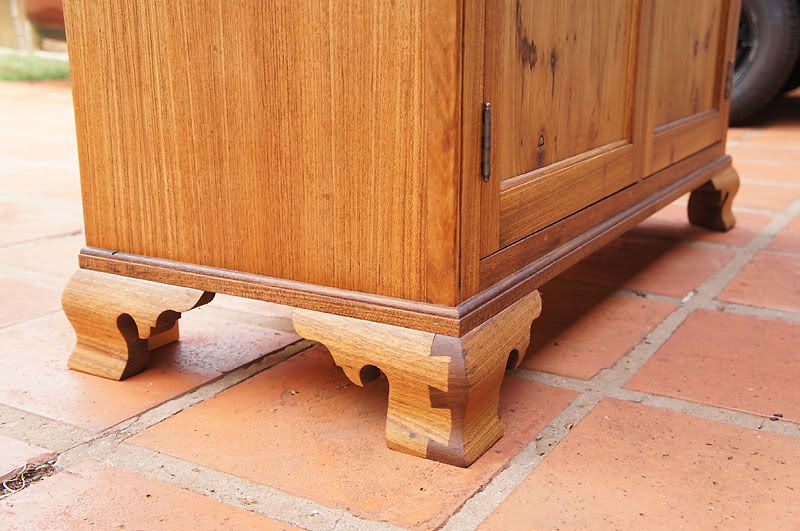
I've used half blind dovetail instead of miter in the front feet because I did not have a long time to wait for the glue set. With snug dovetail joints I can go almost instantaneously from the fit to the band saw to cut the ogee profiles.
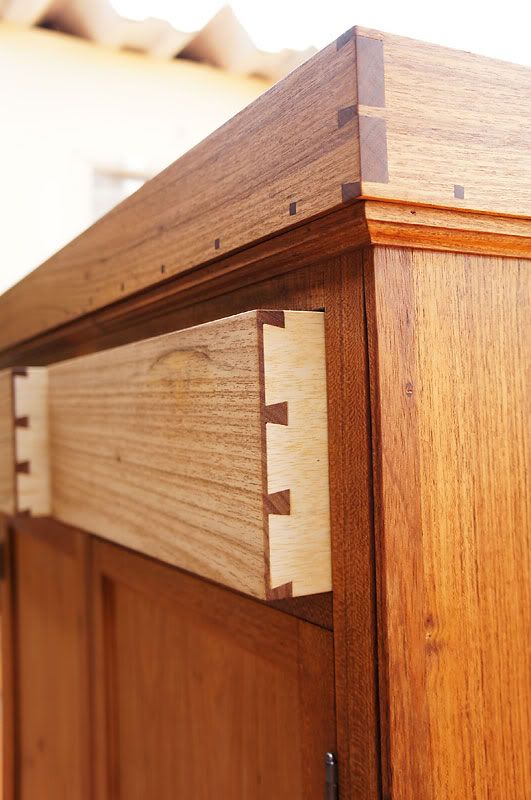
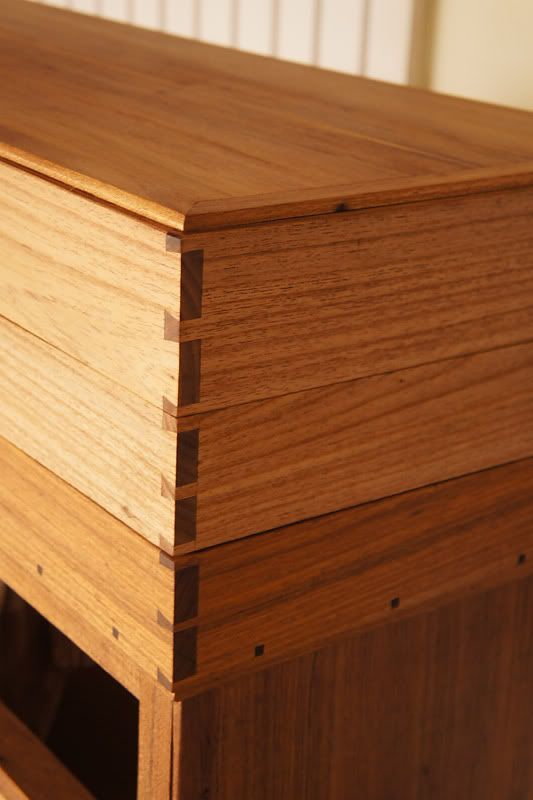
The drawers with secondary wood for the sides. Is also seen a molding on the top, below the skirt.
And the cover consisting of two parts, the fixed and the lid that opens.
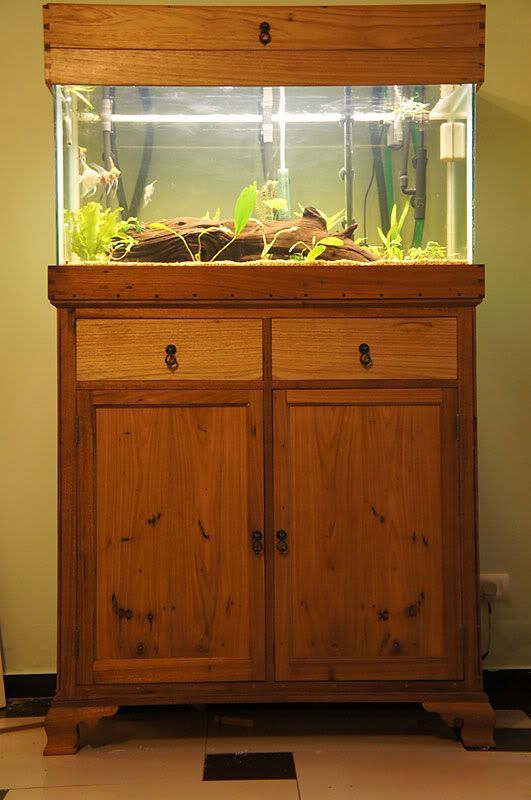
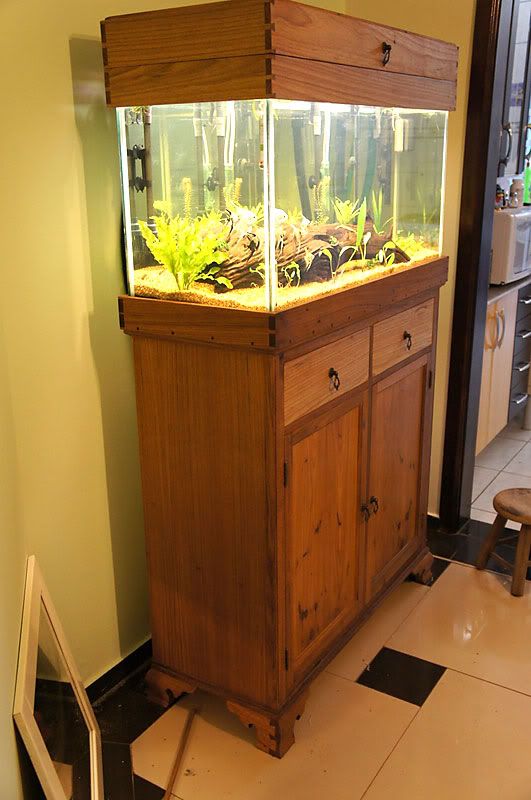
And finally the aquarium assembled.
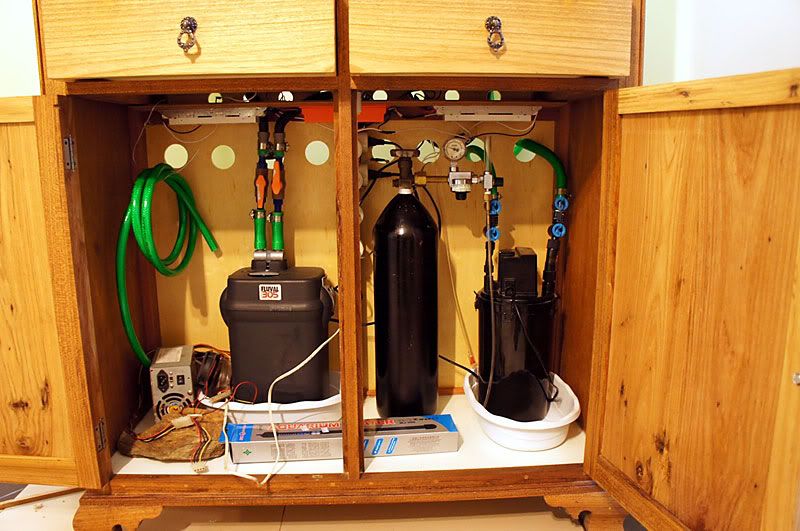
The "engine room" from aquarium. In the base I've put a melamine laminate sheet to seal the plywood from water that always spill during maintenance.
Greetings!
-
27th June 2012, 09:44 PM #4
Intermediate Member
- Join Date
- Jun 2012
- Location
- Brazil
- Age
- 43
- Posts
- 27
Thanks! The photos were taken with my friend's camera, that is a good and much more professional than my camera. The joints are that I think that will make the furniture durable, when I use wood I take decisions of the project mostly seeking for durability, chosing some strong joints even if they are more time consuming than others. Originally Posted by 3 toed sloth

-
27th June 2012, 09:59 PM #5
Senior Member
- Join Date
- Aug 2008
- Location
- Adelaide, South Awstraylia.
- Age
- 63
- Posts
- 290
That is the nicest tank stand I have seen, well done. I envy your wood skills. The photographs were crystal clear and informative. All up a very interesting post.
 Try to look unimportant, they may be low on ammo.
-
27th June 2012, 11:19 PM #6
GOLD MEMBER
- Join Date
- Nov 2003
- Location
- Sydney
- Age
- 53
- Posts
- 8,879
-
28th June 2012, 06:54 AM #7
SENIOR MEMBER
- Join Date
- Jan 2008
- Location
- Blue Mountains
- Age
- 61
- Posts
- 866
Nice work, and thanks for an enjoyable thread. Should be able to score some nice fish in that part of the world too!
Regards, PeterThe time we enjoy wasting is not wasted time.
-
28th June 2012, 08:51 AM #8
 Senior Member
- Join Date
- Aug 2005
- Location
- Gladstone, QLD
- Age
- 71
- Posts
- 478
Thanks for sharing. That was an excellent result. I also loved the video instructional clips.
Cheers
Graeme
-
1st July 2012, 03:55 PM #9
Wood and Metal Enthusiast
- Join Date
- Jan 2010
- Location
- Queensland!
- Posts
- 157
Beautiful stand and great workmanship!
Live life to the fullest, you have to go big and do everything with your all or why do it at all?
-
1st July 2012, 04:00 PM #10
 GOLD MEMBER
- Join Date
- Sep 2006
- Location
- Sydney
- Age
- 83
- Posts
- 1,474
Superb workmanship and great design......thank you for posting this project in such detail.
And my head I'd be a scratchin'
While my thoughts were busy hatchin'
If I only had a brain.
-
4th July 2012, 05:02 PM #11
Intermediate Member
- Join Date
- Jun 2012
- Location
- Brazil
- Age
- 43
- Posts
- 27
In english has so many instructional woodworking videos, but in portuguese has no videos. So I try to do some videos for my woodworking community here in Brazil.
If I If I can keep an activity frequently in this forum, I will try to translate my new videos, making subtitles. There are no videos that you already have similar, and better, in english, but maybe with a different approach.
Thanks for all! I have a relative hability with the tecniques, but i need to work my stile, study and try to do harmonious designs, that is no easy.
Cheers


 Reply With Quote


Similar Threads
-
The beginner and the aquarium stand.
By ZL0gic in forum WOODWORK - GENERALReplies: 6Last Post: 25th June 2012, 10:01 PM -
Designing an Aquarium Stand; could use some advice.
By vim.au in forum WOODWORK - GENERALReplies: 4Last Post: 30th June 2011, 05:58 PM -
Fishing on Aquarium stand
By BlackbuttWA in forum FINISHINGReplies: 3Last Post: 9th June 2010, 12:33 AM -
Aquarium Stand
By Wooden Mechanic in forum WOODWORK - GENERALReplies: 1Last Post: 22nd October 2008, 03:25 PM -
Steel Stand for 2.5 tonne aquarium
By neodama in forum METALWORK FORUMReplies: 2Last Post: 12th May 2008, 12:09 PM
