

 Thanks:
  Likes:
  Needs Pictures: 0
 Picture(s) thanks:
Results 16 to 30 of 67
Thread: Coffee table for my nephew
-
21st December 2018, 12:37 PM #16
 GOLD MEMBER


- Join Date
- Feb 2003
- Location
- back in Alberta for a while
- Age
- 68
- Posts
- 12,006
 Hi Derek
 Originally Posted by derekcohen

Finally got around to looking in "The Woodworker: the Charles Haywood Years" (Lost Art Press).
Carcass dovetails with mitered ends is covered in Volume III (towards the end).
The method is very similar to yours with the following comments / differences :
1. the joint is treated very much as a special case when you want to mold or rebate the edge.
2. Charles seems to assume that everyone knows how to cut accurate miters using a chisel and 45� guide block. But he does recommend that you cut a on the waste side of the knife line, then pare to a fit. In that sense it might be worth making a dummy matching corner to check the fit without needing to maneuver the full 500 wide panel into place.
3. One difference to your layout is that Charles recommends that the tail closest to the edge of the panel have one square edge and one edge at the dovetail angle. i.e. the tail closest to the face of the completed table is marked so that the edge closest to what will be the face of the completed structure is parallel to that face, while the inside edge of that tail is marked at the dovetail angle. (Perhaps a bit confusing?) The closest comparison I can think of is the dovetails holding the back of a drawer, where the bottom dovetail is square on the bottom edge of the drawer back.
does all that make sense?regards from Alberta, Canada
ian
-
21st December 2018 12:37 PM # ADSGoogle Adsense Advertisement
- Join Date
- Always
- Location
- Advertising world
- Age
- 2010
- Posts
- Many
-
21st December 2018, 09:05 PM #17
Be inspired. Be creative. Be bold.
- Join Date
- Apr 2001
- Location
- Perth
- Posts
- 10,826
Ian, thanks for that info. I do not have the Hayward volumes, and so have not seen his method. I like the idea of a dummy matching corner to check the paring. I am not clear on #3 (a bit dim today, my last day at work this year before taking a break over Christmas and the new year. A bit brain dead!).
I have not come across anyone else leaving the mitres to the end, and few seem to manage to make the tails/pins close to the sides. Instead, they create wide mitres at the side, which looks unfinished. It is a surprisingly undocumented dovetail type.
Regards from Perth
DerekVisit www.inthewoodshop.com for tutorials on constructing handtools, handtool reviews, and my trials and tribulations with furniture builds.
-
23rd December 2018, 03:05 PM #18
GOLD MEMBER
- Join Date
- Feb 2003
- Location
- back in Alberta for a while
- Age
- 68
- Posts
- 12,006
here are the two pages I referred to. Originally Posted by derekcohen
(my apologies, but the second pdf will need to be rotated 180 degrees)
IMO not that surprising.I have not come across anyone else leaving the mitres to the end, and few seem to manage to make the tails/pins close to the sides. Instead, they create wide mitres at the side, which looks unfinished. It is a surprisingly undocumented dovetail type.
It's only real application is where the inside face incorporates a rebate or you want to mold the exposed edge.
In many applications, a DT joint can be concealed using
1. an applied molding.
2. a lapped DT joint that is covered by a separate top.
3. concealed miter DTs.
and a lot of the time, a maker may wish to show off their DT joints by cutting neat through DTs.regards from Alberta, Canada
ian
-
26th December 2018, 11:48 PM #19
 GOLD MEMBER
- Join Date
- Apr 2006
- Location
- Hobart
- Posts
- 5,129
Originally Posted by derekcohen
Good Morning Derek
Looking great. Watching intently as you identify and solve design and craft issues.
One question that has me intrigued is how you will do those internal fillets behind the dovetails. These will be intensely visible in the final product, and therefore are critical, IMHO.
Several options are obvious and all hinge around handling of grain orientation:
- End grain visible - probably a little jarring,
- Horizontal grain,
- Vertical grain, or
- Both - mitred grain continuing the line of the dovetail mitre.
Then there is the craft issues of when and how you cut the curved rebate in the back of the fillet - before or after assembly and it will probably be a cross-grain cut, with inherent tear out risks. Also matching of grain, and "invisible" glue lines!
Very interesting project. It is much more complex than it looks.
Fair Winds
Graeme
-
27th December 2018, 11:42 AM #20
Be inspired. Be creative. Be bold.
- Join Date
- Apr 2001
- Location
- Perth
- Posts
- 10,826
Ian, thanks for the email of the Haywood sections. And my apology for not replying immediately. I've been in-and-out over the past few days. Plus dealing with a new MacBook Pro that I swear is haunted - I kid you not. It pastes text without warning. I'm taking it back today.
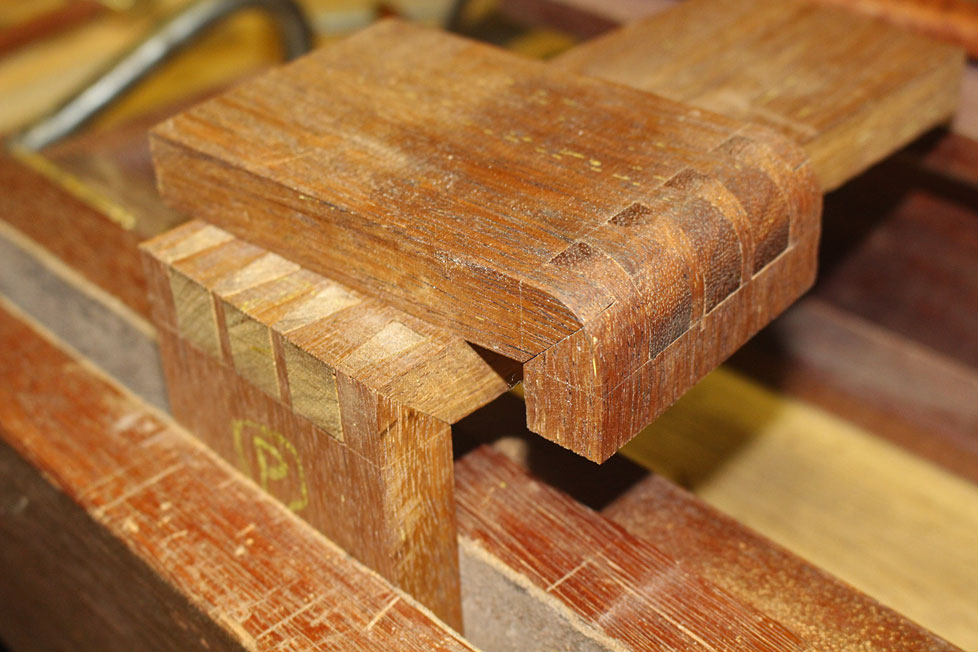
Graeme, thanks for the comments. The radius is more complex than it looks. One thing I realise is that the curve shown in the picture is too tight if I add a filet. Adding a filet will increase the radius at the corner over the thickness of the sides. So the end product will be "rounder". Secondly, the filet needs to be cut along the end grain to have side grain at the edges. Sawing along side grain to create the filet, which is easier to plane a hollow, will leave end grain at the sides. This will darken when finished, and stand out.
The other option is to make the round, as above, and not add a filet at all, that is, leave the insides angles square. I wonder what others think of that look?
i am now back in the workshop and hope to have the carcase done in the next two days.
Regards from Perth
DerekVisit www.inthewoodshop.com for tutorials on constructing handtools, handtool reviews, and my trials and tribulations with furniture builds.
-
27th December 2018, 12:42 PM #21
GOLD MEMBER
- Join Date
- Feb 2003
- Location
- back in Alberta for a while
- Age
- 68
- Posts
- 12,006
Hi Derek
there is another way of approaching the rounding of the inside corners.
1. join the bottom and sides using regular through dovetails.
2. glue triangular cross grain blocks on the inside of each corner.
3. shape the inside and outside curves.
4. repeat 1-3 for attaching the top to the sides.
5. glue a 4-5 mm thick edging strips to the edges of the table that (a) cover the curved bits and (b) are mitered at the corners.
6. shape the edging strips to conform to the curves of the corners.
Note that the inside bottom corners are more critical as the inside of the top corners can only be seen if someone is lying on the floor.regards from Alberta, Canada
ian
-
27th December 2018, 02:35 PM #22
Be inspired. Be creative. Be bold.
- Join Date
- Apr 2001
- Location
- Perth
- Posts
- 10,826
Thanks again Ian.Note that the inside bottom corners are more critical as the inside of the top corners can only be seen if someone is lying on the floor.
I guess that the table were termed a beer/wine/whiskey table, then the upper corners would be especially relevant ... but then again, if you were prostate, if would be more a case of gazing blankly in the direction of the corners, than actually seeing them
Good point.
Regards from Perth
DerekVisit www.inthewoodshop.com for tutorials on constructing handtools, handtool reviews, and my trials and tribulations with furniture builds.
-
28th December 2018, 04:03 AM #23
Be inspired. Be creative. Be bold.
- Join Date
- Apr 2001
- Location
- Perth
- Posts
- 10,826
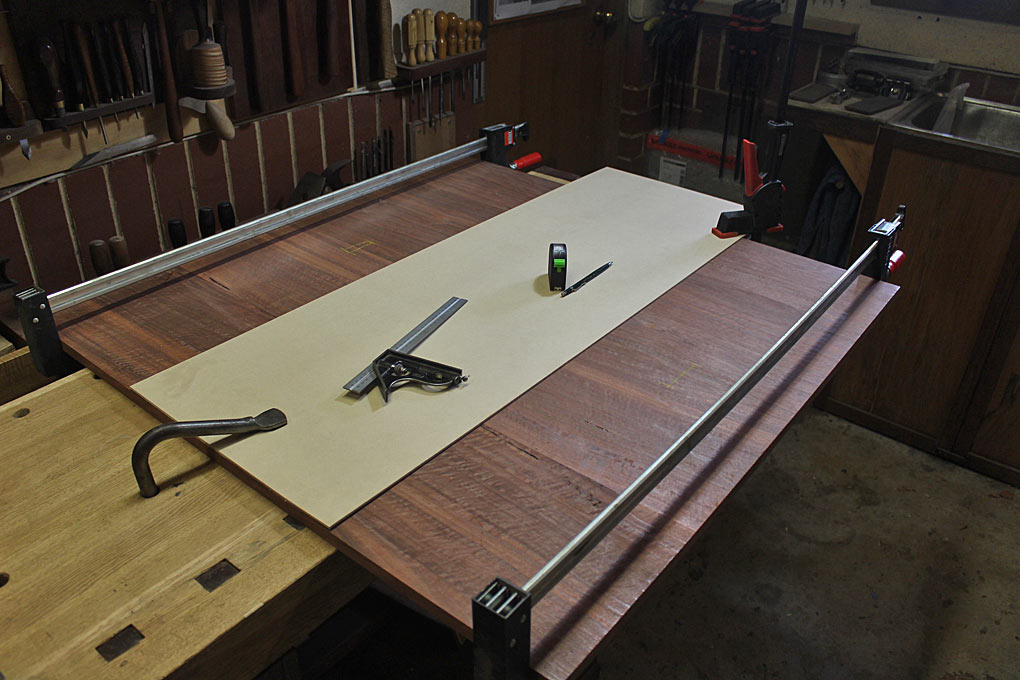
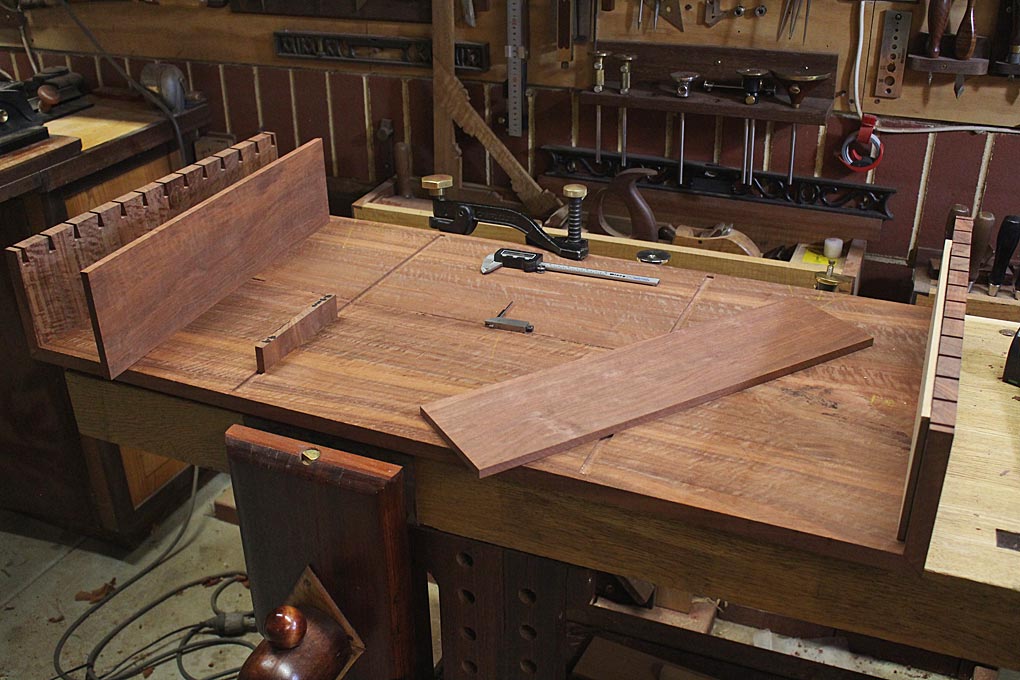
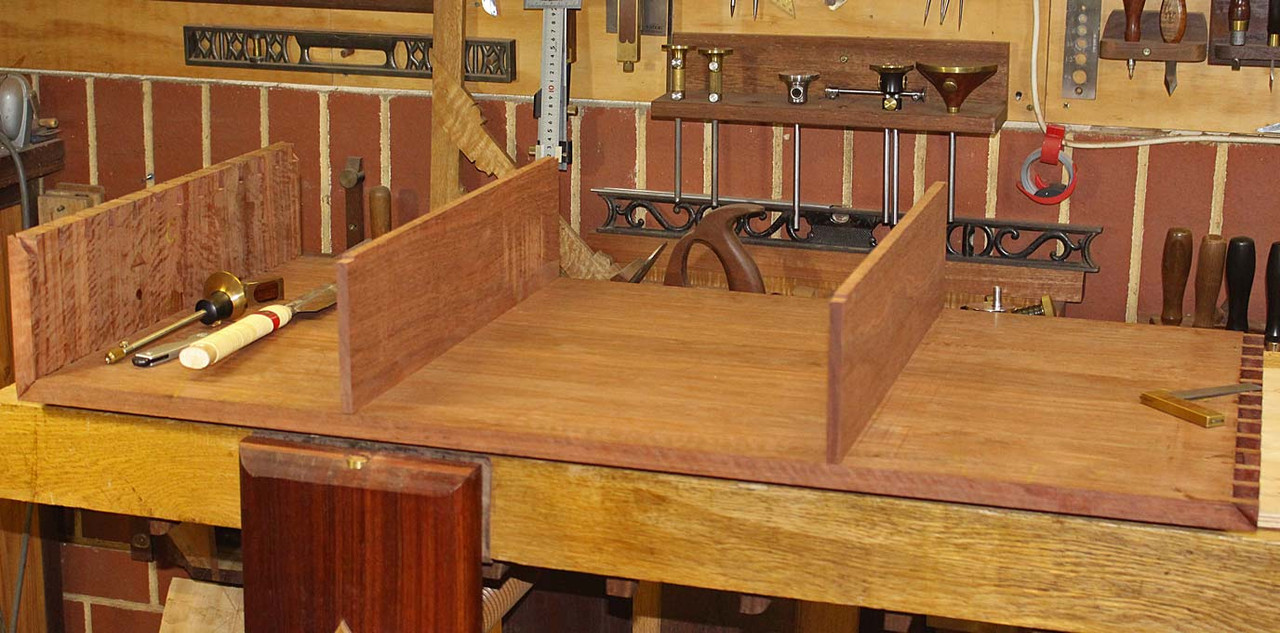
A few progress shots.
The main focus is to complete the carcase. However, to do the carcase, it is important to plan ahead for the drawer case.
The drawer case (at 10mm) is half the thickness of the carcase (20mm). The (eventual) drawer fronts (one for each side) will be the same Fiddleback Jarrah as the top and sides, and will be inset (rather than lipped). The purpose of the thinner sides is simply aesthetic - I want it to look lighter, to subtly separate it from the carcase. The drawer front will be the same thickness as the carcase, and the drawer sides the same thickness as the drawer case.
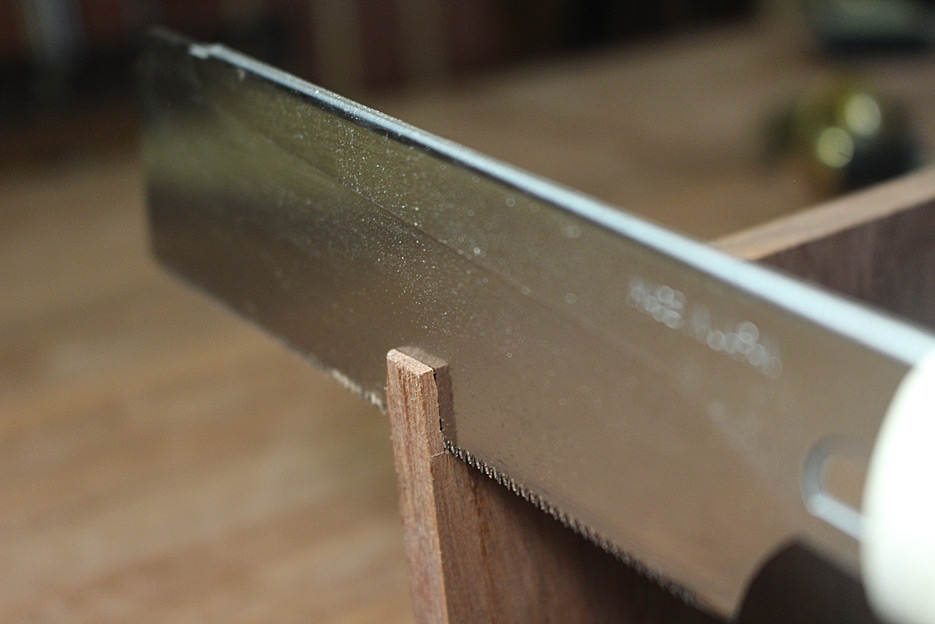
Before beginning on dovetailing the ends, stopped dados were marked out for the drawer case. The lower- and upper panels were clamped together and a MDF template of the drawer case set in position...
Marked out, chisel walls made ...
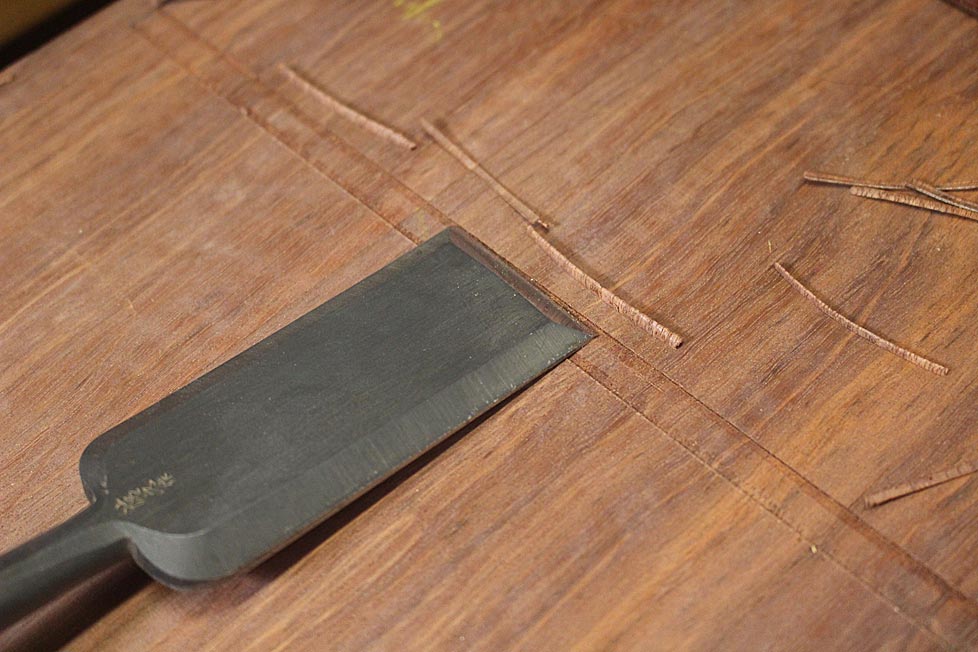
... to guide the saw cut ...
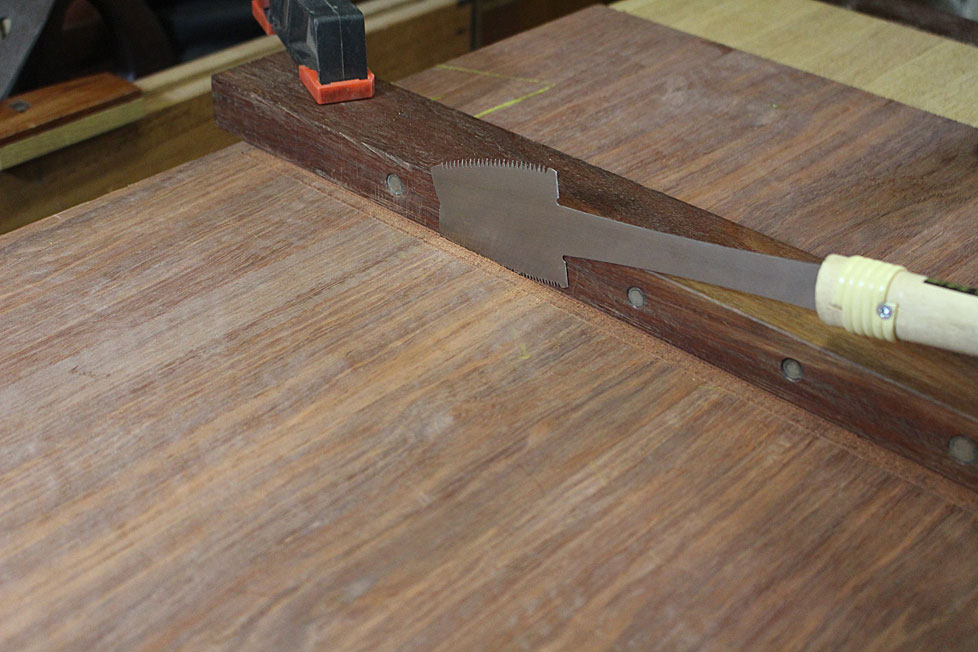
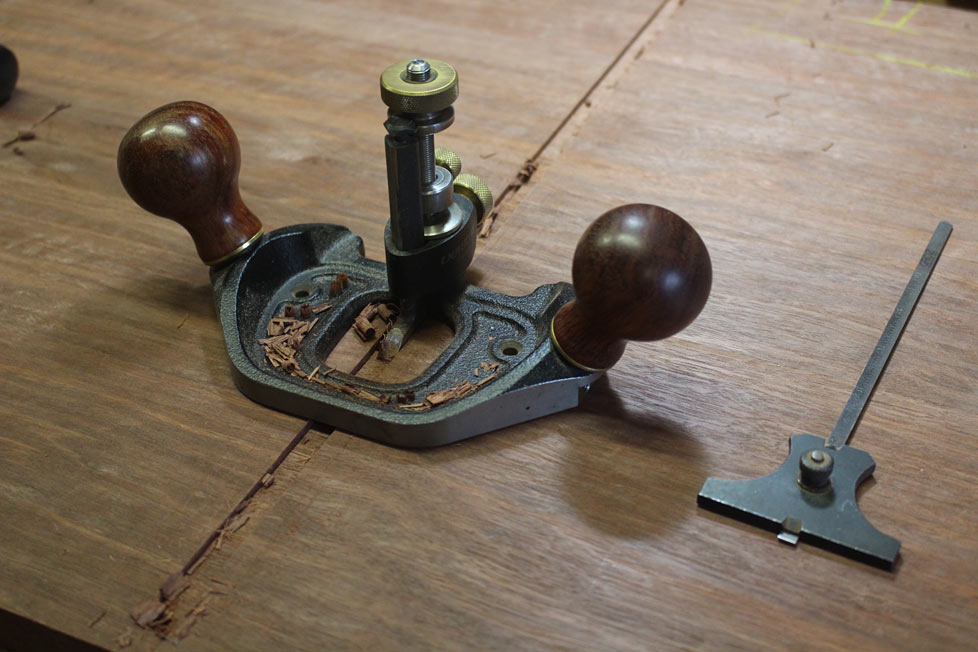
Then chiseled ..
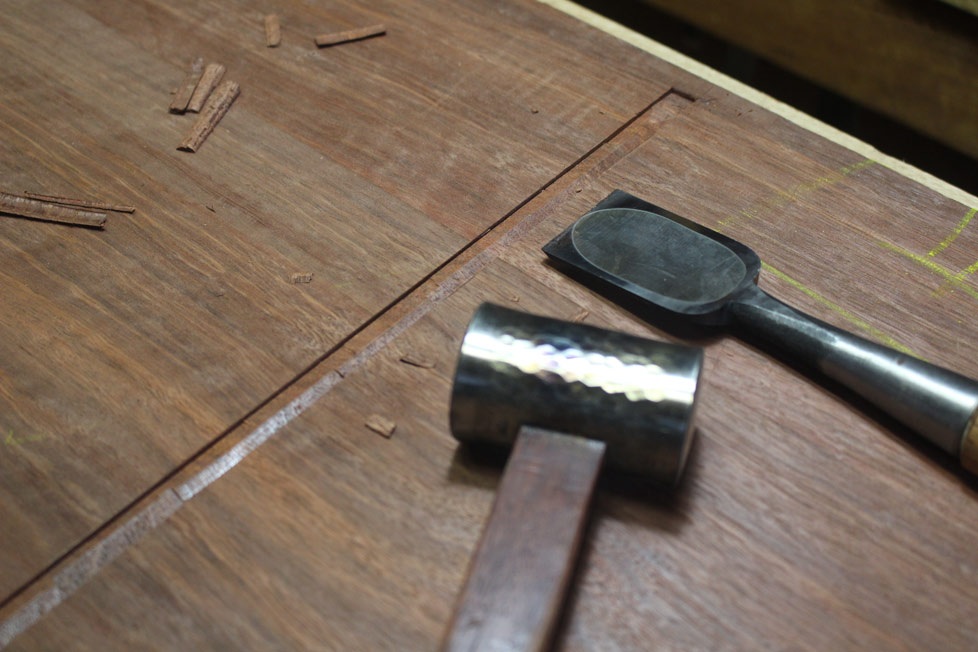
... and routered out ...
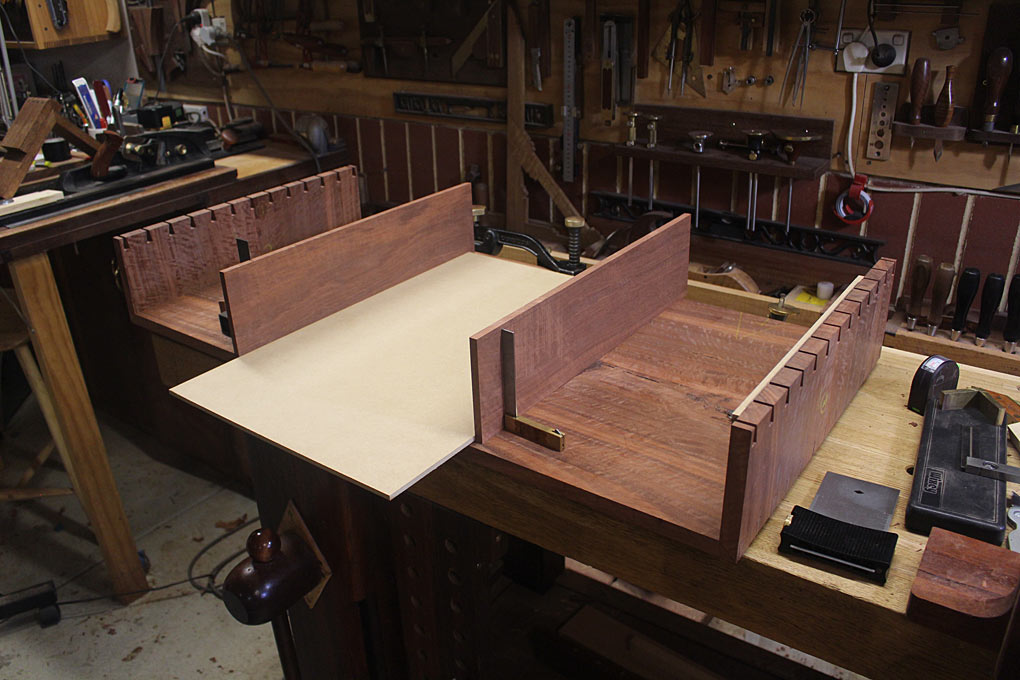
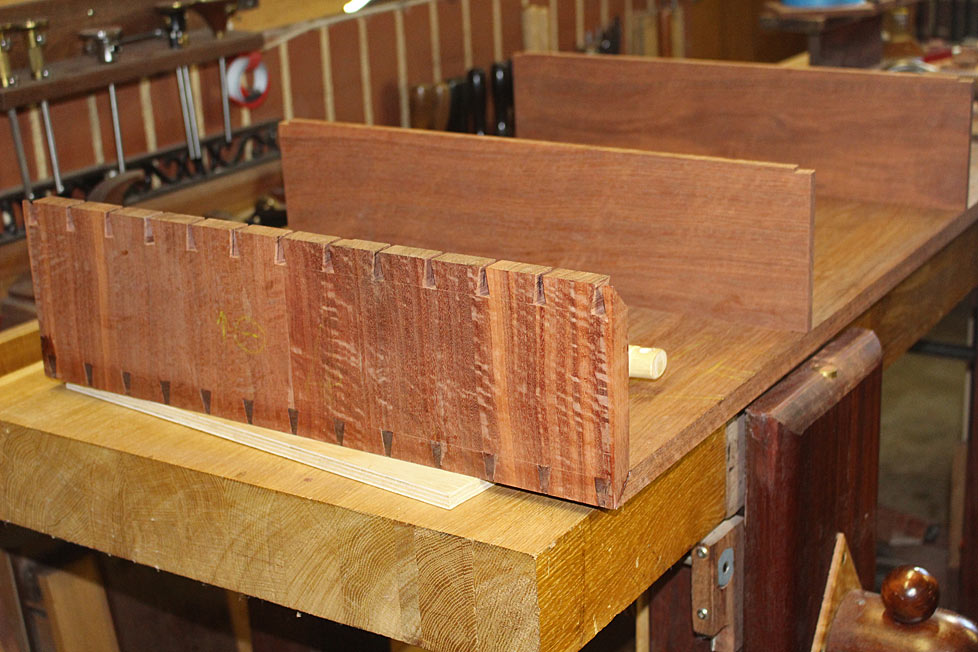
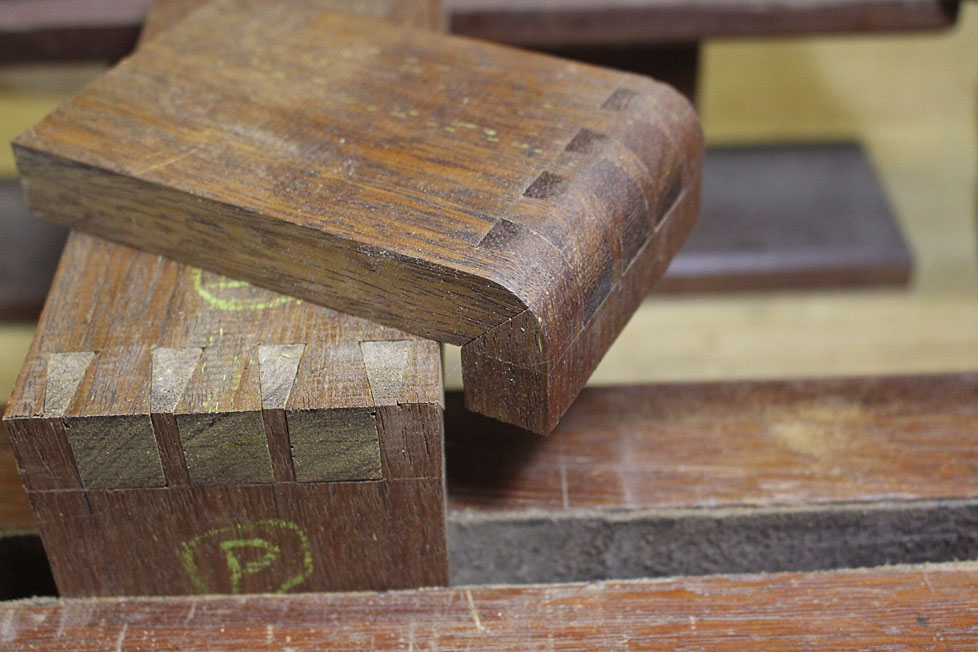
Following the method outlined previously, the two ends and the top were joined with mitred through dovetails ...
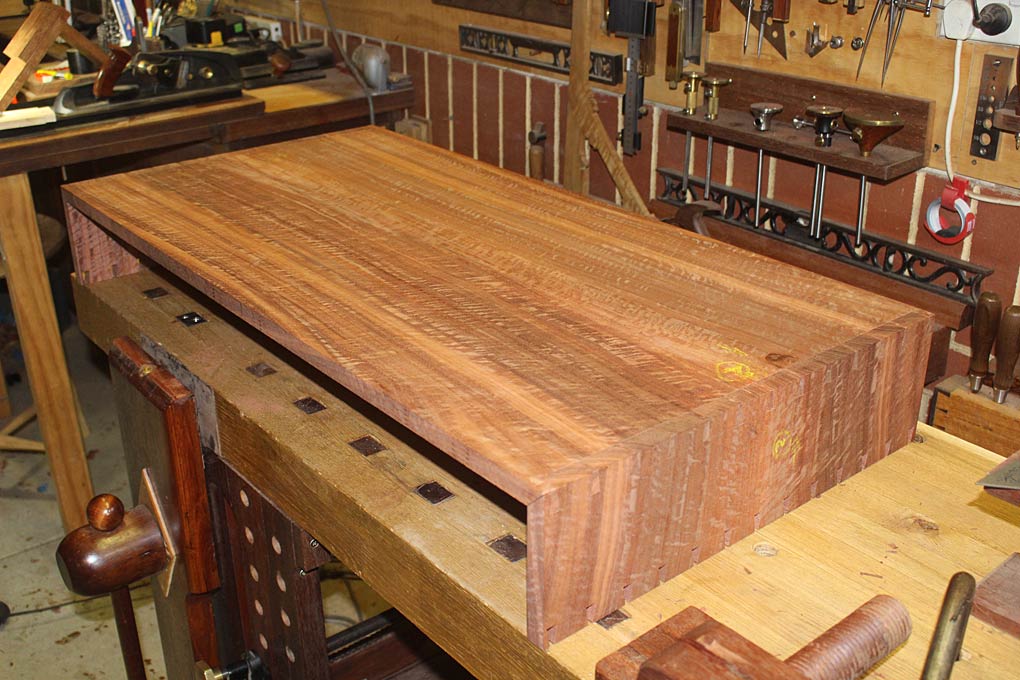
One edge ...
.. and the other side ...
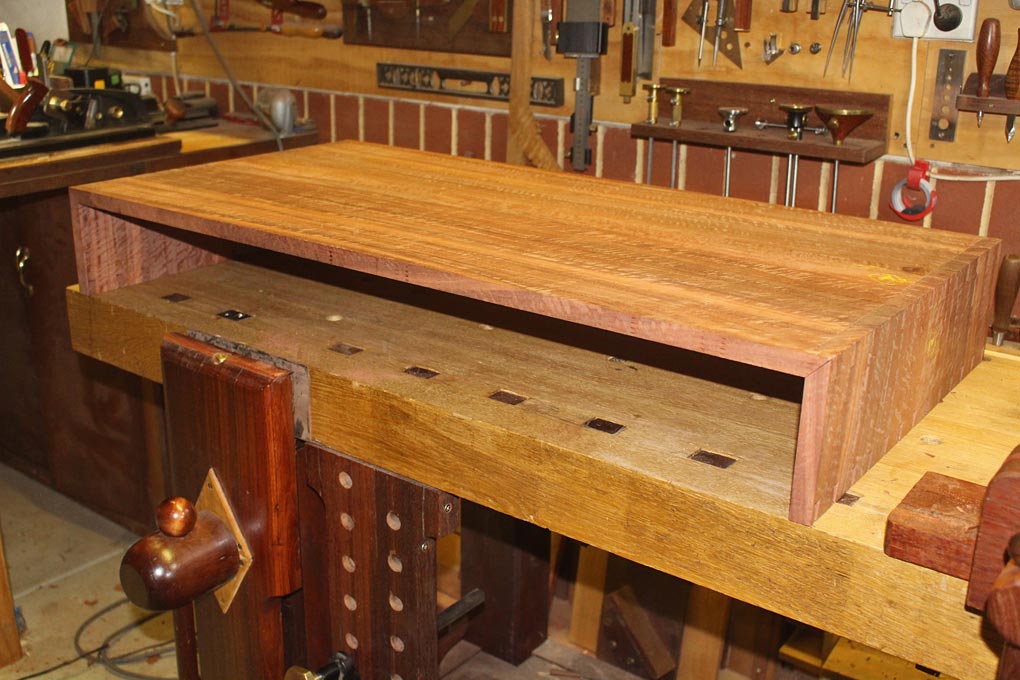
The plan now is to size the drawer case sides before dovetailing and joining the lower panel. Why the templates and sizing at this stage?
When the two ends of the lower panel have been dovetailed, the two sides of the drawer case must be fitted before the panel can be attached. In other words, these three pieces are fitted together at the same time.
Now, as the sides of the drawer case run in a stopped dado, they need to be sized beforehand. This fitting is different and far more exacting that in the typical carcase which as a stopped dado on one side only, and the dividing panels (which I term the drawer case) are slid in, allowing one to mark where the front rebates will go. In the present build, the front and rear rebates need to be determined beforehand, and cut before the parts are brought together.
The MDF template is to aid in measuring up the sides for the drawer case. This is one of the (number of) surprises of this build: it looks so simple from the outside, but when it comes to constructing ...
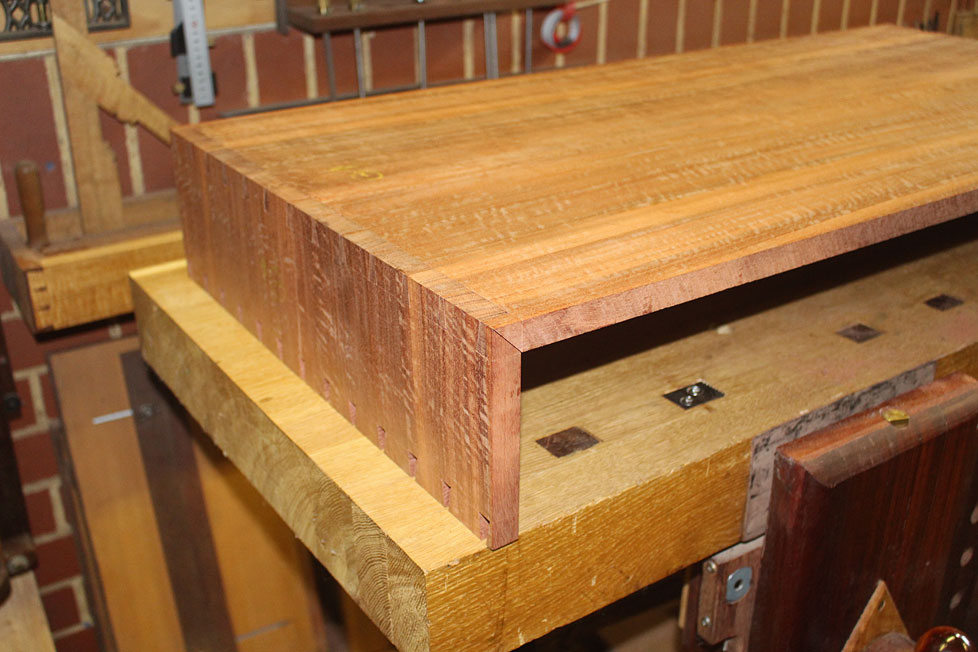
In the photo below, the dados are checked for size with a 10mm wide template ...
An MDF template checks the case sides are parallel ...
At the far end is another MDF template to size the drawer case sides ...
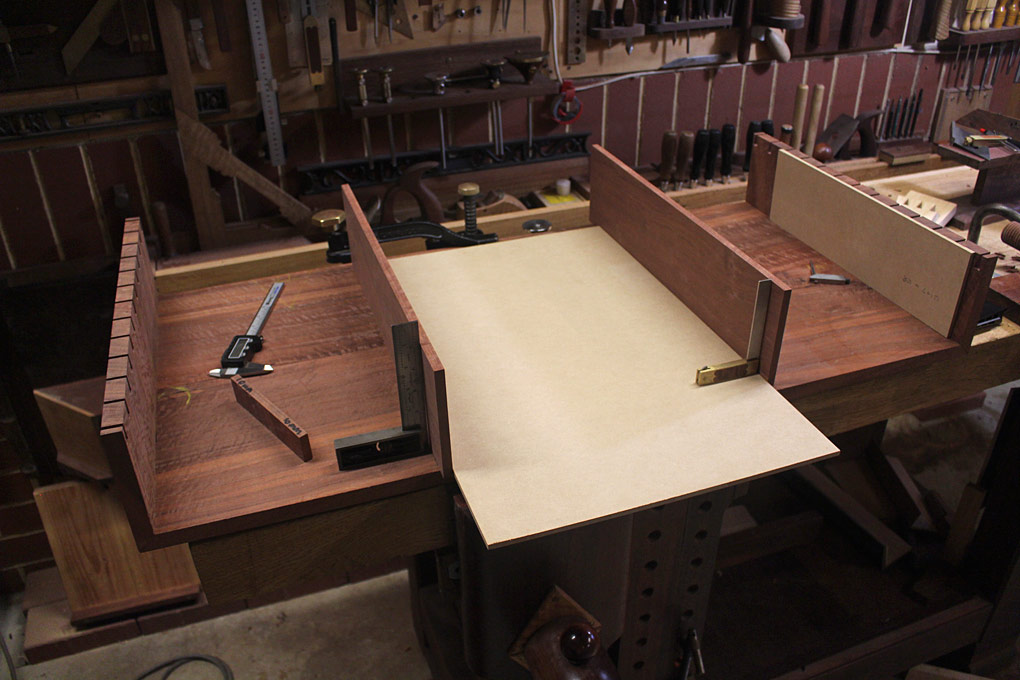
That's it for now.
Regards from Perth
DerekVisit www.inthewoodshop.com for tutorials on constructing handtools, handtool reviews, and my trials and tribulations with furniture builds.
-
28th December 2018, 12:40 PM #24
Be inspired. Be creative. Be bold.
- Join Date
- Apr 2001
- Location
- Perth
- Posts
- 10,826
Relevant changes to text made above.
Regards from Perth
DerekVisit www.inthewoodshop.com for tutorials on constructing handtools, handtool reviews, and my trials and tribulations with furniture builds.
-
29th December 2018, 12:35 AM #25
GOLD MEMBER
- Join Date
- Apr 2006
- Location
- Hobart
- Posts
- 5,129
Hi Derek
Still watching with interest.
I had an encounter with rounded dovetails about a year ago - probably will not assist your project - so I have created another thread.
Art Deco Rounded Dovetail Detail
Cheers
Graeme
-
1st January 2019, 04:02 AM #26
Be inspired. Be creative. Be bold.
- Join Date
- Apr 2001
- Location
- Perth
- Posts
- 10,826
I assembled the carcase today. This began with glueing the one end and, while that dried, fitting the sides of the drawer box ...
Someone predicted that this glue up would be interesting. Was it ever.
I had this plan to glue the ends, attach the drawer box, and then simply drop the top side into place. What could be easier?
Except ... I realised as I positioned the drawer box dividers in their stopped dados - and was just about to glue in the other end - that the ends were tails and the top section had pins ... and they needed to be slid in horizontally, not vertically! The order of assembly should have been: fit drawer box to open base, add top section, now add one end and then the other.
I removed the drawer box parts, and attached the top panel to the already glued end. Lifting the top at an angle, the drawer box dividers were wiggled in. And then I discovered that they were 10mm too high!
Oh hell (or some other descriptive) .. I propped up the top panel, quickly calculated how much needed to be removed on the table saw, did both dividers, rebated the ends again ...
... it fits ... (phew)
.. up ended the monster (which weighed a bloody ton, but I was now a demon possessed of desperation strength!), glued in the last side, and squared the carcase ....
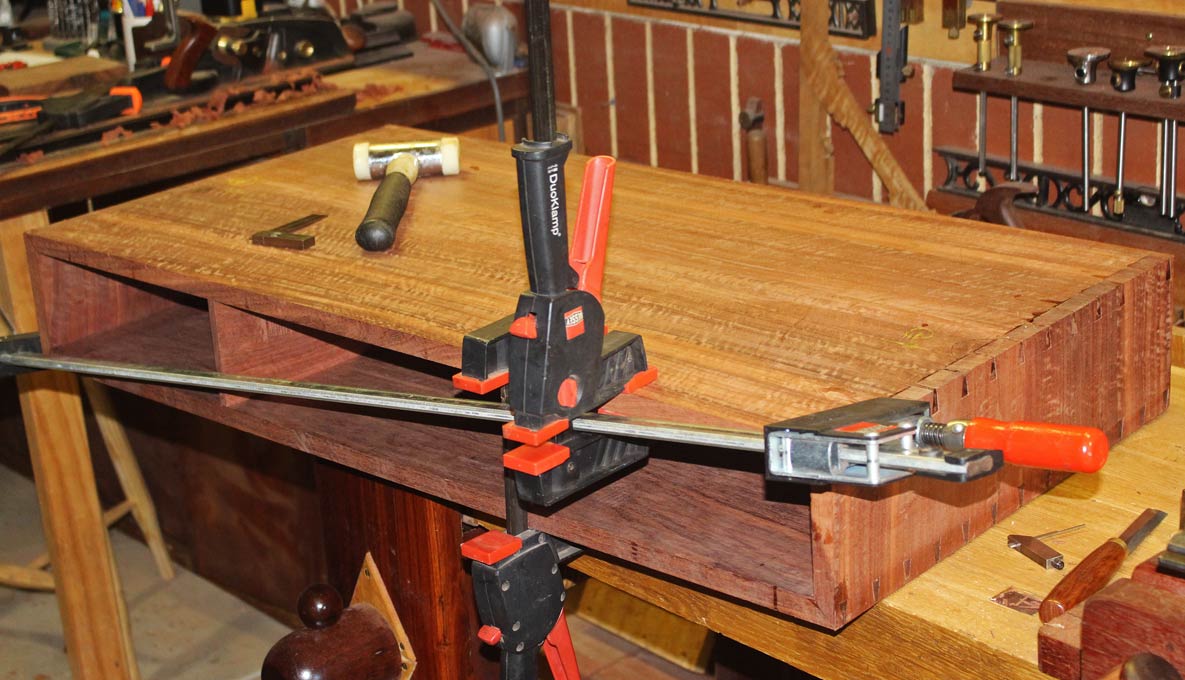
And everything is square ...

I'll clean it up tomorrow, and then start on rounding the ends.
Regards from Perth
DerekVisit www.inthewoodshop.com for tutorials on constructing handtools, handtool reviews, and my trials and tribulations with furniture builds.
-
1st January 2019, 04:26 AM #27
Butcher of wood
- Join Date
- Jun 2010
- Location
- Bundaberg
- Age
- 54
- Posts
- 3,428
Well, that was the last workshop related act of vertical fornication for 2018!
May I ask what glue are you using; is it an epoxy?Nothing succeeds like a budgie without a beak.
-
1st January 2019, 04:31 AM #28
Be inspired. Be creative. Be bold.
- Join Date
- Apr 2001
- Location
- Perth
- Posts
- 10,826
I should have mentioned ... Titebond hide glue.
Happy new year!
Regards from Perth
DerekVisit www.inthewoodshop.com for tutorials on constructing handtools, handtool reviews, and my trials and tribulations with furniture builds.
-
1st January 2019, 01:47 PM #29
GOLD MEMBER
- Join Date
- Apr 2006
- Location
- Hobart
- Posts
- 5,129
Fiddling with Perceptions
Happy New Year Derek, and Every One Else. Originally Posted by derekcohen
Noted you and Chief Tiff posted at 4 am (EST) on New Years Day!
Have been thinking about the "optimal" radii for the curves on both the inside and outside corners of your carcase, and, as I think visually, did some drawings.
Attachment 447517 Attachment 447518 Attachment 447520
Visually, I think I prefer the first drawing where:
- the inside radius = thickness of the carcase timber, and
- the outside radius = double the inside radius.
The other drawings have both curves at the same radius, respectively
- rounder radius,
- tighter radius.
If you enlarge the drawings then you should be able to see my reference lines.
If you leave the internal corner square and do a soft curve outside rounding then you will get a table edge that might look like this:.....the other option is to make the round, as above, and not add a filet at all, that is, leave the insides angles square. I wonder what others think of that look?.......
Round Dovetails 6.jpg
There should be more than enough strength in the corners with the cross grain in the dovetails and I, personally, like the tension between the hard inside corner and soft dovetail. The latter should attract a lot of interest - how did he do that ? - a design feature and conversation catalyst.
I am really enjoying your project !
Cheers
Graeme
-
1st January 2019, 06:40 PM #30
GOLD MEMBER
- Join Date
- Feb 2003
- Location
- back in Alberta for a while
- Age
- 68
- Posts
- 12,006
At the 21 second mark in this profile of Edward Wohl -- a US maker -- is a dovetailed desk where the DTs have been rounded on the outside. Much as Derek has done on his sample piece.
https://youtu.be/LeNwstDAkLA?t=21regards from Alberta, Canada
ian


 Reply With Quote

Similar Threads
-
Little Something for my Nephew
By PLD in forum SCROLLERS FORUMReplies: 3Last Post: 21st August 2014, 05:04 PM -
A toy for my Nephew.
By Mr. Lara in forum TOY MAKINGReplies: 20Last Post: 12th February 2014, 02:55 AM -
New box for Nephew
By Evanism in forum BOX MAKINGReplies: 9Last Post: 17th February 2013, 03:12 AM -
Wanting to Buy - 2xTV unit, Coffee Table Dinnng room table
By Overboardkiller in forum WOODWORK - GENERALReplies: 6Last Post: 10th November 2010, 05:59 PM -
Tall Coffee Table/Desk/BookCase/Holdall of important bits/Sofa Table
By RufflyRustic in forum WOODWORK PICSReplies: 11Last Post: 3rd December 2009, 12:14 AM
