

 Thanks:
  Likes:
  Needs Pictures: 0
 Picture(s) thanks:
Results 16 to 30 of 37
Thread: Sofa Table
-
4th June 2017, 02:24 PM #16
 Skwair2rownd


- Join Date
- Nov 2007
- Location
- Dundowran Beach
- Age
- 76
- Posts
- 19,922

xciting stuphph!! I have just drooled on my keyboard!!

E
-
4th June 2017 02:24 PM # ADSGoogle Adsense Advertisement
- Join Date
- Always
- Location
- Advertising world
- Age
- 2010
- Posts
- Many
-
6th June 2017, 03:04 AM #17
Be inspired. Be creative. Be bold.
- Join Date
- Apr 2001
- Location
- Perth
- Posts
- 10,826
Sofa Table - part II
In part I, work had begun on the boat-shaped sofa table ...
We left off last time with the bow aprons completed ...
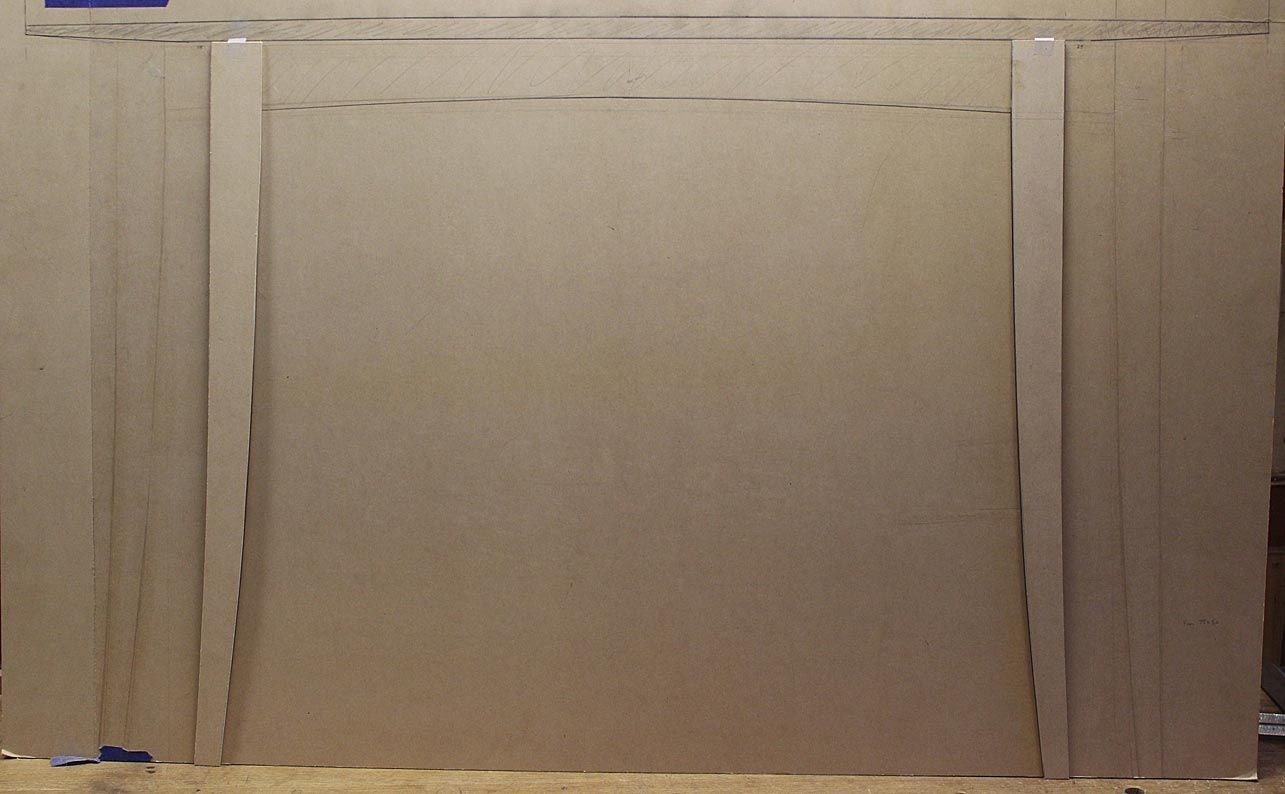
Before I began the legs, which I had planned for this weekend past, I had another look at the aprons and decided that they could be slimmed down, which would enable the legs to be slimmed as well. This involved removing a 10mm strip from the centre on the table saw, and glueing the two sections up again. We could now begin on the legs.
The blanks for the legs were 75 x 40mm (3" x 1 1/2") Hard Maple. Using a template, sections with the straightest grain could be marked out ...
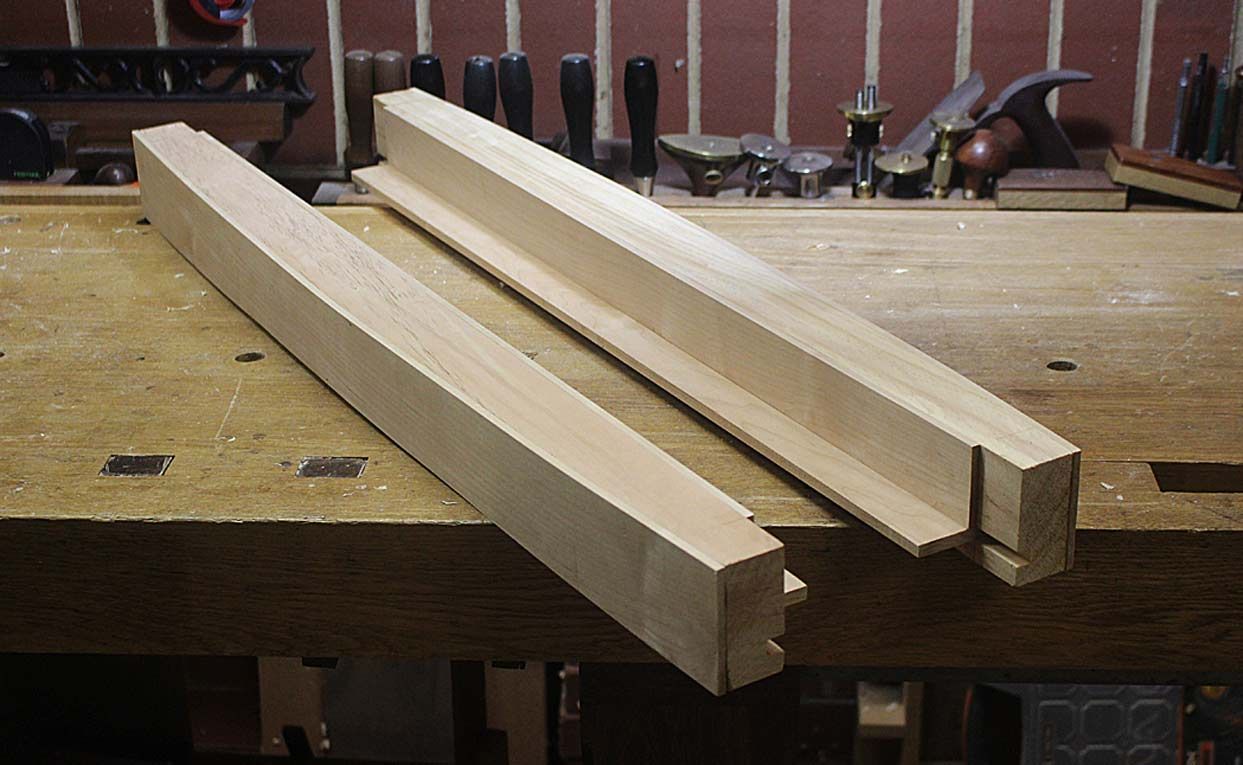
.. and then sawn out on the bandsaw ...
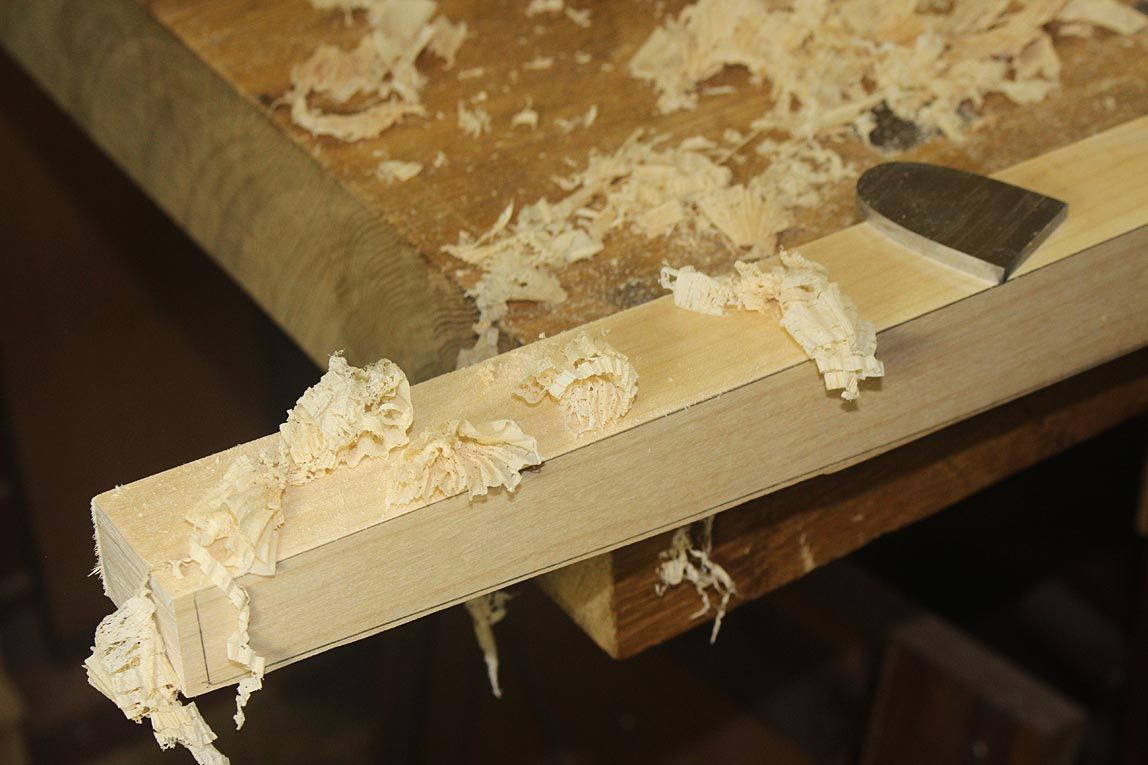
It was easier to plane the concave side and spokeshave the convex side ...
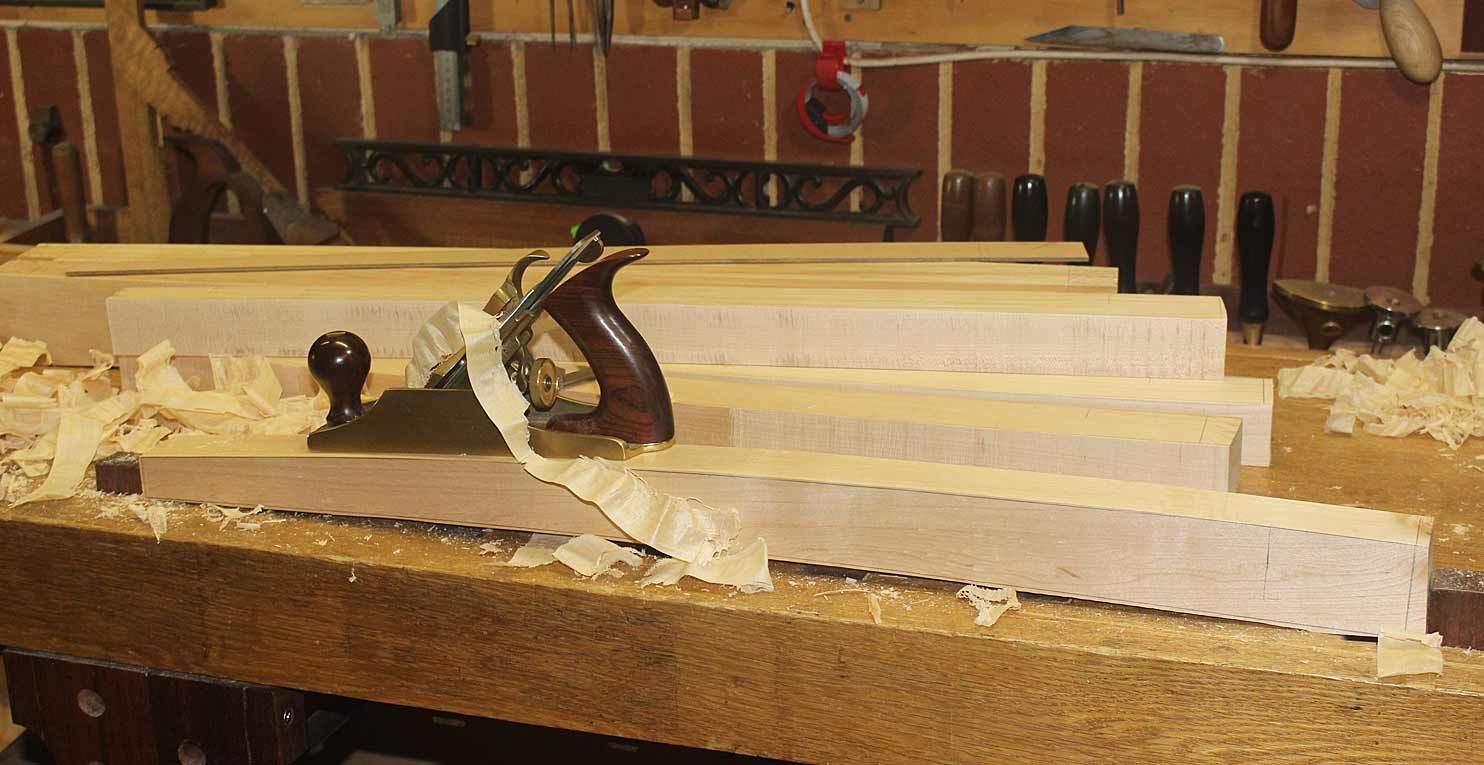
Any irregularities were smoothed with a scraper ...
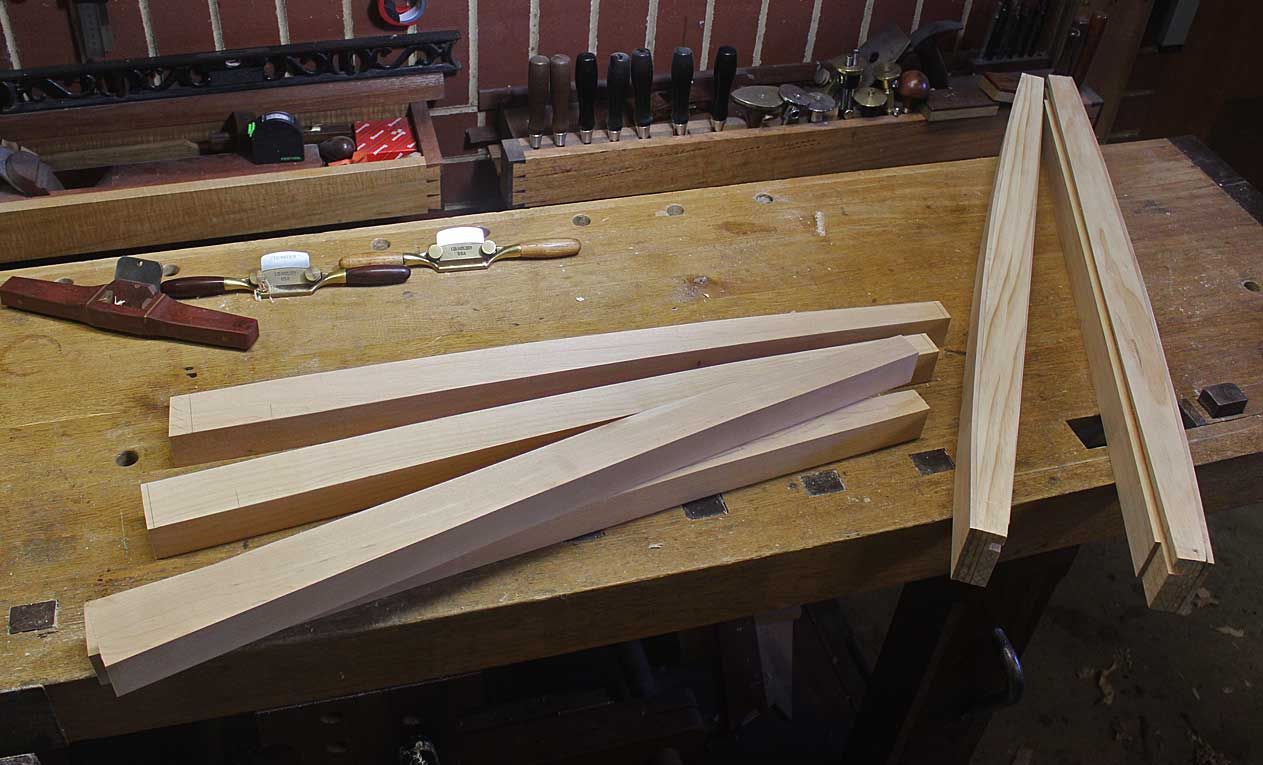
Below are the completed basic legs and slimmed down aprons (with drawer blades removed) ..
The legs would be joined to the apron with mortice and tenons. This had its challenges as the apron, being bowed, has only one flat side. In retrospect, it would have been easier to have extended the maple veneer on the inside all the way, and not stop it short where the tenons would be formed. As a result, it was not possible to mark the tenons with a gauge. Fortunately, the ends were square and became the reference side ...
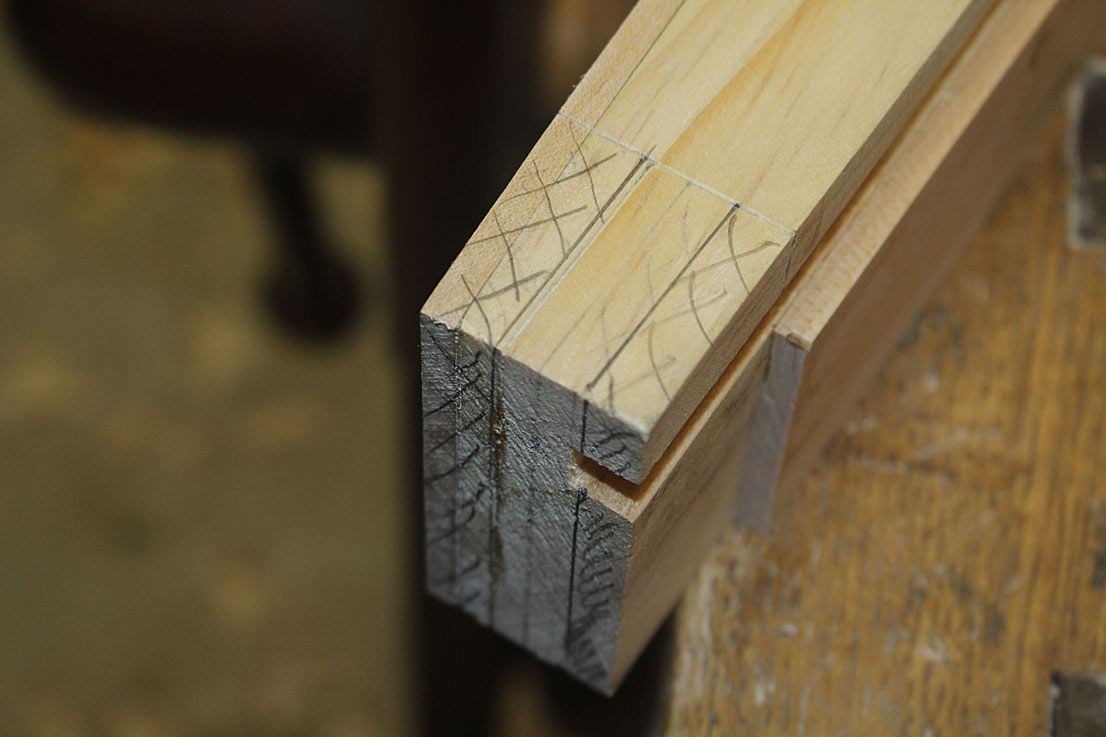
The mortice and tenon is 1/2" wide. The 1/3 Rule is used, and the mortice extends 2/3 in the leg.
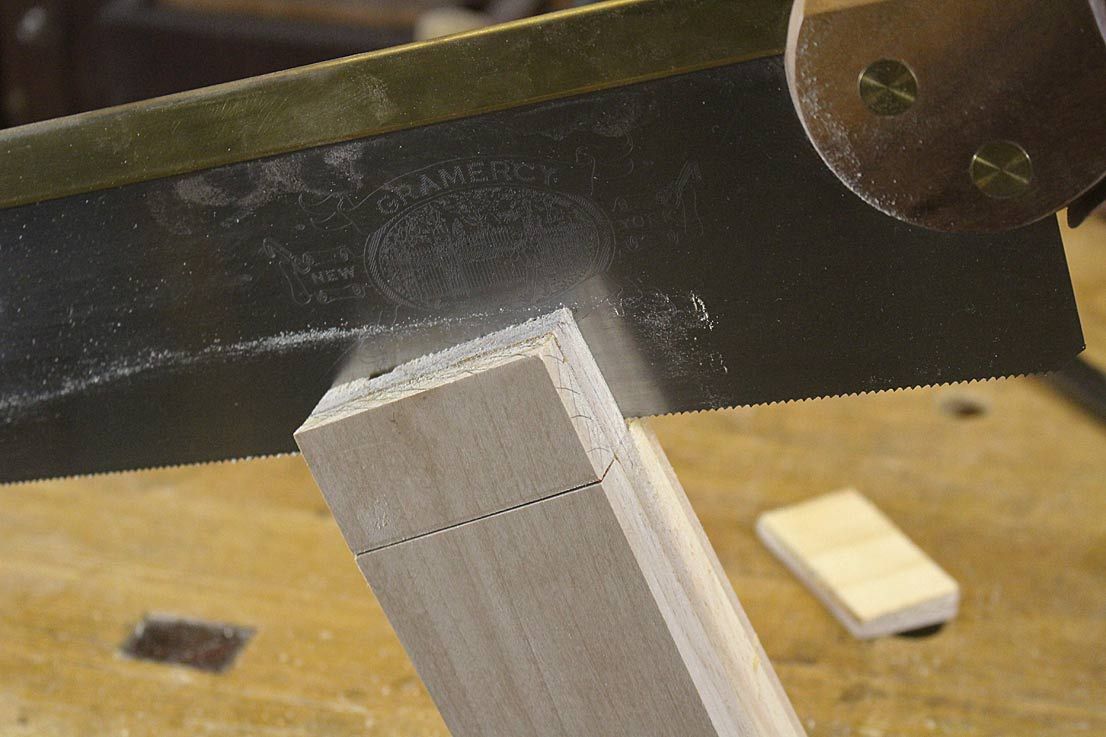
The shoulders are knifed, undercut, and then sawn ...
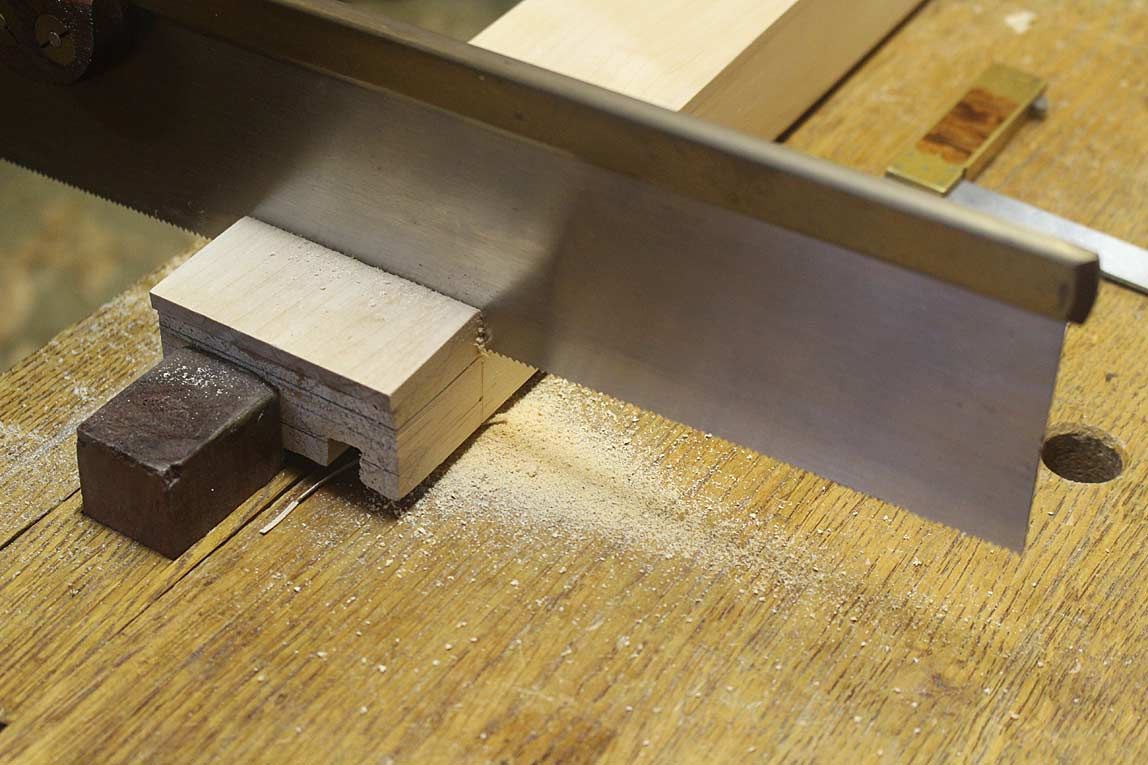
The cheeks are sawn close to the line, but not at close as I usually do. I am leaving a little extra waste for fine tuning ...
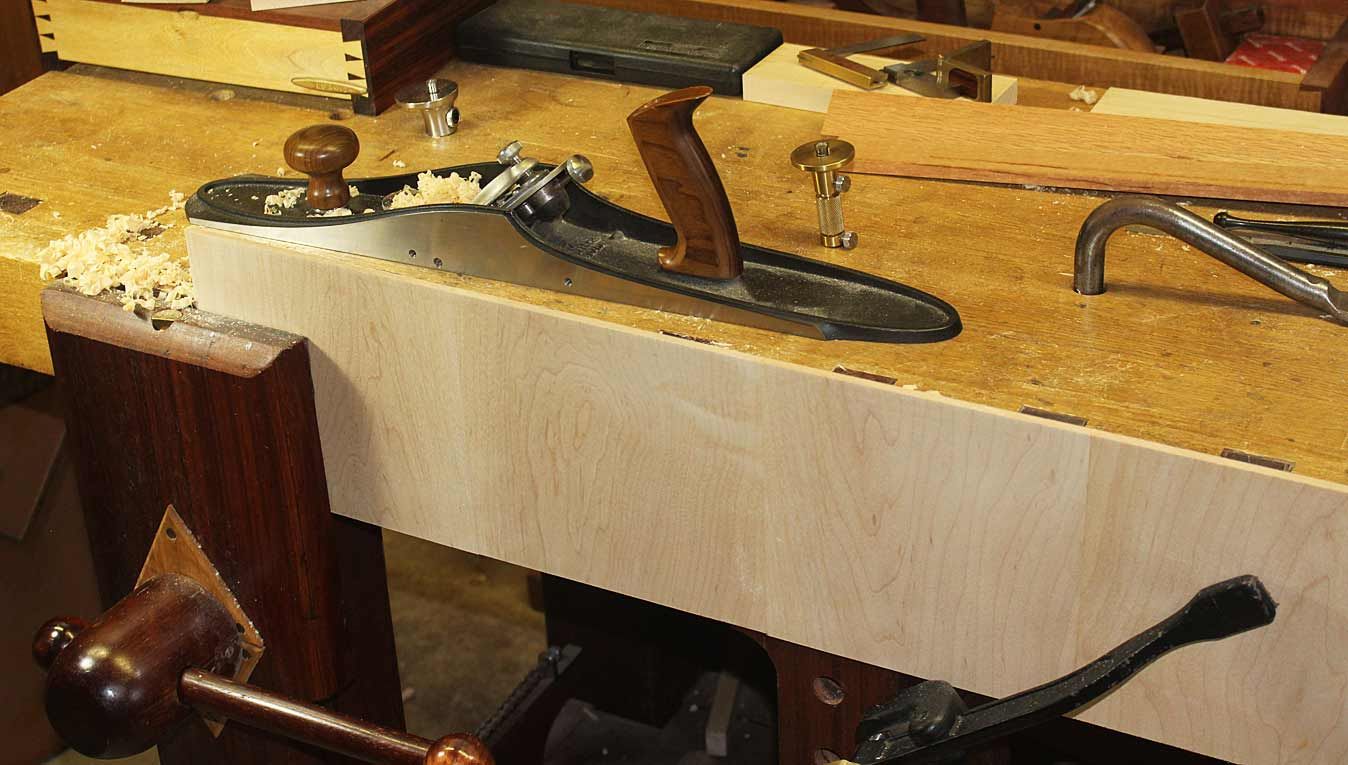
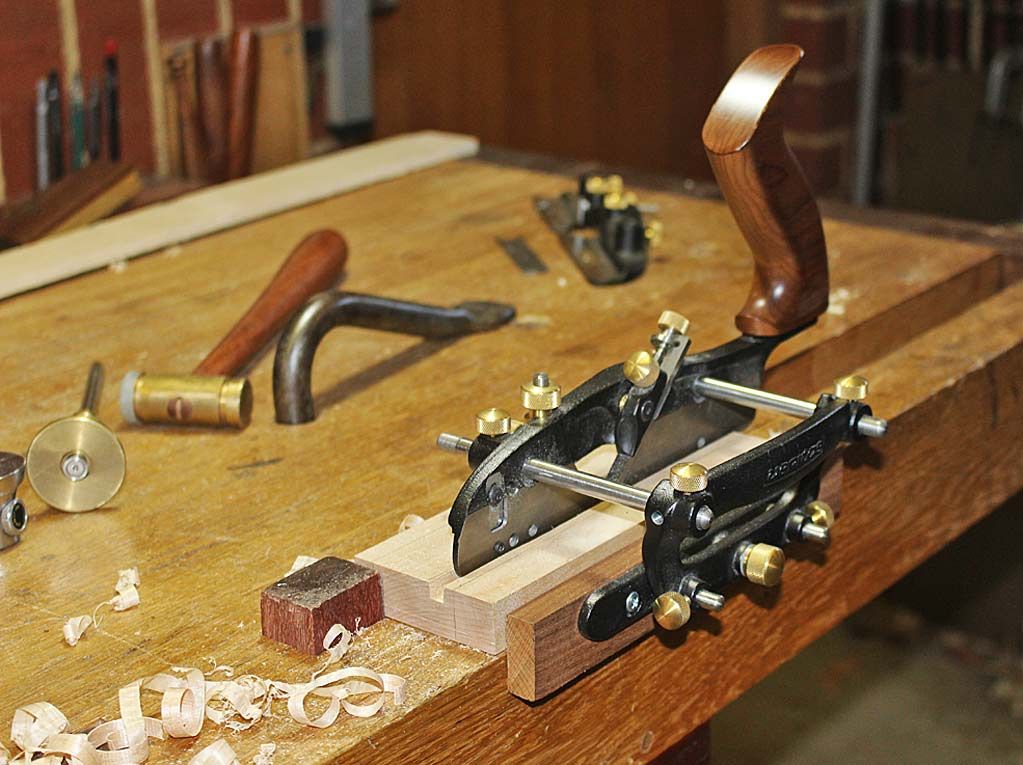
My strategy is to level the side of the cheeks parallel to the flat side of the apron using a router plane (David Charlesworth's technique from about 20 years ago) ..
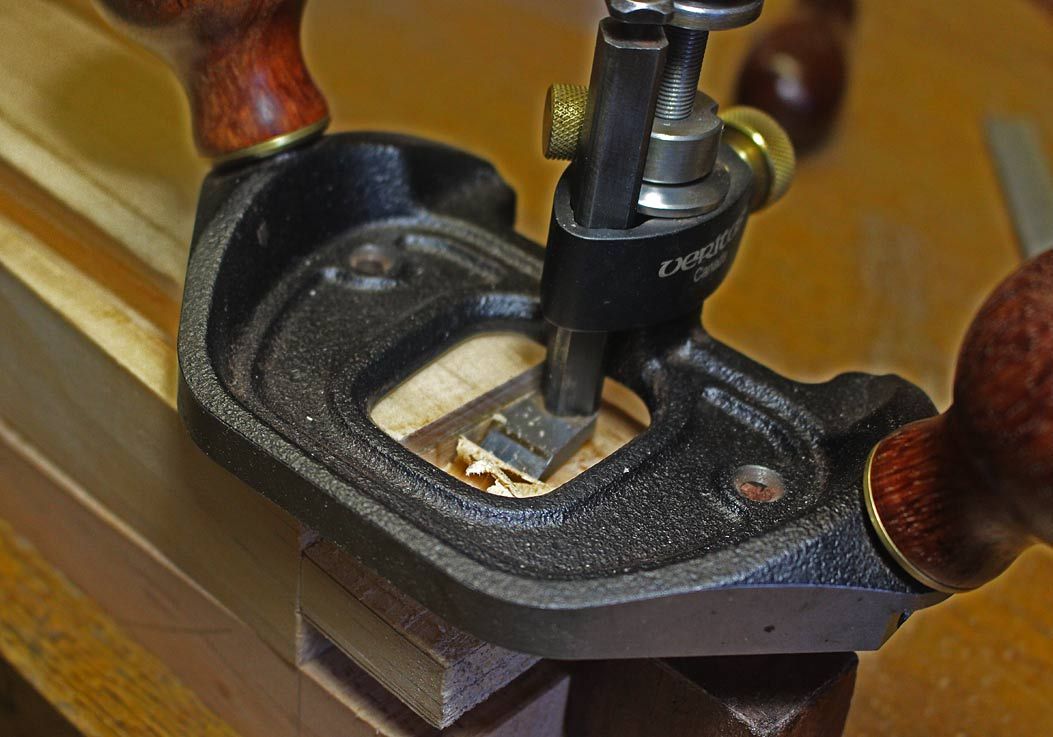
The other side has to be chiseled as the bowed apron does not permit use of the router plane.
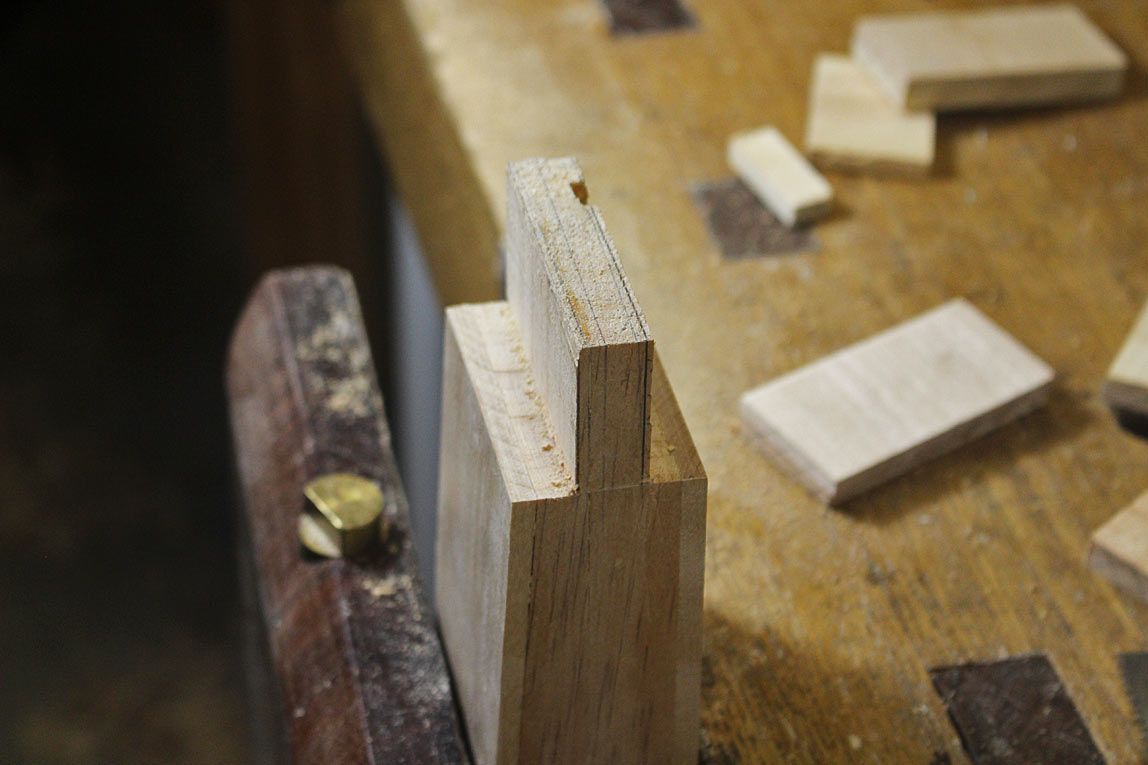
Accuracy of the tenon is checked with a template ...
There is a another reason for the absolute precision here - the inside of the legs must align precisely with the inside face of the apron as a drawer will be fitted from the side.
In the photo below, the position for the mortice is transferred from the tenon. At the rear is a straight edge ensuring all lines up ...
Once done, the mortices were made. After chopping a couple in the hard maple, I thought "this is for the birds", and used a router on the remainder. Half inch wide and 1 1/4" deep in hard maple is not fun!
Before assembling anything, there is some shaping to be done on the legs.
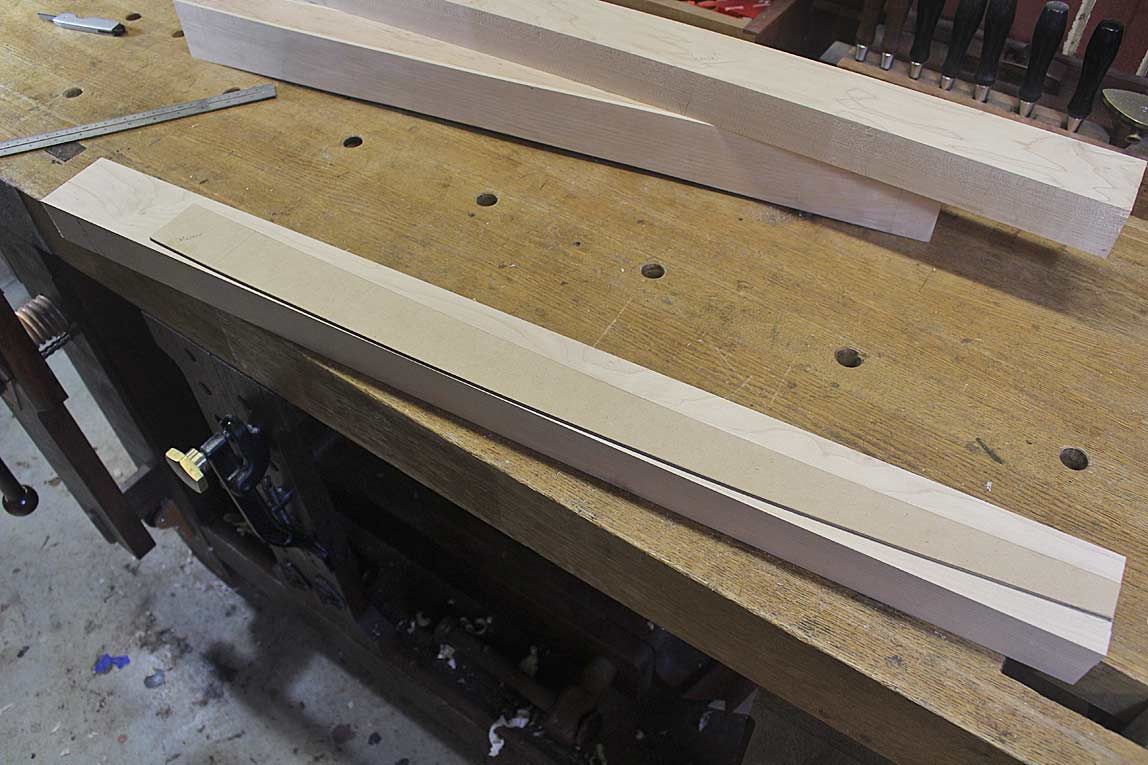
The legs not only curve in elevation, but the front curves in parallel with the apron and the table top ..
The insides of the legs will be tapered, and this will be completed after the outer curve is shaped.
The curve is simply planed to the lines, and then sanded to removed any irregularities ...
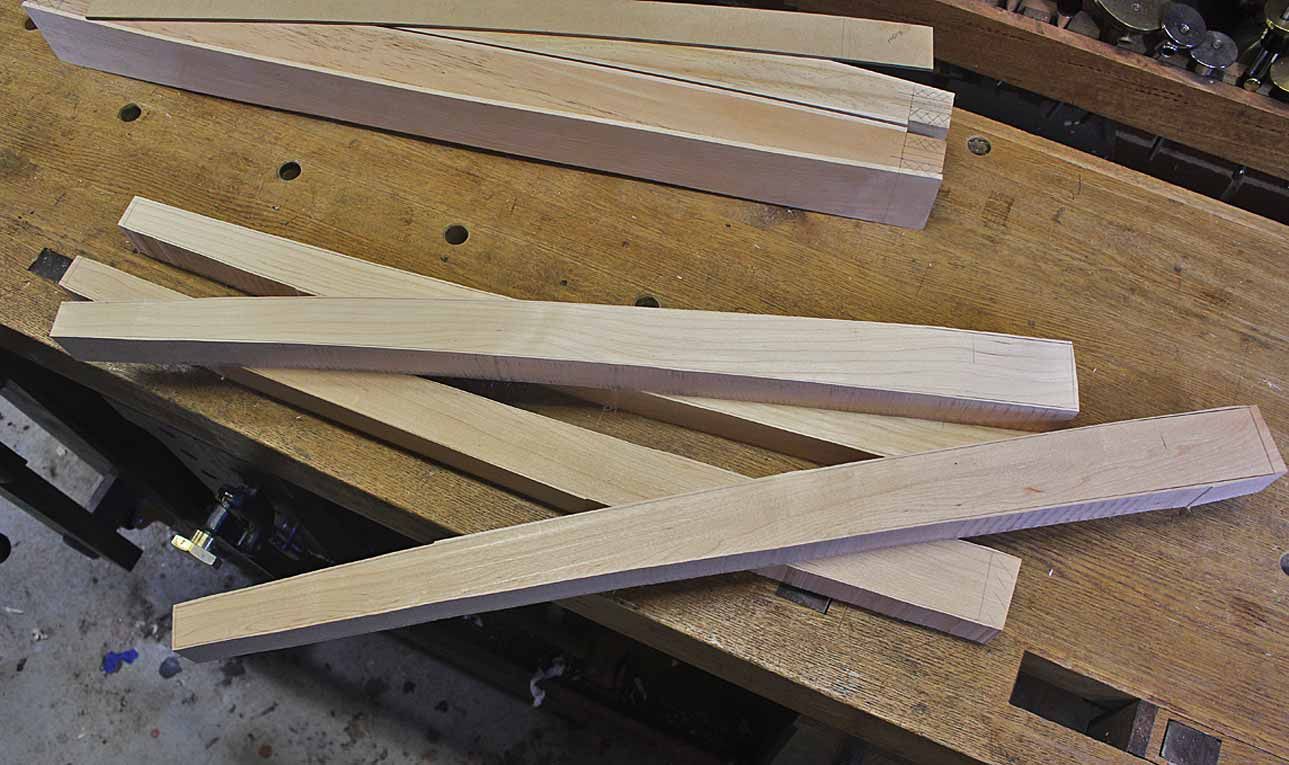
Below you can see two sets of apron/legs. The right hand is shaped, while the left side remains to be done. The apron is set back by 2mm to create a shadow line ...
This is the final photo for this segment. The taper has yet to be done. The mortice and tenon will be drawbored for a tight finish. The inside faces have been cleaned up (too many photos already, so there are lots of small details I have chosen to omit).
This will now give you a better idea of what I am trying to achieve.
Comments and discussion welcomed.
Regards from Perth
DerekVisit www.inthewoodshop.com for tutorials on constructing handtools, handtool reviews, and my trials and tribulations with furniture builds.
-
6th June 2017, 09:46 AM #18
SENIOR MEMBER
- Join Date
- Jun 2007
- Location
- Blue Mountains
- Posts
- 817
I like it a lot. Please include as many pictures as you want. The more the better, from my perspective. It helps us all learn. The slimmed down apron does look more in proportion now - a good mid-build design change.
Thanks for sharing.
cheers,
ajw
-
6th June 2017, 03:19 PM #19
GOLD MEMBER
- Join Date
- Feb 2003
- Location
- back in Alberta for a while
- Age
- 68
- Posts
- 12,006
Derek
As you know I always admire your builds and the accompanying write up, but I believe this sequence will become an "oops" momentIdeally, the dovetail recess for the top drawer rail and the twin mortices for the lower rail should be cut before shaping the outside of the leg. Originally Posted by derekcohen
 regards from Alberta, Canada
ian
-
6th June 2017, 04:59 PM #20
Be inspired. Be creative. Be bold.
- Join Date
- Apr 2001
- Location
- Perth
- Posts
- 10,826
I'm pleased you raised this since there are factors here that I have been thinking about, and did not include them in my post, above.Ideally, the dovetail recess for the top drawer rail and the twin mortices for the lower rail should be cut before shaping the outside of the leg.
Admittedly, I was not thinking far enough when I shaped the outside of the leg (the inside taper will not be shaped until much later). However, it will not make any difference with what I have planned. Specifically, that the lower rail will be held with a sliding dovetail (as was my early plan), and not with a double mortice and tenon (which you recommended). The reason for returning to the earlier position is that the thickness of the lower rail can only be about 1/2". The reason for this is that I need to maximise the internal space for the drawer. An extra 1/4" is too much to give up. The upper rail is expected to be the same (and dovetailed in).
I expect that a blind sliding dovetail will provide a more rigid construction that a mortice-and-tenon. The leg can easily be held in a face vise, or between dogs on the bench (with a wedge if necessary) when completing this joint.
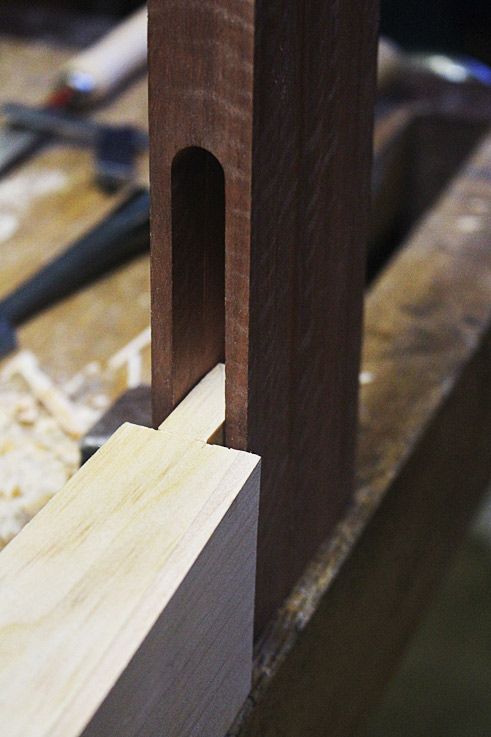
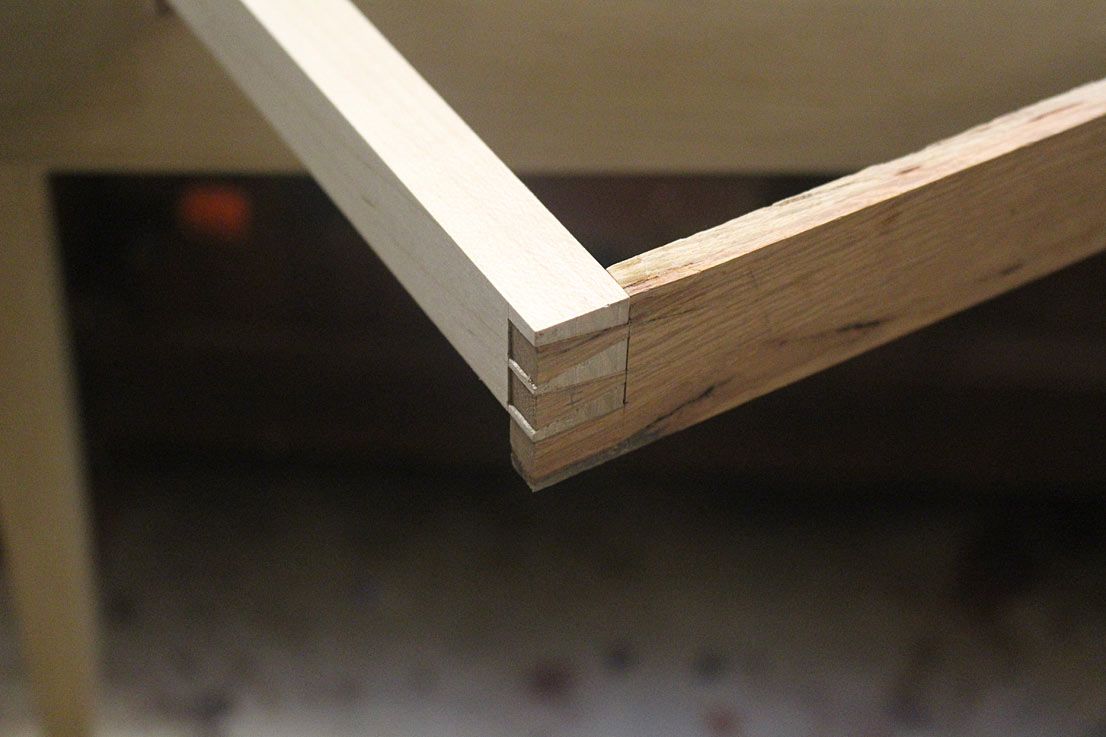
Same construction as this ...

The drawer rests on drawer blades grooved int the rear of the apron, so there is no downforce on the lower rail. The upper and lower rails are in tension, not compression. Dovetails are better for this than a glued butt joint (which is what the mortice and tenon essentially is).
Thoughts?
Regards from Perth
DerekVisit www.inthewoodshop.com for tutorials on constructing handtools, handtool reviews, and my trials and tribulations with furniture builds.
-
6th June 2017, 09:24 PM #21
GOLD MEMBER

- Join Date
- Nov 2011
- Location
- Melbourne
- Posts
- 7,013
Thanks Derek.
Another great write up[emoji106][emoji106]
What makes this a great forum.
Cheers Matt
Sent from my iPhone using Tapatalk
-
12th June 2017, 03:19 AM #22
Be inspired. Be creative. Be bold.
- Join Date
- Apr 2001
- Location
- Perth
- Posts
- 10,826
Sofa Table - part III
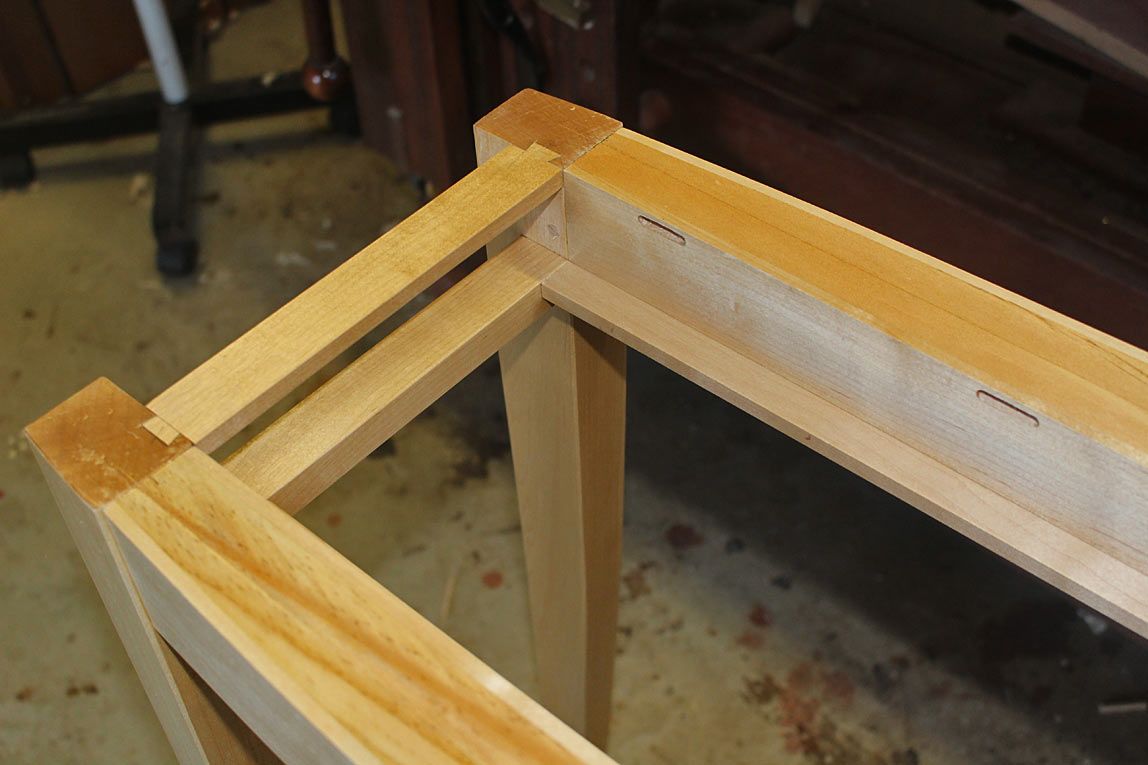
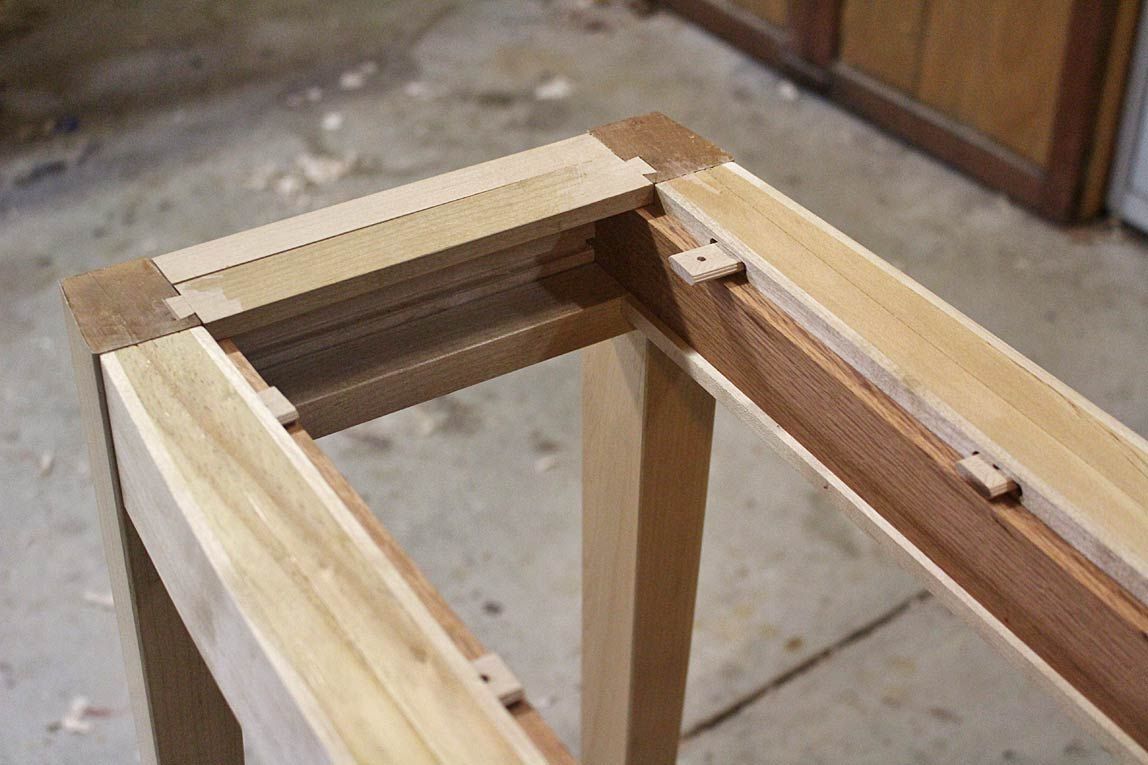
This is where we finished last time - the fitting of legs to the apron ...
I had a day in the workshop, and the following is a summary of the work completed today.
The aim was to make and fit the end rails for the table. I decided to use sliding dovetails rather than mortice-and-tenons: There was little room to add a tenon as much of the space in the legs was taken up with large tenons from the aprons (although working with the 1/3 Rule). A sliding dovetail would provide a compact joint.
A few hours were first spent aligning the aprons and legs. The legs had been cut from the centre of a board, to obtain the best grain arrangement. As a result, there were no registration sides. A degree here-or-there difference in the legs threw off their alignment. Tweaking them into parallel took some time.
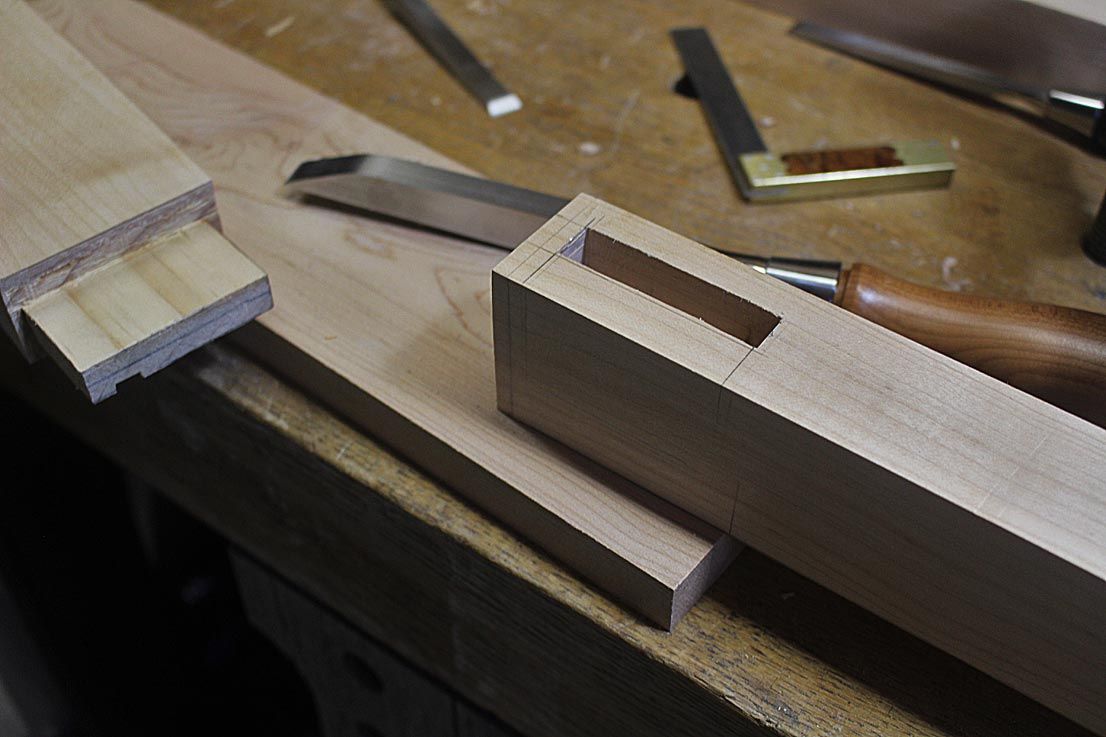
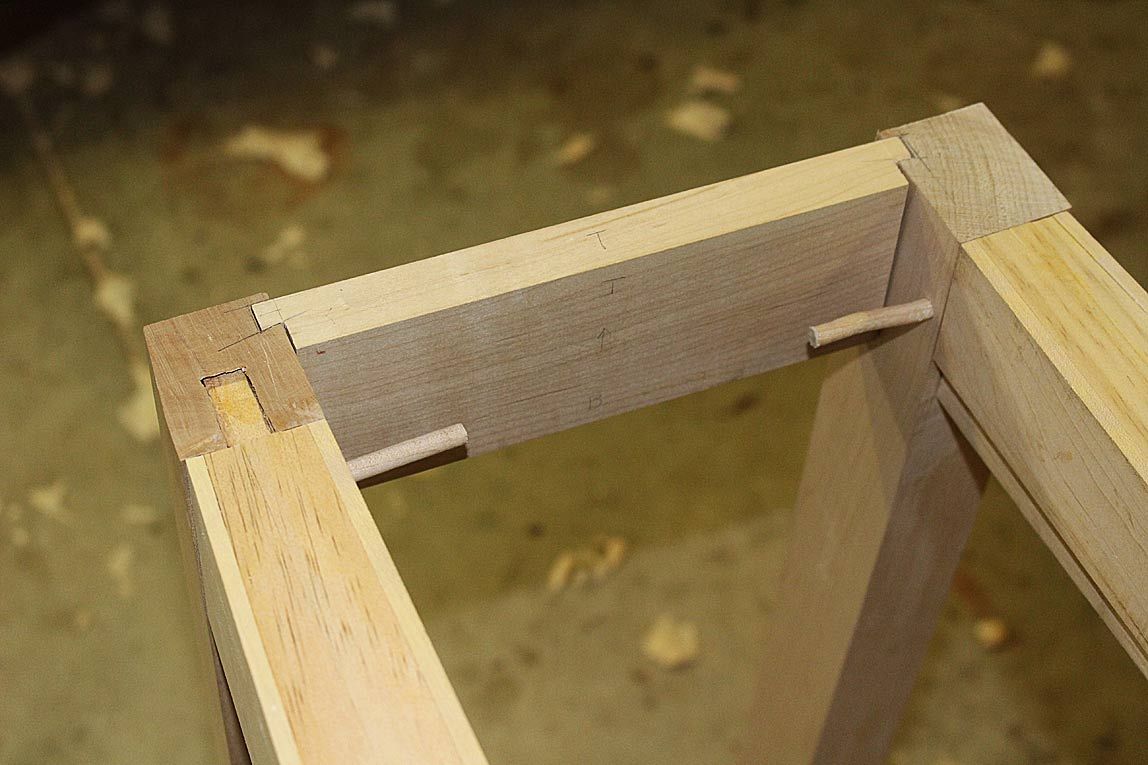
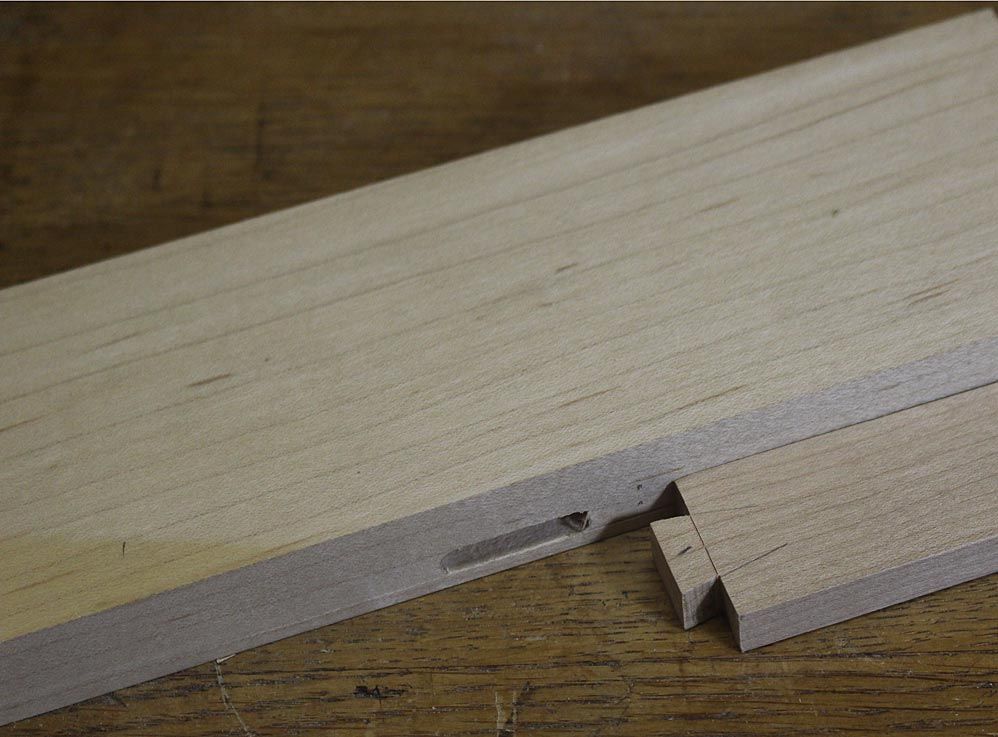
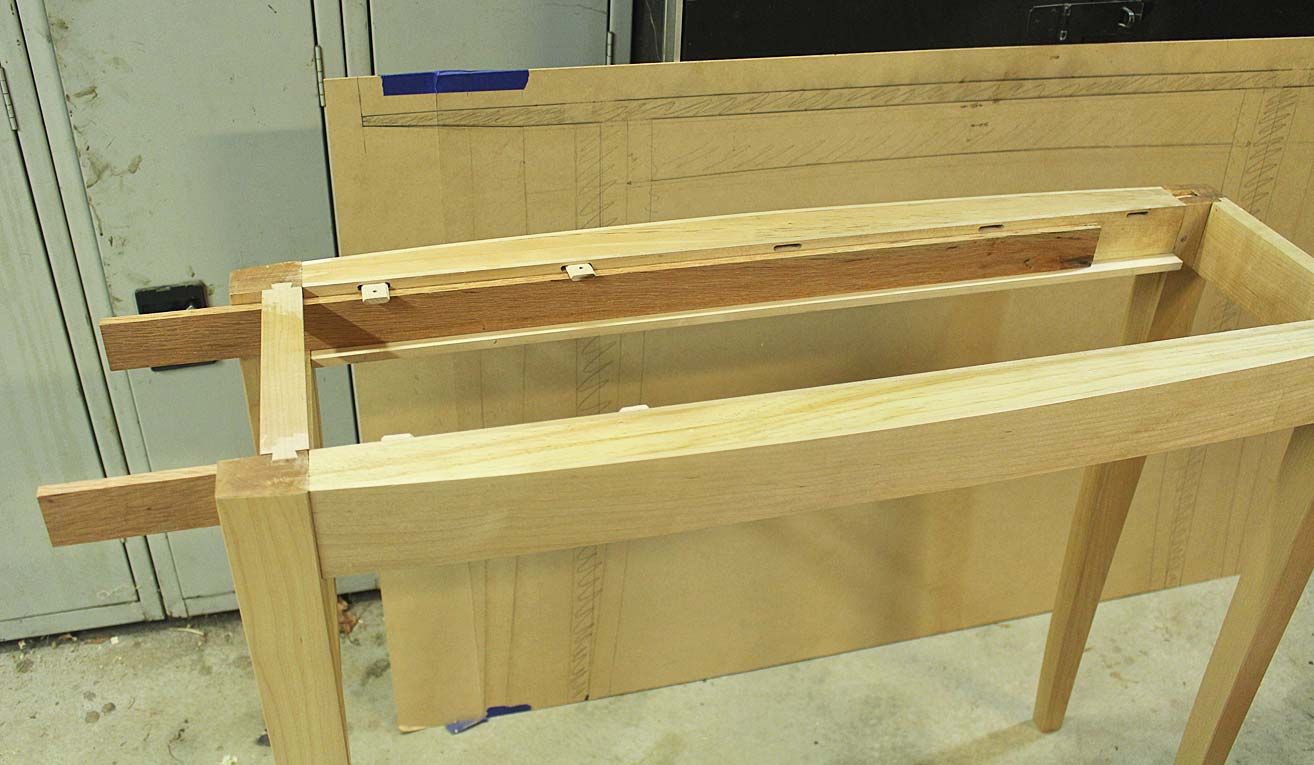
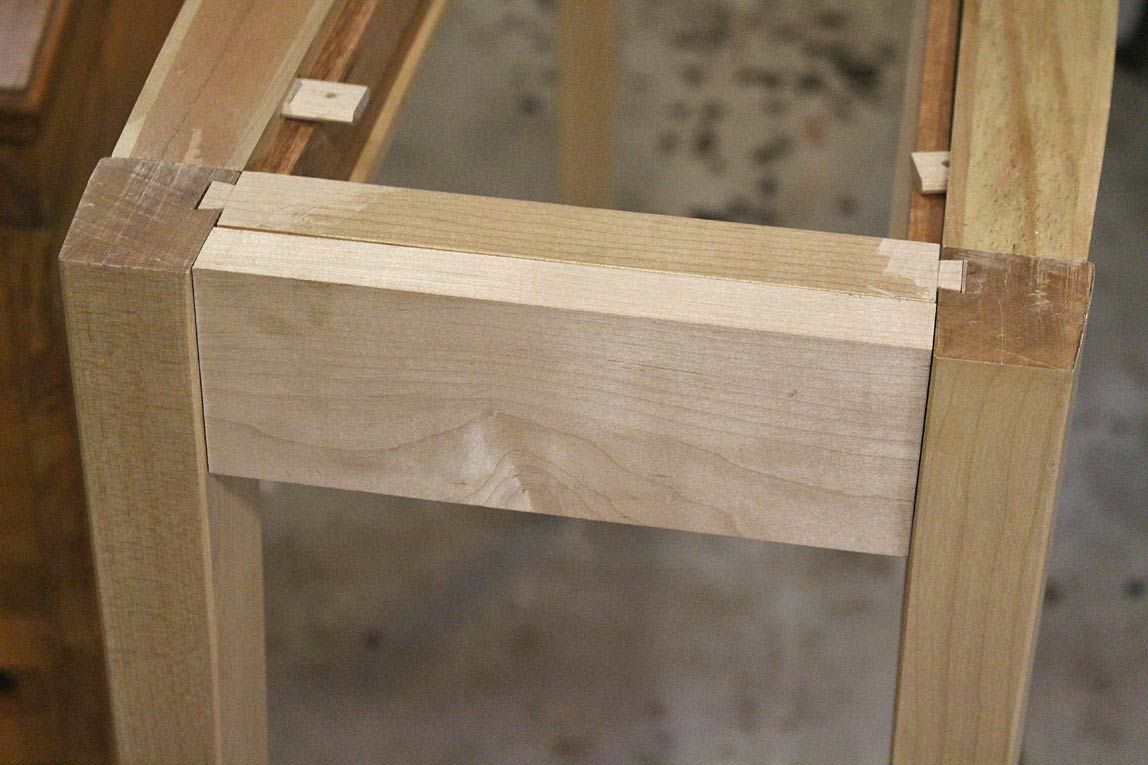
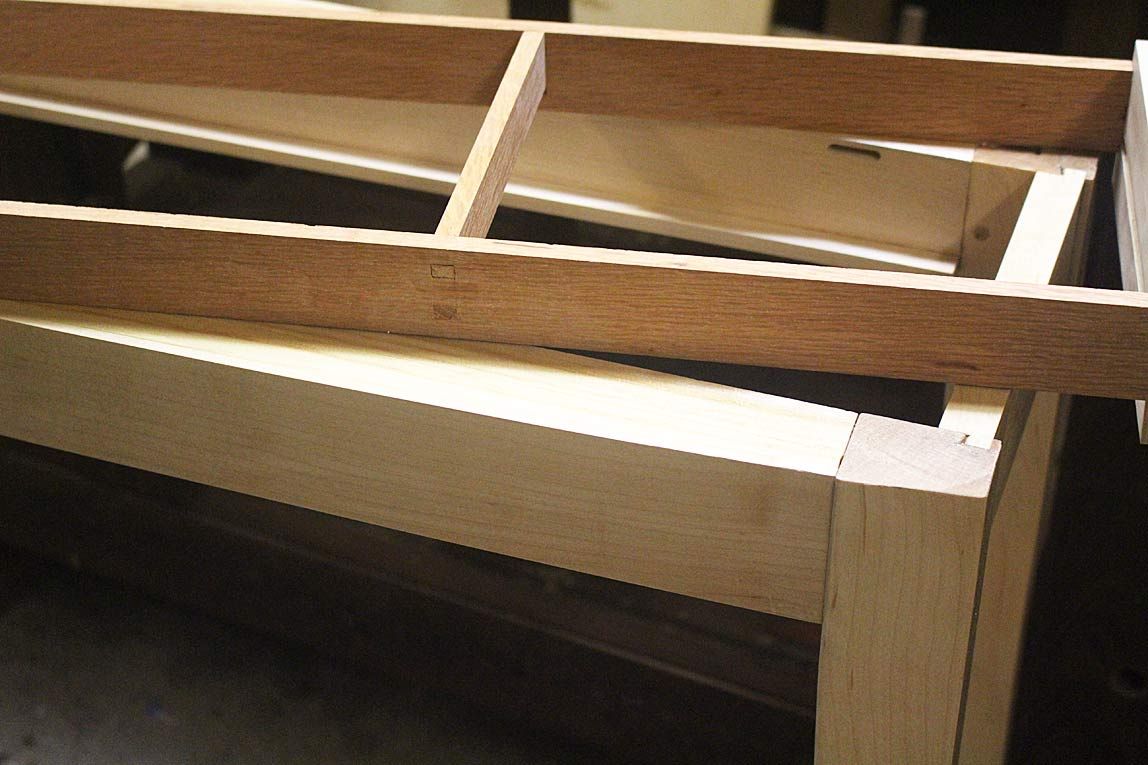
The ends of the table are different. On one side is a solid stretcher. At the other end are top- and lower rails for a drawer. These are below along with the drawer face, which will resemble a stretcher once completed (it is to be a hidden drawer, disguised as a stretcher) ...
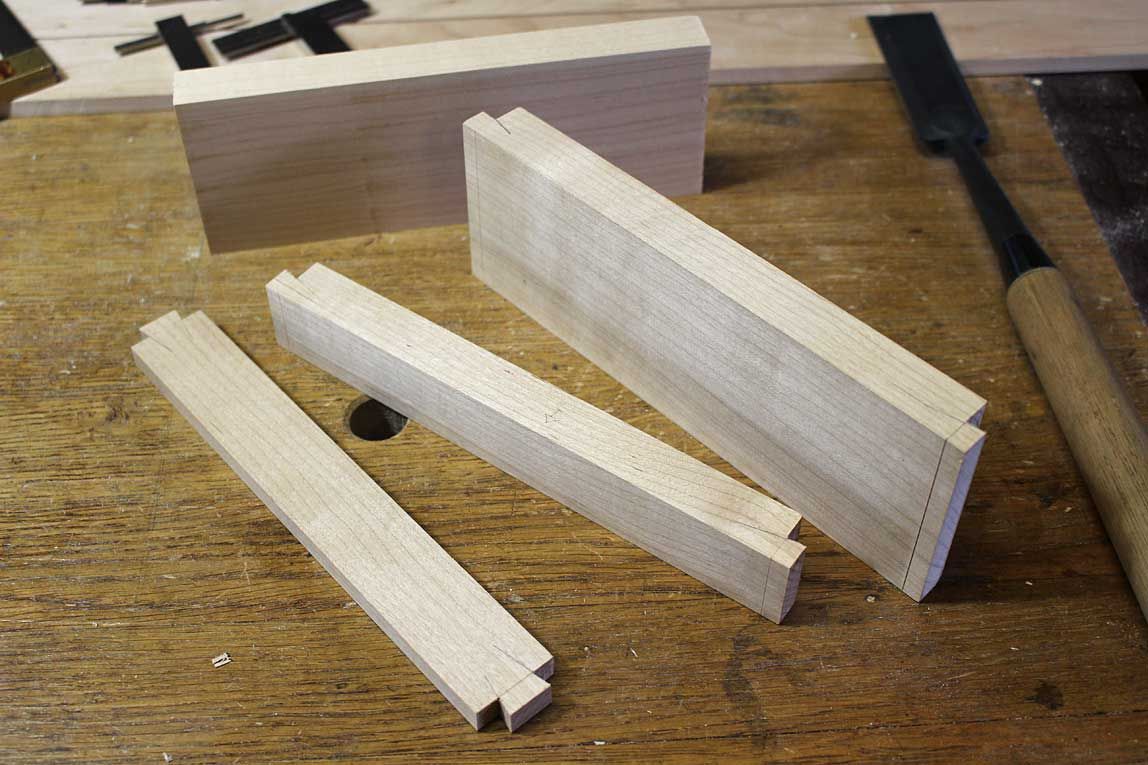
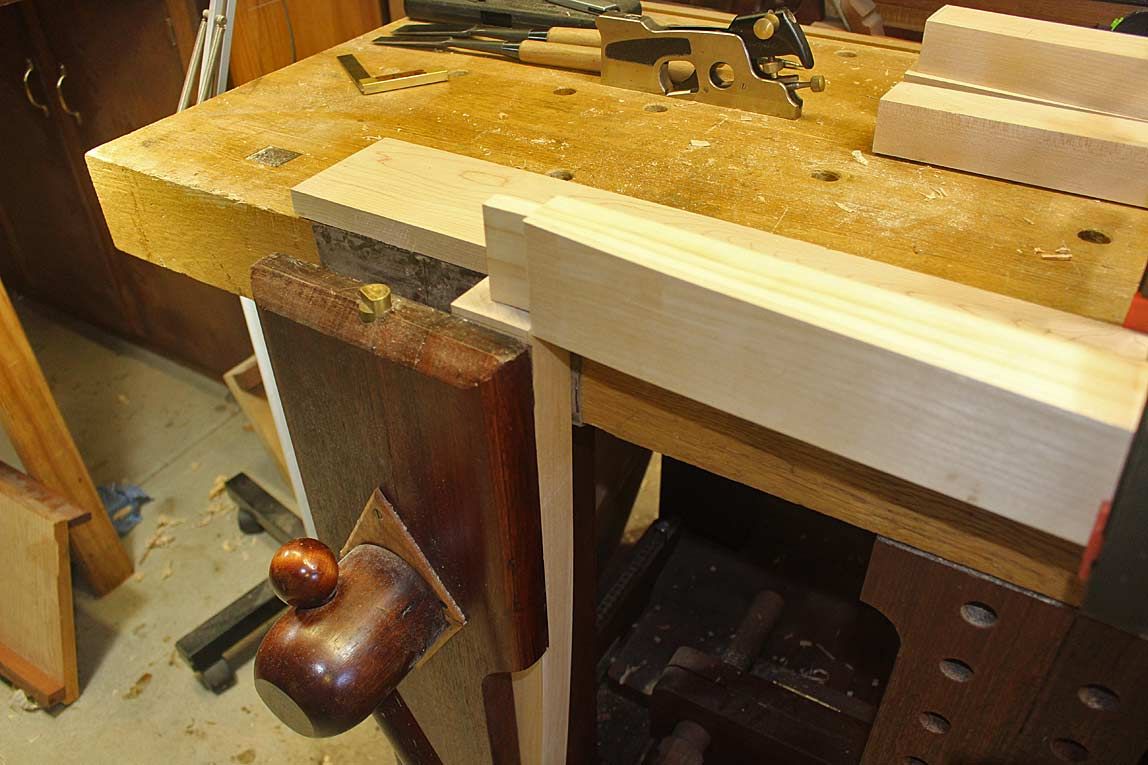
The rails went in this end ...
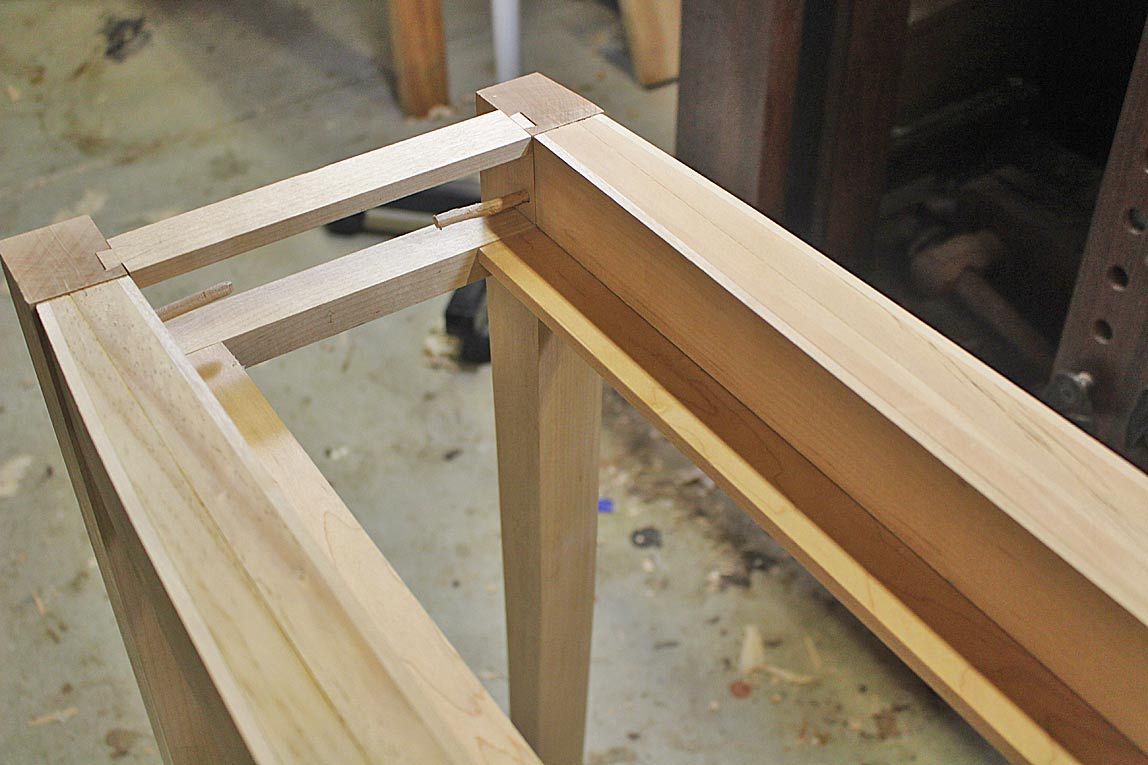
All is loosely fitted for these photos. Drawbore pegs lock the legs to the apron. The lower rail is actually locked by the apron ...
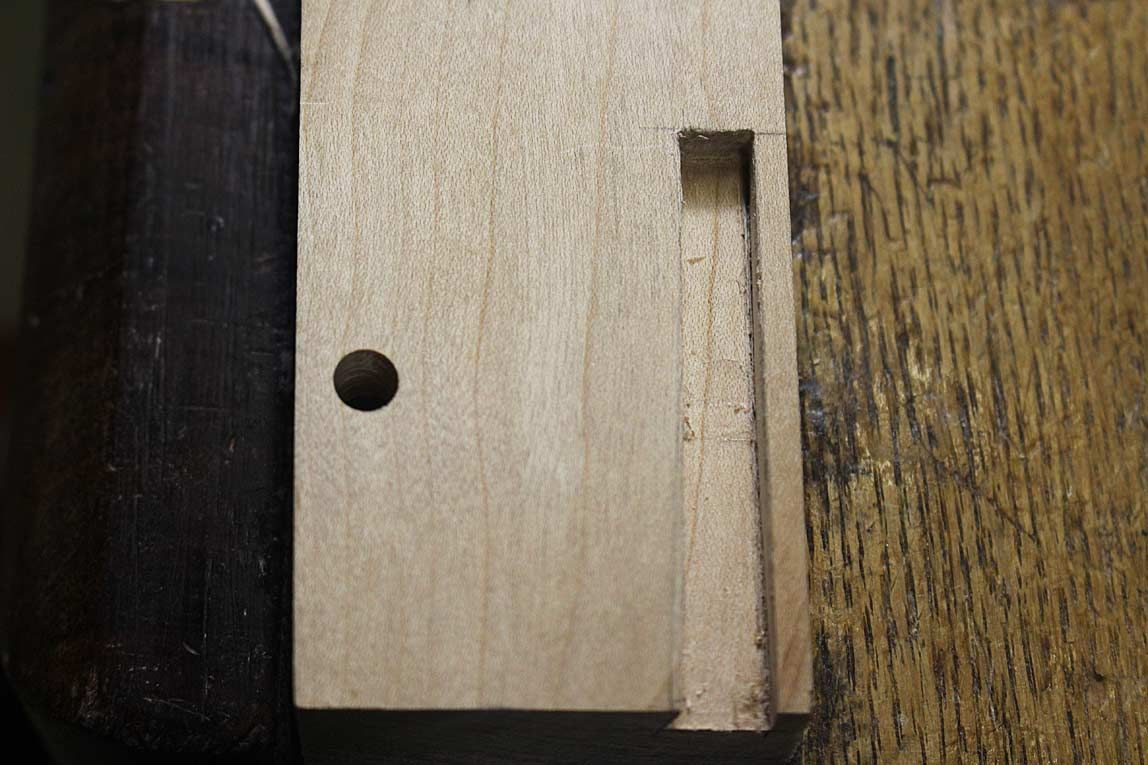
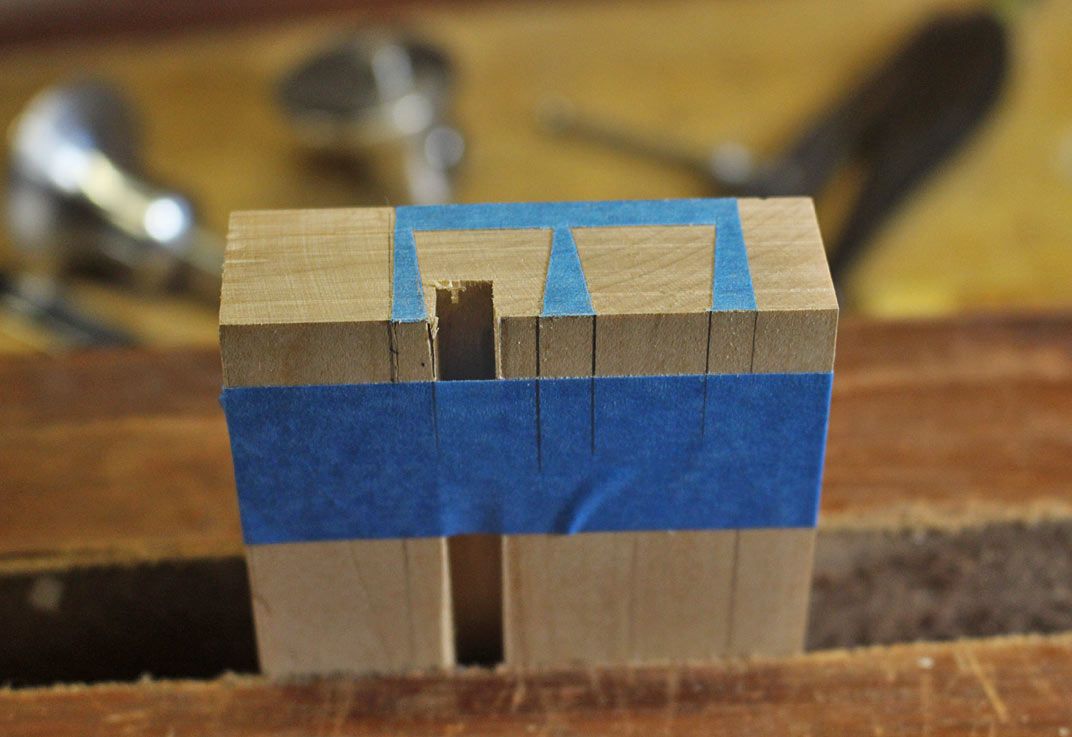
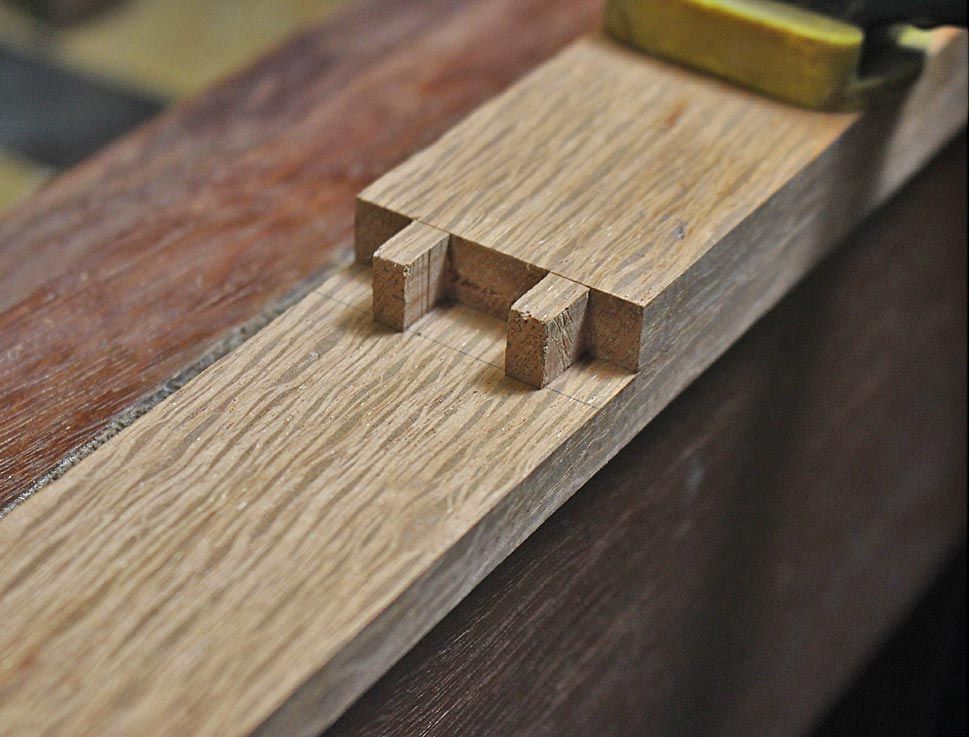
There is nothing special about the sliding dovetail on the lower rails. They are short and, therefore, were left parallel ..

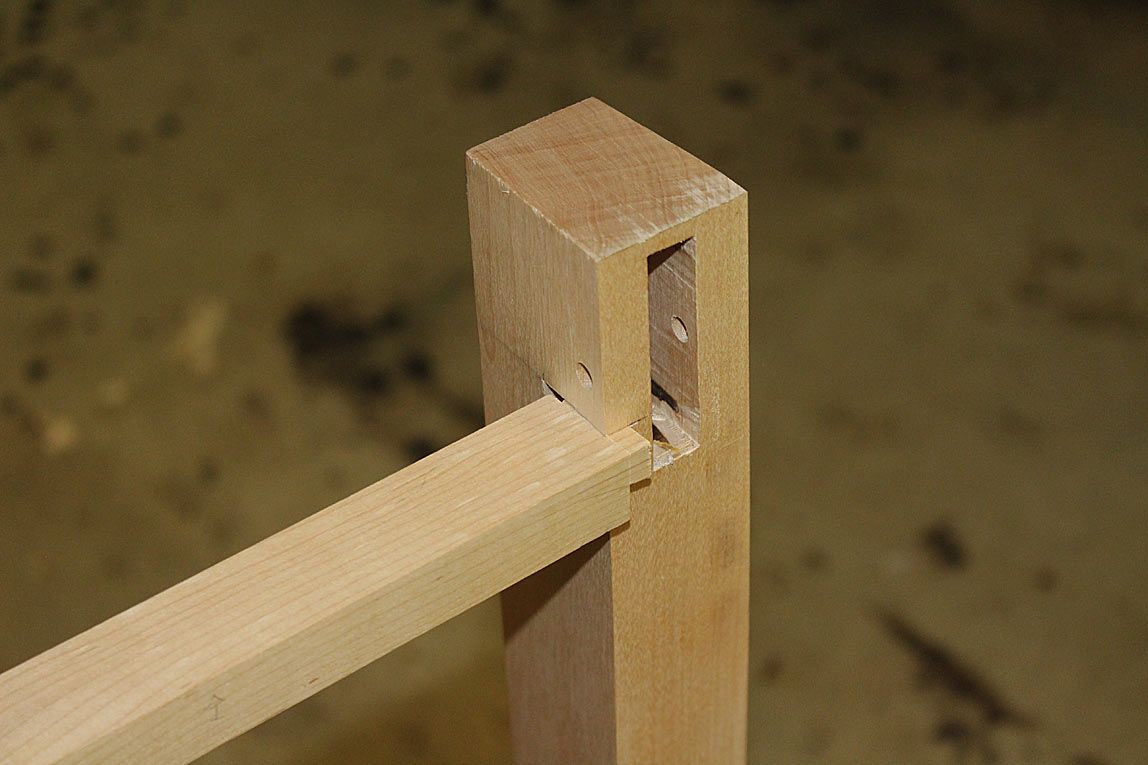
The top rail is simply dovetailed in ...
The top rail is 10mm high and the lower rail is 20mm high. This leaves 39mm for a drawer. No, it is not going to be high! Still, it is part of the fun, and no doubt will be a interesting talking point and find a use.
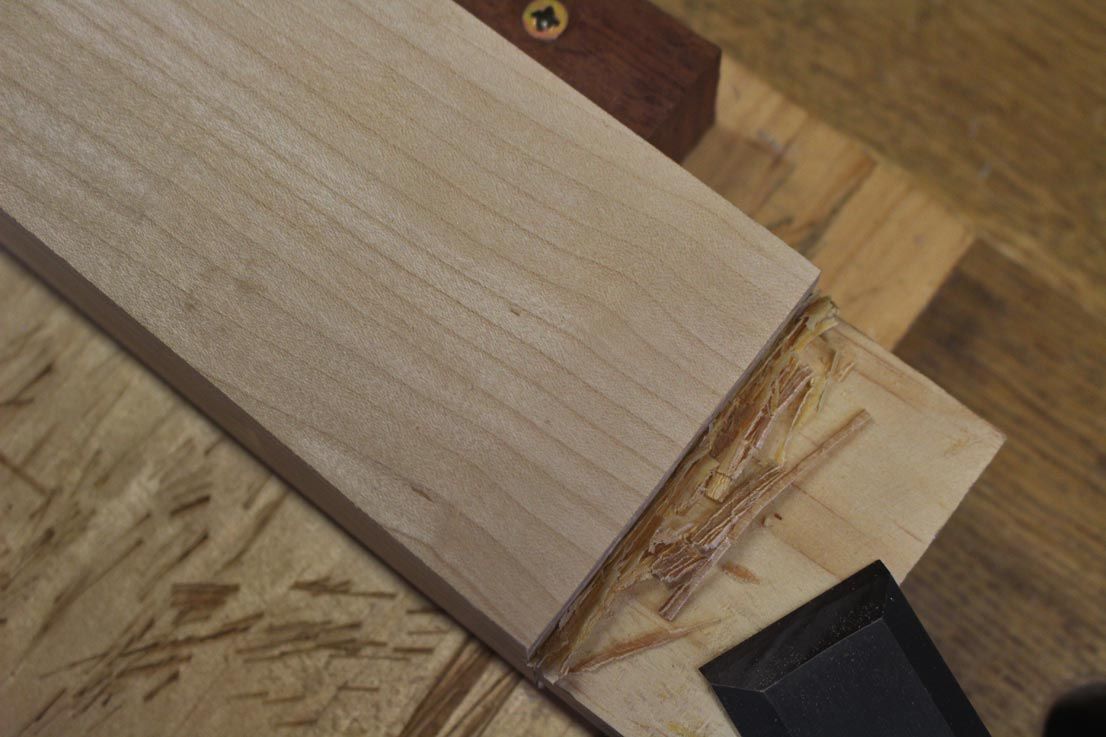
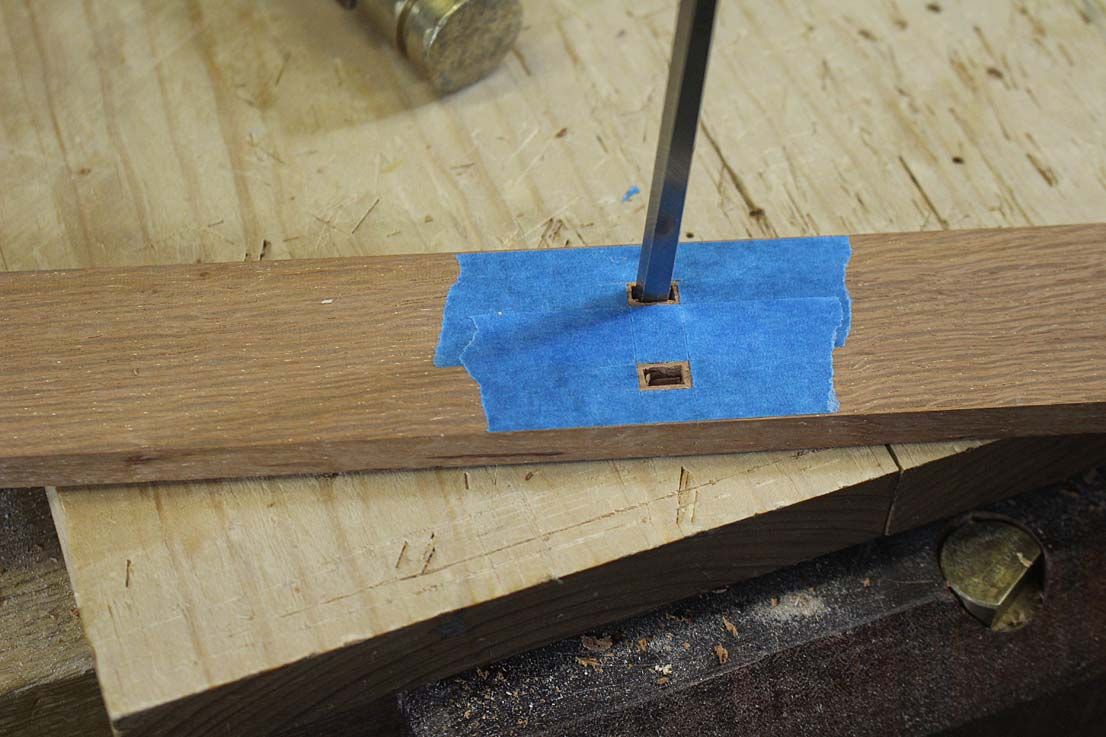
At the other end of the table is a solid stretcher. If you look at the left side leg, you will notice that the top of the mortice has broken out. This was caused by attempts to unstick a peg - which I thought was tapped in lightly, but broke off when I tried to twist it out (damn!). After this, I kept it all loose.
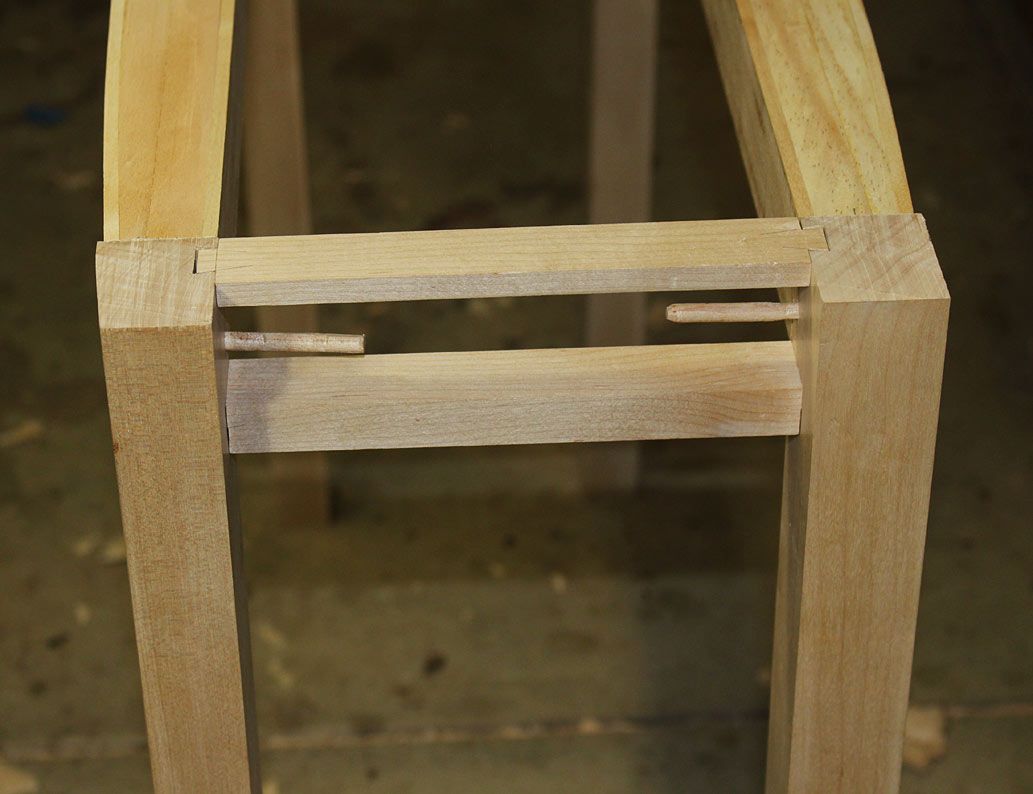
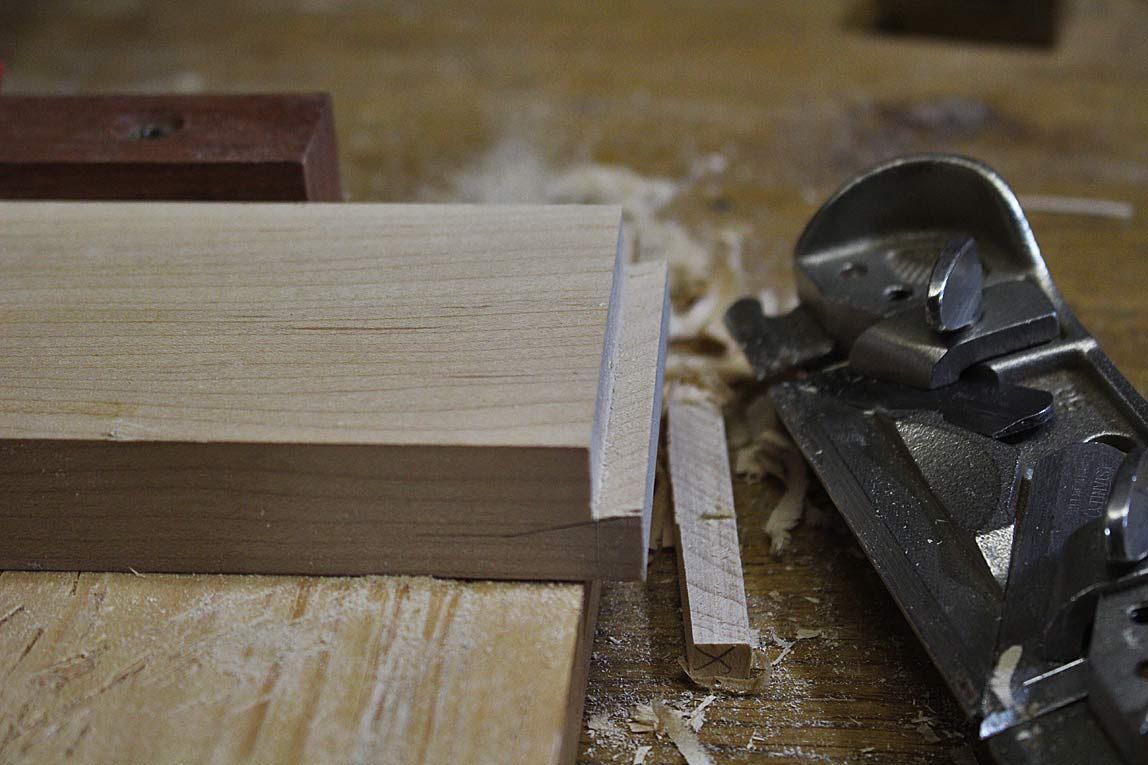
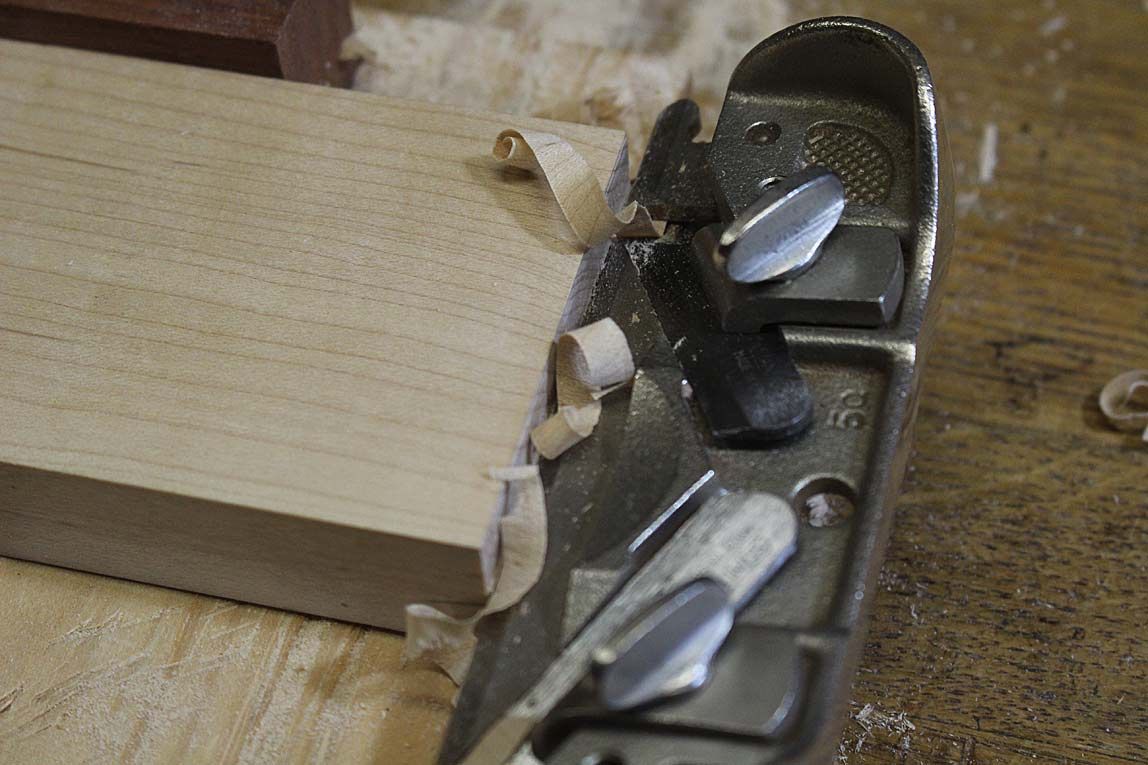
This stretcher has a tapered sliding dovetail at each side ...


All of the sockets were marked, sawn and chiselled.
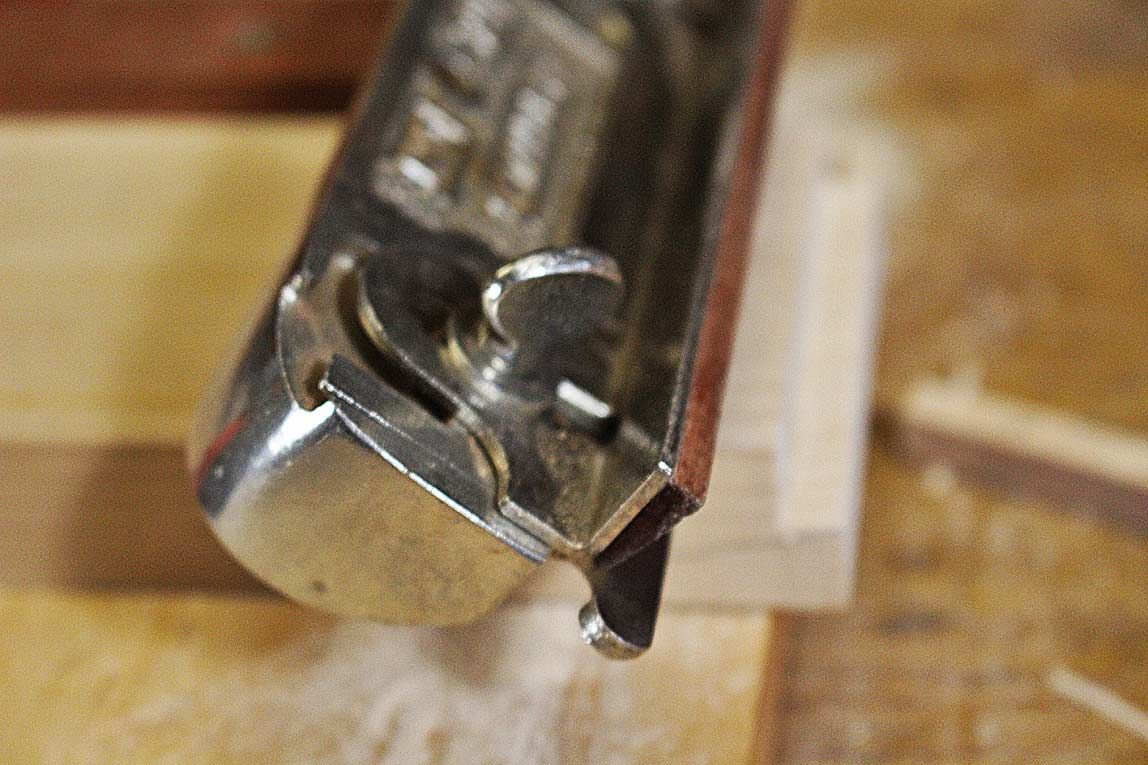
The dovetails were planed with a modified Stanley #79 side rabbet plane. The modification involved an angled fence ...
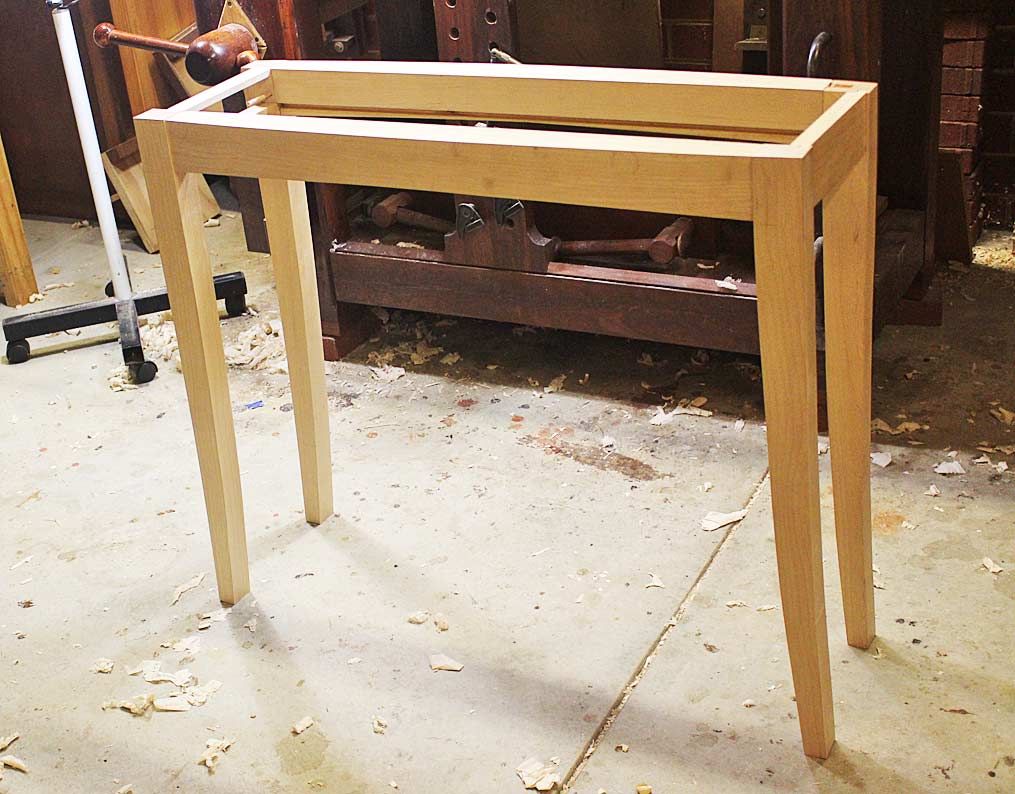
Finally, this is where I am up to with the sofa table. The front legs need to be rounded, and all the legs are yet to be tapered on the insides. There is clean up to do, a drawer to build, and the tabletop to resaw and shape.
Regards from Perth
DerekVisit www.inthewoodshop.com for tutorials on constructing handtools, handtool reviews, and my trials and tribulations with furniture builds.
-
13th June 2017, 08:56 AM #23
Member
- Join Date
- Mar 2017
- Location
- Victoria
- Posts
- 73
Awesome, thanks for posting, very informative.
-
13th June 2017, 07:55 PM #24
GOLD MEMBER
- Join Date
- Mar 2007
- Location
- Adelaide
- Posts
- 2,139
I agree, always look forward to Derek's threads they are so well constructed just like the woodworking. Originally Posted by Twist
Mike
"Working to a rigidly defined method of doubt and uncertainty"
-
20th June 2017, 01:24 AM #25
Be inspired. Be creative. Be bold.
- Join Date
- Apr 2001
- Location
- Perth
- Posts
- 10,826
The bevel lies in the details: Sofa Table IV
Earlier posts on the Sofa Table build may be found here:
http://www.inthewoodshop.com/Furnitu...bleAprons.html
http://www.inthewoodshop.com/Furnitu...able-Legs.html
http://www.inthewoodshop.com/Furnitu...IEndRails.html
We are at the stage where the legs are to be completed and the base will be glued up.
Now Bill will nag me to death if I do not provide more detail this time around, so blame him for the extra photos.
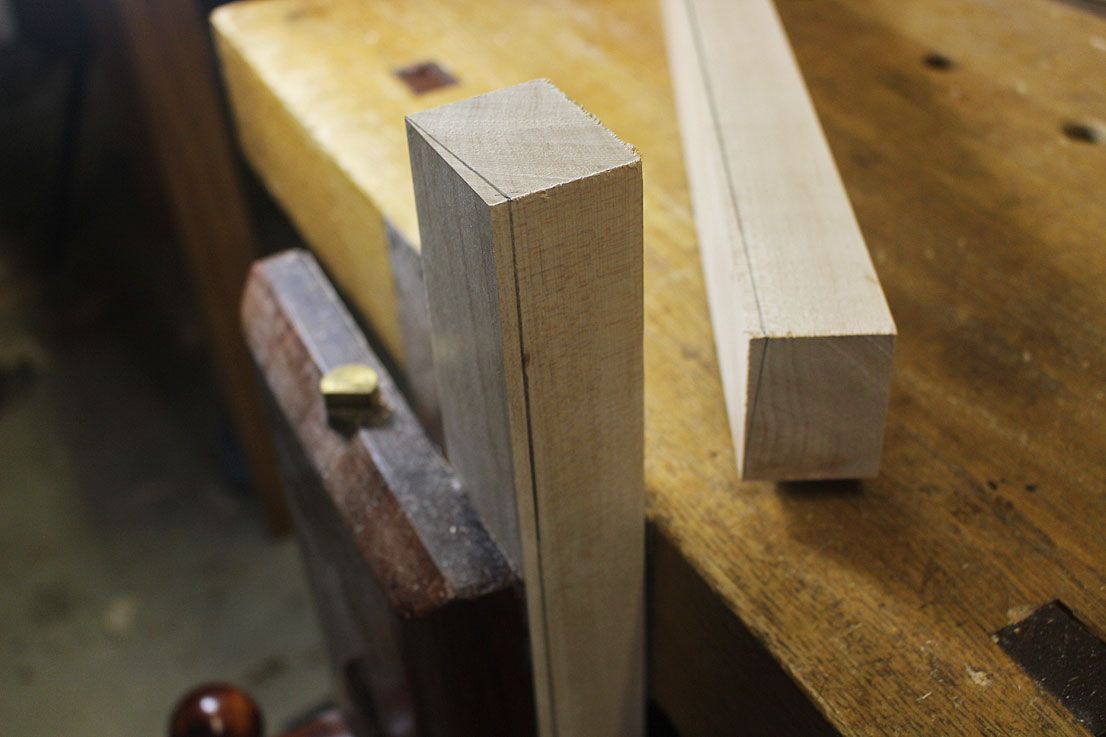
The first item on the agenda was to add a curve to the front of the legs that paralleled the table top bow, and continued that from the apron. Two legs had been completed near the beginning of the build. This was premature as I lost a parallel side when the legs were required to be planed on the bench or held in a vise. As a result, the other two legs were left until this stage.
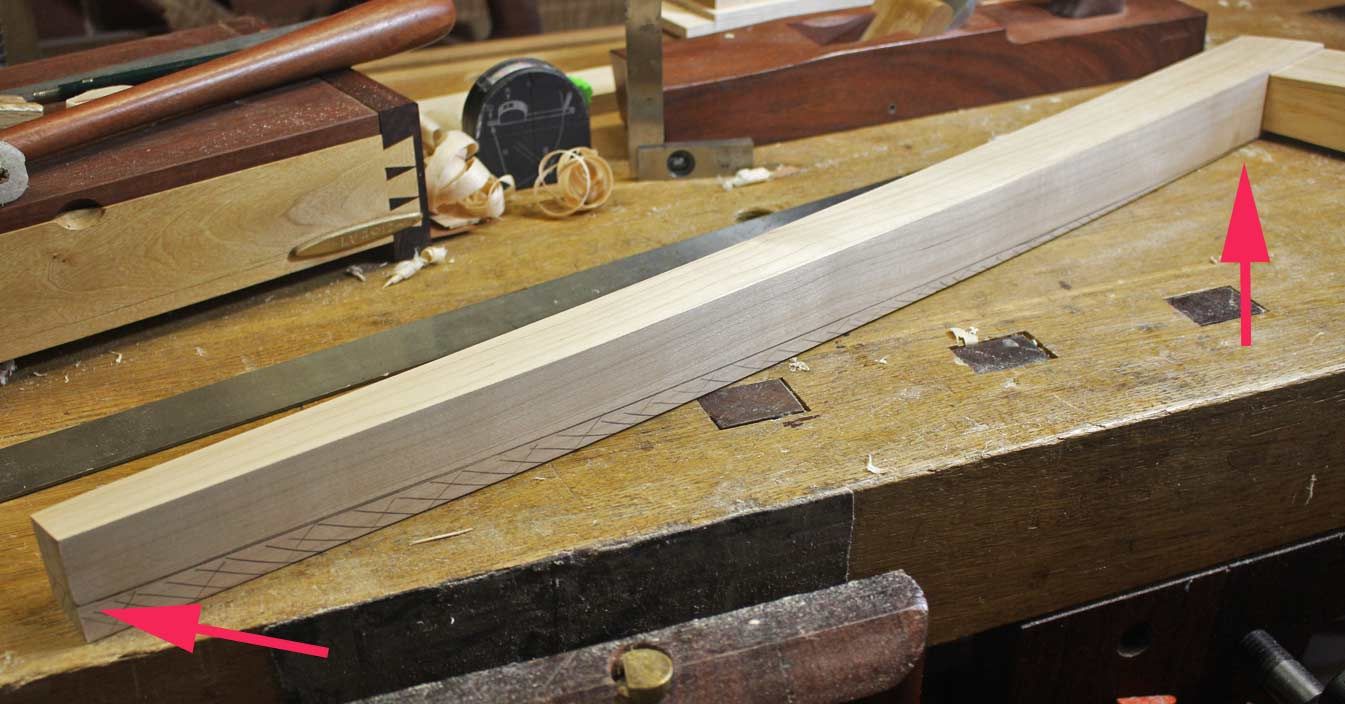
Here is an unshaped leg (on the left) and a shaped leg (on the right) ..
The curve was drawn in using a template of the top ...
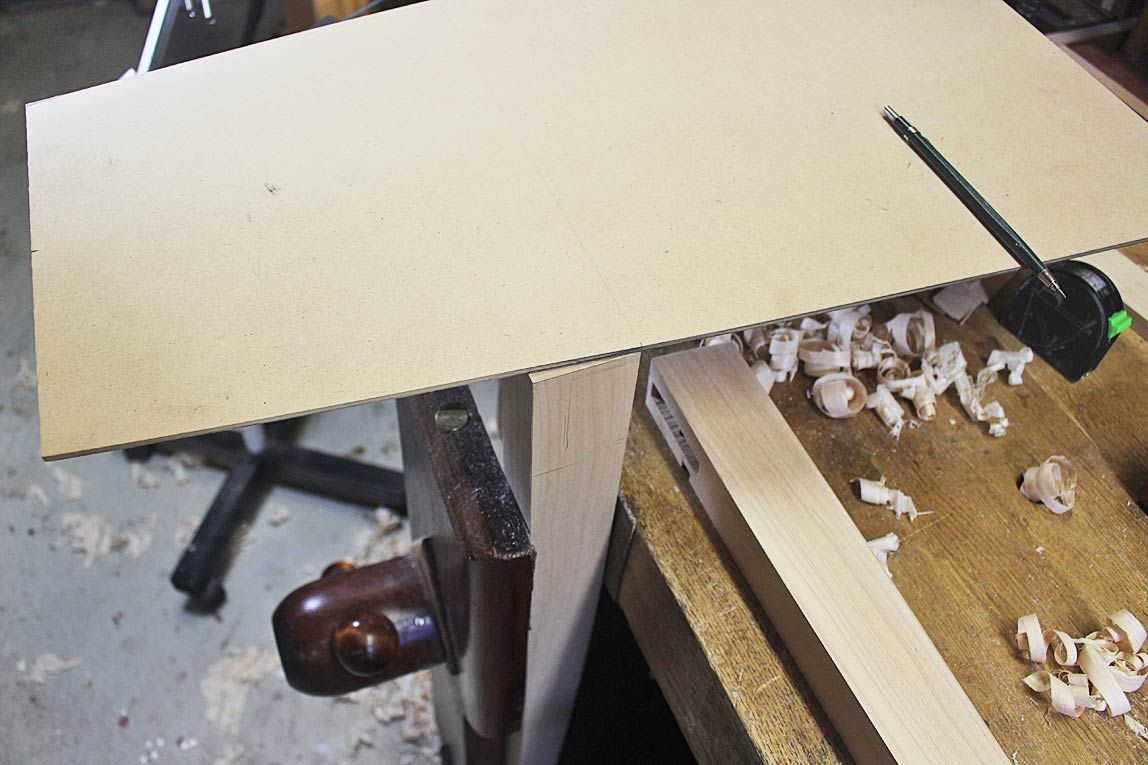
The curve was continued down the leg. In all, it removed 5mm.
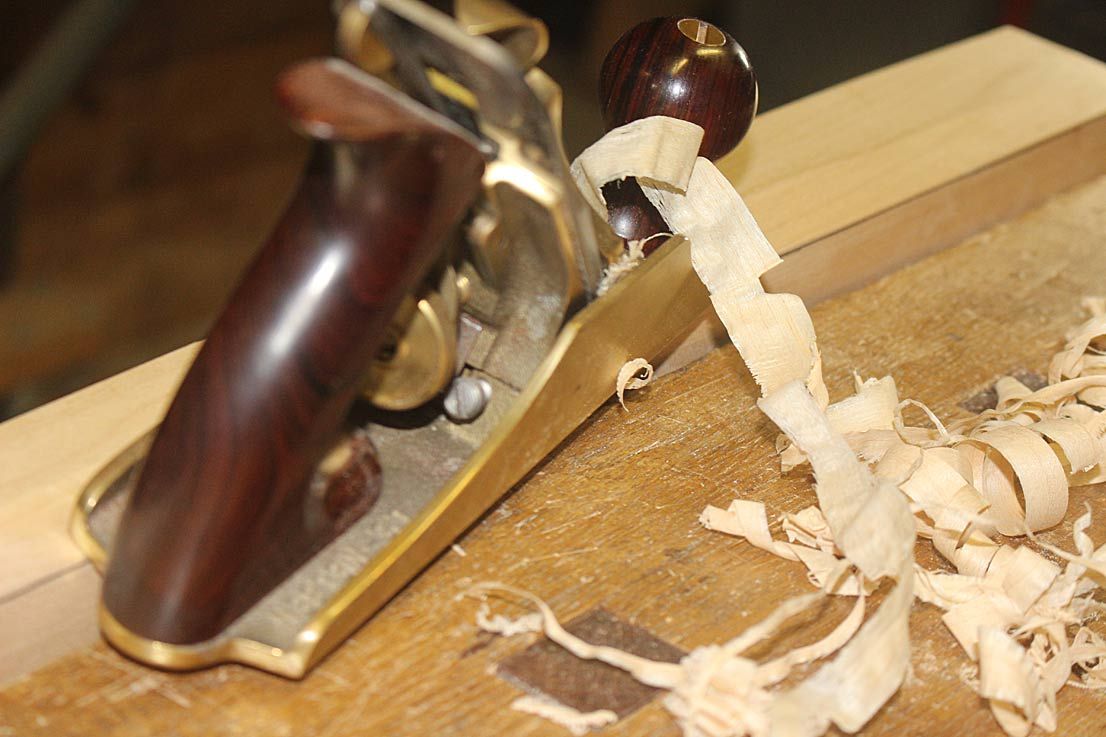
The waste was removed with a handplane.
Once the curves were added, the legs needed to be tapered on the inside. The aim here was to create the illusion that the legs were slightly splayed. They are, in fact, 90 degrees on the outside, since the added curve is constant down the legs.
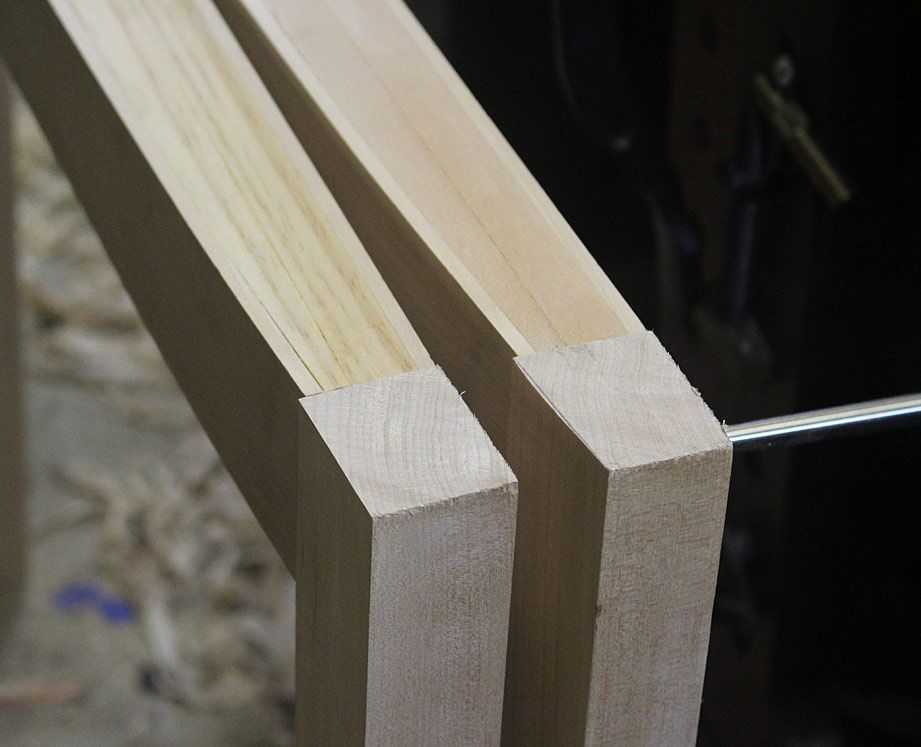
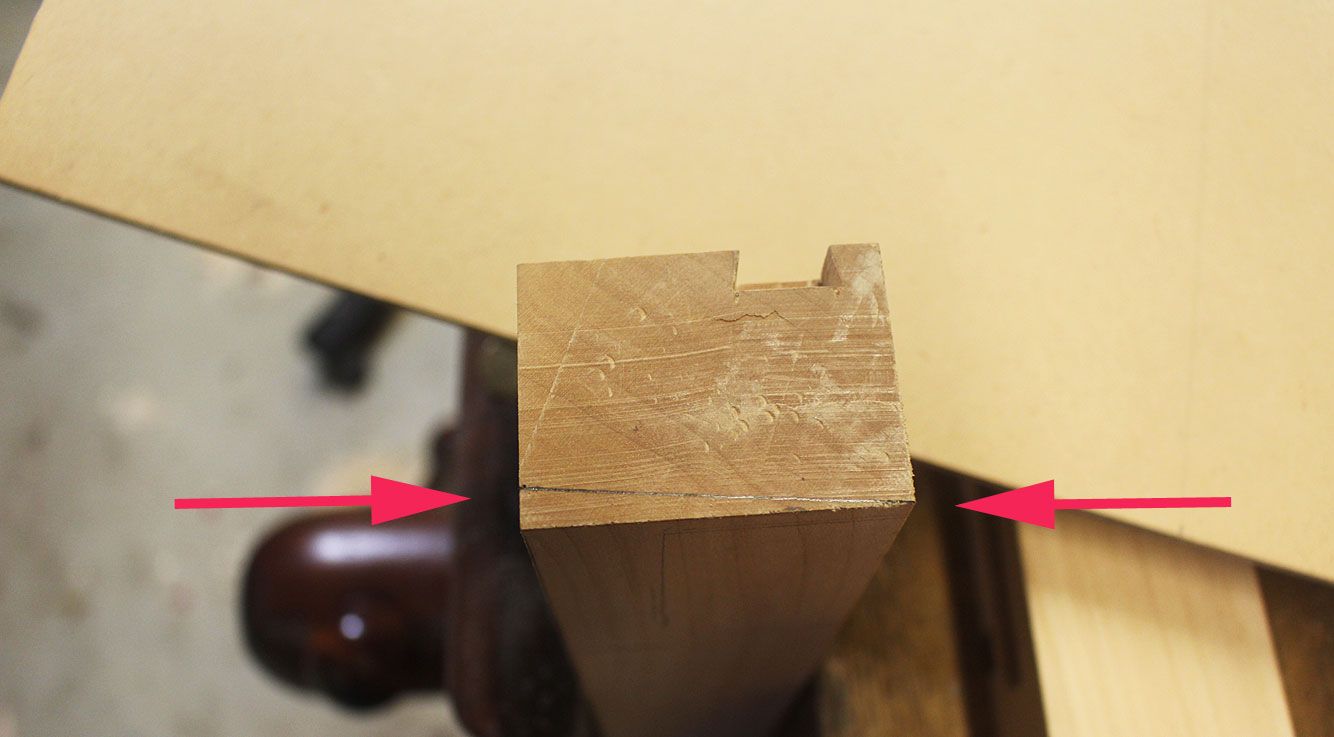
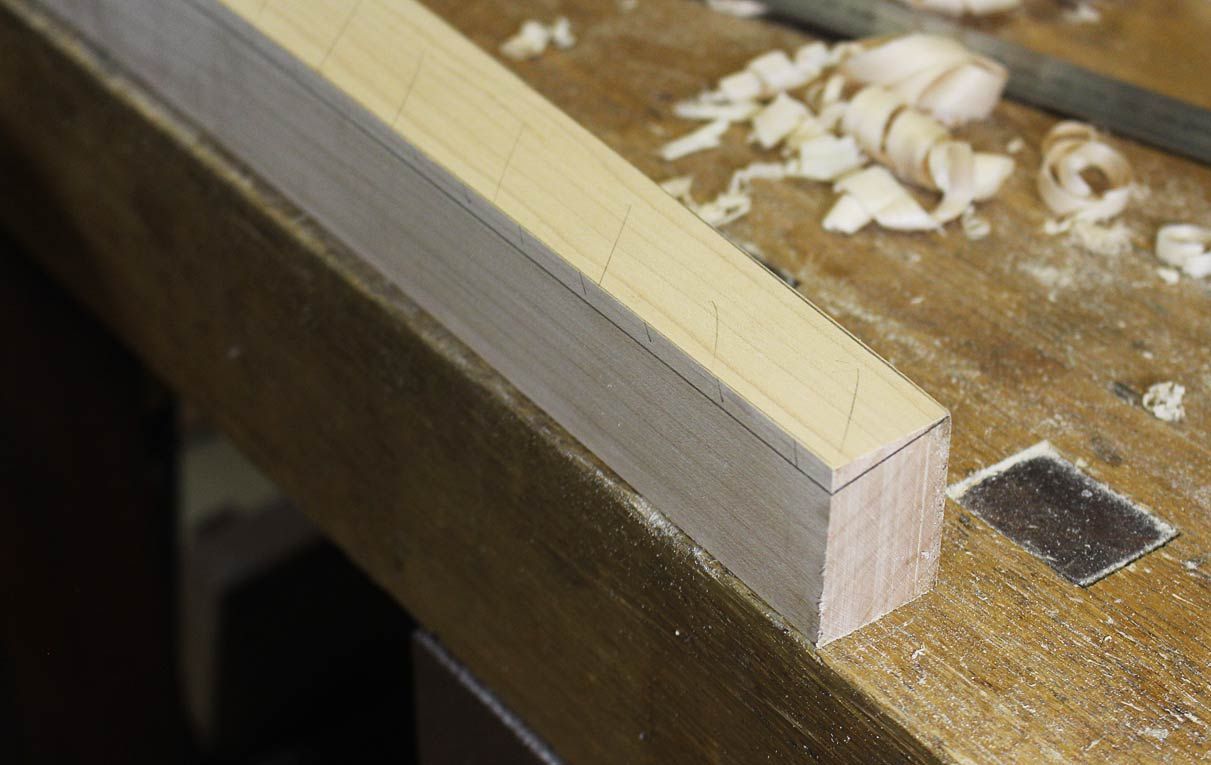
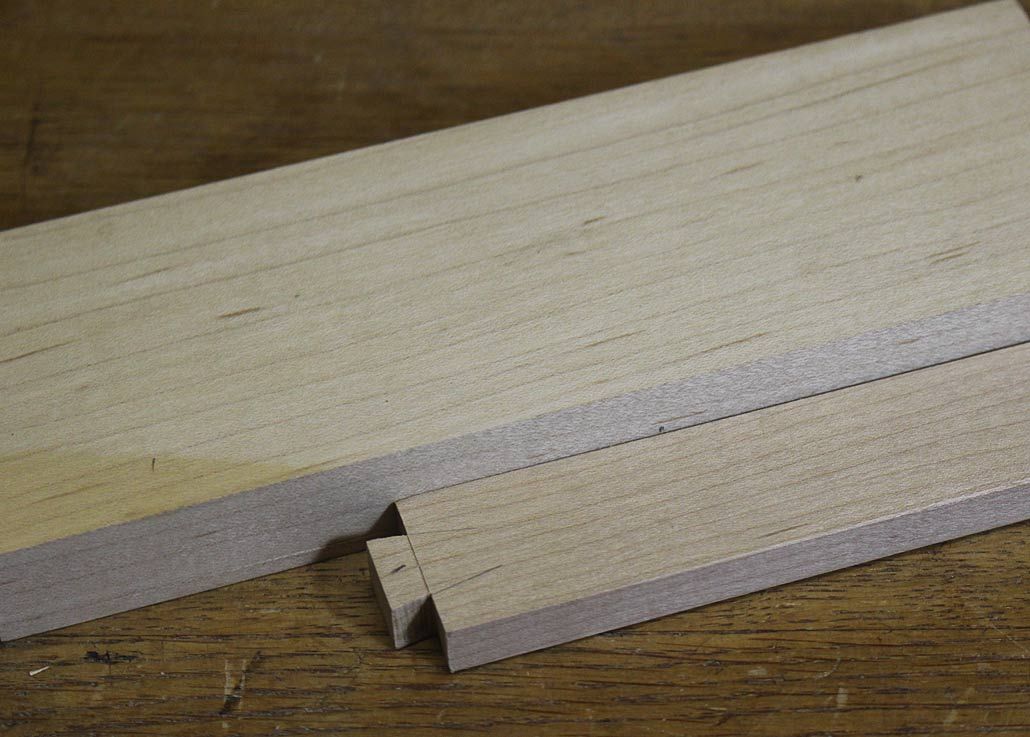
The width of the leg at this stage is 40mm. It will remain this width down to 5mm below the apron, and then taper to 25mm at the foot, thus ...
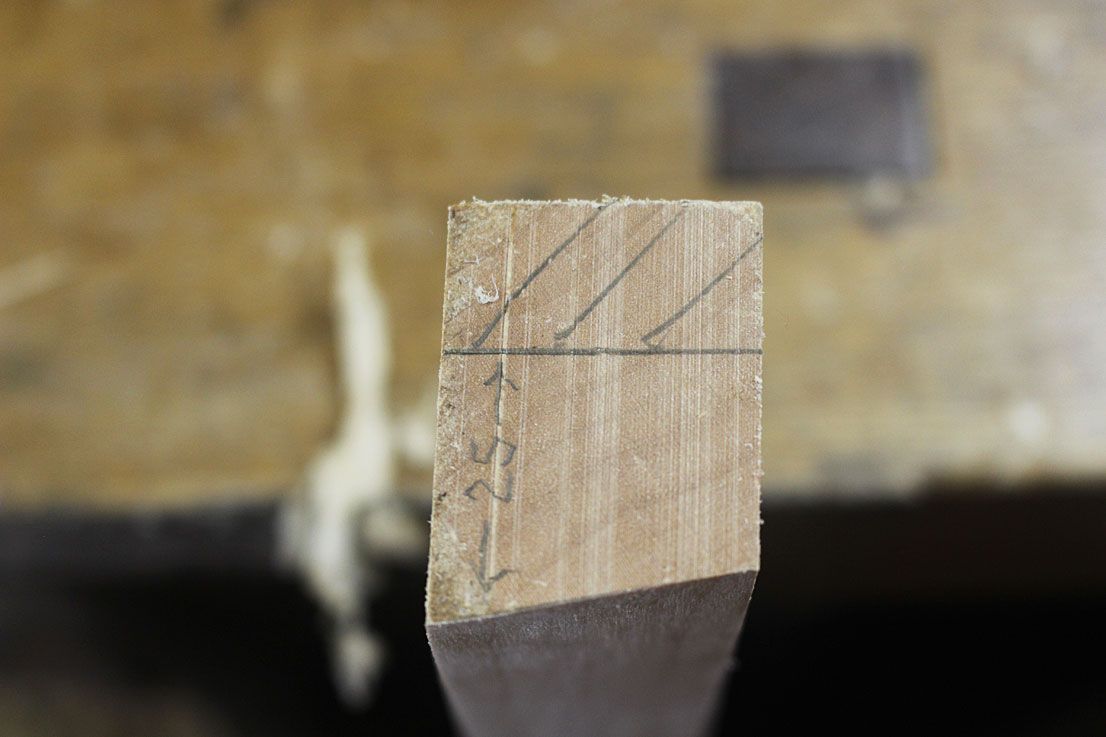
Here the bevel is drawn in and the line may be seen where it ends below the apron ...
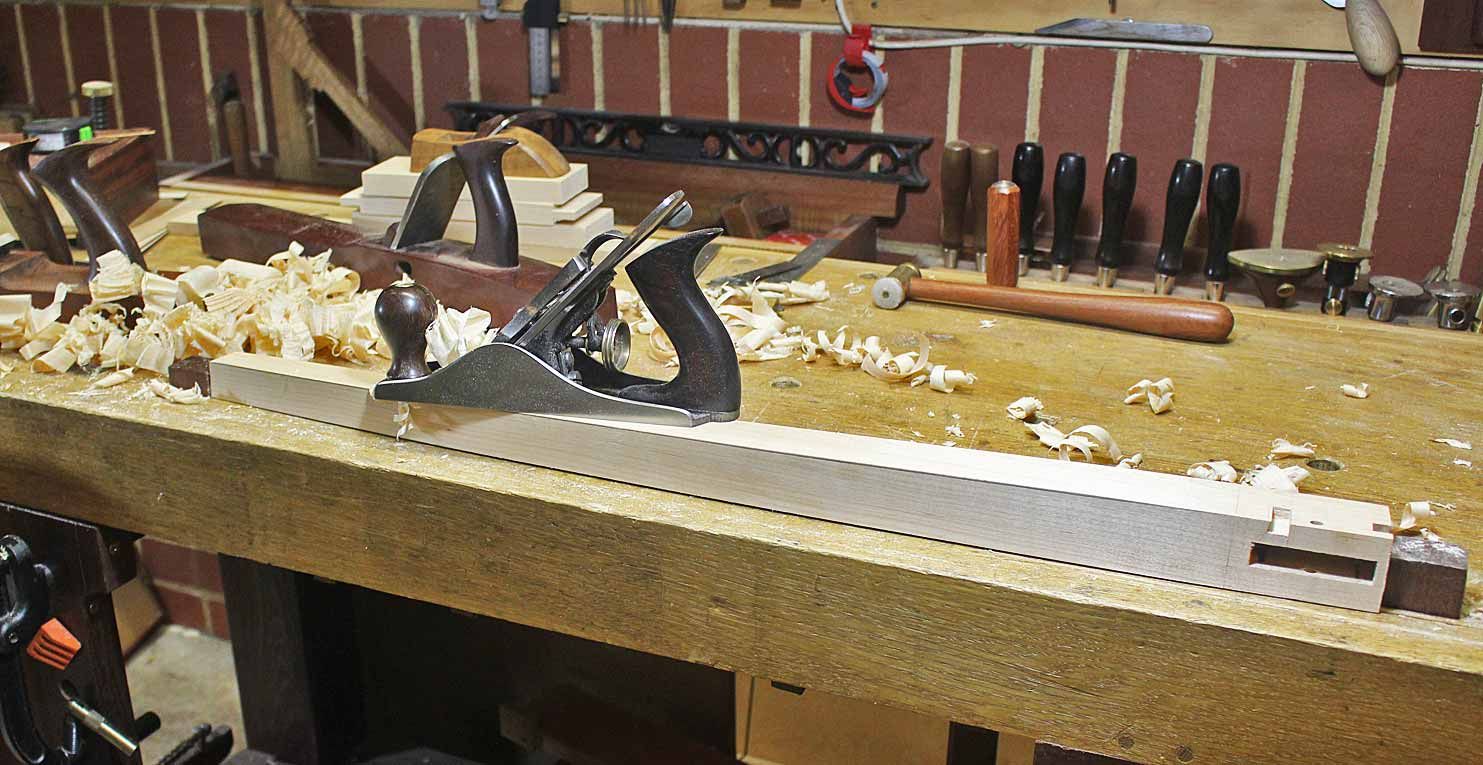
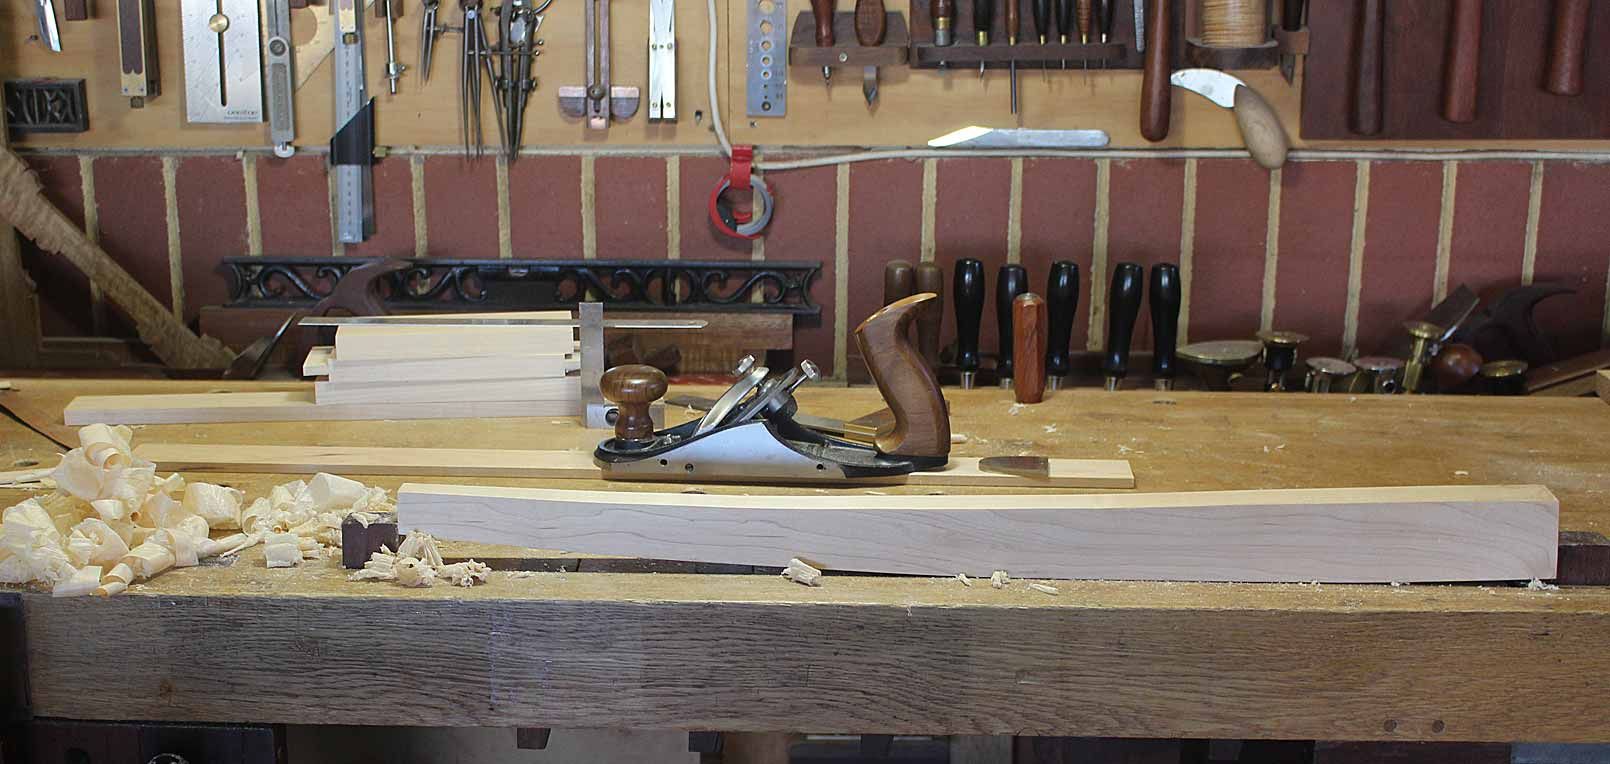
As with other waste removal, I found it easier to use shorter planes, first a jack and then a #3 than a long plane, such as a jointer ....
Once this was completed, the legs were essentially shaped, and the next task was to, firstly, smooth everything perfectly ...
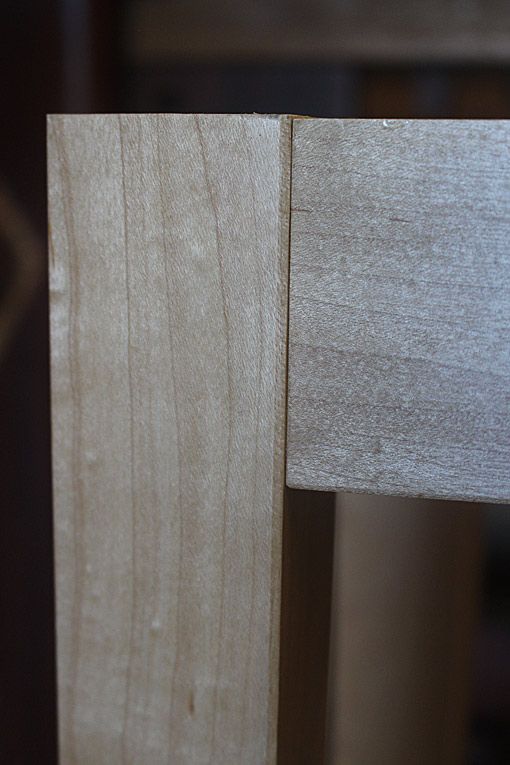
... and, secondly, to freehand a 2mm bevel to all edges (all sides of the legs and the lower edge of the apron) ...
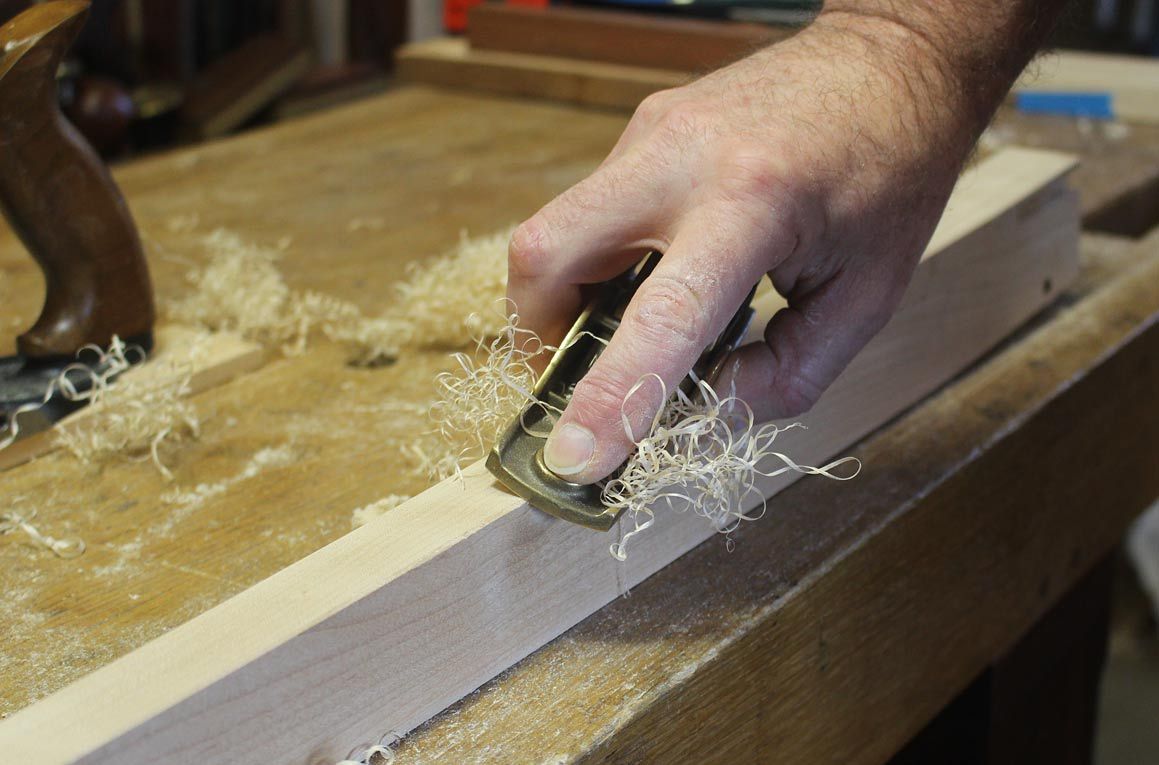
The reason for the 2mm bevel was that the shadow line juncture of the apron and legs is 2mm. The bevel on the legs will blend into the sides of the apron, thus ...
All parts were dissembled and finished in 2 coats of Ubeaut White Shellac. This is an unwaxed concentrated shellac (diluted 50:50 in denatured alcohol/methylated spirits) which adds the very lightest touch of amber to the pale Hard Maple. It brings out detail and seals the wood. Then 3 coats of General Finishes Satin water-based poly were wiped on-and-off. The GF provides a finish that will retain the pale colour of the wood, and avoid the yellowing that occurs with oil-based finishes. This is the process I used when finishing the Hard Maple doors and drawers in the recent kitchen built, and the sofa table is intended to be an associated piece.
The finishing process for the kitchen is here: http://www.inthewoodshop.com/Furnitu...20Rebuild.html
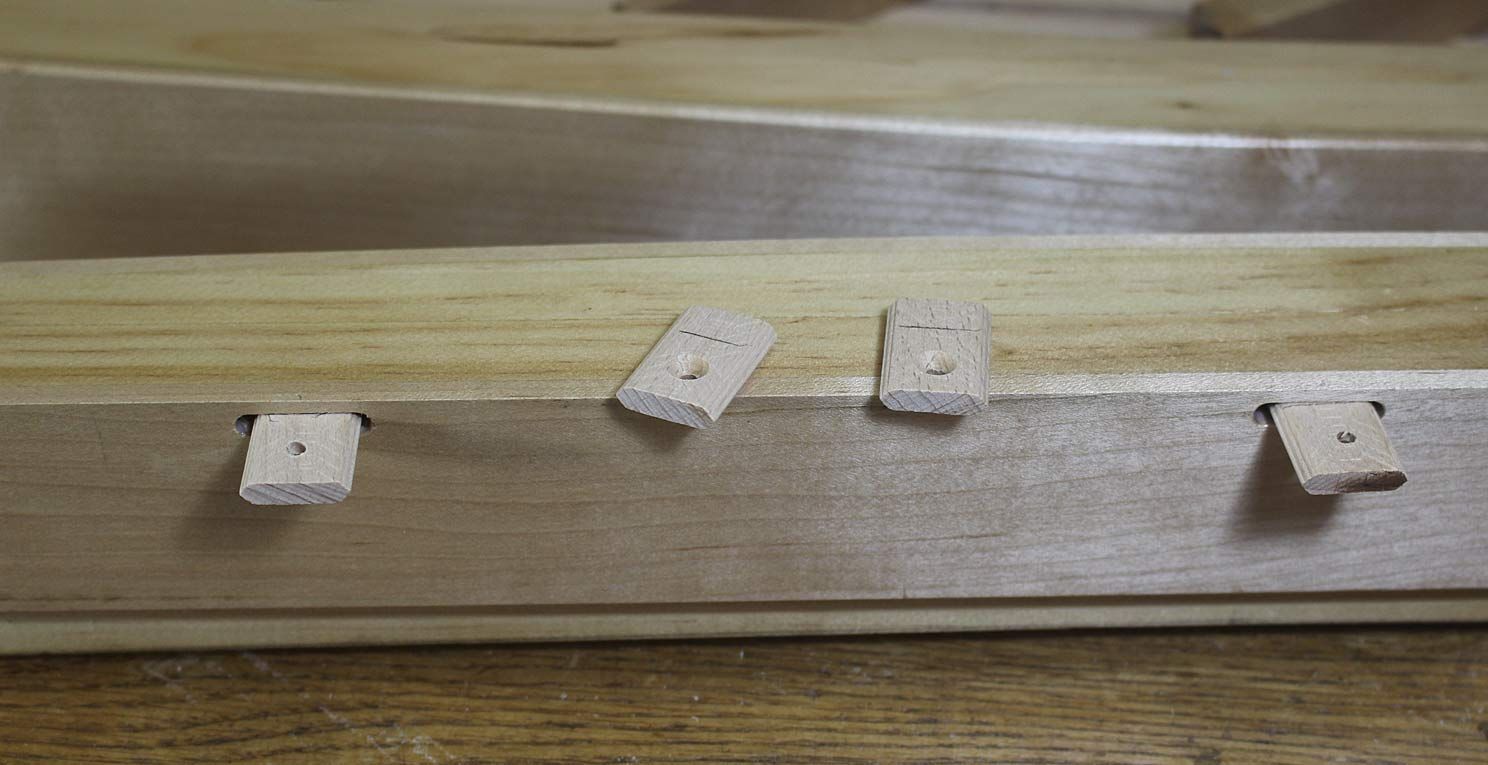
Before glueing up, it was necessary to add slots for buttons, to later fasten the top to the apron. The issue was this: the buttons needed to be less than 10mm in height, which was the thickness of the dovetailed rail for the drawer (the rail alongside a piece of scrap) ...
... otherwise the long drawer that was to run from the side of the table would catch on the buttons.
I decided to use my new Domino DF500 to cut 5mm slots that were placed 4mm below the surface, and then use 5mm dominos as buttons ...
All done! Finally, to the glue up, and ...
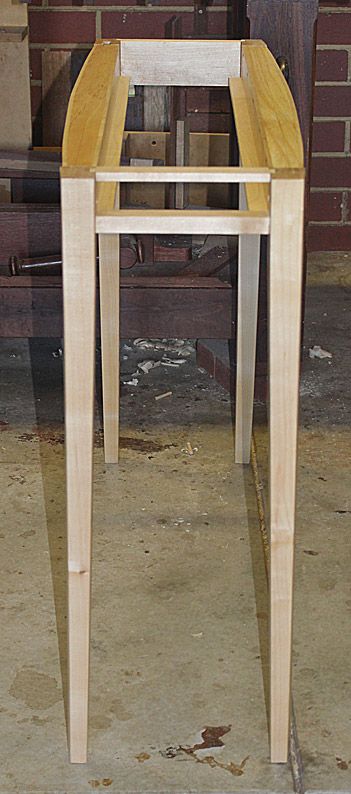
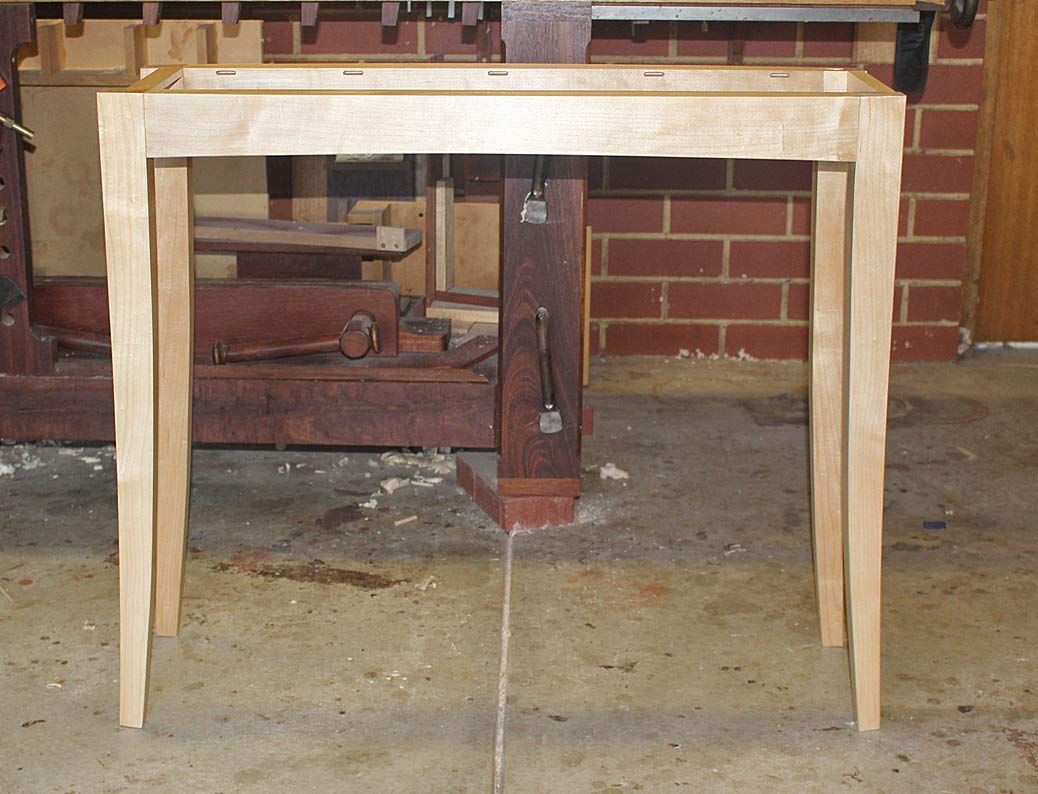
Here is a side view of the legs, showing the taper (and the continuous bow) ..
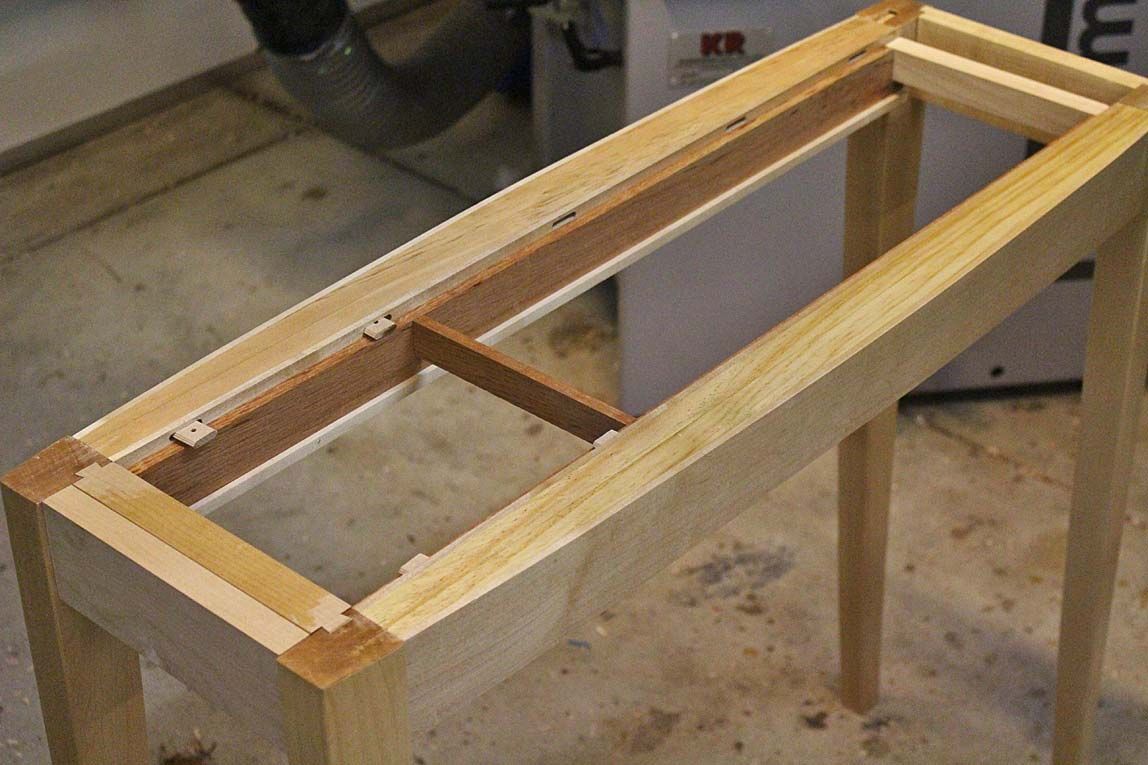
This is the inside of the table, with the drawer blades ...
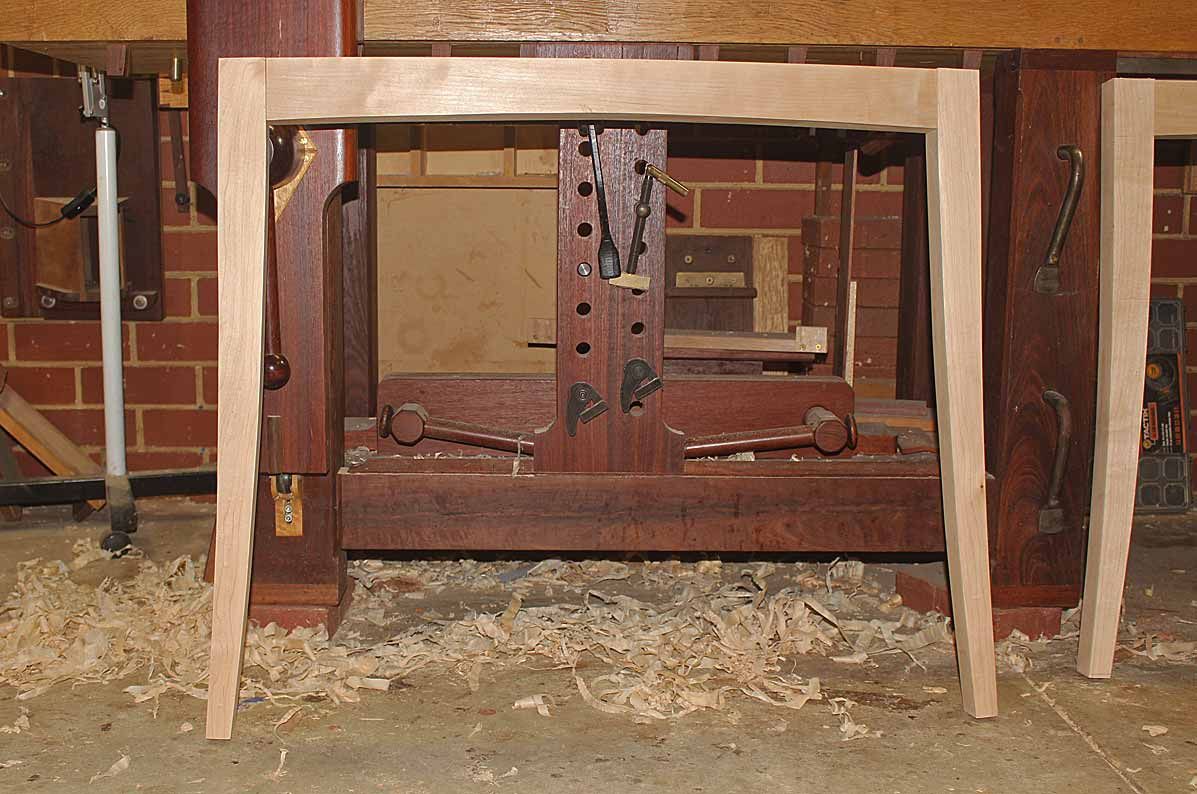
And, lastly, a shot of the front elevation at this stage ...
Next, building the drawer.
Regards from Perth
DerekVisit www.inthewoodshop.com for tutorials on constructing handtools, handtool reviews, and my trials and tribulations with furniture builds.
-
20th June 2017, 01:38 AM #26
GOLD MEMBER
- Join Date
- Oct 2013
- Location
- Perth, Australia
- Posts
- 1,813
Looking beautiful Derek, thanks as always for the progress pics.
-
27th June 2017, 03:15 AM #27
Be inspired. Be creative. Be bold.
- Join Date
- Apr 2001
- Location
- Perth
- Posts
- 10,826
Sofa Table - part V: The Hidden Drawer
It's time to begin building the drawer that will fit this table ...

I must say up front that this is the strangest drawer I have built to date. It is definitely the longest. In fact, I dare anyone to have built a longer drawer (it's about 1200mm long, or nearly 4 feet in the old money).
It is also the ugliest drawer I think I have built - however, that is partly to be expected as it is a hidden drawer, that is, it must blend in with the apron so that no one knows its there (no telling now).
The drawer sides are made from the same timber that will be used for the table top, West Australian Sheoak. This is a pink-brown wood with a fine figure (similar to Lacewood). Here is the slab I started with ...

The drawer is slim - more like a tray. There is just 40mm for the drawer, and this will convert to 30mm of head room after the drawer bottom is added.
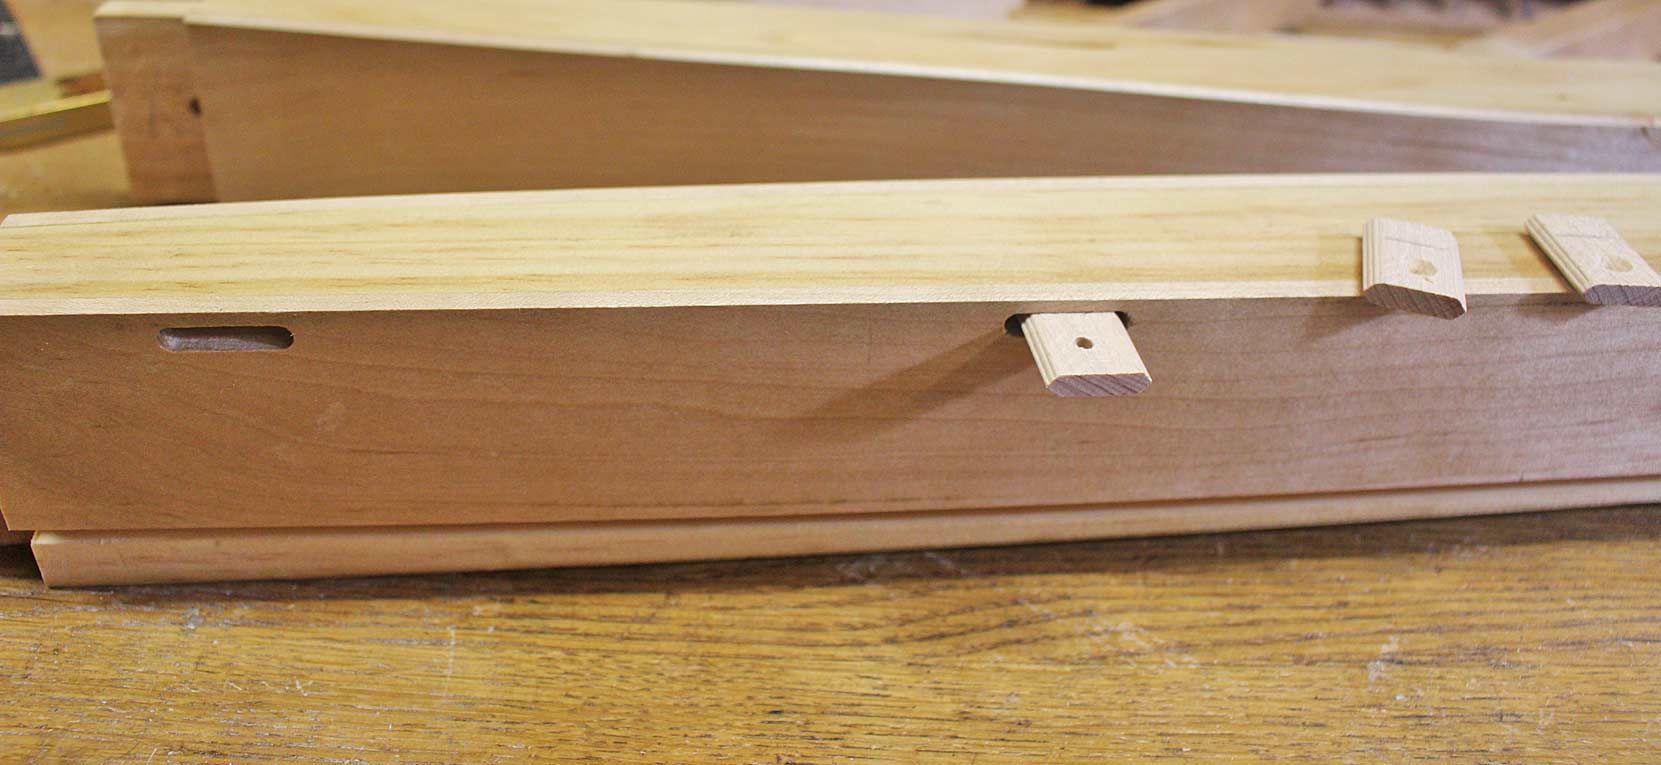
Below is a picture of the drawer sides fitted to the interior ...
They run below the Domino-buttons, which double to ensure that the drawer will not tip when extended.
The next step was to glue up the drawer bottom ...
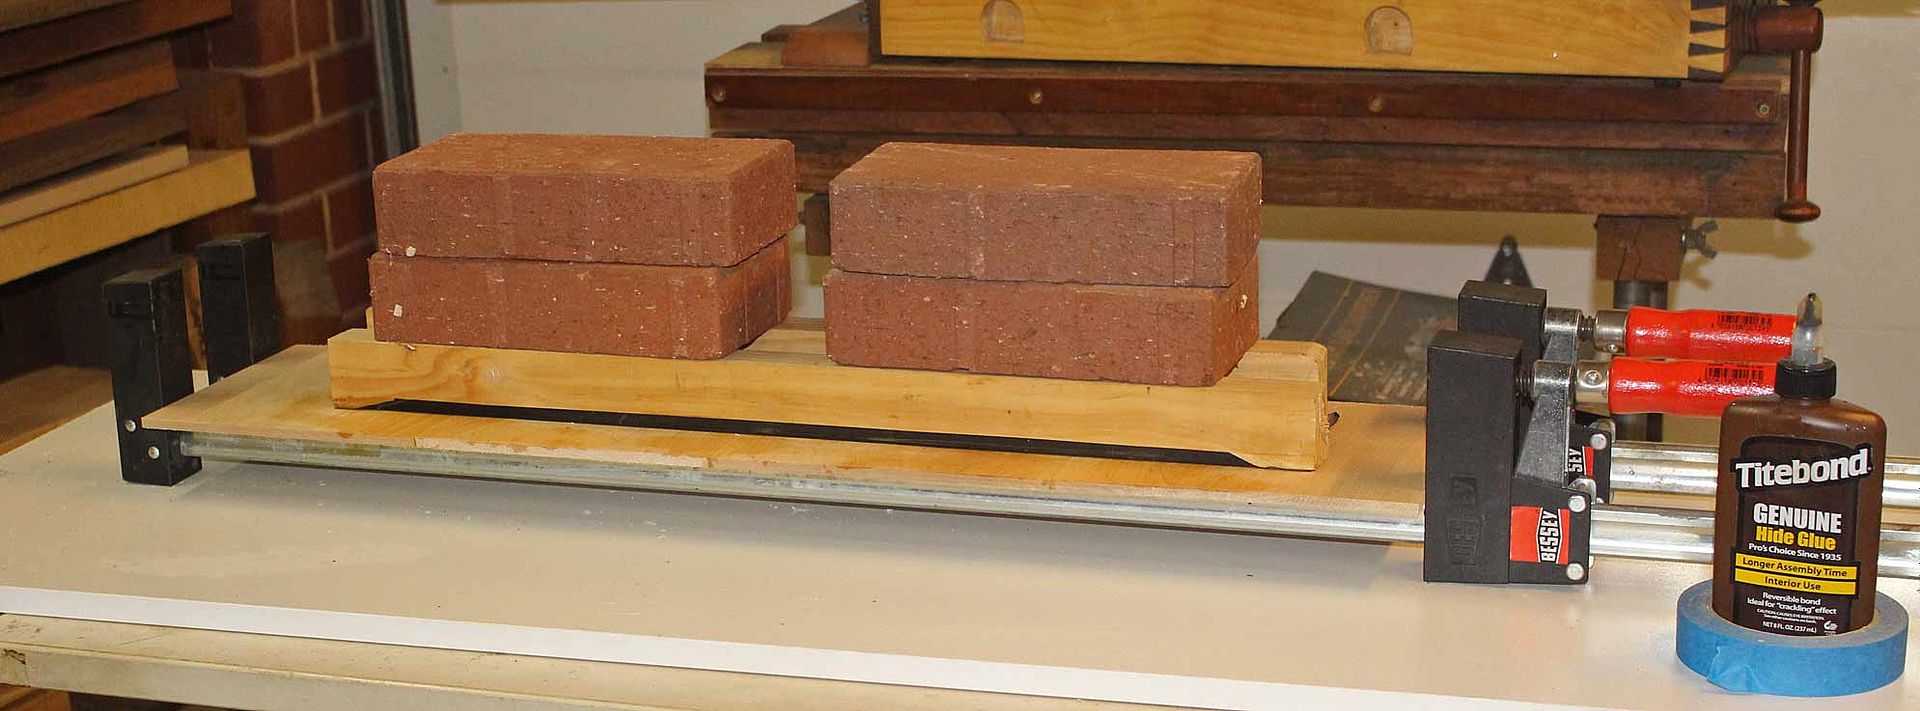
Since the drawer is fairly narrow (about 210mm/8 1/4"), it was tempting to simply use a single board and run it with the grain down the length of the drawer. However I know that this will create problems when the wood expands and contracts. Drawer bottoms need to run across its width. Consequently, boards were sawn and glued together for this purpose. The thickness of the drawer bottom is 1/4".
Below is the drawer bottom being trued on one length and one width. The remainder will be sized at the end.
Drawer Slips
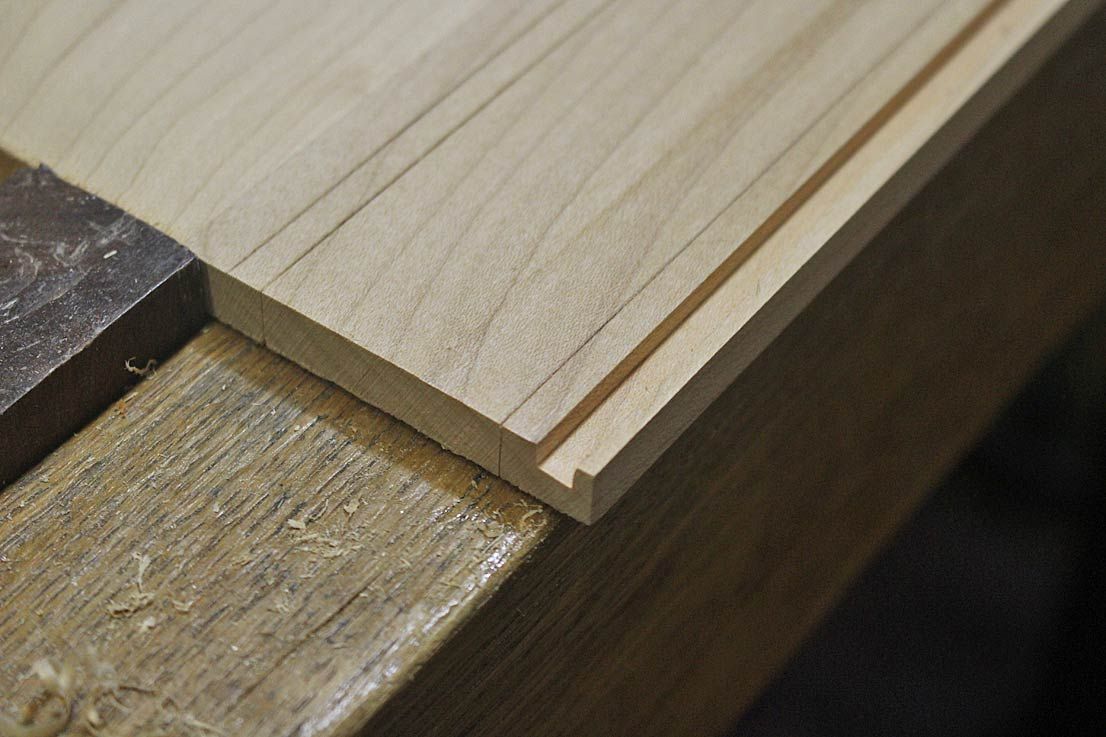
The drawer sides are 3/8" thick, which is too thin for grooves. Consequently, the drawer bottom will be attached with slips. This is how they were made ...
The first step was to score the bottom of the slip. They are being made from the top down, and reverse-engineered ...
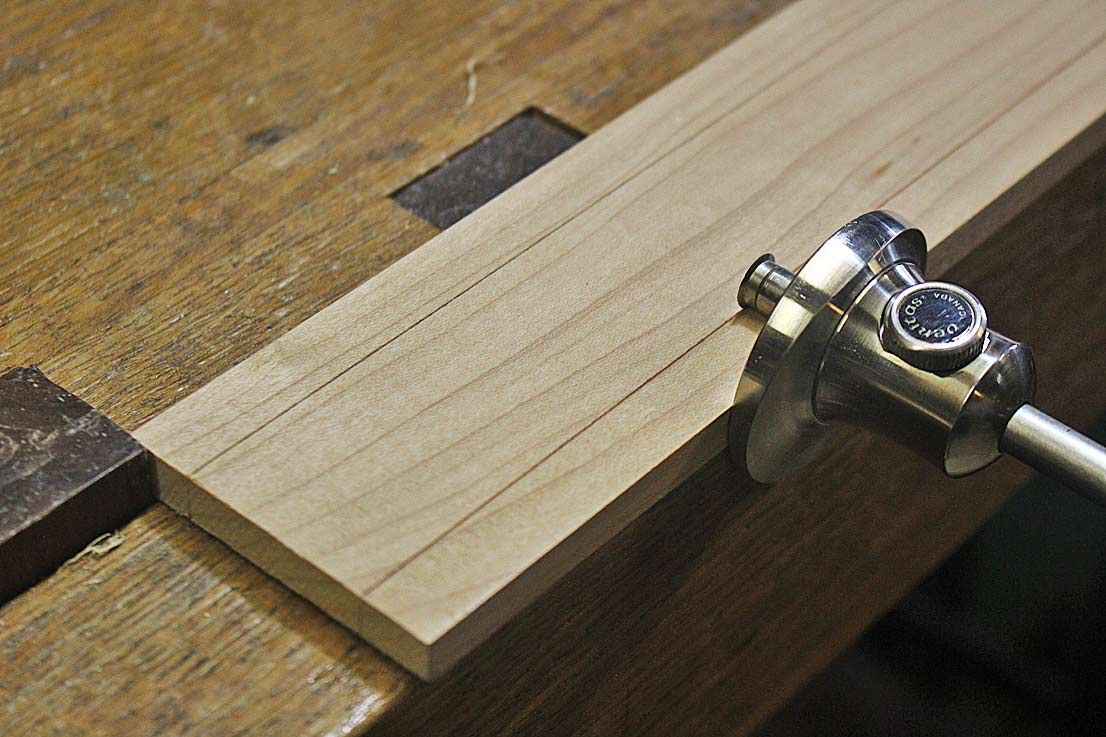
There is a 5mm space to the next line (the height above the drawer blade) ...
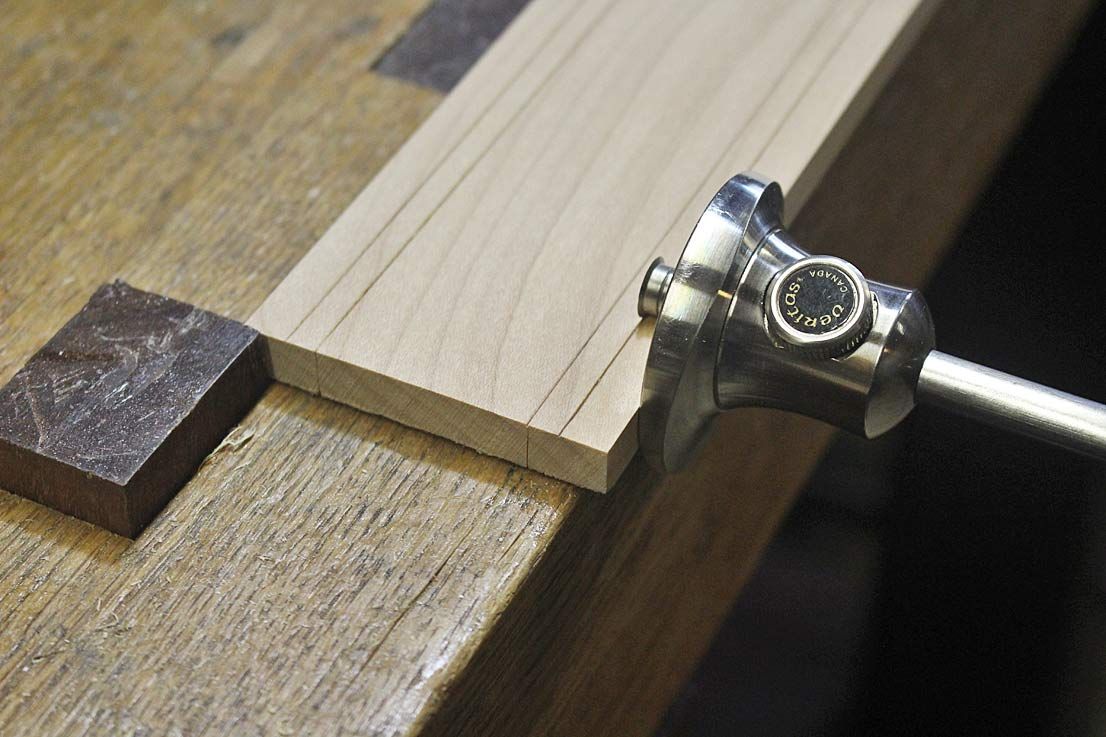
The groove is going to be 3/16". The drawer bottom will be rebated 1/16" along the sides to fit.
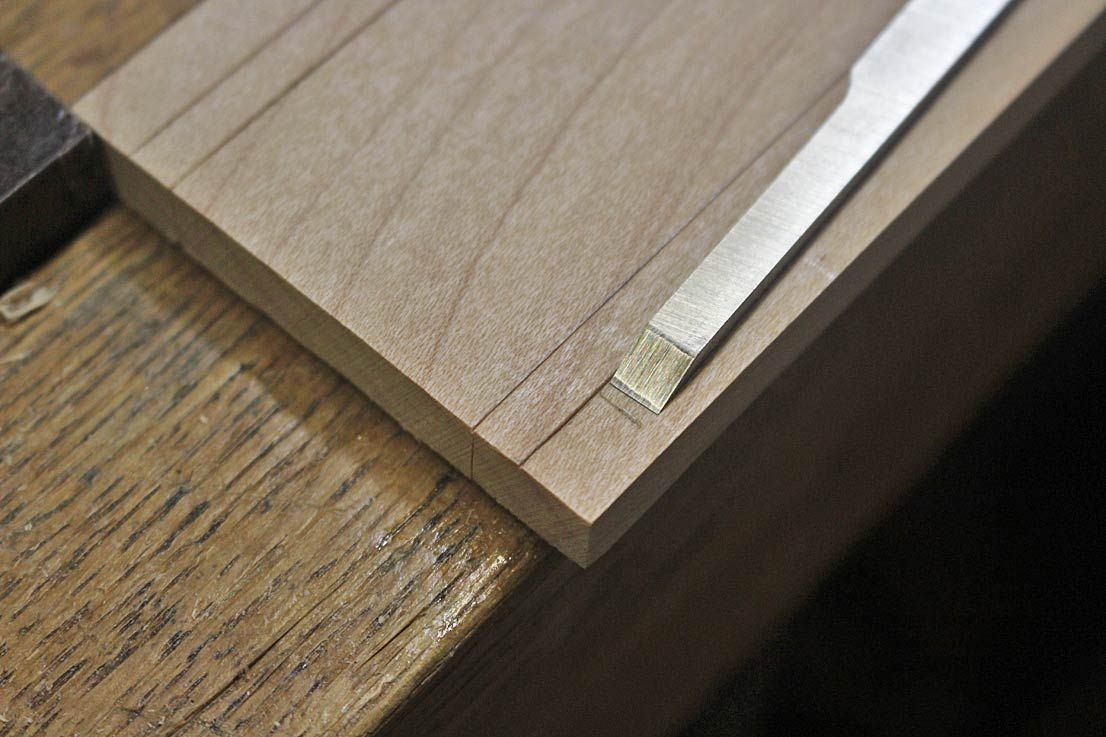
Plough the groove ...
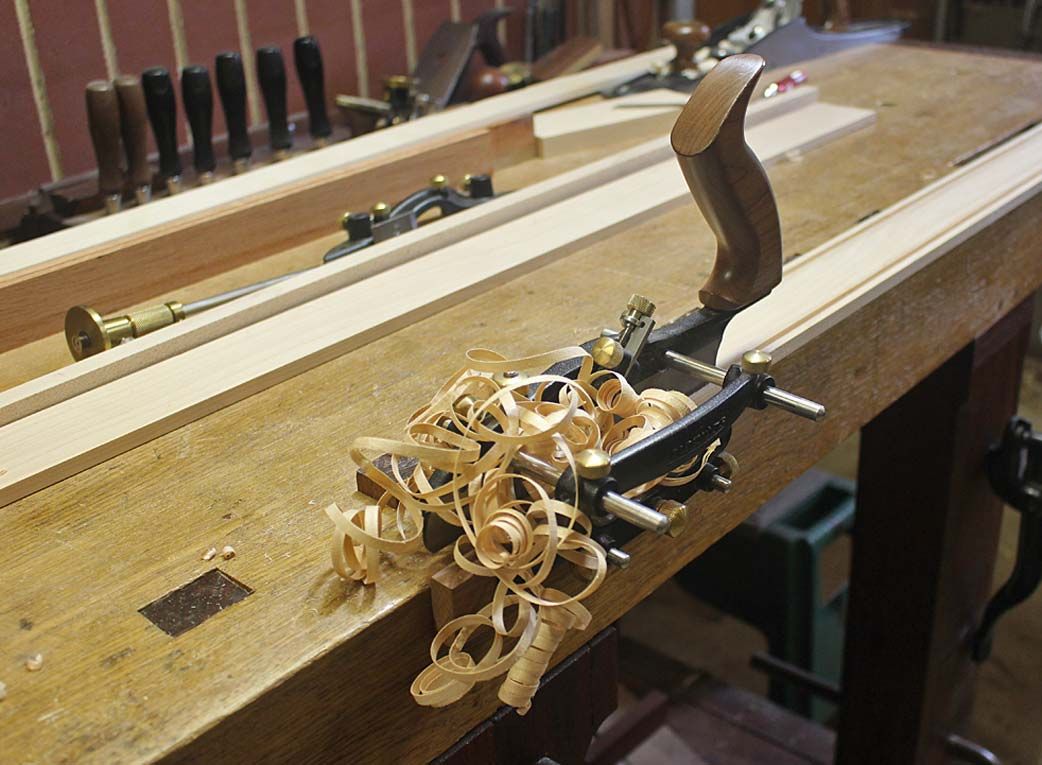
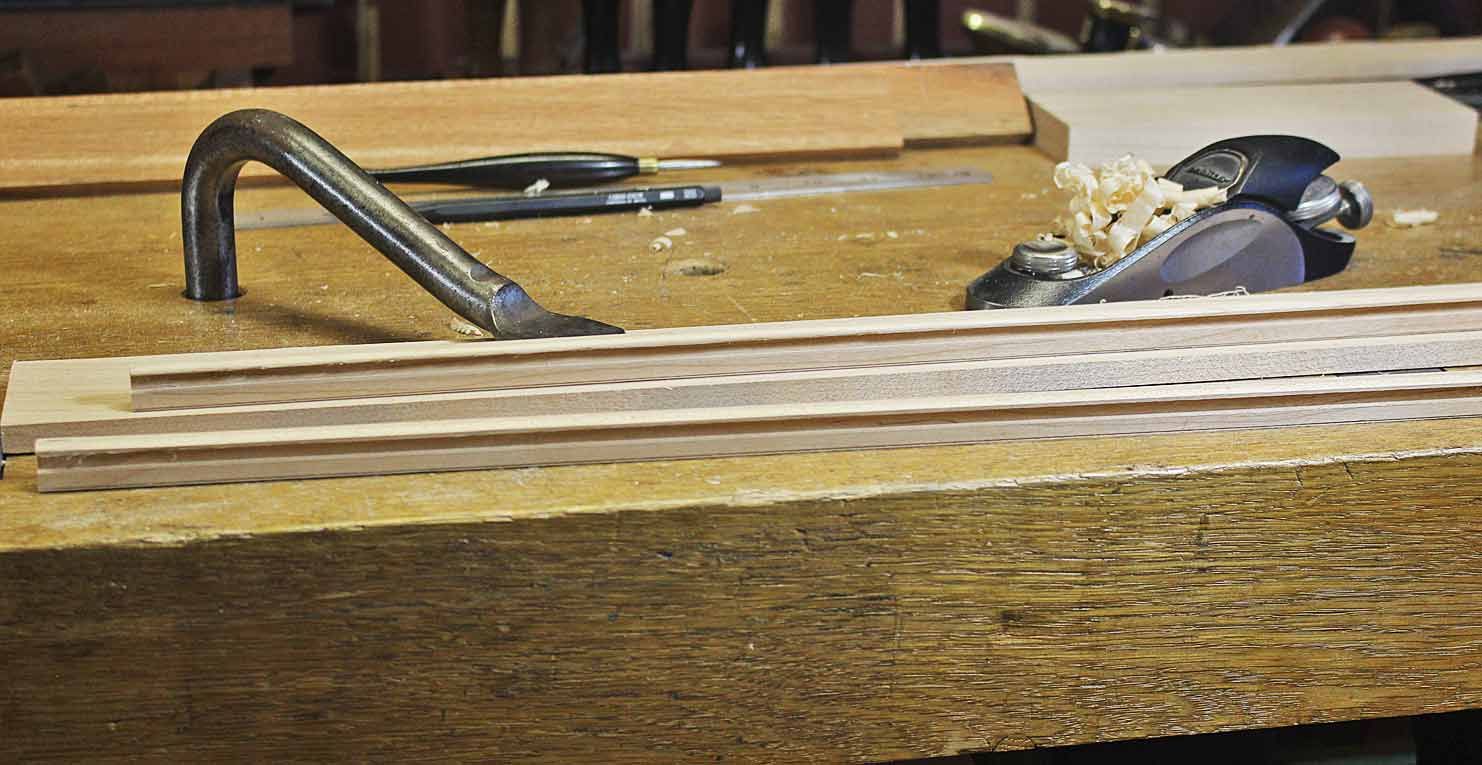
Chamfer the edges ...

I scraped a slight curve on the inside ...
... and then ripped them free on the table saw ...
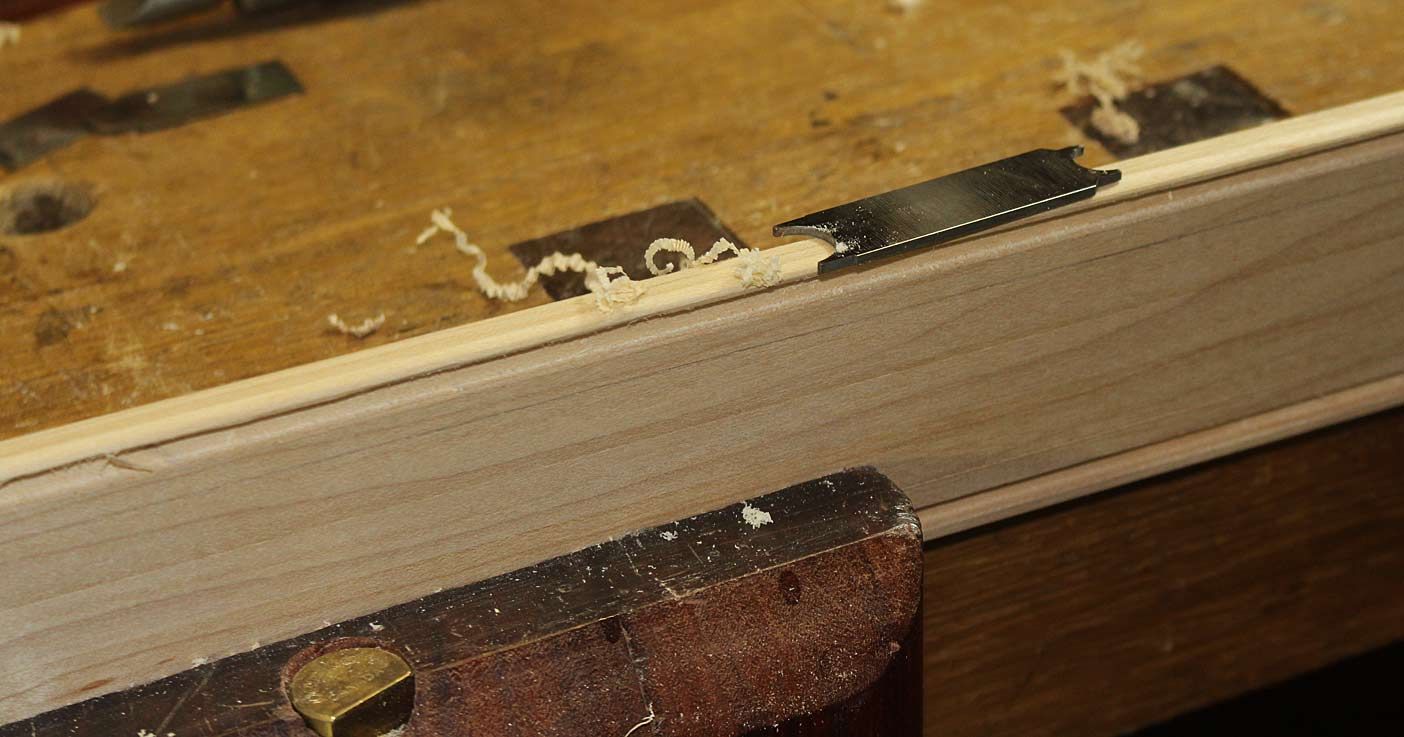
Back to the drawer
I warned you that this was a weird looking drawer. Here is the drawer front - ploughing the front groove. This has to allow for the lower- and upper overlay to match the apron ...
I will not show you boring pictures of dovetailing, however this is a how the drawer front is constructed ...
With the sides joined, this is how the drawer front looks ...
From this inside ...
The through dovetails at the rear of the drawer look like this (all very rough at this stage) ...
I planned that the drawer would have a working depth of 250mm (10"). The drawer back was attached with a though mortice-and tenon ...
Of course, I did not think this through, and the lower tenon sits where the slip runs. I had to saw it off and fill the hole. Well, it looks like a double mortice-and-tenon. We are the only ones to know the truth ...
Here is a picture of the drawer ...
Below is the drawer extended, with a mock up of the top ...
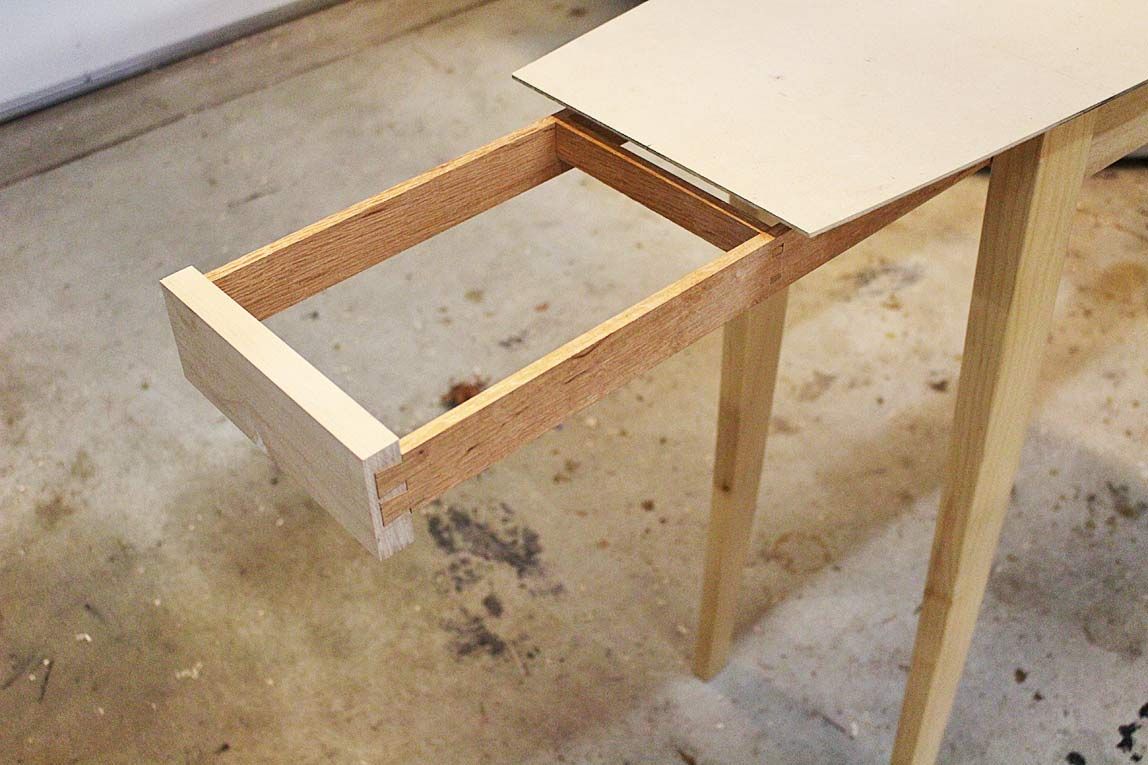
The drawer can extend much further than this without any droop. I am considering another hidden drawer behind this drawer - by adding another divider. This would also add more rigidity (not sure if this is needed).
Finally, here is a picture of the drawer end of the table alongside the sofa table it will replace ...
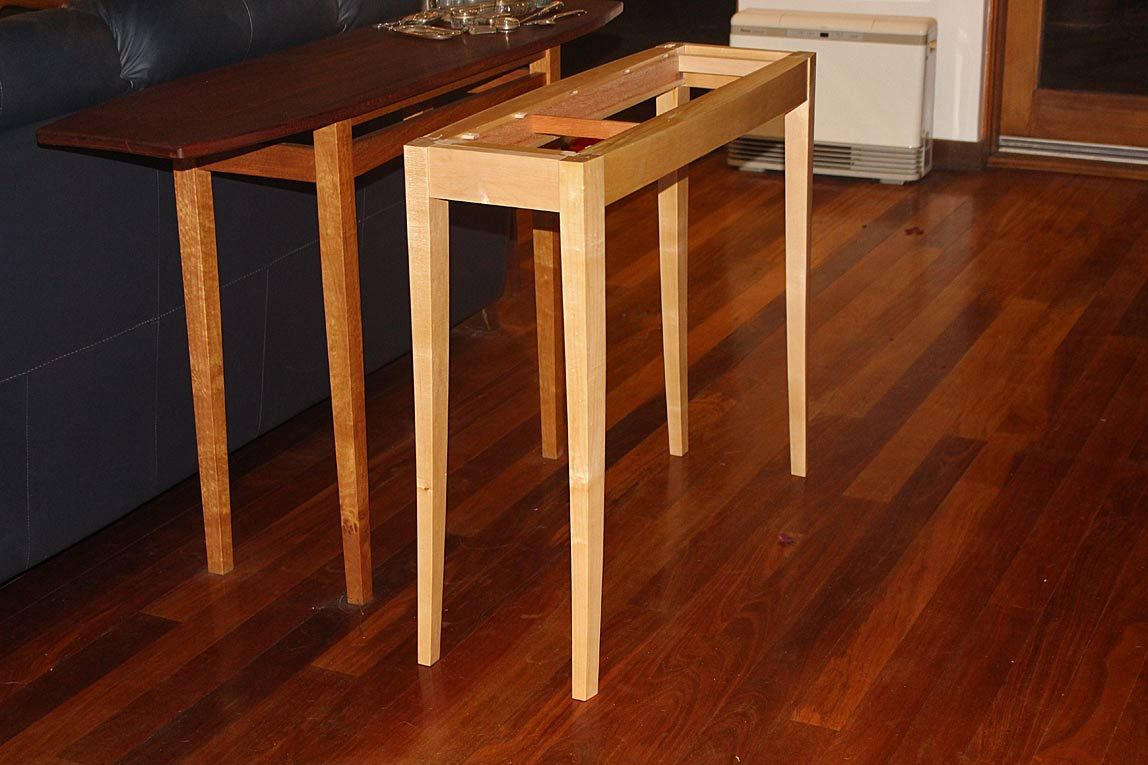
We'll complete the drawer next time.
Regards from Perth
DerekVisit www.inthewoodshop.com for tutorials on constructing handtools, handtool reviews, and my trials and tribulations with furniture builds.
-
9th July 2017, 05:16 AM #28
Be inspired. Be creative. Be bold.
- Join Date
- Apr 2001
- Location
- Perth
- Posts
- 10,826
Sofa Table VI - All the way to completion
We begin the final session with the table top being glued up. The timber is West Australian Sheoak, and this promises to be something special. When finished, it is a rose gold in colour, darkening over time to a rose-gold-brown.

While the panel is drying, I get on with finishing the drawer. So far it has been fitted to the table with an extra divider attached with a through mortice-and-tenon �

We move on to attaching the slips �

The drawer bottom is trimmed to fit, and then rebated for the slips �

Here is the completed drawer. Note that the drawer bottom rests below the slips (rather than at the same height). This was to save a few mm of height �

The rear of the drawer �

The end of the drawer has a fitted section that serves to prevent the drawer bottom expanding to the rear. Instead, it will expand into a deeper groove at the front of the drawer. The reason for this less typical construction will be clearer later.

The drawer sides require a little tuning to slide smoothly. The drawer front at the legs was very tight (so that the drawer front appears to be a solid join), and it was necessary to remove some thickness from the drawer sides. This was done with a scraper for control, to avoid planning into the drawer front �

Here is the fitted drawer �

�and here is the drawer front �

The table top is ready for shaping. It has been book matched to create a pattern in the figure of a slight boat. This will enhance the outline of the top �


The top is marked out with the template I made early on, and then bandsawed to shape. Below the ends are planed �

� and then the sides receive their final shaping with a Mujingfang double iron woodie. The advantage of this plane here is that it can take a thick shaving without tearout regardless of grain direction �

The top is smoothed with my favourite Veritas Custom #4 �

Time to shape the underside of the table ends. The plan is a long chamfer. This is roughed out by traversing with a Veritas LA Jack, using a low cutting angle ..

When traversing, the far end is bevelled to avoid spelching. However, as on gets to the line, it is safer not to plane over the far end. As a result, a slight wedge is created. This is smoothed down with a skew block plane �

Finally, the surface is finished with a cabinet scraper. At the same time the inside of the chamfer is fared into the underside of the table top.

Having spent a little time with the table top on the base, I decided that the curved front could be a little deeper. This was done before proceeding further �

Time to attach the top to the base. I had earlier cut slots for the buttons with a Festool Domino, and had planned to use the dominos as buttons. In practice the dominos were too short, and so I cut out sections in Maple to the desired length.
Note in the picture below that I have also attached cross pieces at the inside ends of the base. These were to ensure that the to does not move. They are cross grain to ensure what little movement runs to the inside �


The final construction is to add a Quaker Lock for the drawer. This is a simple stop that prevents the drawer being extended further than desired. It is attached using the same screw �

But, since it is spring-loaded, it can also be pressed in and the drawer opened up fully (if you know to do this). This will reveal the hidden drawers behind the hidden drawer J

Finally!!!! All is completed. The base has been finished in two coats of dewaxed white shellac (Ubeaut), and then received three coats of General Finishes water-based poly, which was hand rubbed. This is to retain the light colour. The top has been finished in Livos Universal Wood Oil. This is a green oil made largely from cold pressed flax seeds. It adds a slight amber sheen to the wood.
This is two coats. I plan on a few more.

From the front �

Here is a side elevation of the shaped ends �

The drawer slides out this far �

Thanks for the support along the way. Please ask any questions you like. All discussion welcomed.
Regards from Perth
DerekVisit www.inthewoodshop.com for tutorials on constructing handtools, handtool reviews, and my trials and tribulations with furniture builds.
-
9th July 2017, 09:54 PM #29
Butcher of wood
- Join Date
- Jun 2010
- Location
- Bundaberg
- Age
- 54
- Posts
- 3,428
As usual I'm in awe of your skills in design and execution; what a lovely piece to have.
I have a query about one particular point; in the 20th picture of post 28 you show how you have added "cross pieces at the inside ends of the base. These were to ensure that the to does not move. They are cross grain to ensure what little movement runs to the inside �" By making them cross grain you will of course ensure that any timber movement of the top and the cross pieces will be in the same direction, but as they are of two different timbers there is the potential for them to have significantly differing rates of expansion and contraction. I'm trying to draw a parallel here with the action of a bimetallic strip used in simple thermostats; the two differing coefficients of expansion force the strip to physically bend in response to a change in temperature. Did you consider this possibility when deciding this method? I'm not suggesting that the small strips would force the top to warp; but could they could split in contraction or possibly even snap the screws in expansion?
It just stood out to me in the photo; had this part been designed by me I likely would have either just screwed four smaller blocks (one in each corner) or a fitted a single long grain strip but with one screw hole slightly slotted. If I had thought to make it cross grain as you have done I would have tried to make it from the same plank of Sheoak as the top; just the thought of mixing two differing species in this way would set little alarm bells ringing and I would then be pouring over timber species data sheets to determine if any amount of stress would be there.
But that's the artificer in me; I can tell you the square root of a jam jar but would struggle to open it. Similarly I could calculate the ideal placement of every joint and fixture you have used but to come up with such a visually pleasing design in the first place is somewhat beyond my abilities!
ps; in reference to your latest thread; I shan't be offended by any lack of "Like"! Nothing succeeds like a budgie without a beak.
-
10th July 2017, 12:21 AM #30
GOLD MEMBER
- Join Date
- Jun 2005
- Location
- Helensburgh
- Posts
- 7,696
Derek, why don't the feet sit flat on the floor? Did you make the drawer a rattling good fit? it will be interesting to see if it opens and closes without sticking in a few years time. I would have gone with two as previously mentioned but then I could never build it anyway.
CHRIS

 Reply With Quote


Similar Threads
-
tafe 2009 sofa table & bedside table
By nz_carver in forum WOODWORK PICSReplies: 6Last Post: 3rd December 2009, 11:38 AM -
Tall Coffee Table/Desk/BookCase/Holdall of important bits/Sofa Table
By RufflyRustic in forum WOODWORK PICSReplies: 11Last Post: 3rd December 2009, 12:14 AM -
Sofa table - tribute to JK
By derekcohen in forum WOODWORK PICSReplies: 12Last Post: 26th July 2007, 10:51 AM -
Jarrah Sofa Table
By Scissors in forum WOODWORK PICSReplies: 13Last Post: 14th November 2006, 06:03 AM -
Sofa table
By derekcohen in forum WOODWORK PICSReplies: 19Last Post: 4th November 2005, 09:49 AM
