

 Thanks:
  Likes:
  Needs Pictures:
  Picture(s) thanks:
Results 31 to 45 of 252
Thread: First stages in drawer building.
-
4th September 2011, 09:43 AM #31

Head Moderator
Sister of the DarkSide


- Join Date
- Dec 2004
- Location
- Toowoomba Q 4350
- Posts
- 9,217

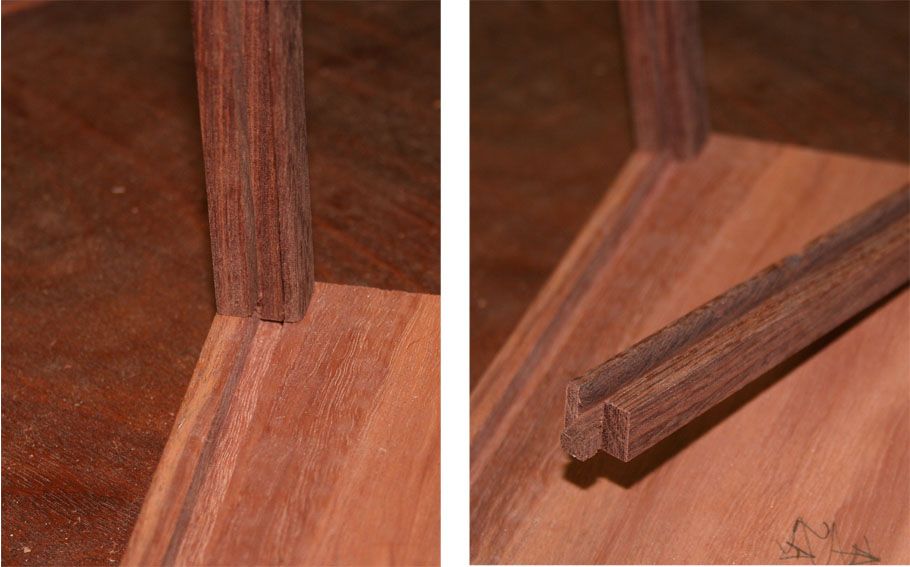
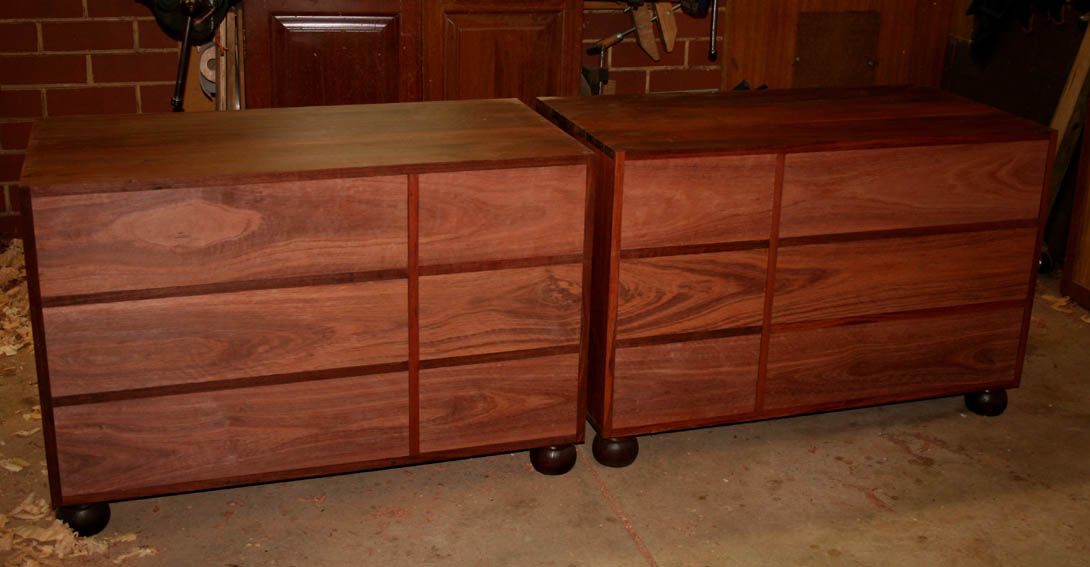
Thank you Ian, for these two photos, especially the last one. It has to be one of the best pictures around for showing how a good drawer is made.

 Box Challenge 2011 - Check out the amazing Boxes!
Twist One - Wooden Hinge/Latch/Catch/Handle
Twist Two - Found Object
Twist Three - Anything Goes
-
4th September 2011 09:43 AM # ADSGoogle Adsense Advertisement
- Join Date
- Always
- Location
- Advertising world
- Posts
- Many
-
4th September 2011, 09:57 AM #32
GOLD MEMBER
- Join Date
- Jul 2004
- Location
- Laurieton
- Posts
- 2,251
Have a look in the current Australian Wood Review.Neil Erasmus has an article on slip drawers. More fuel for the fire.
Bob
"If a man is after money, he's money mad; if he keeps it, he's a capitalist; if he spends it, he's a playboy; if he doesn't get it, he's a never-do-well; if he doesn't try to get it, he lacks ambition. If he gets it without working for it; he's a parasite; and if he accumulates it after a life time of hard work, people call him a fool who never got anything out of life."
- Vic Oliver
-
4th September 2011, 05:11 PM #33
GOLD MEMBER
- Join Date
- Feb 2003
- Location
- back in Alberta for a while
- Age
- 68
- Posts
- 12,006
and it's a good article Originally Posted by BobR

the only "problem" is that Neil is dependent upon a dedicated router bit set for both the slots and the tongues in the drawer base.
Now if you're working with hand tools ...regards from Alberta, Canada
ian
-
6th September 2011, 02:50 AM #34
Be inspired. Be creative. Be bold.
- Join Date
- Apr 2001
- Location
- Perth
- Posts
- 10,826
More questions than answers..
Another update on the Military Chests ...
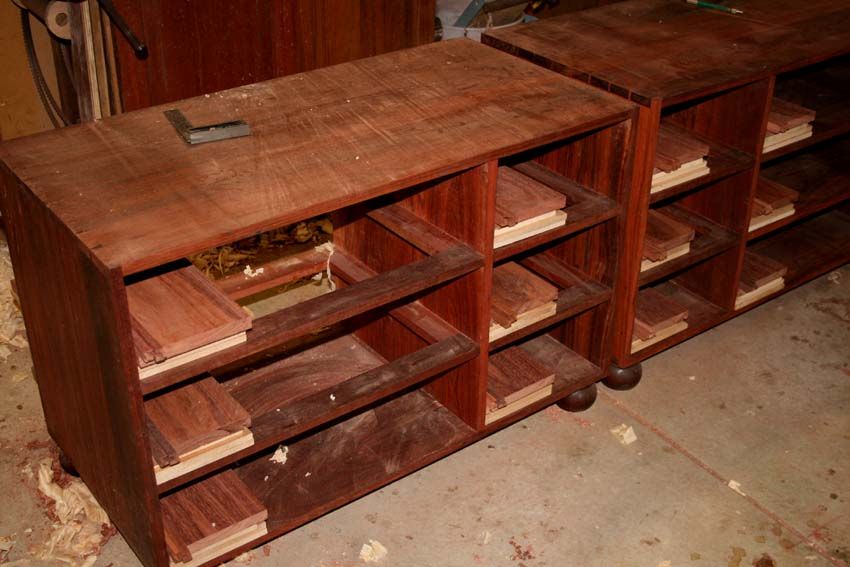
I am still working on preparing the drawer parts preparatory to dovetailing and assembly. It feels like I will never get there. 12 drawers at one time is more than I've done together before (6 was my previous record, and then the construction was Shaker).
Over the weekend I completed the slips, cut the drawer sides to length, and completed the drawer backs. The slips ...
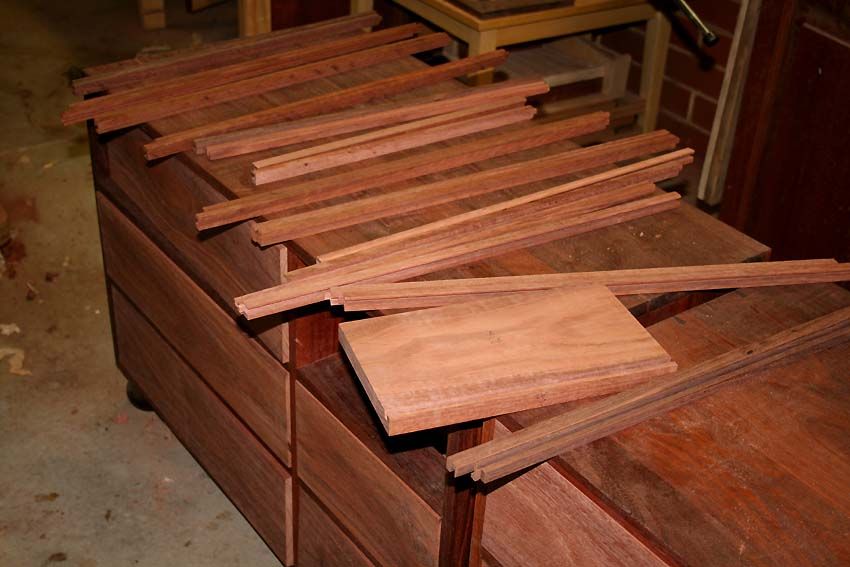
All the parts are now done with the exception of the drawer bottoms. I have decided to make and fit these last. Usually I would fit them immediately after dovetailing the 4 sides, as it is a way of squaring the drawer. In this case, I am concerned about having too many planed boards lying around and their potential to cup. I have a jig that will ensure that the drawer is square as the glue dries. Comment?
All the parts ...
The second of three questions I throw open to the forum is about the next stage in the drawer build. Before I dovetail the drawers I need to fit the drawer handles. These are to be recessed into the drawer front, so I plan to complete the mortices first, dovetail the drawers, then attach the handles.
I researched these handles quite a bit, discovering that they were now all made in India - even the ones said to be made in the UK. I was fortunate to discover that one of the local Perth stores that specialised in brass had a few of the different versions in stock. Philip Marcou gave me some tips on what to look out for. All of these handles are cast brass, which then requires finishing. It appears that some companies flattened the tops with a belt sander, with the result that the plate were not flat but curved. There would be signoficant difficulties recessing curved plates into flat drawer fronts. Indeed, all but one of the brass handles I looked at were rounded over. I ended with this ...
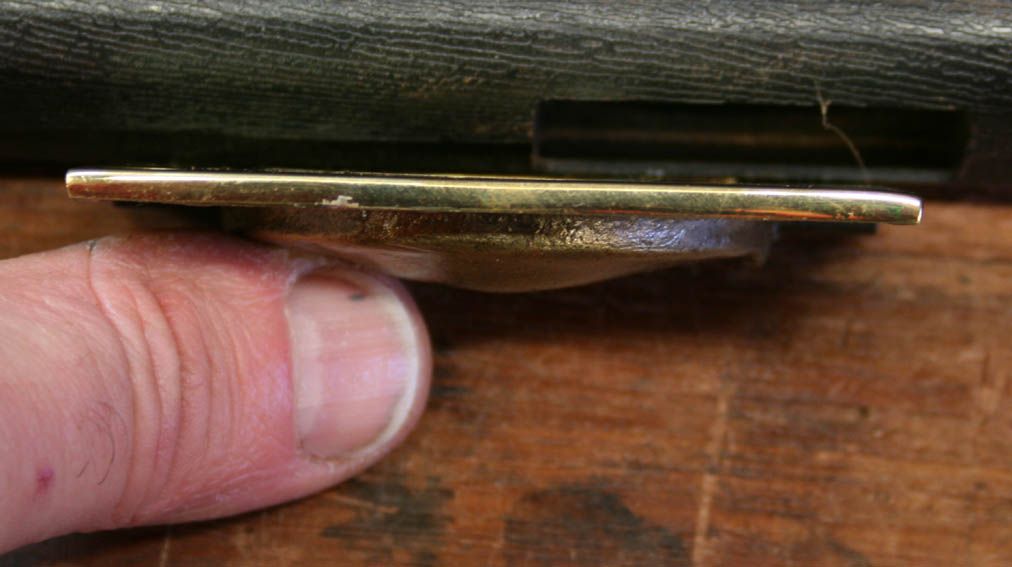
However, almost all the handles are slightly wavy at the edges ...

Here is the question: Do I leave them as is, or do I straighten them (on my disk sander)? Straightening them makes it easier to fit in the drawer front, but this may alter some of the "handmade look". Opinion?
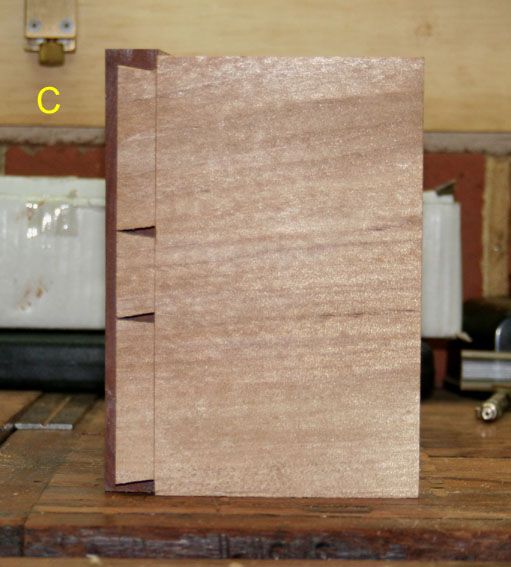
The third question relates to the dovetail design. I ran up a couple of mock fronts. I shall mention my own preferences, but it hearing yours would be helpful in firming up the best design. And, of course, you may suggest something else.
The first was simply to create an even set. I like this, but it is my second choice ...

My preference goes to a simpler, less cluttered look ...
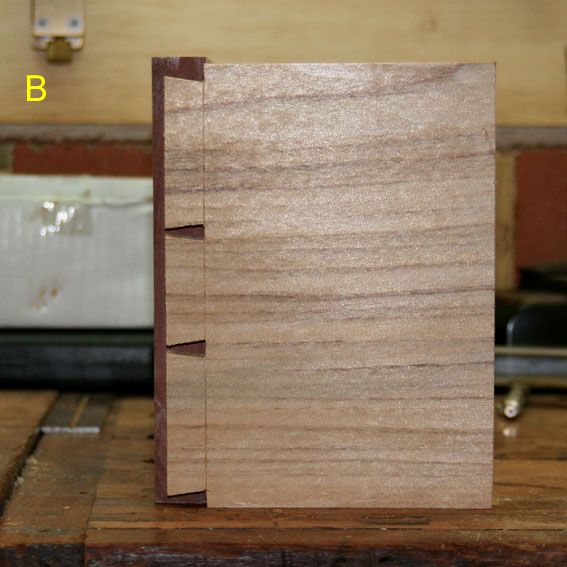
The third version did not come out as I intended - the dovetails look a little too skinny. I thought the centre two dovetails from the second example should have been closer, but then also I made them even slimmer. I think that was a mistake. However, let me know what you think of the spacing ..
Regards from Perth
DerekVisit www.inthewoodshop.com for tutorials on constructing handtools, handtool reviews, and my trials and tribulations with furniture builds.
-
6th September 2011, 08:35 AM #35
What... you mean it's not 1792?
- Join Date
- Oct 2006
- Location
- Melbourne
- Posts
- 5,271
.
I know you believe you understand what you think I wrote, but I'm not sure you realize that what you just read is not what I meant.
Regards, Woodwould.
-
6th September 2011, 10:24 AM #36
Be inspired. Be creative. Be bold.
- Join Date
- Apr 2001
- Location
- Perth
- Posts
- 10,826
WW
You are right about using the cabinet to ensure their being square. That was what I intended all along, then wrote something silly late at night (with my mind on a box squaring jig I built).
The handles were discussed here early on. They feature in pictures of many photos of vintage military furniture. I liked the ones with the cut off corners at the top. However they turned out to be much larger than they look, and too large (long) for the small drawers, which they overwhelmed. In the end the ones I have chosen were a better proportion - and were my wife's first choice. The small drawers get a single handle, while the longer drawers get two.
Regards from Perth
DerekVisit www.inthewoodshop.com for tutorials on constructing handtools, handtool reviews, and my trials and tribulations with furniture builds.
-
6th September 2011, 10:42 AM #37
What... you mean it's not 1792?
- Join Date
- Oct 2006
- Location
- Melbourne
- Posts
- 5,271
Not in this thread they weren't which validates my point about keeping the whole WIP in the one thread where it's easily referenced. Originally Posted by derekcohen
.
I know you believe you understand what you think I wrote, but I'm not sure you realize that what you just read is not what I meant.
Regards, Woodwould.
-
6th September 2011, 11:10 AM #38
SENIOR MEMBER
- Join Date
- Jan 2008
- Location
- NSW southern Highlands
- Posts
- 548
Derek
There is I am sure a Gazillion variations for the spacing of your dovetails, & it is always more difficult to judge from a photo rather than the actual.
My own preference is something with a bit of asymmetry, but "B" & "C" don't appeal to me & I would consider using "A" but moving the outer two pins a little towards the top & bottom edges of the drawers. Giving differing tail sizes & three pins which I think would give an asymmetric look, & greater strength.
Plus those on the stopwatch will have more fun timing the production of the 96 hand cut dovetails
On the handles, my experience is limited to the Indian made ones which convinced me to avoid them. If I was to do this style of cabinet I would wish to see a nice crisp finish on the mating edges, with a matt finished surface using 320 / 400 grit, similar to how I fit butt hinges. This is likely to mean removing a lot of material on the face of those handles in order to get a flat face and crisp edge & therefore a lot of work. If I was doing it I would use files & wet & dry. Personally I think the agricultural look of the handles will detract from the overall look of the cabinet. But, you could save them for the Yacht
If WW has used those he suggested he may be able to provide advice on the finish you can expect from those.
Incidentally an effective way to look at differing pin layouts is to mark them on a strip of paper or veneer using a marker pen, then stick this onto the drawer side, which saves cutting a number of draw sides, and is a lot quicker.
Regards
-
6th September 2011, 11:34 AM #39
What... you mean it's not 1792?
- Join Date
- Oct 2006
- Location
- Melbourne
- Posts
- 5,271
The entire surfaces of military chests were sanded handles, (steel) screws and all prior to being polished. This was to ensure the furniture slid smoothly into their respective tight-fitting transport cases without snagging. The brasses exhibit quite coarse but uniform scratches from being sanded (I'm guessing 120 grit in modern parlance). I've seen them sanded to the degree where the screw slots have all but disappeared, making removal extremely difficult.
Original brasses should retain their oil/shellac varnished surfaces. Polished fittings are normally the result of exuberant housewives/maids prettying them up..
I know you believe you understand what you think I wrote, but I'm not sure you realize that what you just read is not what I meant.
Regards, Woodwould.
-
6th September 2011, 11:51 AM #40
Be inspired. Be creative. Be bold.
- Join Date
- Apr 2001
- Location
- Perth
- Posts
- 10,826
Hi Basil
Good points all.
I had anticipated all along stripping the lacquer finish from the brass and allowing them to age (perhaps even aging the brass). It now looks like I need to file their edges and complete a little finishing work on the brass faces. The pictures tend to magnify the imperfections in the casting. The handles are quite good - certainly an order better than the others I looked at. There was a large price range for these. I seached all over the world, and discussed retailers with members of a few forums. They all use the same catelogue pictures. Perhaps WW would have been able to steer me in another direction, but there was also a limit to the budget - $30+ per handle @ 18 handles was outside the budget.
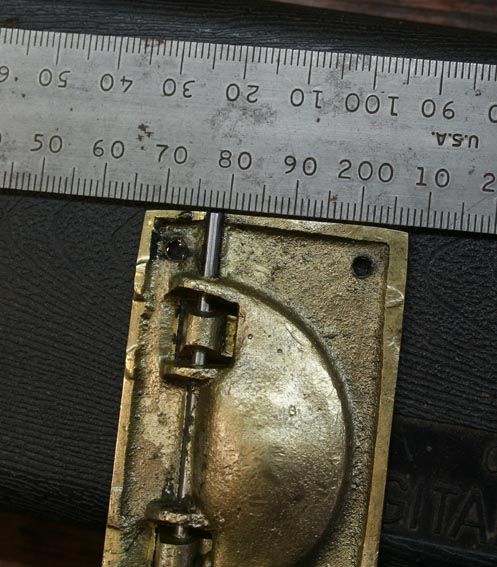
With regard the dovetails, I am returning to A, with thoughts of a very slightly thinner profile, but still substantial. I have not seen original, vintage military chests in the flesh, nor photos of the dovetails. I keep imagining slim "London" dovetails (as some refer to them), but this may be out-of-keeping. WW?
WW, to save you hunting, the set below (first lot of pictures) was used as a guideline.

The change in the proportions of the drawers (in mine) was because Lynndy had requested an etertainment centre, and I needed then to make room for audio equipment (shelves on the right) ...
This is what was intended ...
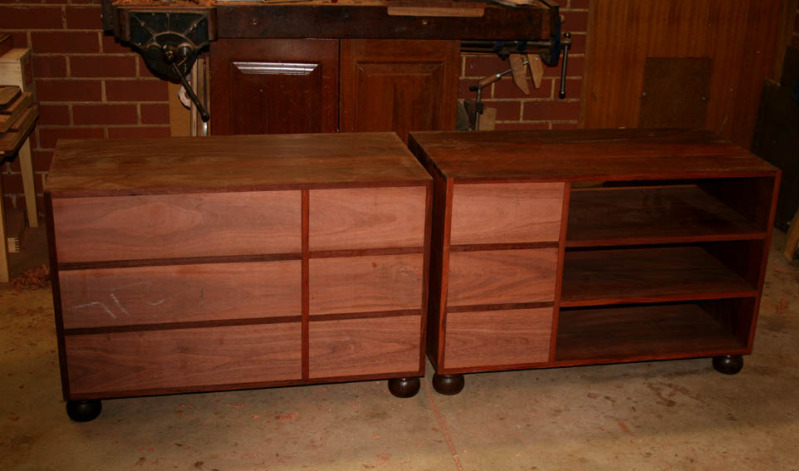
However Lynndy changed her mind when she saw the chests with added drawer fronts ...
Regarding the proportions of the handles, the drawers are 165mm high and 600/300mm wide. The first set of handles are 90mm wide (the smallest I could find) and the ones I am using are 65mm wide. An example of one reference is here. Now I'd rather do the right thing than compromise the final result for the sake of a couple of dollars. Can you point me to a source for the hardware?
Regards from Perth
DerekVisit www.inthewoodshop.com for tutorials on constructing handtools, handtool reviews, and my trials and tribulations with furniture builds.
-
6th September 2011, 11:57 AM #41
SENIOR MEMBER
- Join Date
- Jan 2008
- Location
- NSW southern Highlands
- Posts
- 548
OMG
 120 grit Shagreen
That must have been the job of the apprentice or sanding wench
Is that where the term Coarse Fishing comes from

-
6th September 2011, 12:16 PM #42
Be inspired. Be creative. Be bold.
- Join Date
- Apr 2001
- Location
- Perth
- Posts
- 10,826
Hi WW
I did not see the links you supplied - thanks - and am now exploring them.
It is interesting that one (I!) only notice some of the subtle (not so subtle!) details when you get two alongside one another. Something about the design of the ones I have did not look right. Now I see it as the flush lift in the recess. I did not think much about this before now as the smaller nautical types are like this. However, looking at my model more closely, and at the picture below, which are forged and not cast-and-ground-flat, the pull section is quite different (i.e. rounded).

Regards from Perth
DerekVisit www.inthewoodshop.com for tutorials on constructing handtools, handtool reviews, and my trials and tribulations with furniture builds.
-
6th September 2011, 12:23 PM #43
What... you mean it's not 1792?
- Join Date
- Oct 2006
- Location
- Melbourne
- Posts
- 5,271
In keeping with what? You're making 'in the style of' and not a direct copy of anything in particular, so really, anything goes. If it mattered, I prefer the appearance of the first example of dovetails. Originally Posted by derekcohen
As your wife prefers the style of handle you've purchased, your hands appear to be tied. Did you follow the links in my previous post? Originally Posted by derekcohen
.
I know you believe you understand what you think I wrote, but I'm not sure you realize that what you just read is not what I meant.
Regards, Woodwould.
-
6th September 2011, 12:27 PM #44
What... you mean it's not 1792?
- Join Date
- Oct 2006
- Location
- Melbourne
- Posts
- 5,271
Sandpaper was well and truly established and in general use by the time they were sanding campaign chests! Originally Posted by Basilg
"Coarse Fishing"... I like it..
I know you believe you understand what you think I wrote, but I'm not sure you realize that what you just read is not what I meant.
Regards, Woodwould.
-
6th September 2011, 12:29 PM #45
What... you mean it's not 1792?
- Join Date
- Oct 2006
- Location
- Melbourne
- Posts
- 5,271
I think you'll find they are all cast and not forged. Several styles have round-section bails. Originally Posted by derekcohen
.
I know you believe you understand what you think I wrote, but I'm not sure you realize that what you just read is not what I meant.
Regards, Woodwould.


 Reply With Quote


Similar Threads
-
Finished building a tallboy / drawer chest
By chubs in forum WOODWORK - GENERALReplies: 32Last Post: 4th July 2009, 12:55 PM -
4 stages
By wheelinround in forum WOODIES JOKESReplies: 2Last Post: 25th August 2007, 03:26 PM -
My dream shed...the planning stages.....
By bulldog in forum WOODWORK - GENERALReplies: 17Last Post: 17th May 2007, 01:08 AM -
Basic stages of Finishing
By Shane Watson in forum FINISHINGReplies: 0Last Post: 24th June 2001, 12:41 PM
