

 Thanks:
  Likes:
  Needs Pictures:
  Picture(s) thanks:
Results 151 to 165 of 252
Thread: First stages in drawer building.
-
9th October 2011, 01:33 PM #151
 SENIOR MEMBER


- Join Date
- Jan 2008
- Location
- NSW southern Highlands
- Posts
- 548
 The One & only, tried, true, and tested method of making dovetail joints
- select wood
- select appropriate Power tools, hand tools, other devices & jigs
- dimension wood using prefered tools
- cut wood into required numbers
- on the ends of some pieces remove all wood that does not look like a dovetail
- on the ends of other ( and matching ) pieces remove all wood that does not look like like a Pin
- Glue & assemble
- Clean & finish
- Review in 250 years or so to establish if items 1 to 8 require adjustment
- Done
For those not already using this method & after its adoption, you may receive suggestions for amendment, if so refer all to item 9

-
9th October 2011 01:33 PM # ADSGoogle Adsense Advertisement
- Join Date
- Always
- Location
- Advertising world
- Posts
- Many
-
9th October 2011, 02:19 PM #152
What... you mean it's not 1792?
- Join Date
- Oct 2006
- Location
- Melbourne
- Posts
- 5,271
No! Derek, please stop trying to reinvent the wheel. By all means have fun experimenting, but honestly, nothing has changed in hand-cut dovetailing in over three hundred years and is unlikely to. Originally Posted by derekcohen

I don't believe I slammed anything. I offered you, what in my opinion is, a successful way of removing waste from sockets and I went on to describe the method I use for cutting half-lapped dovetails. I fail to see how I could have possibly been more magnanimous! Originally Posted by derekcohen
.
I know you believe you understand what you think I wrote, but I'm not sure you realize that what you just read is not what I meant.
Regards, Woodwould.
-
9th October 2011, 02:20 PM #153
What... you mean it's not 1792?
- Join Date
- Oct 2006
- Location
- Melbourne
- Posts
- 5,271
Amen! Originally Posted by Basilg
.
I know you believe you understand what you think I wrote, but I'm not sure you realize that what you just read is not what I meant.
Regards, Woodwould.
-
9th October 2011, 09:35 PM #154
Be inspired. Be creative. Be bold.
- Join Date
- Apr 2001
- Location
- Perth
- Posts
- 10,826
Originally Posted by derekcohen Originally Posted by Woodwould
Are you advocating bevelling the underside of the tails?
WoodwouldNo! Derek, please stop trying to reinvent the wheel. By all means have fun experimenting, but honestly, nothing has changed in hand-cut dovetailing in over three hundred years and is unlikely to.
Then stop telling us/me what not to do and either describe or show us what you do or what you recommend. You sidestep every request to do so (see highlights above).
I cannot imagine how you can clean the inside of a half-pin socket without either a skew chisel or similar. A bevel edged chisel is not enough to get into the corners, not unless you are choosing something in the region of 1/16" (and if you are doing that you may as well use a skew chisel).
Regards from Perth
DerekVisit www.inthewoodshop.com for tutorials on constructing handtools, handtool reviews, and my trials and tribulations with furniture builds.
-
9th October 2011, 10:48 PM #155
What... you mean it's not 1792?
- Join Date
- Oct 2006
- Location
- Melbourne
- Posts
- 5,271
Derek, I'm not telling you what, or what not to do, rather, querying the sagacity of some of your procedures and pleading for cessation of the constant wheel-reinventing. Have you actually read posts 138 and 142? Originally Posted by derekcohen
.
I know you believe you understand what you think I wrote, but I'm not sure you realize that what you just read is not what I meant.
Regards, Woodwould.
-
9th October 2011, 11:41 PM #156
Be inspired. Be creative. Be bold.
- Join Date
- Apr 2001
- Location
- Perth
- Posts
- 10,826
Let's see ... Originally Posted by Woodwould
Post #138 was where you assumed I used a wide chisel to chop the waste, and then told me to use a 1/4" and a wide chisel instead ... (and later in post #143 I wrote to state that I did the same as you).
Post #142? There was Basil querying the use of the kerf chisel ...
This is an extremely useful tool and method. Others have used it with great results as well. It originated with Tage Fride, who used a bandsaw blade and a card scraper. I just added a handle.
Then Basil wrote, Pushing a chisel in will clean out the corner but will leave an indent from the opposing corner of the chisel, I take it you are saying it is simpler and not worth the fuss of reaching for a skew chisel or knife, and to just accept this.
I was not clear what you were doing here, and so asked for clarification. Your response was impatient and ill-tempered: No! Derek, please stop trying to reinvent the wheel. By all means have fun experimenting, but honestly, nothing has changed in hand-cut dovetailing in over three hundred years and is unlikely to.
What reinventing? This forum is about exploring and sharing ideas. Why do you find this so irritating?
I find your tone insulting and condescending in the extreme.
Regards from Perth
DerekVisit www.inthewoodshop.com for tutorials on constructing handtools, handtool reviews, and my trials and tribulations with furniture builds.
-
10th October 2011, 12:50 AM #157
Novice
- Join Date
- Jul 2006
- Location
- Leeds, UK
- Posts
- 21
I think what Wouldwood is suggesting Derek is that the skew chisels that seem to have become popular over the last decade or two aren't really necessary for cleaning out the socket corners next to the pins. I tend to agree with him on that as I've never owned a skew chisel, although I've used a few that learners have had about their bench, but I've never been convinced of their usefulness for dovetailing. Originally Posted by derekcohen
He is right in the sense that the sockets between the pins of lap dovetails don't need to be overly pretty. They work effectively if they are undercut a bit, and winkling the last bits out of a corner can usually be done quickly with something like a 1/4" chisel by working in three directions, ie pare along (or across) the pin into the corner if needed, pare along the base of the socket (again if needed), then pare down the end grain at the shoulder line perhaps with a whack from a mallet if the wood's hard. It doesn't matter if the corner of the chisel that is towards the centre of the socket over-cuts a bit. You can also swap a bevelled 1/4" chisel for a 3/16" or 1/8" chisel for the final cut across the grain if you prefer, especially if the wood is very hard. Slainte.
-
10th October 2011, 01:15 AM #158
Be inspired. Be creative. Be bold.
- Join Date
- Apr 2001
- Location
- Perth
- Posts
- 10,826
Thank you Richard. That makes it easier to understand.
My concern, raised earlier, was whether this could affect the integrity of the dovetail. Now I am more concerned about the viability of this method with narrow dovetails, especially those skinny ones some refer to as "London". Surely you could not use this technique with these as it would break the finely chiseled and thin web? Or are skew chisels only used with the skinny dovetails?
Regards from Perth
DerekVisit www.inthewoodshop.com for tutorials on constructing handtools, handtool reviews, and my trials and tribulations with furniture builds.
-
10th October 2011, 01:53 AM #159
SENIOR MEMBER
- Join Date
- Jan 2004
- Posts
- 686
Originally Posted by Sgian Dubh
Dovetailing
Hi Derek.
I read into WW's post the terminology stuff - it's pretty specific terminology used to avoid errors in the trade.
Tails/Tail sockets; Pins/Pin Sockets etc... I think the reference to: "cutting a mortice" when you were referring to: "chopping the waste out of the tail socket" was what WW was referring to, but I could be wrong and WW can definitely speak for himself.
I agree with Richard - see images below.
But, this wasn't the reason for the post.
To answer the pleas for a "how-to" on dovetailing, here 'tis
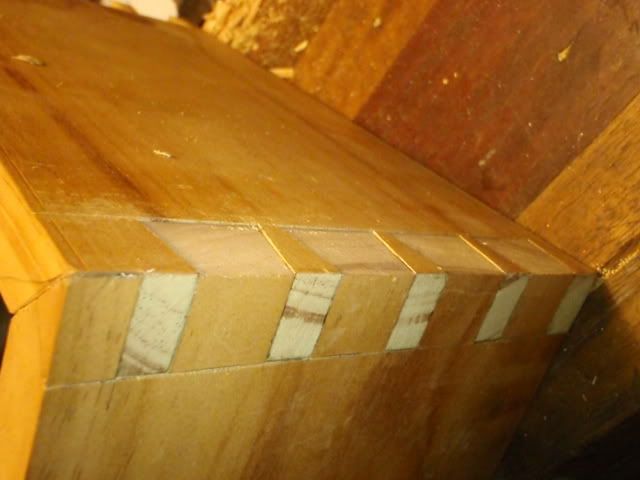
THis is a plain dovetail (the first I've cut in about 2 years, so the mitre's open a trifle more than I'd accept. If this was anything other than a tool box, I'd recut the thing.)
Note the top, it's a mitred through dovetail.
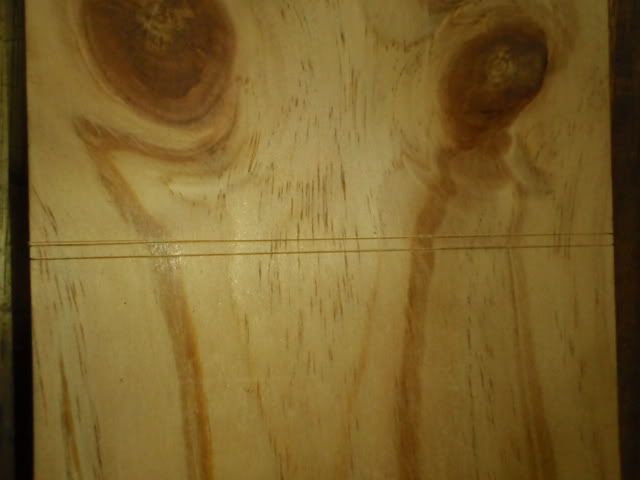
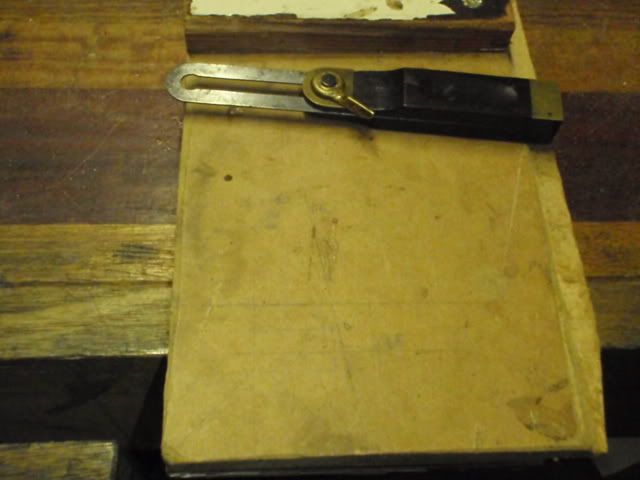
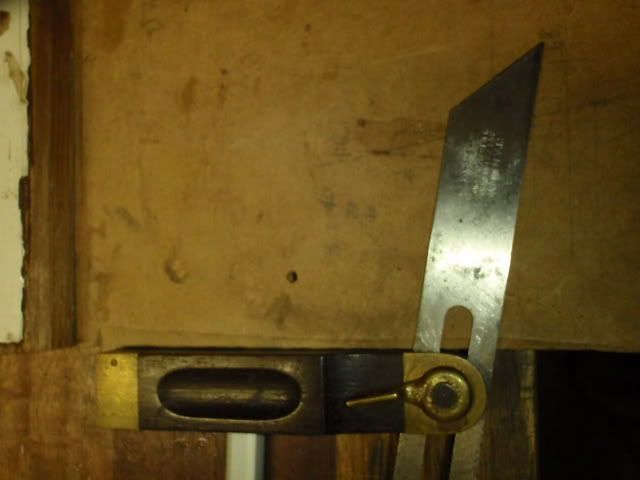
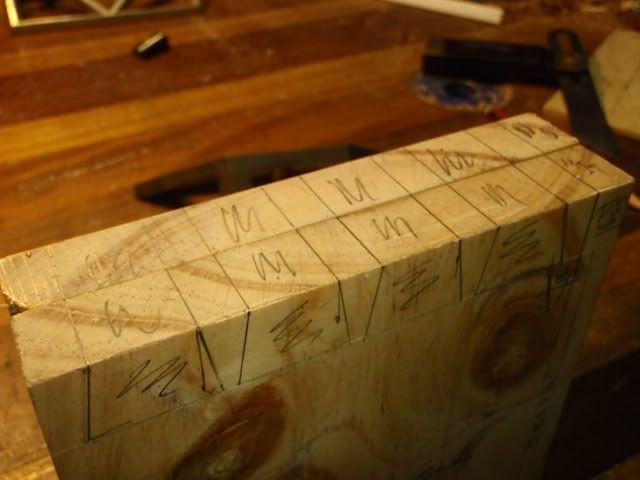
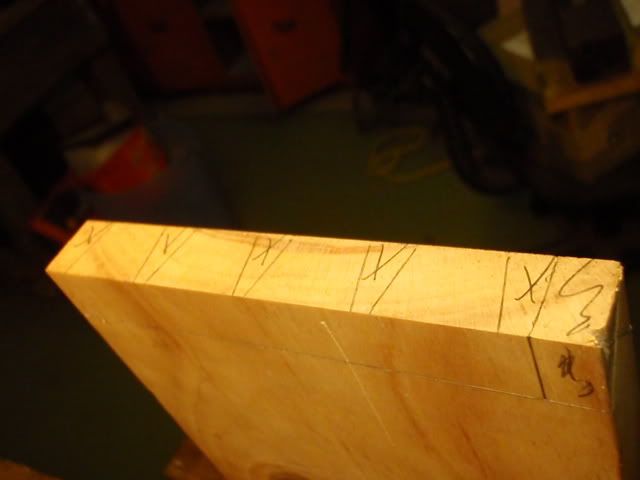
Step 1: Lay out board, using marking knife and square
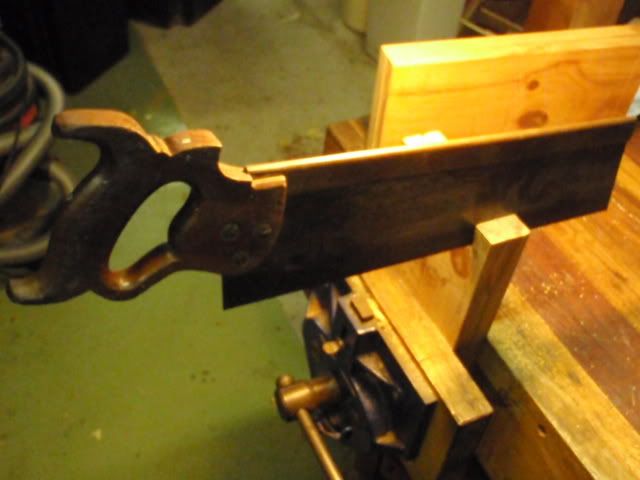
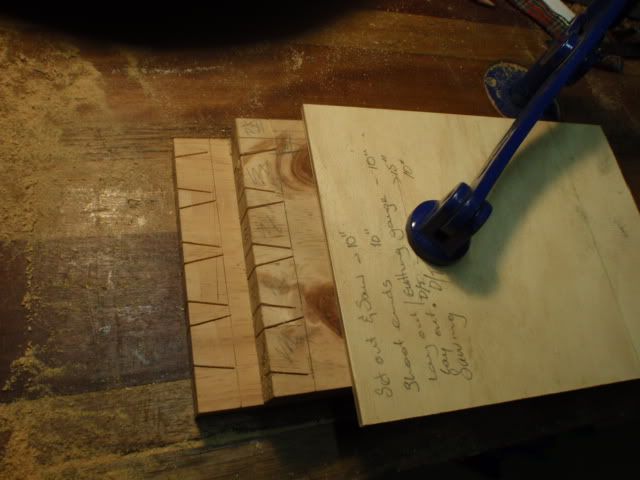
Step 2: Cut board. Note tolerances typical for trade cabinetmakers using handtools.
Step 3: Square up boards, get ends square (I've used a shooting board in this example, but anything works fine, a tablesaw, for example.)
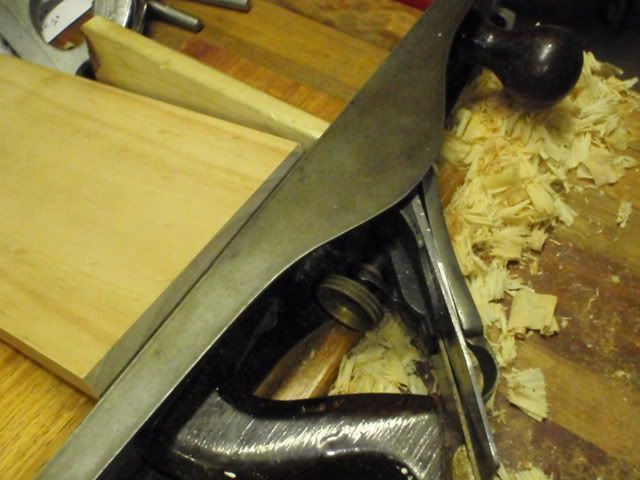
Notice how a sharp plane takes clean shavings off the end grain of pine. Not showing off, just showing what to look for.

Step 3a:
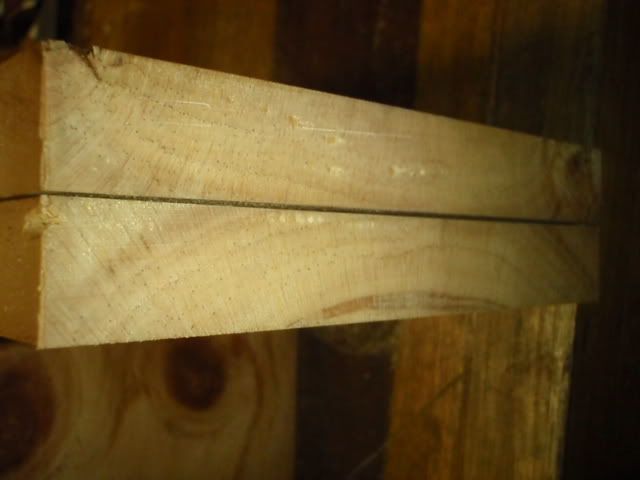
Arrange boards so that they're heart side out. Mark them accordingly
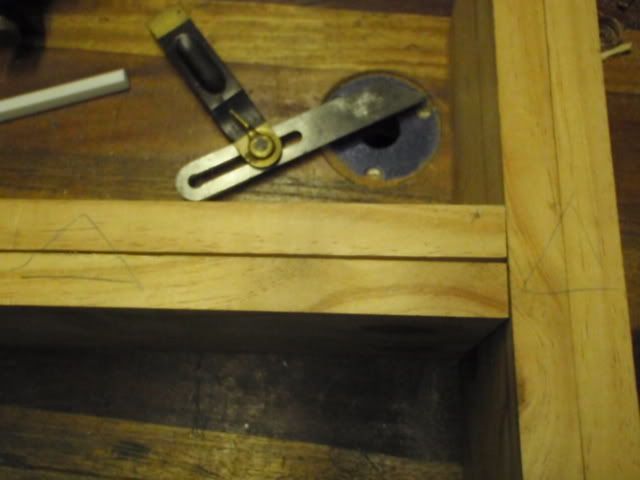
4: Lay out dovetails
EDIT: NOTE THAT THESE ARE LAID OUT INCORRECTLY. WILL CHANGE PHOTO LATER.

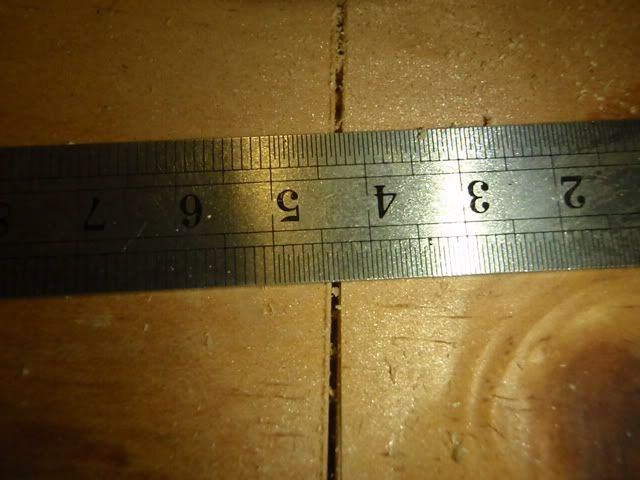
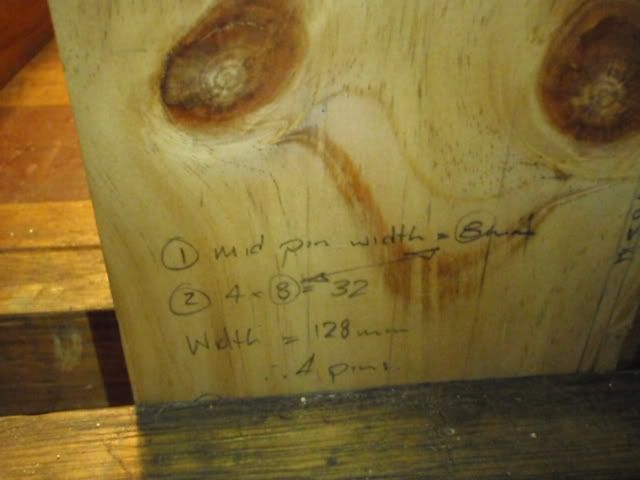
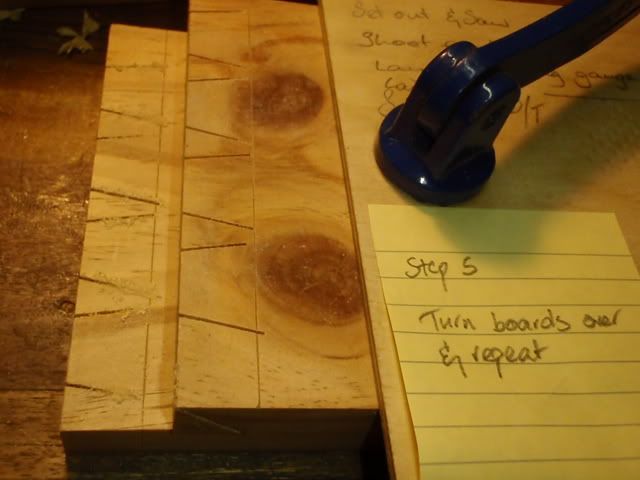
Step 5: Note, as this is construction, the dovetails are 1:6 slope. I've got the 1:6 measurements laid out somewhere permanent and easily obtainable, on my bench hook.
EDIT: NOTE THAT THESE ARE LAID OUT INCORRECTLY. WILL CHANGE PHOTO LATER.
EDIT: NOTE THAT THESE ARE LAID OUT INCORRECTLY. WILL CHANGE PHOTO LATER.
Step 6: Lay out details
EDIT: NOTE THAT THESE ARE LAID OUT INCORRECTLY. WILL CHANGE PHOTO LATER.
EDIT: NOTE THAT THESE ARE LAID OUT INCORRECTLY. WILL CHANGE PHOTO LATER.
-
10th October 2011, 01:59 AM #160
SENIOR MEMBER
- Join Date
- Jan 2004
- Posts
- 686
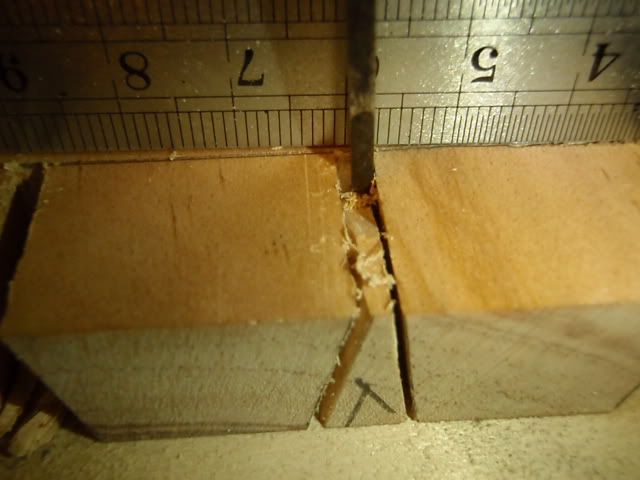
Step 7: Cut tail sockets using any saw. As these are construction dovetails, I used my tenon saw, not too fussed if there are tiny saw marks (as it turns out, there aren't any - see later.)
EDIT: NOTE THAT THESE ARE LAID OUT INCORRECTLY. WILL CHANGE PHOTO LATER.
Step 8:
Clamp boards to table
 EDIT: NOTE THAT THESE ARE LAID OUT INCORRECTLY. WILL CHANGE PHOTO LATER.
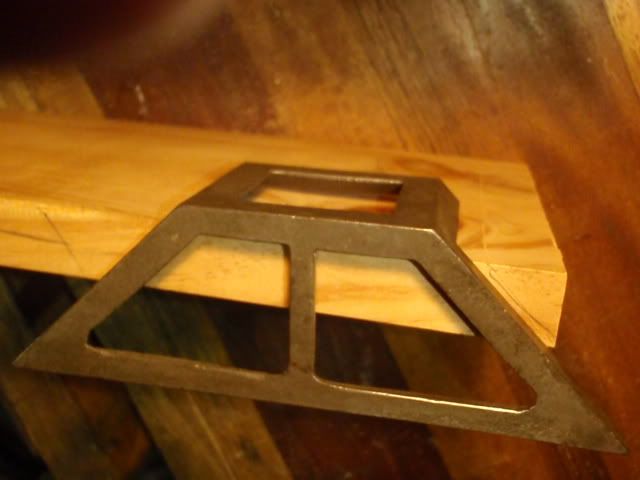
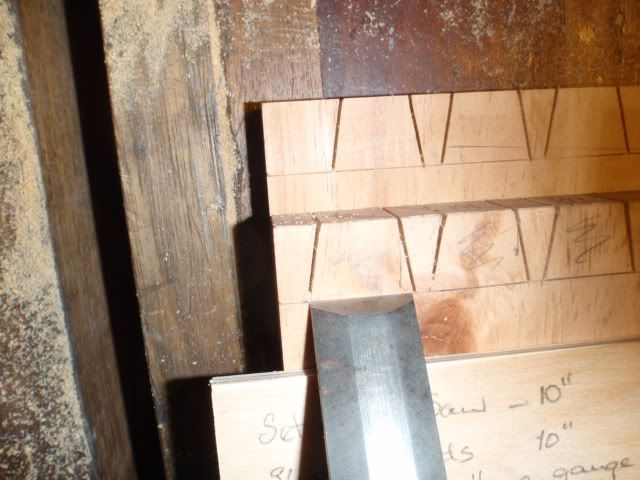
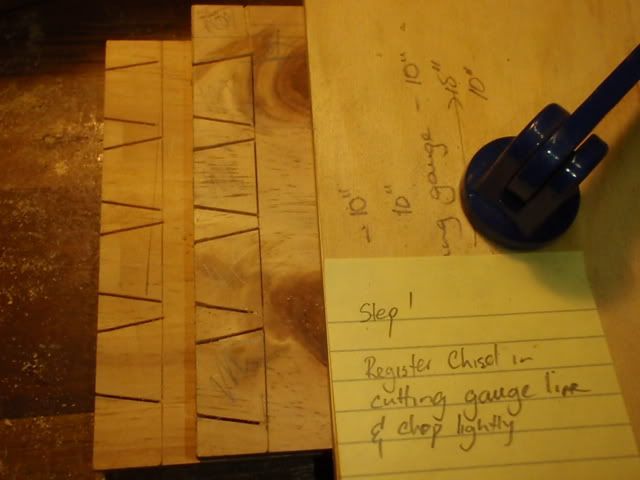
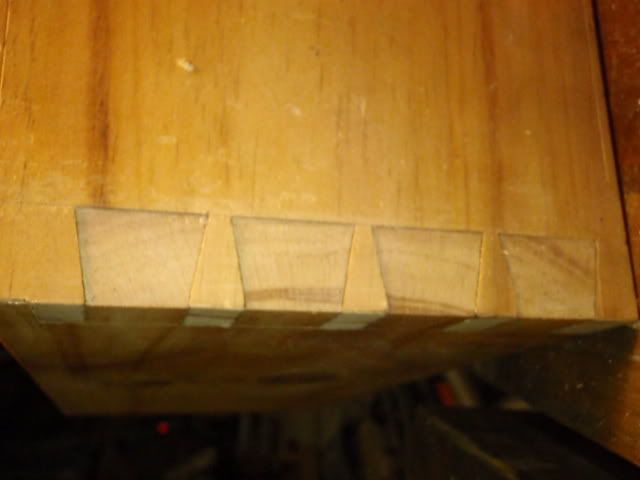
Choose a chisel that fits neatly between the pins/ the width of the tail socket.
 EDIT: NOTE THAT THESE ARE LAID OUT INCORRECTLY. WILL CHANGE PHOTO LATER.
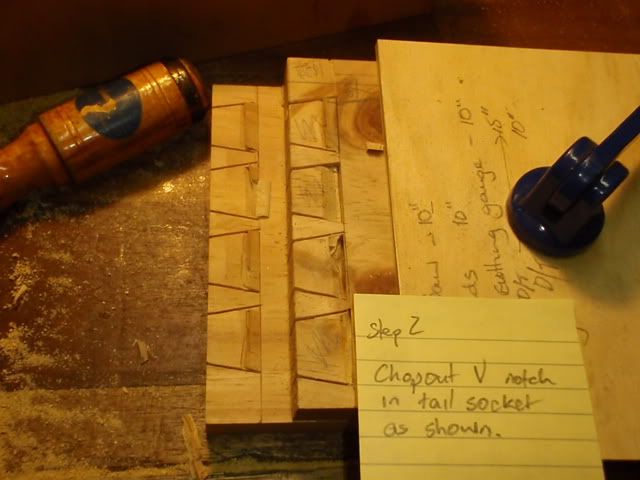
Step 9:
Read the Post-It
 EDIT: NOTE THAT THESE ARE LAID OUT INCORRECTLY. WILL CHANGE PHOTO LATER.
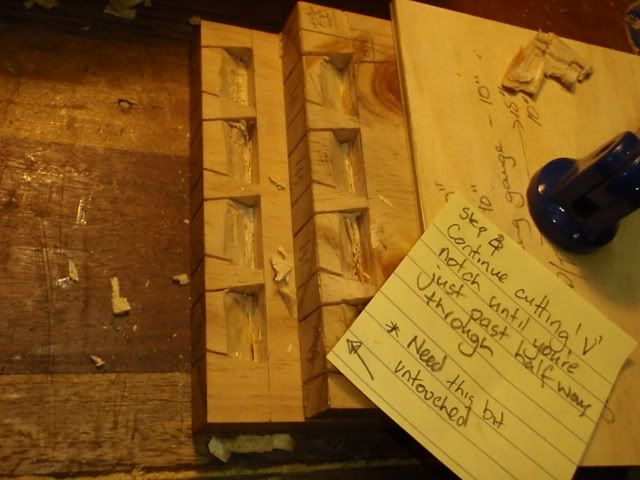
Step 10:
Read the Post-It note.
 EDIT: NOTE THAT THESE ARE LAID OUT INCORRECTLY. WILL CHANGE PHOTO LATER.
 EDIT: NOTE THAT THESE ARE LAID OUT INCORRECTLY. WILL CHANGE PHOTO LATER.
(note angle of chisel, bevel down.)
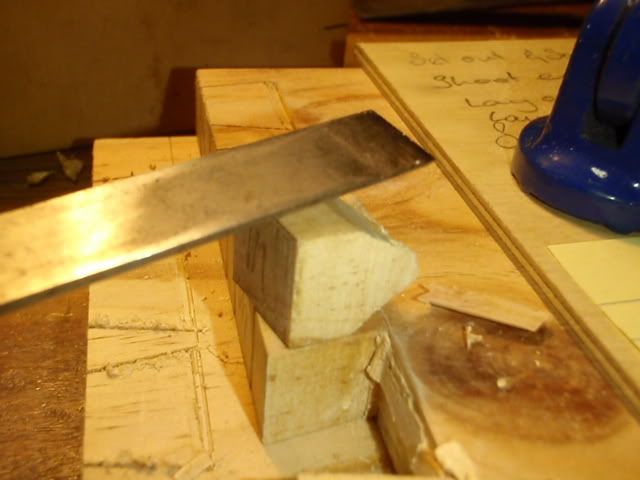
Step 11:
Read the Post-It Note.
 EDIT: NOTE THAT THESE ARE LAID OUT INCORRECTLY. WILL CHANGE PHOTO LATER.
Step 12:
Read the Post-It Note.
 EDIT: NOTE THAT THESE ARE LAID OUT INCORRECTLY. WILL CHANGE PHOTO LATER.
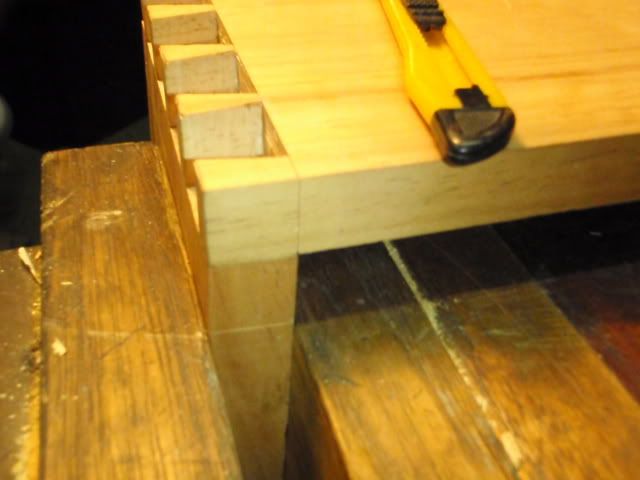
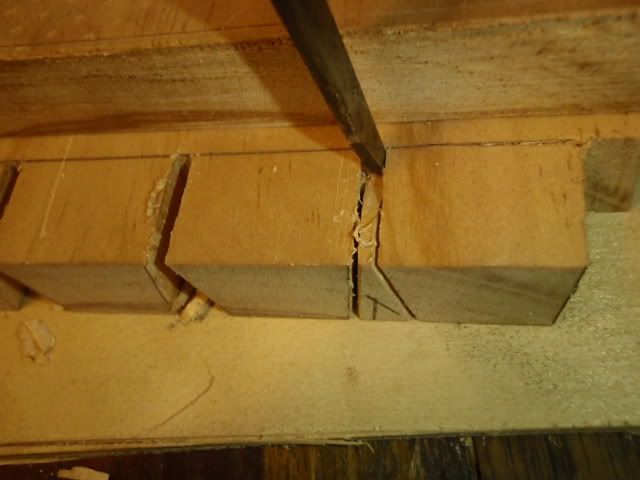
You're looking at the reverse side of the board to the one I was cutting. The first couple of cuts were a bit inaccurate (saw wasn't level,) but after that, it's like riding a bike - the saw levelled up and the rest cut perfectly. (no, I don't look at the back of the board when I'm dovetailing, I just cut with the saw level. Critical show work, I stop 2mm short and check, but it's not really a problem.) This is only a toolbox, so I didn't care about the overcut. If it was show work or furniture, I would.
Step 13:
The chunk of tail socket that comes out. Note how the outside is still full thickness to support the wood while you're chopping.
 EDIT: NOTE THAT THESE ARE LAID OUT INCORRECTLY. WILL CHANGE PHOTO LATER.
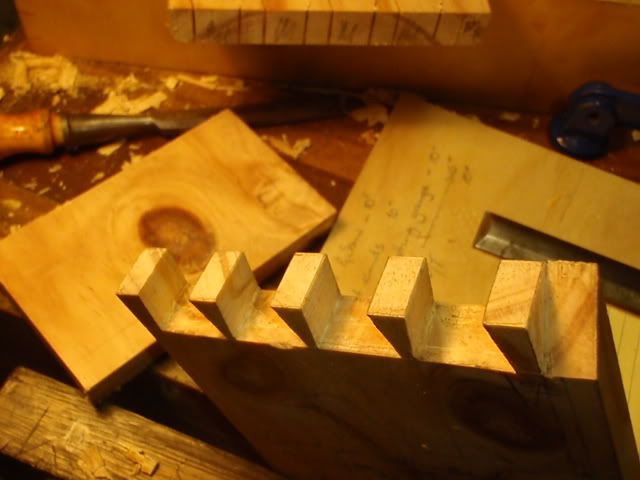
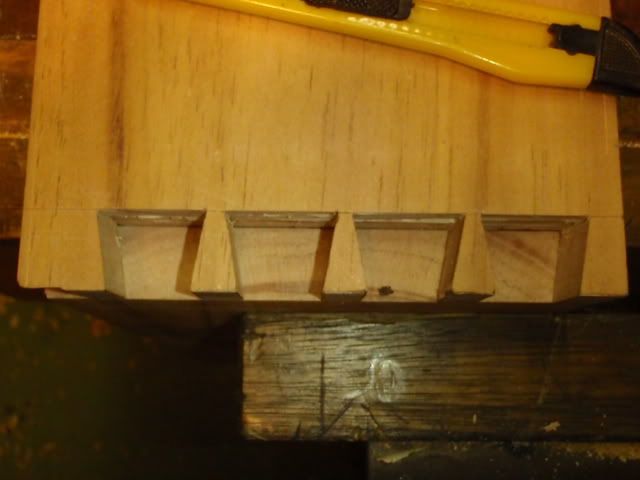
Step 14:
The finished pins/tail sockets:
 EDIT: NOTE THAT THESE ARE LAID OUT INCORRECTLY. WILL CHANGE PHOTO LATER.
-
10th October 2011, 02:07 AM #161
SENIOR MEMBER
- Join Date
- Jan 2004
- Posts
- 686
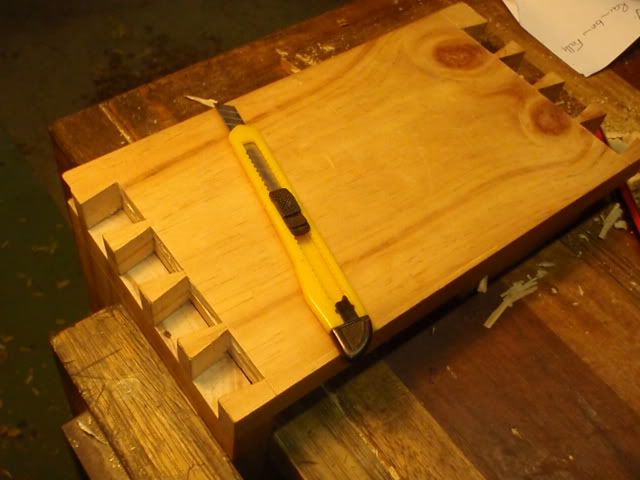
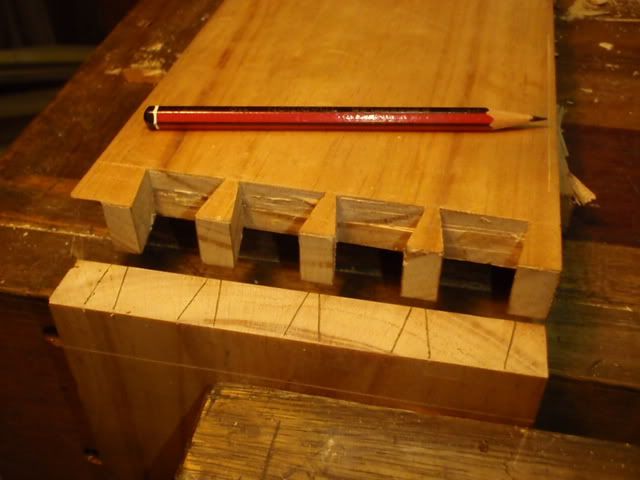
Step 15:
Lay the pin board in position above the relevant end, and mark with an Olfa knife (sitting on the board.) This step is absolutely critical to get it accurate.
EDIT: NOTE THAT THESE ARE LAID OUT INCORRECTLY. WILL CHANGE PHOTO LATER.
EDIT: NOTE THAT THESE ARE LAID OUT INCORRECTLY. WILL CHANGE PHOTO LATER.
EDIT: NOTE THAT THESE ARE LAID OUT INCORRECTLY. WILL CHANGE PHOTO LATER.
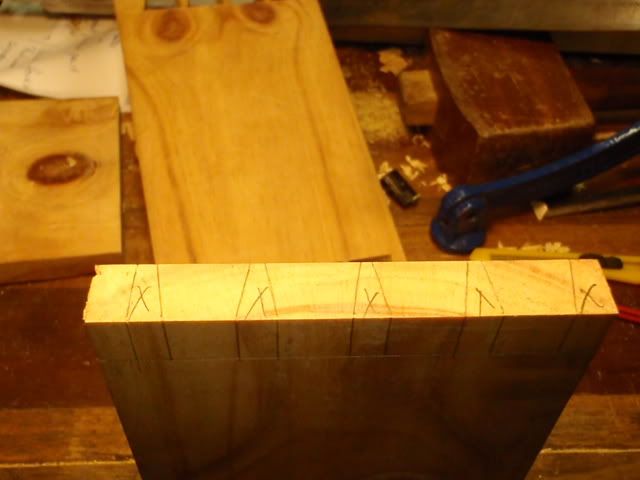
Step 16: Run a sharp pencil in the knife lines
EDIT: NOTE THAT THESE ARE LAID OUT INCORRECTLY. WILL CHANGE PHOTO LATER.
Step 17: Transfer lines square down face of board. Mark Waste Clearly.
EDIT: NOTE THAT THESE ARE LAID OUT INCORRECTLY. WILL CHANGE PHOTO LATER.
EDIT: NOTE THAT THESE ARE LAID OUT INCORRECTLY. WILL CHANGE PHOTO LATER.
EDIT: NOTE THAT THESE ARE LAID OUT INCORRECTLY. WILL CHANGE PHOTO LATER.
Step 18:
Cut out baselines of pin sockets as you did for tail sockets.
EDIT: NOTE THAT THESE ARE LAID OUT INCORRECTLY. WILL CHANGE PHOTO LATER.

EDIT: NOTE THAT THESE ARE LAID OUT INCORRECTLY. WILL CHANGE PHOTO LATER.
Note you can use a saw to cut the outside pin sockets.
Step 19: Turn board over and finish.
(As these pins were finer than I wanted them, I needed to use a skewer (1/16" chisel) with hand pressure to pop out the waste from the pin sockets.
EDIT: NOTE THAT THESE ARE LAID OUT INCORRECTLY. WILL CHANGE PHOTO LATER.
EDIT: NOTE THAT THESE ARE LAID OUT INCORRECTLY. WILL CHANGE PHOTO LATER.
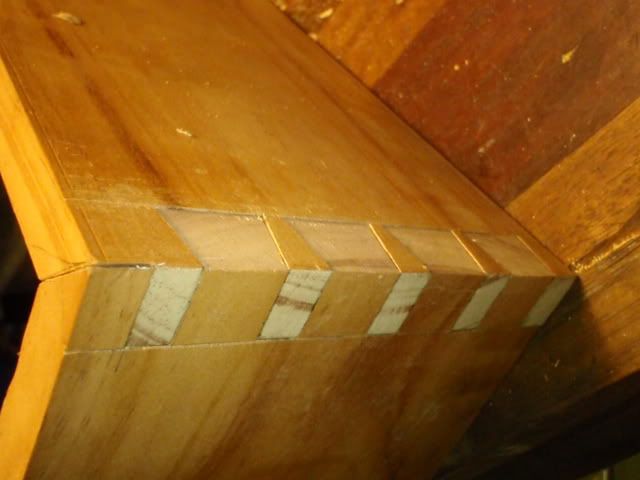
Step 20: Assemble - these fit perfectly off the saw, but I stuffed up the mitre - I'd be recutting it or running a tiny 0.75mm rebate on the inside of the board to close up the mitre gap. The pin sockets aren't quite deep enough, meaning that I need to plane a tiny bit off the board where the pins are protruding. No biggie.
EDIT: NOTE THAT THESE ARE LAID OUT INCORRECTLY. WILL CHANGE PHOTO LATER.
EDIT: NOTE THAT THESE ARE LAID OUT INCORRECTLY. WILL CHANGE PHOTO LATER.
Note the black line here is a shadow or remnant of a pencil line, not a gap.
EDIT: NOTE THAT THESE ARE LAID OUT INCORRECTLY. WILL CHANGE PHOTO LATER.
-
10th October 2011, 02:07 AM #162
Novice
- Join Date
- Jul 2006
- Location
- Leeds, UK
- Posts
- 21
I've never worked out from where this "London" dovetail nomenclature emerged. As you know I live and work in the UK, and I've never heard the term used in any furniture workshop, gallery, museum, shop or antique dealer around these parts. I just know that kind of dovetail as 'delicate', 'fine', or 'refined' or something like that. Originally Posted by derekcohen
However, even if the pins are very fine, ie just a saw kerf or so thick at the narrowest point nearest the front face of the drawer front (down at the bottom of the socket) the chiselling out shouldn't be any more of a challenge than doing the same job around stouter pins, if executed carefully.
It really makes little difference which method you use to clear out the bulk of the waste from the socket between the pins, ie, hand chopped or routed, you still have to prod around a bit to get the last bits out of the corners. I suppose a skew chisel has the characteristic that you don't have to cut deeper at the base line of the socket, but a good sharp 1/8" to 1/4" bevel edged chisel will do the job just as well, even if it does cut down into the base line by 1/128" or perhaps even as much 1/32".
In other words, I don't think skew chisels are a particularly useful chisel, whatever kind of pins you are working with, stout or delicate, and everything in between. However, if you've got a pair-- they are always a pair-- there's no reason why you shouldn't use them. They are, of course, an extra couple of tools flopping about your workbench that you have to keep an eye on, and there are extra movements required to put down one tool and select another, all of which might slow down production a bit. That may or may not be important, all depending on your reason for woodworking. Slainte.
-
10th October 2011, 02:12 AM #163
Novice
- Join Date
- Jul 2006
- Location
- Leeds, UK
- Posts
- 21
Ah, Eddie, Egyptian style dovetails. I haven't seen that pattern on a regular basis since about 5,000 years ago, ha, ha. Slainte. Originally Posted by eddie the eagle
-
10th October 2011, 02:35 AM #164
SENIOR MEMBER
- Join Date
- Jan 2004
- Posts
- 686
Hi Richard, Originally Posted by Sgian Dubh
Let's start a new naming trend. How about Phonetician dovetails, weren't they the rough and ready type? (either that or you could be The Doctor and you actually did see them 5000 years ago.)
Or, we could call them just bog-standard carcase dovetails, more or less as per training, unless I've stuffed something up in the layout. (possible, running on very little sleep.)
[top pin is fairly thick as I'm running a groove internally for a sliding lid and cutting off the mitred section for use as a handgrip.]
Trust all is well with you and Leeds. Drove through the city centre looking for Hertz rent-a-car in July, but couldn't find it so kept on going. Beautiful part of the world you're in.
Cheers,
eddie.
-
10th October 2011, 02:53 AM #165
Be inspired. Be creative. Be bold.
- Join Date
- Apr 2001
- Location
- Perth
- Posts
- 10,826
Ah, Eddie, Egyptian style dovetails.
Heh, Eddie .. I recall building all the drawers in a chest like that several years ago. I termed them "backwards". I prefer Richard's terminology
Thanks for posting the Tutorial. There is also an article with tips on my website: http://www.inthewoodshop.com/Furnitu...Dovetails.html
Richard, I have no idea who started calling the fine dovetails "London". It does appear to have caught on as many now use the term to describe this type. The one's I have been building are not what I would call London - "London" style come to a sharp point at the apex. Mine do not, and do not deliberately as I did not feel that this would suit the chests I am building.
"Phonetician" sounds fine as well
Nevertheless the ends are quite close together, and the Jarrah is hard and brittle. It would be easy to break off a piece with too much force in the corner. I have a fishtail chisel for the corners, which works very well. A couple of strokes and the corners are cleaned out. Perhaps there are more than one way to do this dovetailing business?
Regards from Perth
DerekVisit www.inthewoodshop.com for tutorials on constructing handtools, handtool reviews, and my trials and tribulations with furniture builds.


 Reply With Quote

Similar Threads
-
Finished building a tallboy / drawer chest
By chubs in forum WOODWORK - GENERALReplies: 32Last Post: 4th July 2009, 12:55 PM -
4 stages
By wheelinround in forum WOODIES JOKESReplies: 2Last Post: 25th August 2007, 03:26 PM -
My dream shed...the planning stages.....
By bulldog in forum WOODWORK - GENERALReplies: 17Last Post: 17th May 2007, 01:08 AM -
Basic stages of Finishing
By Shane Watson in forum FINISHINGReplies: 0Last Post: 24th June 2001, 12:41 PM
