

 Thanks:
  Likes:
  Needs Pictures: 0
 Picture(s) thanks:
Results 1 to 15 of 17
Thread: TH Chair WBIP
-
26th January 2019, 05:24 PM #1
 SENIOR MEMBER


- Join Date
- Aug 2017
- Location
- Mt Kembla
- Age
- 62
- Posts
- 256
 TH Chair WBIP
Been wanting to make another of these chairs that we made in NZ.So while I think about the drawers for awhile this is a work back in progress after sitting in the shed for a few months.I steam bent some hoops up last year and it's about time I started to shape them.20190126_091325.jpg
All the shaping has been done with a pencil,spokeshave and a mini ebony radius plane.So getting closer to finish with lots of lovely curly shavings.20190125_091600.jpg
20190126_112839.jpg
1 out of 3 photos up the right way.
cheers.....Roy
-
26th January 2019 05:24 PM # ADSGoogle Adsense Advertisement
- Join Date
- Always
- Location
- Advertising world
- Age
- 2010
- Posts
- Many
-
29th January 2019, 04:40 PM #2
SENIOR MEMBER
- Join Date
- Aug 2017
- Location
- Mt Kembla
- Age
- 62
- Posts
- 256
Been having a play with the hoop and reckon it might be getting close to ready.Tested it on the frame and it looks alright will probably glue it together in the next day or so.20190129_152723.jpg
20190129_152819.jpg
And one day the picture gods may smile and everything will be the right way up.
cheers....Roy
-
29th January 2019, 09:59 PM #3
SENIOR MEMBER
- Join Date
- Jul 2014
- Location
- Brisbane
- Posts
- 937
Looks like this is going to be another excellent build. The dresser was top notch. How long did it take you to shape the hoop from the square section to round? Did you do all of it with spokeshaves?
-
30th January 2019, 06:08 AM #4
SENIOR MEMBER
- Join Date
- Aug 2017
- Location
- Mt Kembla
- Age
- 62
- Posts
- 256
Thank you just trying to remember how I made the original when I was in NZ.The hardest part was doing the steam bend it took 3 goes before I got the form right with the springback.Shaping was the easy part it probably took about 8 hours all up and was done with a flat and curved bottom spokeshave plus a mini ebony radius plane.And sand paper for the finish.Would love to have a draw knife maybe one day as that would speed up the process. Originally Posted by Alkahestic

cheers ....Roy
-
13th February 2019, 04:24 PM #5
SENIOR MEMBER
- Join Date
- Aug 2017
- Location
- Mt Kembla
- Age
- 62
- Posts
- 256
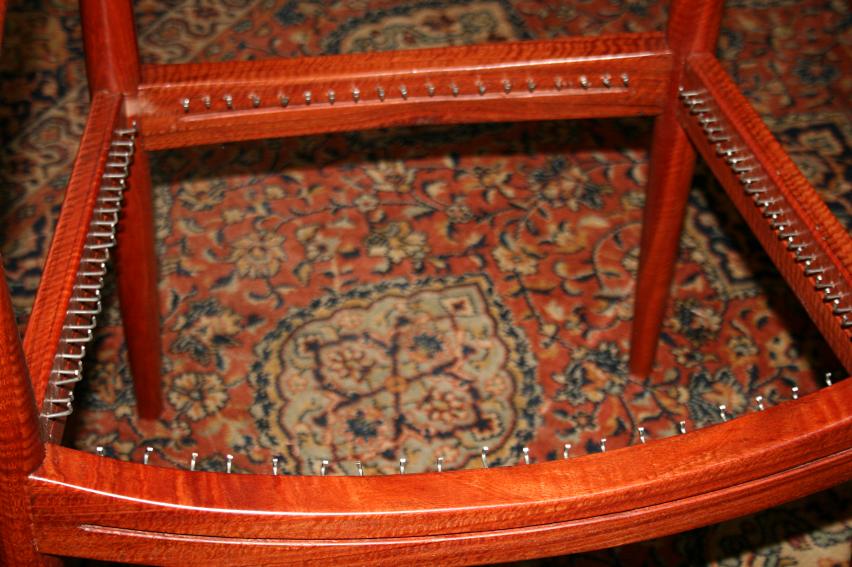
Been doing a bit on this when I can and decided to have a crack at doing the Danish Cord last night.Found 2 youtube posts and both doing a different method.
Decided on the one that doesn't cut and rejoin the cord at various lengths.Seemed to go alright but I don't think I have any skin left on my fingers that stuff is brutal.Any way got the front to back done and filled in the gaps.Will wait for a skin graft before I finish the rest.
20190213_115910.jpg
cheers....Roy
-
13th February 2019, 04:58 PM #6
Be inspired. Be creative. Be bold.
- Join Date
- Apr 2001
- Location
- Perth
- Posts
- 10,821
Hi Roy
I have an article on weaving Danish Cord: http://www.inthewoodshop.com/Furnitu...gTheChair.html


Regards from Perth
DerekVisit www.inthewoodshop.com for tutorials on constructing handtools, handtool reviews, and my trials and tribulations with furniture builds.
-
18th February 2019, 08:27 AM #7
SENIOR MEMBER
- Join Date
- Aug 2017
- Location
- Mt Kembla
- Age
- 62
- Posts
- 256
G'day Derek that is one stunning build.The timber and cord work very well together.It must of been a real pain to be threading the cord through the rebate
as you said a mind numbing process when your doing it but the end result is worth it.I will put up a finished photo of mine once I can get a decent one.
After doing the sides do you think that putting an extra nail or 2 in is worth it as it can get pretty bunched up with 3 threads to a nail at times.Just a thought for next time.
cheers....roy
-
18th February 2019, 04:13 PM #8
Be inspired. Be creative. Be bold.
- Join Date
- Apr 2001
- Location
- Perth
- Posts
- 10,821
Roy, it was the first (and only) time I wove Danish Cord, and I was so focussed on getting it done, that I did not consider variations. In retrospect, there would not have been space for extra nails, and it may have affected the spacing of the lines. There was enough room on each nail.
Regards from Perth
DerekVisit www.inthewoodshop.com for tutorials on constructing handtools, handtool reviews, and my trials and tribulations with furniture builds.
-
20th February 2019, 02:27 PM #9
SENIOR MEMBER
- Join Date
- Aug 2017
- Location
- Mt Kembla
- Age
- 62
- Posts
- 256
Chairs been finished for a few days but was hoping to get some decent photos.Unfotunately just have to put the ones I have up.
Pretty happy with the result and how the weaving went hopefully I will get to do another project with it again.20190216_081156.jpg20190216_081247.jpg
20190216_081310.jpg
And the sideways gods are here again.
cheers.....Roy
-
21st February 2019, 12:20 AM #10
GOLD MEMBER
- Join Date
- Jun 2005
- Location
- Helensburgh
- Posts
- 7,696
I would give you a pass mark for that Roy, in fact it looks a damned good job to me. How are the fingers after the weaving?
CHRIS
-
21st February 2019, 03:31 PM #11
SENIOR MEMBER
- Join Date
- Aug 2017
- Location
- Mt Kembla
- Age
- 62
- Posts
- 256
Originally Posted by Chris Parks
Cheers Chris any time you want to come down and rest your weary legs and have a seat your welcome.
Fingertips are just recovering that stuff is sandpaper in disguise.
-
21st February 2019, 09:28 PM #12
Be inspired. Be creative. Be bold.
- Join Date
- Apr 2001
- Location
- Perth
- Posts
- 10,821
That is fabulous, Roy! Makes my effort look amateurish! Destroy them NOW!

Regards from Perth
DerekVisit www.inthewoodshop.com for tutorials on constructing handtools, handtool reviews, and my trials and tribulations with furniture builds.
-
22nd February 2019, 04:43 PM #13
SENIOR MEMBER
- Join Date
- Jul 2014
- Location
- Brisbane
- Posts
- 937
Both woodwork and cord work are fantastic!

-
23rd February 2019, 01:51 PM #14
SENIOR MEMBER
- Join Date
- Aug 2017
- Location
- Mt Kembla
- Age
- 62
- Posts
- 256
I appreciate the kind words Derek we both know how much hard work goes into making one of these.How about we meet halfway and have a chair bonfire Originally Posted by derekcohen
together. LOL.
LOL.
cheers....Roy
-
23rd February 2019, 01:53 PM #15
SENIOR MEMBER
- Join Date
- Aug 2017
- Location
- Mt Kembla
- Age
- 62
- Posts
- 256
Cheers thank you for the kind words. Originally Posted by Alkahestic
cheers.....Roy

 Reply With Quote
Similar Threads
-
chair
By SPIRIT in forum WOODCARVING AND SCULPTUREReplies: 8Last Post: 30th March 2014, 11:57 PM -
Windsor chair - fan back side chair course
By MGFWoodworking in forum ANNOUNCEMENTSReplies: 0Last Post: 28th August 2012, 04:20 PM -
GOLF CHAIR (a chair with balls)
By Michael Spain in forum WOODWORK - GENERALReplies: 3Last Post: 10th June 2011, 09:13 PM -
Sit in my new chair
By wheelinround in forum WOODWORK - GENERALReplies: 7Last Post: 20th February 2008, 08:16 AM -
Wbip
By jacko in forum WOODWORK PICSReplies: 4Last Post: 16th March 2006, 08:25 PM
