

 Thanks: 0
 Likes: 0
 Needs Pictures: 0
 Picture(s) thanks: 0
Results 1 to 9 of 9
Thread: glue Press jig - Part 1
-
24th April 2008, 04:53 PM #1
 hardly human

- Join Date
- Jun 2005
- Location
- Sydney
- Posts
- 3,096
 glue Press jig - Part 1
I'd love a set of Plano glue press/panel clamps, the ones that you use to glue up benchtops and the like... but I am a cheap ?????.
I have this set up at home (which I am away from at the moment) and remade a 'throw away' system on a job I helped out at lately.
I got the idea somewhere on the net... but can't find it to link, so the idea is not mine... just one I stole shamelessly!
This one is a good way of gluing up a bench top for your work bench… which is a PITA when you don't have a workbench to start with.
<o></o>No pics 'cause I'm disorganised and on a slow, intermittent, internet connection... so use your imagination! The net has dropped out about 5 times in the space of this post…. So I can’t be stuffed adding pics.
<o></o>I got some MDF 6' x 3' by 1" sheets very cheap, they were 'out of spec' or something. Cause they were cheap I got a station wagon full.
Edge banded them with some solid timber and then painted them... just to keep the moisture out.
<o></o>The ‘glue up panel’:
<o></o>Shellac the MDF sheet and then wax it, this stops the glue from the bench top from sticking the ‘glue up’ bench top/MDF together.
Top and bottom ‘clamp’:<o></o>
I screw a batten to the bottom of one sheet. I have another batten I screw to the sheet at a width determined by the bench top I'm going to glue up. Different bench top... just change the position of the top batten to suit. I plane the battens to be a mm or so thinner than the bench top. The bottom batten only needs paint/shellac/wax.<o></o>
<o>
</o>
-
24th April 2008 04:53 PM # ADSGoogle Adsense Advertisement
- Join Date
- Always
- Location
- Advertising world
- Posts
- Many
-
24th April 2008, 04:59 PM #2
hardly human
- Join Date
- Jun 2005
- Location
- Sydney
- Posts
- 3,096
Part 2
Leaning sticks:
I have a couple of heavier timbers, 70 x 35 or something, that I can lean against a wall/bench or whatever, vertically... screw a piece of pine framing stud across them (horizontally) top and bottom, sit the MDF sheet on the batten so the sheet is supported off the ground. I call the pine framing stud my ‘clamp to leaning stick support bit’.
Drop the MDF sheet onto the 'bottom stud, this supports the MDF, and the top stud I screw to the back of the sticks… holds them together nicely.
I like to lean my ‘glue up clamp’ against a wall… but you can also just lay the MDF sheet on a bench and do the whole thing flat. Whatever is easier.
If my bench top is bigger than a 6’ x 3’ MDF sheet, then I use longer ‘leaning sticks’ and lay a sheet up, horizontally, across the ‘clamp to leaning stick support bit (bottom stud)’, put another sheet on top of the first, edge to edge. Then lay two MDF sheets (orientated vertically) over, and flat against, the bottom layer. Then screw the bottom clamp on.
Clear as mud? Basically just build up a larger ‘glue up panel’.
If I use 4 MDF sheets, I get a 6’ x 6’ "glue up panel", two sheets thick.
Wedge Pairs:
Cut some wedges out of a board the same thickness as the bench top you’ll glue up.. so if the bench top is from 19mm boards, use 19mm stock, and so on.
My wedges are cut from 70mm, or so, width board; I cut them about 200 or 300 mm long. Just dock the 19mm stock into a 200 or 300mm rectangle and then cut on the diagonal of the rectangle. Plane the diagonal bit smooth, then wax it. Put the two wedges together to reform the original rectangle, mark the top and bottom ‘long edge’, glue a strip of scrap sandpaper to one of these edges.
You will probably need a ‘wedge pair’ every 400 – 500 mm, at a minimum one pair for each end of the bench.
-
24th April 2008, 05:02 PM #3
hardly human
- Join Date
- Jun 2005
- Location
- Sydney
- Posts
- 3,096
Part 3
Sandwich boards:
Lastly I have a few boards I will use to stop the bench top from buckling when it is clamped. Sandwich the bench top between the glue up panel and these boards so they need to be nice and square, and strong enough to not bow. Shellac and wax these as well.
Im just using scrap for most of this so I just use what is going to go to waste.
The only really important dimensions are:
The leaning sticks strong enough to not bow,
The MDF glue up panel larger than the bench top,
The top and bottom clamp slightly thinner than the bench top youll be gluing up,
Wedges cant be too steep, and
The sandwich boards are square and not going to bow.
OK, how to use it:
So, the MDF has a top and bottom batten screwed to it and laid flat or leaned up . Apply glue and chuck in the boards to be glued up.
Insert the wedges between the top batten and the bench top, the wedge with the sandpaper bites into the outer edge of the last bench lamination.
Use a light hammer to knock the top wedge in finger tight now we have our edge to edge clamp.
Lean the sandwich boards up against the whole lot.
Clamp them down with your small G/C clamps now we have the clamp that stops the bench buckling.
Tap in the wedges a little more till you think shell be right.
Ive used it with PVA, Yellow PVA and Kleiberit Construction Adhesive, both the 5 and 20 minute skin time types.
If the glue is going to go off too quick, Ill just set the top batten at the right height to allow me to work fast enough and do it all in stages. Shift the top batten to put it all together.
Used it to fix a stuffed up table top as well just got reverse profile molding to put between the wedge and the tables molded edge.
-
24th April 2008, 05:06 PM #4
hardly human
- Join Date
- Jun 2005
- Location
- Sydney
- Posts
- 3,096
Last part - Tips
TIPs:
1. You can lay out your bench top on the jig as a dry run, position the wedges and then mark the position of the top batten/clamp.
2. Order/arrange the boards for growth ring alternating and figure arrangement. Mark off one edge with a straight line and dock the boards to that line
Now you have 3 straight edges on your bench top, lay down another thin batten vertically on the glue up jig. When you put the boards on the jig, it is very easy to tap the boards into position so your figure arrangement positions itself.
My MDF sheets were $10 each wouldnt have used MDF if I was paying full price for the sheets.
I had two of these set ups going last time I used them and as it was about 35 degrees C, I was able to get a bench top off every 10 minutes using 20min skin glue (20 mins at 27 degrees C). Used DAR stock that had been pre-prepared the carpenter was swearing as he was doing the rail and stiles.
Well, thats it works for me. Hope someone more professional doesnt point out a glaring problem that makes me realize Ive been stuffing it all up!
-
24th April 2008, 05:14 PM #5
Moderate Moderater


- Join Date
- Feb 2006
- Location
- Lindfield N.S.W.
- Age
- 62
- Posts
- 5,643
 Originally Posted by Clinton1

Yeah, having some trouble quite seeing how this works.
Will keep reading Clinton and perhaps all will be revealed...Cheers
Jeremy
If it were done when 'tis done, then 'twere well it were done quickly
-
24th April 2008, 05:16 PM #6
Head Moderator
Sister of the DarkSide
- Join Date
- Dec 2004
- Location
- Toowoomba Q 4350
- Posts
- 9,217
Hi Clinton,
Shame about the net drop out.
That's an impressive way of getting around a problem to get the result you want!
Cheers
Wendy Box Challenge 2011 - Check out the amazing Boxes!
Twist One - Wooden Hinge/Latch/Catch/Handle
Twist Two - Found Object
Twist Three - Anything Goes
-
24th April 2008, 05:35 PM #7
hardly human
- Join Date
- Jun 2005
- Location
- Sydney
- Posts
- 3,096
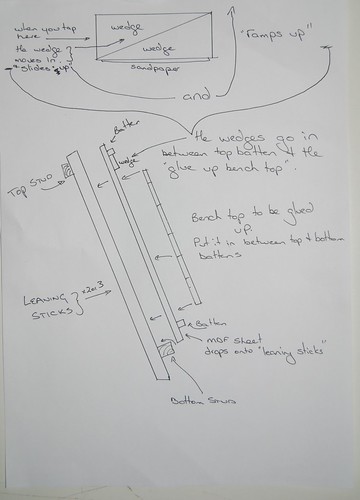
yeah... its a bit hard to visualise.

try thinking of it as two straight edges on either end of the dining table... drop in your glue up and use double wedges to push it all together. Muddier?
I've been trying to put this thread up for more than 2 weeks...
We had earthquakes over the weekend and during this post!... I think the (already dodgy) satellite dishes are out of alignment or the mountings are loose.
I'm going to have to try and fix them this weekend, which involves me, a spanner and a long stick.
A bodgy drawing:
-
24th April 2008, 05:53 PM #8
Moderate Moderater
- Join Date
- Feb 2006
- Location
- Lindfield N.S.W.
- Age
- 62
- Posts
- 5,643
Originally Posted by jmk89
Ah! Light dawns!!! Originally Posted by Clinton1
 Cheers
Jeremy
If it were done when 'tis done, then 'twere well it were done quickly
-
24th April 2008, 07:46 PM #9
hardly human
- Join Date
- Jun 2005
- Location
- Sydney
- Posts
- 3,096
Hope the drawing helps out... forgot to put in the 'sandwich boards' though!
My first full laminated bench was from @40mm square Messmate, which dressed down (by hand) to about 32mm square. Made a lovely benchtop 600mm wide. Lovely and curved.
Since then I've shied away from clamps and come up with this way of doing it... never have a problem with it.
Thats it for me... after 3+ hours... near enough is good enough.


 Reply With Quote

Similar Threads
-
Glue for vacuum press bag
By Al B in forum GLUEReplies: 7Last Post: 1st March 2006, 08:28 PM -
plano glue press
By Tonyz in forum HOMEMADE TOOLS AND JIGS ETC.Replies: 14Last Post: 26th December 2004, 07:56 PM -
Plano Glue Press Clamp
By Robert WA in forum GLUEReplies: 5Last Post: 25th March 2004, 10:42 PM -
2 part epoxy glue
By John tdw in forum GLUEReplies: 4Last Post: 1st May 2001, 09:19 AM
