

 Thanks:
  Likes:
  Needs Pictures:
  Picture(s) thanks:
Results 16 to 30 of 30
-
26th April 2024, 12:54 PM #16
 Be inspired. Be creative. Be bold.


- Join Date
- Apr 2001
- Location
- Perth
- Posts
- 10,831

Scott, I have considered this as well and planned to explore the option - but to add later and not up-front (how will you remove the waste for the riving knife?!). The issue is whether there will be enough clearance between the insert and the wagon. I would check this first. My photos suggest that there may be too little clearance for epoxying the piece on. Also, 12mm depth may not provide enough depth for a L-section to run under the wagon.
Regards from Perth
DerekVisit www.inthewoodshop.com for tutorials on constructing handtools, handtool reviews, and my trials and tribulations with furniture builds.
-
26th April 2024 12:54 PM # ADSGoogle Adsense Advertisement
- Join Date
- Always
- Location
- Advertising world
- Posts
- Many
-
26th April 2024, 01:04 PM #17
SENIOR MEMBER
- Join Date
- Mar 2009
- Location
- Sydney
- Posts
- 538
12mm depth provides adequate clearance for the carriage.
And 1.6mm thickness should work. I would not be able to fix a 3mm angle - too wide.
I'll have a go on the weekend and report back.
-
27th April 2024, 07:32 PM #18
GOLD MEMBER
- Join Date
- Sep 2012
- Location
- Coffs Harbour
- Posts
- 1,811
Hey Scott so are you going 150 internally to cabinet through to the saw blade housing or just to the cabinet where it changes to 120mm standard hammer piping? Originally Posted by scottbr

Apologies if you already said and Ive missed it
Cheers
Nathan
-
28th April 2024, 02:52 PM #19
SENIOR MEMBER
- Join Date
- Mar 2009
- Location
- Sydney
- Posts
- 538
Hey Nathan. I've been pondering the best way to deal with the cabinet. So far, what I did has worked well. Originally Posted by delbs
1. The 150mm PVC travels 100mm into the cabinet.
2. Attached to it is some 150mm flex.
3. I take that up to the blade housing and hang it loosely off it - 'loosely' so I can still crank the blade over to 45 degrees.
4. The 100mm flex that came with the saw travels inside the 150mm.
Why did I keep the original 100mm? Because it would have been hard to disconnect and even harder to reconnect if the 150mm didn't work.
I don't know if having the 150mm encasing the 100mm helps, but I am getting very little dust escaping from the saw so I'm pretty pleased with the outcome.
Saw1.jpgSaw2.jpg
-
29th April 2024, 01:11 AM #20
Be inspired. Be creative. Be bold.
- Join Date
- Apr 2001
- Location
- Perth
- Posts
- 10,831
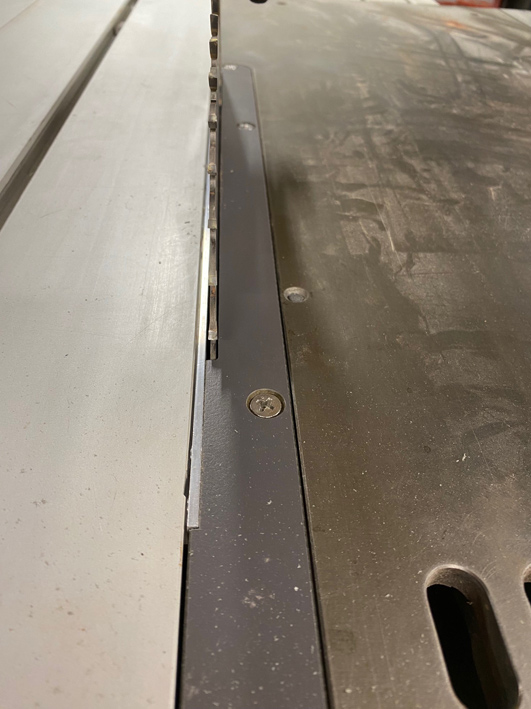
I built a new ZCI for the K3 today. The reason for this was to improve two aspects of the old design.
The Mk1 solution was to narrow the gap between blade and wagon with a section of aluminium ...
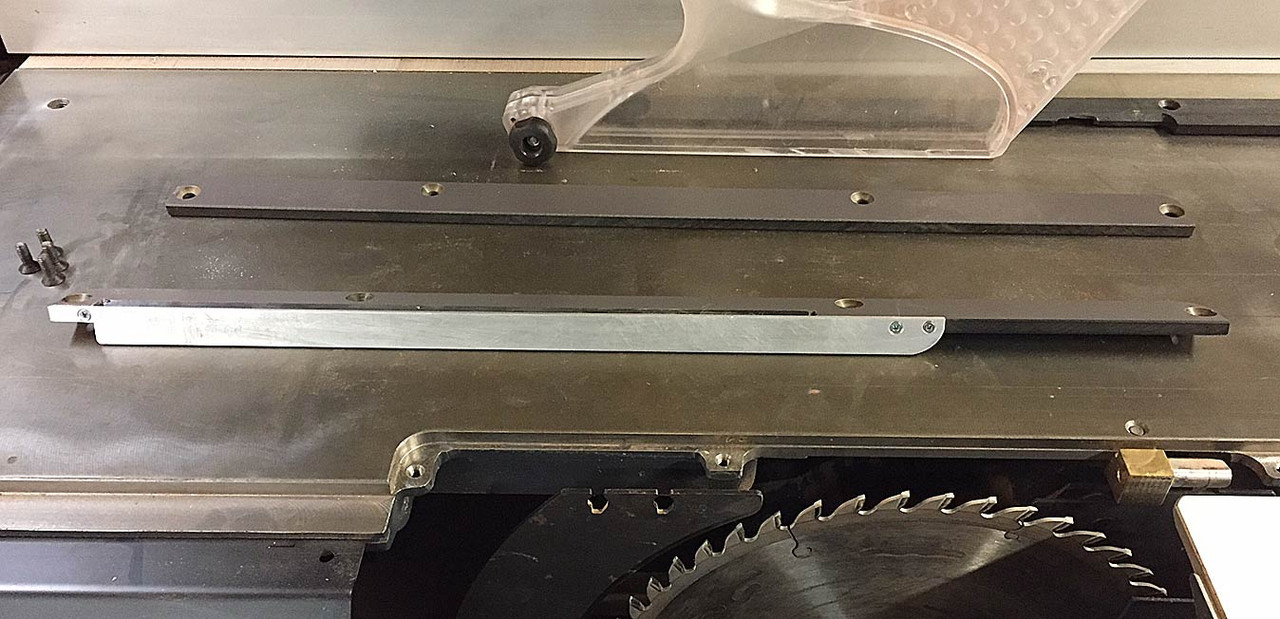
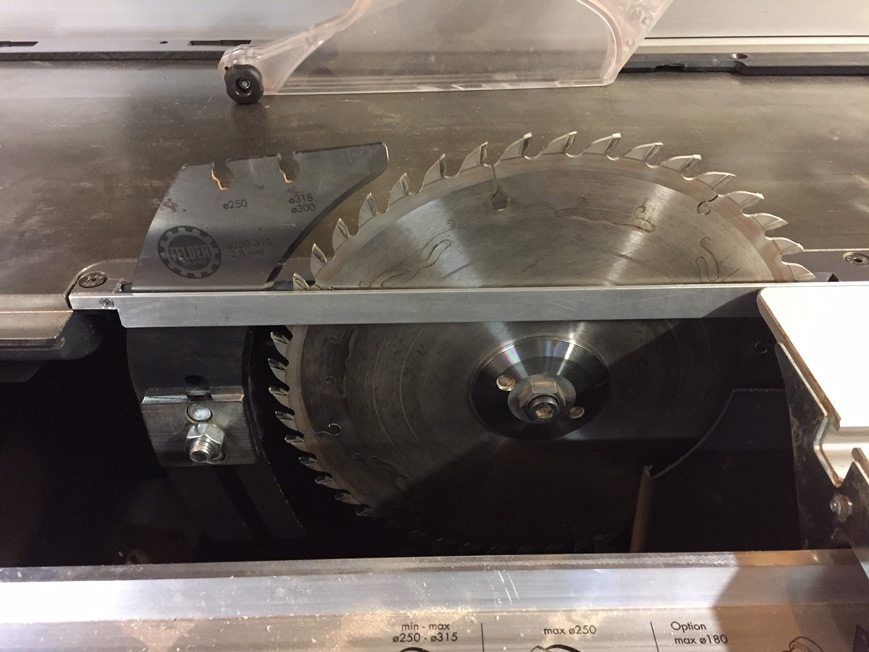
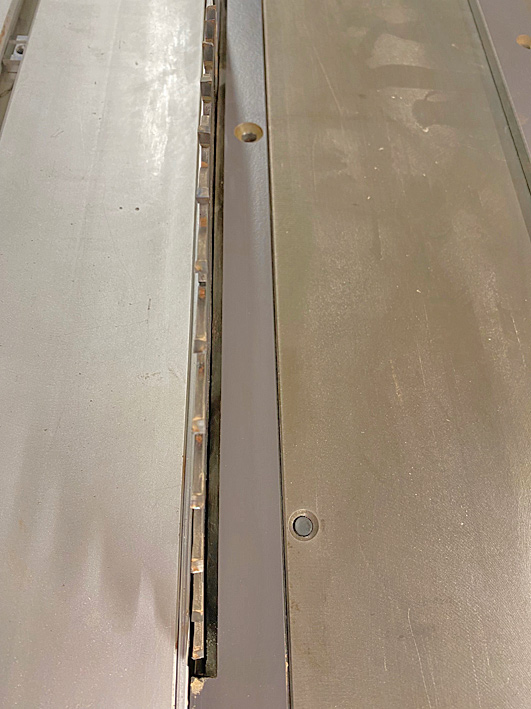
The reason for the aluminium was that the thin sliver of insert closest to the wagon, as seen below, vibrated and then exploded when it touched the spinning blade!

The aluminium on the Mk 1 did improve on the original insert by closing up the side closest to the wagon, and prevented almost all but the thinnest offcuts dropping through the gap. However, the design retained the bevel for a mitre cut - which rendered that side of the blade decidedly non-ZCI!
The new Mk 2 ZCI is also made from a Hammer blank for a dado blade, and uses 3mm aluminium to close off the wagon side, but the aluminium is now a L-section. The reason for this shape is two-fold: it is stiffer and will not vibrate, and it will prevent any very fine slivers falling through.
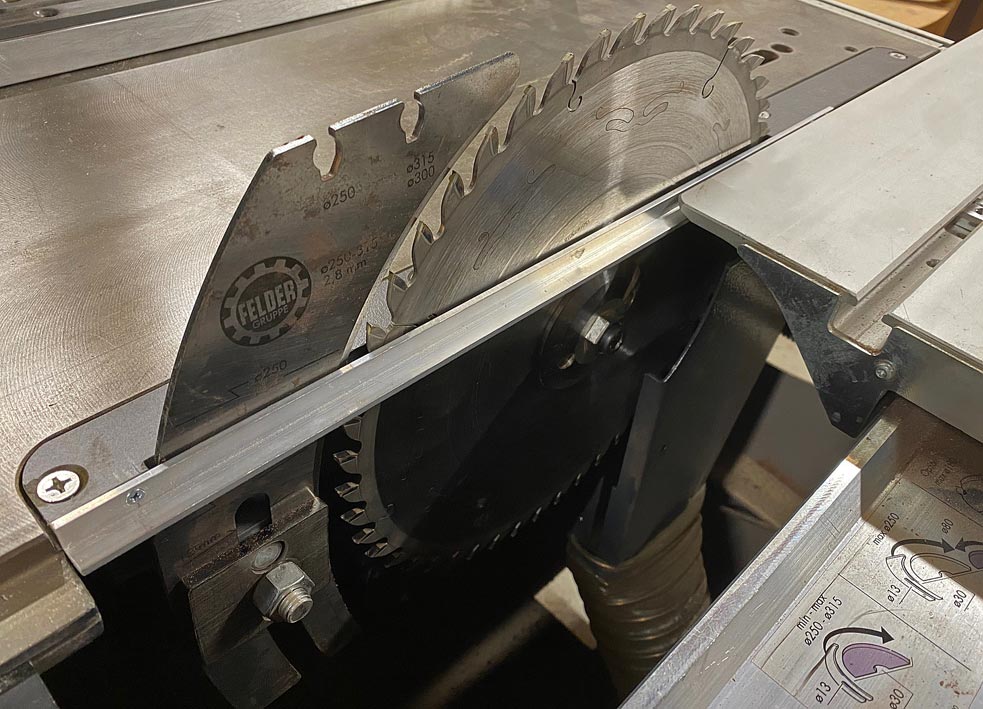
Importantly, the rip fence side of the blade is now sealed ...
Regards from Perth
DerekVisit www.inthewoodshop.com for tutorials on constructing handtools, handtool reviews, and my trials and tribulations with furniture builds.
-
29th April 2024, 09:32 AM #21
GOLD MEMBER
- Join Date
- Aug 2004
- Location
- Brisbane
- Posts
- 4,997
I don't understand this. Is the 100mm flex just an end floating loosely in the 150mm? I could understand if the 100mm flex is still plumbed in and you get an auxilliary suction from the surrounding 150mm, but I can't see how you maintain good flow through the 100mm if it's not connected. You could also try a 150-100 reducer somewhere closer to the guard - you will have to cut the 100, but it's really not that hard to replace if you take the gaurd out to squash it on and use a heat gun for the plastic reinforced stuff. Originally Posted by scottbr
-
29th April 2024, 09:46 AM #22
 .
.
- Join Date
- Feb 2006
- Location
- Perth
- Posts
- 27,803
I would try removing the 100mm flex. I'm guessing it won't make and difference to chip collection but should increase invisible dust collection inside the cabinet - provided there are sufficient gaps for air to enter as the blade slot (especially a zero slot) alone is very restrictive to air flow.
In addition Table saw blades act like mini impellers and drag fine dust from inside the cabinet out through the slot and this air/dust expands when exiting the slot
A near zero gap throat plate will help reduce the amount of dust pulled out of the cabinet but will also reduce the amount of fine dust pulled back down into the cabinet hence the need for improved OH duct collection.
-
29th April 2024, 09:59 AM #23
GOLD MEMBER
- Join Date
- Aug 2004
- Location
- Brisbane
- Posts
- 4,997
You will certainly gain by removing the 100mm flex obstruction in the 150mm but my concern is that the air speed through the guard will not be enough to divert the high speed chips into the extraction rather than the blade flinging it out the top as happened with my situation. Originally Posted by BobL
-
29th April 2024, 10:58 AM #24
SENIOR MEMBER
- Join Date
- Mar 2009
- Location
- Sydney
- Posts
- 538
Yep, the 100mm is just floating in the 150mm. It was a first stab and a quick one at dealing with the dust line inside the cabinet because I needed to use the saw on the weekend. I have to say it works very well. Maybe it shouldn't, but it does. I'll probably fiddle with it down the track and perhaps get that fitting made, Nathan. Originally Posted by mic-d
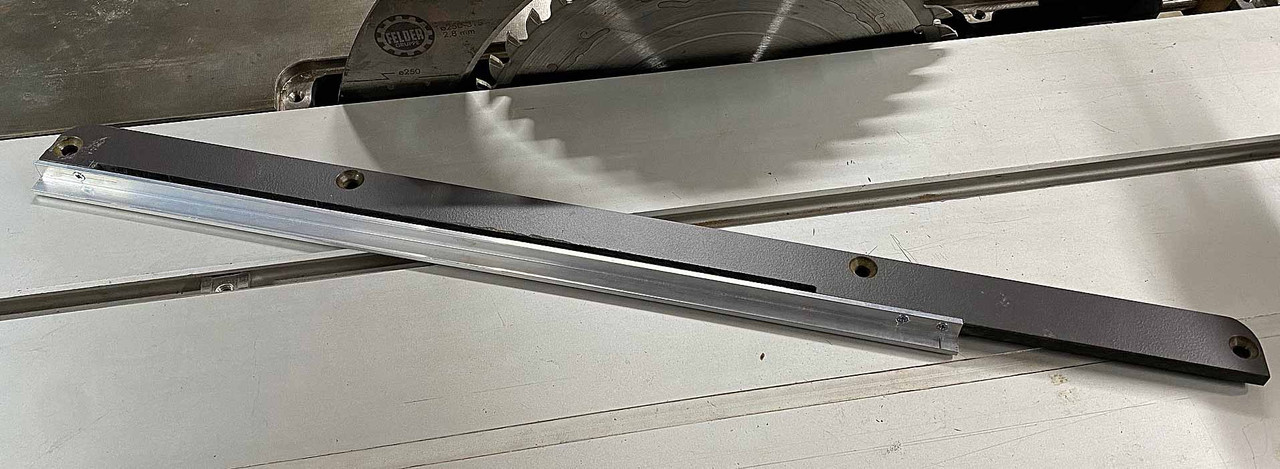
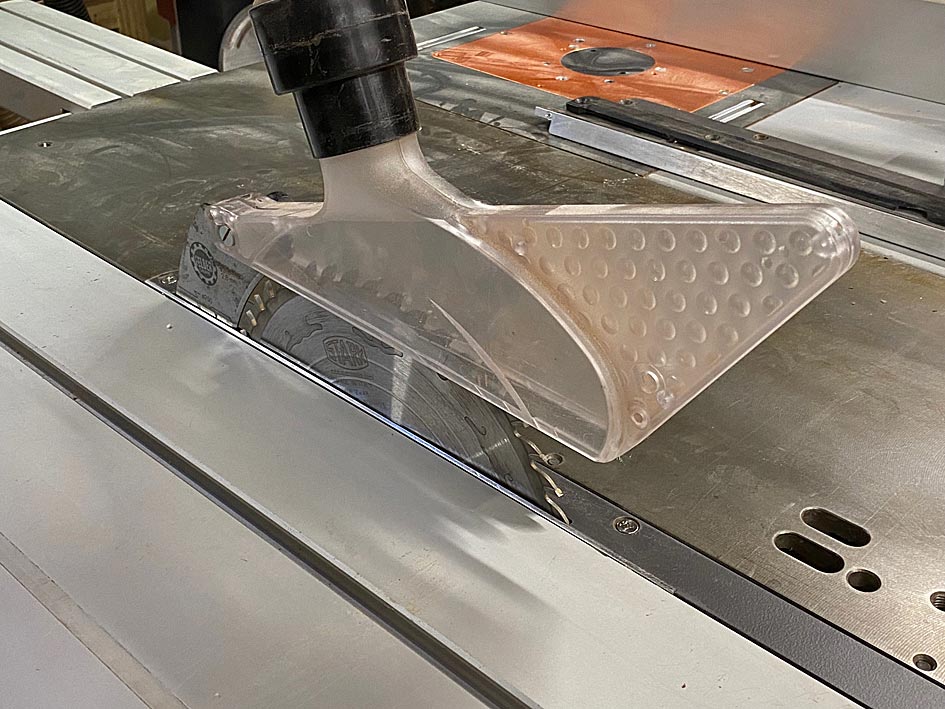
And Derek, spookily, probably around the same time as you were making ZCI # 2 I was making ZCI # 1 with that bit of 12mm angle I had. Just need to do the slot for the knife. I did not like at all the part when I had to bring the blade up through the plastic blank. That sliver of plastic epoxied to the aluminium angle seems very rigid - fingers crossed. I have seen some videos of people making ZCIs out of plywood, which I may do one day. One thought is to make a plywood one and get someone to 3D print some.
I guess dealing with dust is all to do with incremental changes, and the ones I have made over the last few weeks have made a huge difference. There will be more changes and refinements I suspect.
ZCI1.jpgZCI2.jpgZCI3.jpg
-
29th April 2024, 04:17 PM #25
Be inspired. Be creative. Be bold.
- Join Date
- Apr 2001
- Location
- Perth
- Posts
- 10,831
Originally Posted by scottbr
Scott, it looks a good fit so far. I am curious how you plan to make the slot for the riving knife?
Regards from Perth
DerekVisit www.inthewoodshop.com for tutorials on constructing handtools, handtool reviews, and my trials and tribulations with furniture builds.
-
29th April 2024, 04:19 PM #26
SENIOR MEMBER
- Join Date
- Mar 2009
- Location
- Sydney
- Posts
- 538
Me too. Originally Posted by derekcohen
-
29th April 2024, 06:47 PM #27
SENIOR MEMBER
- Join Date
- Mar 2009
- Location
- Sydney
- Posts
- 538
4 inch grinder with a stone cutting blade on it did the trick, Derek. I used that blade because it's about 3mm wide and because it was already on the grinder. I suspect any blade on a grinder would work with the plastic.
It was the least onerous part of the whole dust upgrade operation.
-
29th April 2024, 08:30 PM #28
GOLD MEMBER
- Join Date
- Sep 2012
- Location
- Coffs Harbour
- Posts
- 1,811
Have watched a method of once you have a plate that fits with the rounded corners you remove the riving knife and bring the blade up once then flip the insert from back to front so the rounded edges still fit and raise the blade again and this extends the cut to cater to both the blade and riving knife
Ramon on YouTube who sells the k3 insert I think I saw that originally
-
30th April 2024, 08:19 AM #29
GOLD MEMBER
- Join Date
- Nov 2007
- Location
- melbourne australia
- Posts
- 2,652
Sorry, I haven't read the whole thread. On my Luna TS I split the 125mm flexi duct from my DE into two 100mm flexis with a Y reducer. One 100m flexi goes to the original blade shroud dust port and the other has a "Big Gulp" style pvc collector which is jerry-rigged under the blade shroud. The Y piece is outside the cabinets as there's very little room inside the TS cabinet since the spindle moulder is in there too.
This setup doesn't catch all the dust, but is a definite improvement. My overhead blade guard connects to my Festool DE. That catches a lot of fine dust.
-
30th April 2024, 08:20 AM #30
GOLD MEMBER
- Join Date
- Nov 2007
- Location
- melbourne australia
- Posts
- 2,652
That's how I make mine. Originally Posted by delbs


 Reply With Quote

Similar Threads
-
Improving dust extraction for C26 Advice Requested
By WoodyOwen in forum DUST EXTRACTIONReplies: 2Last Post: 28th June 2021, 04:38 PM -
Hammer K3 Improving dust collectionmm and then into
By AJ. in forum DUST EXTRACTIONReplies: 18Last Post: 7th February 2021, 04:45 PM -
Dust extraction on Hammer K3 slider
By ronboult in forum DUST EXTRACTIONReplies: 7Last Post: 23rd September 2020, 07:52 PM -
Cabinet Dust Extraction On a Hammer Slider
By Chris Parks in forum DUST EXTRACTIONReplies: 1Last Post: 23rd October 2016, 09:59 PM -
Improving the dust extraction on a generic drum sander?
By KBs PensNmore in forum DUST EXTRACTIONReplies: 5Last Post: 11th May 2016, 11:44 PM
