

 Thanks: 0
 Likes: 0
 Needs Pictures: 0
 Picture(s) thanks: 0
Results 1 to 15 of 59
-
2nd March 2010, 10:11 AM #1
 Senior Member


- Join Date
- Dec 2008
- Location
- Oshawa, Ont., Canada (I wish I was in Brissie)
- Posts
- 331
 The Brisbane Southern - N-Scale Layout
I started this in the Model Railways thread but rather than fill that up with my drivel I thought I'd just start over in a new thread. So.......
The name of the thread and the layout I'm building are kind of a misnomer because Brisbane is considered by most people to be "North" not South. I suppose I could easily call it the Brisbane Northern because of where I'm located now and the fact that it'll be modelled as a ficticious branch of the AT&SF/BNSF with the scenery based on the South-Western USA.
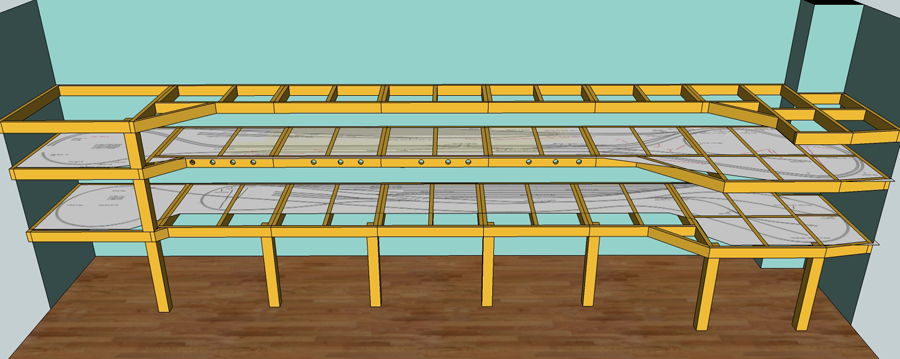
At this point the plan is to build three shelves along the longest wall of the basement - 20'8" - with Shelf A being the lowest and holding the majority of the staging. Shelf B at optimum viewing/operating height and having a good sized through yard, changes of elevation and some industry. Shelf C to be at roughly my upper chest level featuring the edge of a large town with possibly auto and steel industries as the major operations. Shelf C I'm going to build in such a way that I can possibly make use of another wall in the basement down the road by leaving a pair of tracks ready for that extension if I get the chance.
Attachment 148572
Here's my plan for Shelf B which is what I'm starting with as it's the most interesting scenically and can be operated as a stand alone unit till the other shelves are added..... or my patience runs out!
Attachment 148573
Here's Module 4 where the up and down helix's are located at the left end of the wall. I plan to have a couple of bridges here before the three tracks all disappear into the mountain hiding the helix's.
Attachment 148574
Once trains come up from Shelf A and cross the Brisbane River they enter Module 1 which I have pretty much finished already.
Attachment 148575
This was prior to the last of the track being glued down, wiring run and the ground throws for the switches attached. Because it's right at the front of the shelf and at prime height I only need ground throws here. Some scrap hard maple came in handy as the templates for turning flex track into straight track.
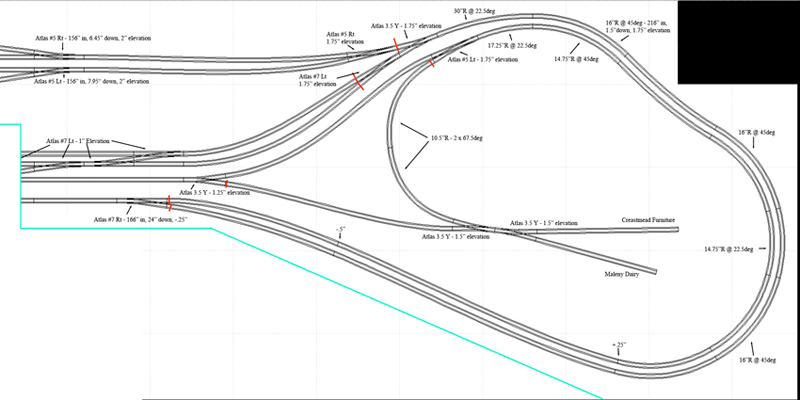
Next up is Module 3 where the majority of this shelf's industry is located - Crestmead Furniture and Maleny Dairy. My Dad's side of the family are all from Maleny-Conondale-Merridan Plains-Caloundra and there will be a Merridan Plains cattle operation on this level in the mountains of Module 4 and a Tesch Bros. hardware and sawmill as well as a bakery dedicated to my Dad on Shelf C. Crestmead gets a mention because that's where I stayed with friends on a visit home last year.
Attachment 148576
Then comes Module 2 which is the next module I'm working on. This has the through yard on this level featuring a car/loco service area and will also have Intermodal services. I christened the yard after the suburb I grew up in. I suppose I could have called it the Gabba yards because I remember them as a kid but I think maybe the yard on Shelf A will get that moniker.Last edited by RETIRED; 26th September 2010 at 06:37 PM.
-
2nd March 2010 10:11 AM # ADSGoogle Adsense Advertisement
- Join Date
- Always
- Location
- Advertising world
- Posts
- Many
-
2nd March 2010, 10:15 AM #2
Senior Member
- Join Date
- Dec 2008
- Location
- Oshawa, Ont., Canada (I wish I was in Brissie)
- Posts
- 331
I've started on the frames for the shelves. I'm making each section of the frame for Shelf B 32"x281/2". With the wall studs 16"OC they should match up pretty well.
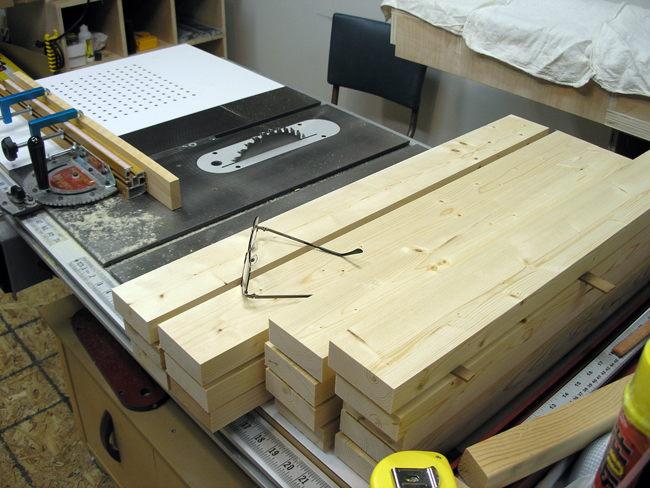
You know cheapo 2by comes up pretty nice once you mill it down to 11/4" x 31/4" The mitre gauge sits waiting to handle squaring the ends and final length cuts.
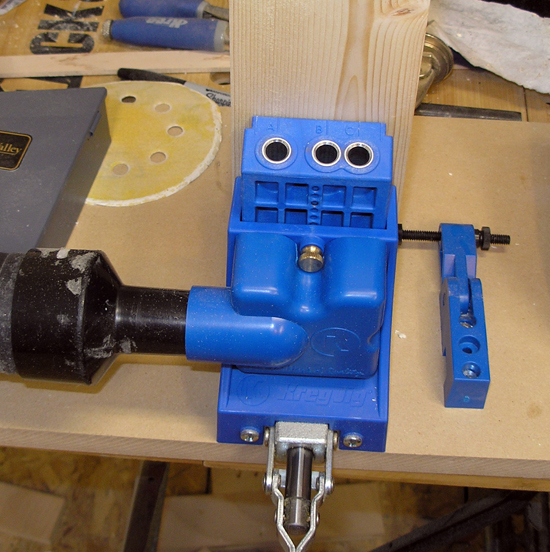
Once all the rails and stiles were milled it was time to break out the pocket hole jig on the stiles. I always use the shop vac not just to clear out the chips but it also holds the board in place pretty well prior to clamping.
Time for some screwin' and gluin'!
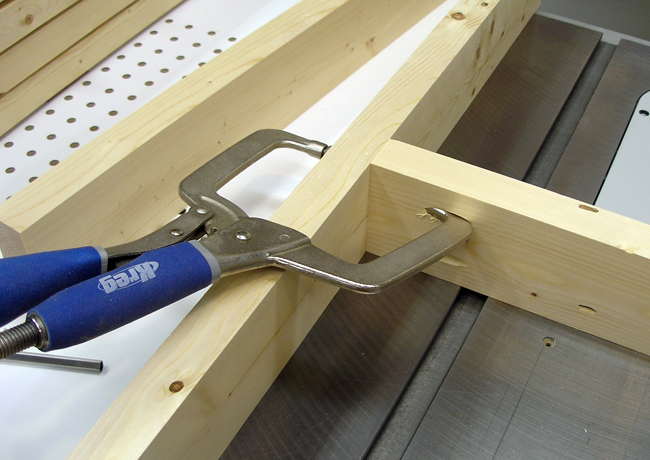
Love those Kreg clamps!
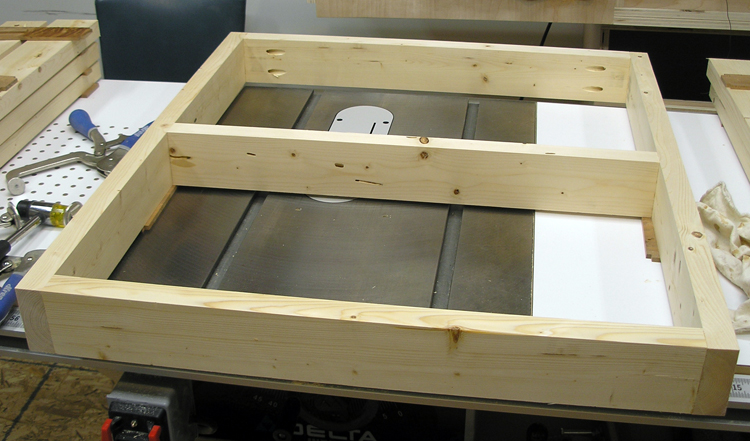
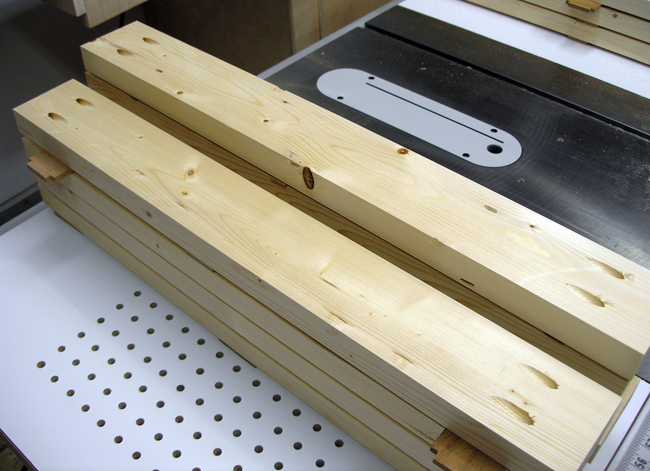
Tah dah! One down and many, many more to go. I'll be attacking each frame with a 11/2" hole saw to the front rails and the end stiles to reduce weight. The ends can be drilled out because they will be screwed to another frame for added strength but the center stile will only have small holes for the DCC buss and comm lines. The front rail will have a facia attached so it's holes won't be seen and it's cantilevered out so it needs the weight reduction while the rear rail needs as much strength as possible. The cantilever braces will all be routed like a "H" beam to reduce their weight too.
Anyway....... lots more gluin' and screwin' to be done so of I go back to work!
-
2nd March 2010, 04:57 PM #3
GOLD MEMBER
- Join Date
- Mar 2007
- Location
- Munruben, Qld
- Age
- 83
- Posts
- 10,027
Fascinating, I'm sure this thread will be watched with much interest.
 Reality is no background music.
Cheers John
-
4th March 2010, 03:51 AM #4
Senior Member
- Join Date
- Dec 2008
- Location
- Oshawa, Ont., Canada (I wish I was in Brissie)
- Posts
- 331
I was locating all the studs in the walls and got to thinking about what the layout would look like over the frame work along with the stud positions and everything that needs to be taken into consideration before I go attaching anything to those walls. So.........
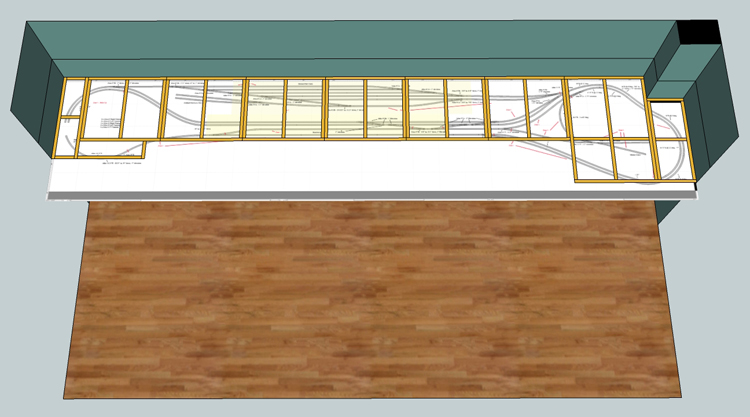
Got some changes to make to the framework don't I? Not a big deal really. The frame pieces at the left end need to be changed to allow for the helix going down to/up from Shelf A and I figured as much before I laid the plan in there. The frame at the right end needs to be made around 2" longer to fully support the plan and give me some space for scenery in front of the curve.
However, I was looking at "the lay of the land" in the basement and because the next wall to the right of the layout has the washroom door and it is at 45deg to the end wall of the layout I was thinking about extending a peninsula out from Shelf B into the floor space to handle some more industry. It could be served by the spur that currently handles the dairy and furniture factory inside the loop. Hmmmm.......
Anyway I have 6 of the frame pieces ready to go and surprisingly the plan regardless of any changes and/or additions uses 6 of those 32"x281/2" frames. Rock on!
The line above Shelf B is the top of the Shelf C framework at 62" above the floor. I have no idea what I'm going to do up there!!! Not even the faintest hint of a track plan. The only thing I know is I need to allow for the double main line coming up from Shelf B and a possible expansion "round the bend" on the right end.
Suggestions?
-
4th March 2010, 09:18 AM #5
GOLD MEMBER
- Join Date
- Jan 2004
- Location
- Kilmore, near Melbourne, Australia
- Age
- 66
- Posts
- 1,879
spectacular use of KREG - and I love the layout, even though I must confess to being a "OO" British tragic .... will be watching this one with relish! Well done mate
Steve
Kilmore (Melbourne-ish)
Australia
....catchy phrase here
-
5th March 2010, 11:43 AM #6
Senior Member
- Join Date
- Dec 2008
- Location
- Oshawa, Ont., Canada (I wish I was in Brissie)
- Posts
- 331
Love my Kreg! I use it everywhere I can. Never could get into O. Way too big for me. I used to run HO but when N started to take off I made the switch and have never regretted it.
Finalised the frame plans for the shelves. Got to go buy another 20 lengths of 2by and get milling. I'd best buy another 500 count box of 2" pocket hole screws too!
-
6th March 2010, 08:24 AM #7
Senior Member
- Join Date
- Dec 2008
- Location
- Oshawa, Ont., Canada (I wish I was in Brissie)
- Posts
- 331
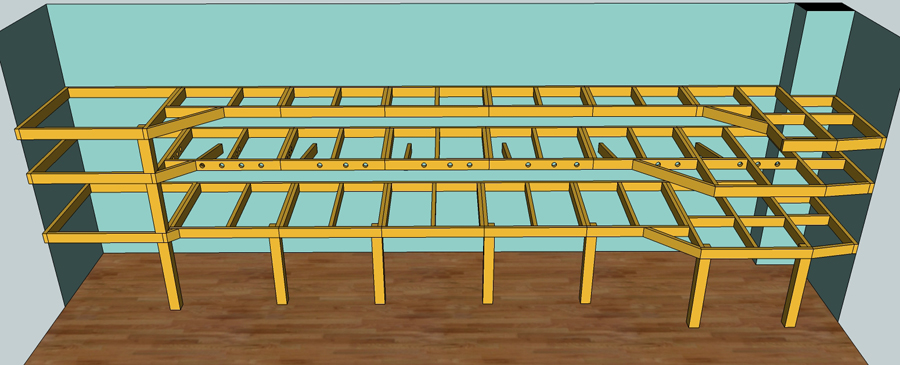
Thought I'd see what the shelf track plans I have so far will look like laid flat on the framework:
From this I see I can make some changes to Shelf A's plans. Increasing the radius of the yard loop and also bringing the main line closer to the front of the shelf as it meanders along. Both of those upgrades should give me more room in the yard area so more details and maybe an extra service area track?
Shelf B looks just fine to me.
Shelf C is a real problem for me. I am drawing a blank on ideas. I've started laying it out dozens of times and scrapped each attempt. Suggestions?
-
7th March 2010, 01:10 PM #8
Senior Member
- Join Date
- Sep 2008
- Location
- bateau bay
- Posts
- 275
Massive job youve got there.
 Do the trains run from the lower shelf to the middle shelf?
Maybe scrap top shelf and put more detail into the other two?
Dunno much about train sets but yours looks a beauty.
How big is N gauge? length of a loco for instance?
Good luck,
cheers, billy
-
8th March 2010, 10:15 AM #9
Senior Member
- Join Date
- Dec 2008
- Location
- Oshawa, Ont., Canada (I wish I was in Brissie)
- Posts
- 331
I've already bought and am ready to mill the 2by material to make all three shelf frames so there's no going back. Plus the track plan for Shelf B is such that Shelf C has to be built. Originally Posted by Billy

As for detail there will be plenty put into this regardless of if it were a single shelf or all three. I've already started weathering the track on the modules I've built so far and I'd be further along if it weren't for a shortage of flex track from one of the major manufacturers.
No offence taken but N-gauge is what it was called 20 years ago and is considered a bit of a swipe at the people who model it so please don't use that term again. You see those who modelled in larger scales derided N as toys so they called it a gauge and not a scale. N-Scale is roughly 1/160 of prototype size. It gets the moniker N from the fact that the rails are 9mm apart having first been made in Germany and 9 in German is Neun so they called it N-Scale.
-
8th March 2010, 08:39 PM #10
Senior Member
- Join Date
- Sep 2008
- Location
- bateau bay
- Posts
- 275
Gee, I would have thought that the smaller the scale the better.
You could have heaps more stuff in your display than other scales. An HO scale or larger wouldnt fit much on the same area as N scale.
Do you have to figure in wiring for all your controls prior to cutting out all the timber, I imagine there will be a fair bit for a set up as complex as yours looks?
Low voltage, 12v?
Anyhoo, good luck with it, I'll be watching with interest.
cheers, billy
-
9th March 2010, 06:19 AM #11
Senior Member
- Join Date
- Dec 2008
- Location
- Oshawa, Ont., Canada (I wish I was in Brissie)
- Posts
- 331
Controls are all DCC so feeders from every second set of rail joiners plus black separation to avoid shorts shutting everythiong down and computer controlled polarity switching for all the turnout frogs and operation. You run two buss lines from each block booster and then hook all the feeders to them and then polarity boards. It's pretty simple once you lay it all out and it makes running trains way easier. You can program in a route for a particular train and the command station automatically throws the turnouts correctly as it approaches and turns the signals the correct colour as well. Originally Posted by Billy
-
19th March 2010, 12:54 PM #12
Senior Member
- Join Date
- Dec 2008
- Location
- Oshawa, Ont., Canada (I wish I was in Brissie)
- Posts
- 331
It's been a while since I posted any updates on the layout but here goes. Due to a lack of Atlas Code 55 flex track all over the world I have no new track laid because I simply ran out of what little I had sitting around. So instead I've been doing detail and scenery work. I hope you find this interesting:
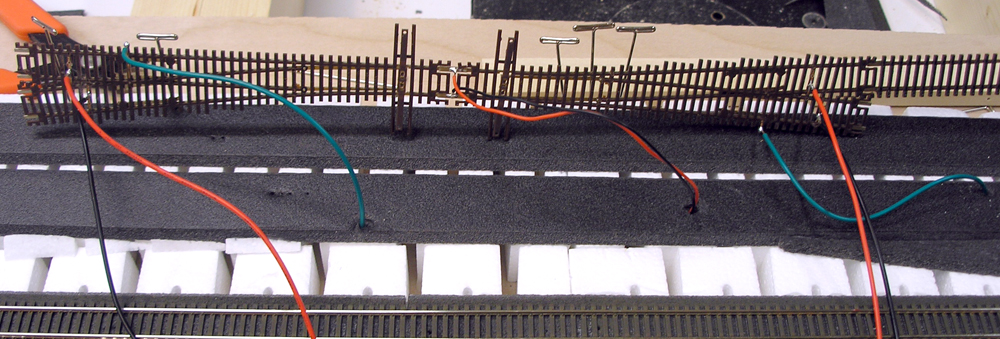
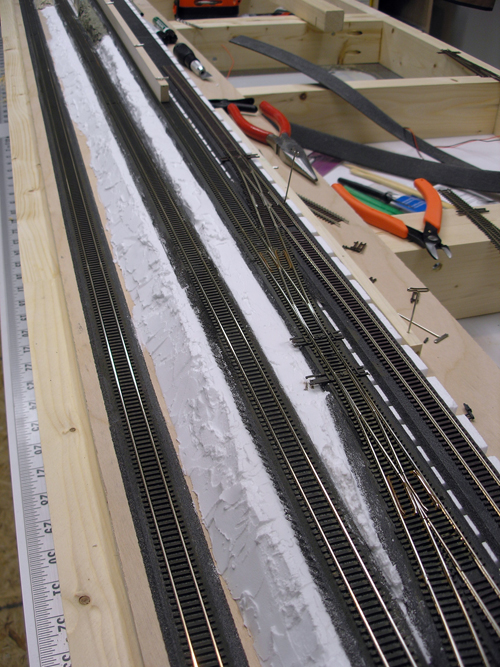
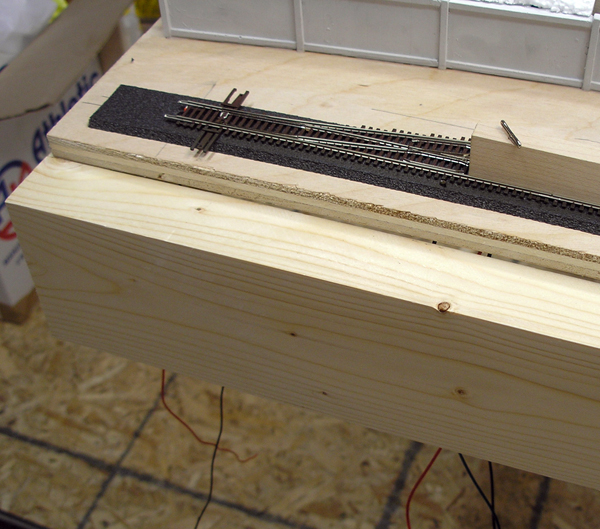
Okay why so many wires for two turnouts? Wait, in this photo I have yet to install the two jumpers for the switch tracks on each turnout! That's right there's more! The red and black wires are feeders from the DCC booster for that control block. The green wires are the direct feed to the turnout frog which comes from a little circuit board that detects a train crossing on the frog and instantly sends positive or negative to that frog depending on which path the train is headed. Neat. This was a test fit to make sure the holes for the feeders lined up okay.
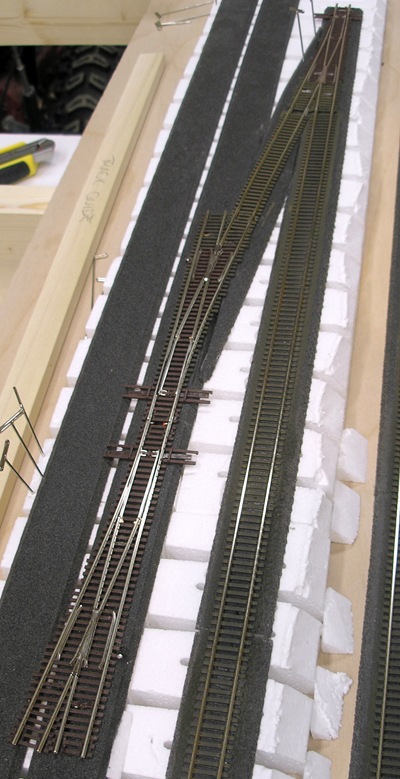
Ready to be glued down to the roadbed. If those two turnouts look different to the turnout furthest away in this photo that's because I've started to weather that turnout to make it look like it's been out in the sun and rain and had hundreds/thousands of trains pass over it.
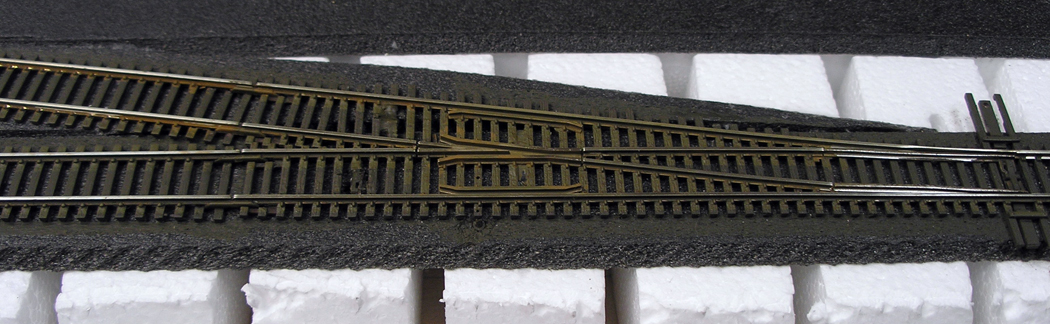
Like this. Not all of the turnout has been weathered as evidenced by the bright shiny rails at the right of the photo.
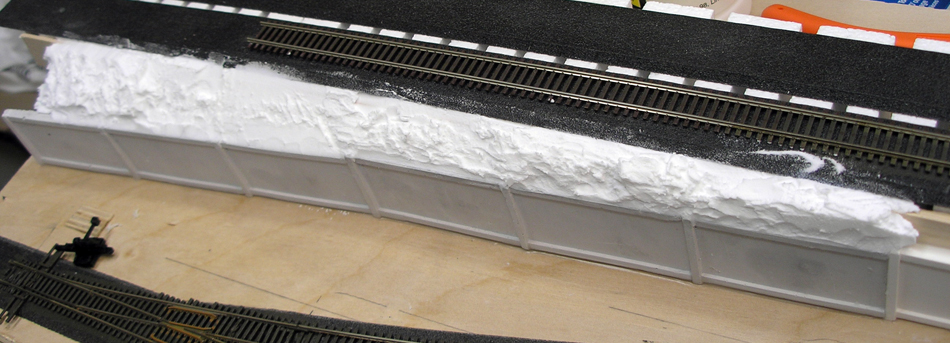
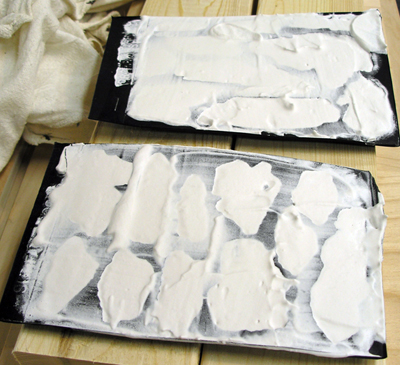
I started working on scenery as well. Most of the products available today I have never used before so I'm learning as I go with this stuff. One product I really like is called Foam Putty. It's basically the same stuff the risers and supports the track is laid on are made from only in a putty form. Really easy to apply and shape, cleans up with water and once it's dry you can carve it just like the other foam pieces. Plus it weighs almost nothing!
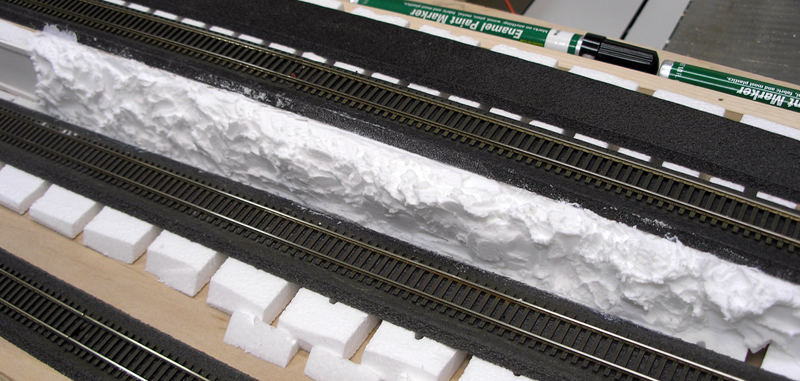
With very little effort I got this section looking like a rock wall.
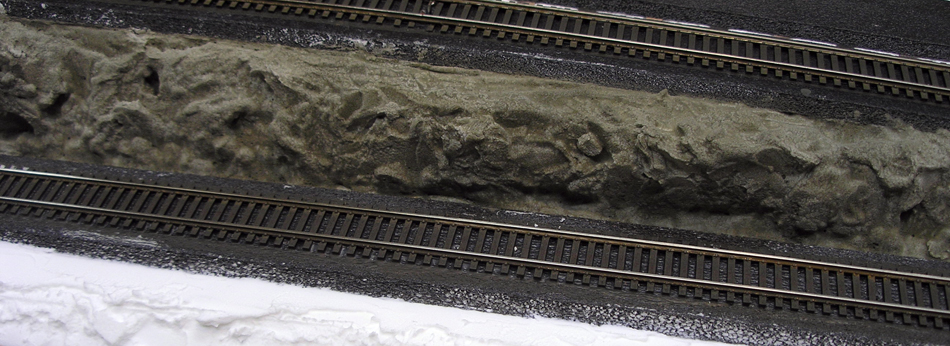
Add a little water-based colouring and it begins to look real.
I'm about 90% done applying the foam putty here. I have some rock castings to adhere to the smoother sections and I'll fill in the gaps between them with more putty.
Just waiting for the rocks to come out of their moulds.
I'll post some more once the rocks harden and I can glue them in place. Then comes the colours to make them look real followed by dirt, grass, bushes, trees (maybe) and of course the ballast for the tracks. A fun way to spend my spare time.
-
21st March 2010, 01:15 AM #13
Intermediate Member
- Join Date
- Sep 2007
- Location
- Gold Coast
- Posts
- 37
Hi Expat, looks like beautifully straight track. How did you manage that?
-
21st March 2010, 04:53 AM #14
Senior Member
- Join Date
- Dec 2008
- Location
- Oshawa, Ont., Canada (I wish I was in Brissie)
- Posts
- 331
I posted that pic earlier in the thread: Originally Posted by drivesafe
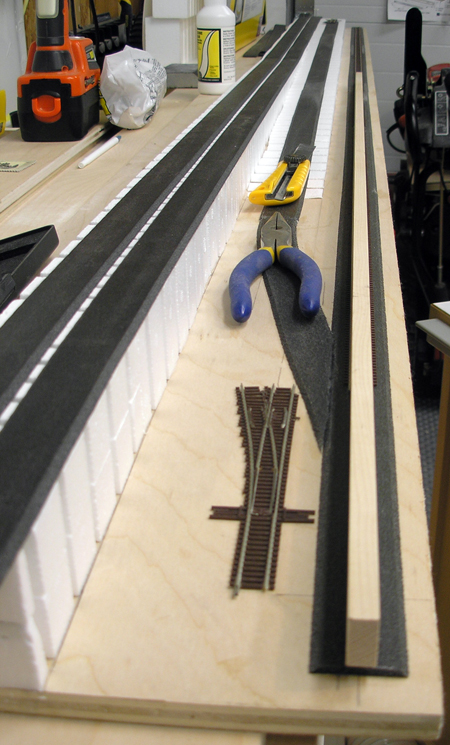
Took a piece of scrap hard maple and cut it down to 47/128" thick. Fits between the rails with a nice "click". Since this photo I've drilled some holes through it for the foam pins to go through to secure it to the layout while the glue dries (see pic below). I have shorter versions as well. Got to make up my curve templates and double track alignment pieces this weekend as well. Main line double track is 11/4" center-to-center but in the yards it's mostly 11/2".
-
22nd March 2010, 01:20 AM #15
Intermediate Member
- Join Date
- Sep 2007
- Location
- Gold Coast
- Posts
- 37
With it now, I thought the timber was for keeping the track FLAT, didnt realise you actually fitted the timber between the rails.
That a good one.

 Reply With Quote


Similar Threads
-
Great Southern Failure
By steven in forum NOTHING AT ALL TO DO WITH WOODWORKReplies: 15Last Post: 22nd May 2009, 12:50 AM -
Southern Gentleman
By Barry Hicks in forum WOODIES JOKESReplies: 1Last Post: 29th June 2008, 03:07 PM -
Southern Myrtle Bed
By BobR in forum WOODWORK PICSReplies: 16Last Post: 13th May 2008, 12:08 AM -
Need sharpening help - Southern Brisbane
By jisk in forum SHARPENINGReplies: 42Last Post: 14th August 2007, 06:08 PM
