

 Thanks: 0
 Likes: 0
 Needs Pictures: 0
 Picture(s) thanks: 0
Results 31 to 45 of 59
-
18th March 2011, 11:38 PM #31
 Senior Member


- Join Date
- Dec 2008
- Location
- Oshawa, Ont., Canada (I wish I was in Brissie)
- Posts
- 331

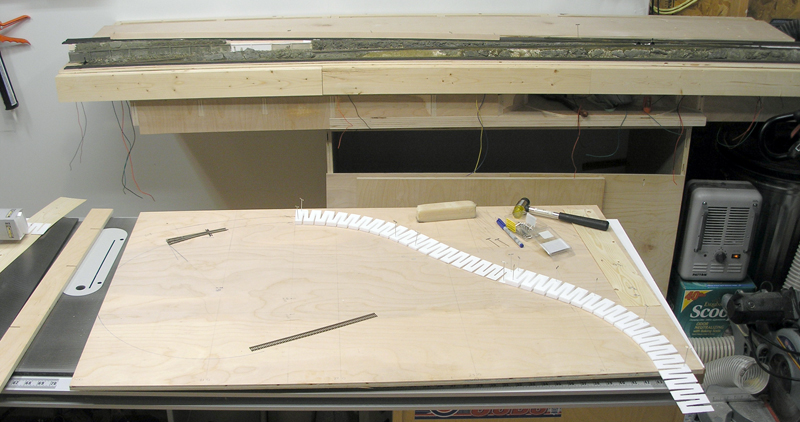
Time to get to work on the industrial park itself. After sanding the foam roadbed sheets smooth I grabbed a bunch of paper from my printer and went to work making a template for the styrene sheets.
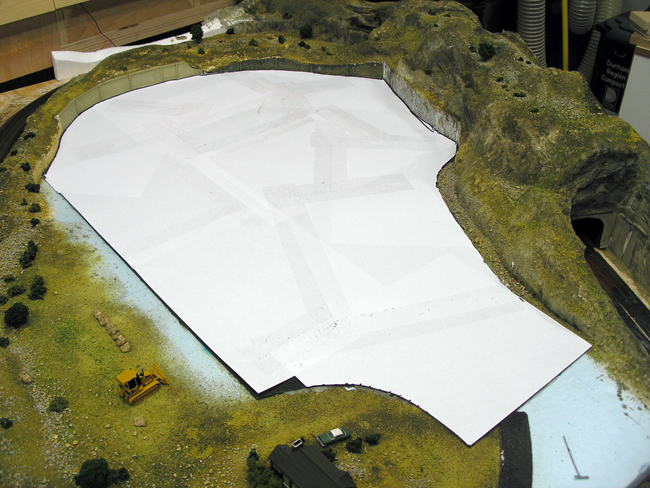
It don't look too bad at all. Now to transfer that to the styrene.
I am holding the sheets together with tape till it's time to glue them so that I don't get any cracks as it's moved around and about.
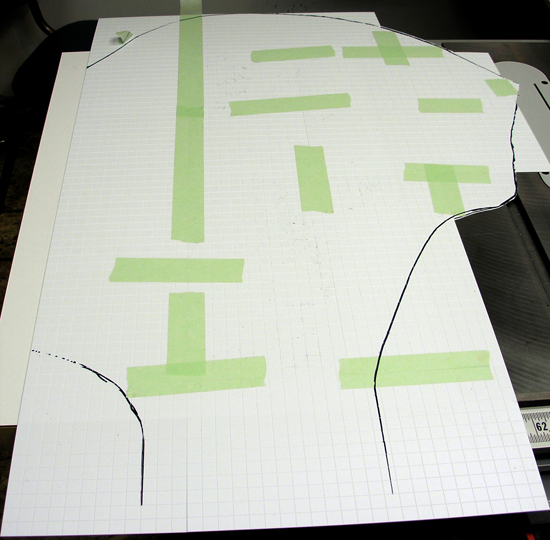
Trimmed to suit and it actually fits! Woo hoo! Now this of course is the top layer of styrene that will be around .005" below the rail head. To get it at that height I needed two layers of styrene underneath it that will butt up against the sides of the sleepers. So how do I get that pattern and the location of the rail heads to trim the top layer as well?
First one sprays the track with black paint - it has to be sprayed with rail tie brown and some other shades of brown anyway and then the rails hit with rail brown and rust followed by a good cleaning and application of NoOxId so this is no big thing. While it's wet I drop the paper template on top of this and run my hands over the rails to achieve......
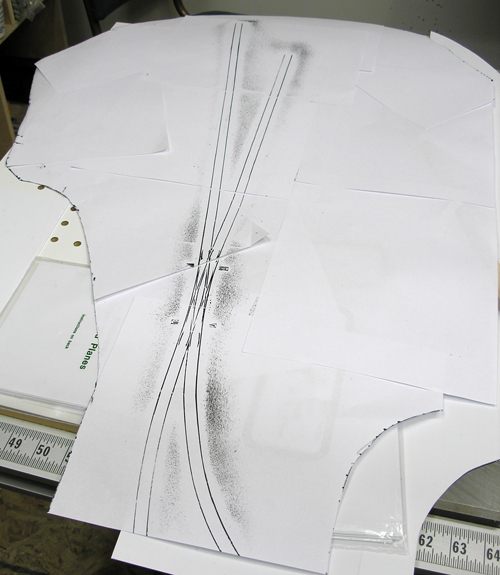
..........this! Perfecto. I just use this to cut the sub layers of styrene to a rough shape and then they are glued to the roadbed and each other. Because the roadbed now has the outline of the tracks on it thanks to the black paint I know exactly where to place everything without the need to have the tracks in place. Clever huh? The top layer gets pretty much the same treatment only I use the rails themselves as the guides to make the cuts.
-
18th March 2011 11:38 PM # ADSGoogle Adsense Advertisement
- Join Date
- Always
- Location
- Advertising world
- Posts
- Many
-
18th March 2011, 11:43 PM #32
Senior Member
- Join Date
- Dec 2008
- Location
- Oshawa, Ont., Canada (I wish I was in Brissie)
- Posts
- 331
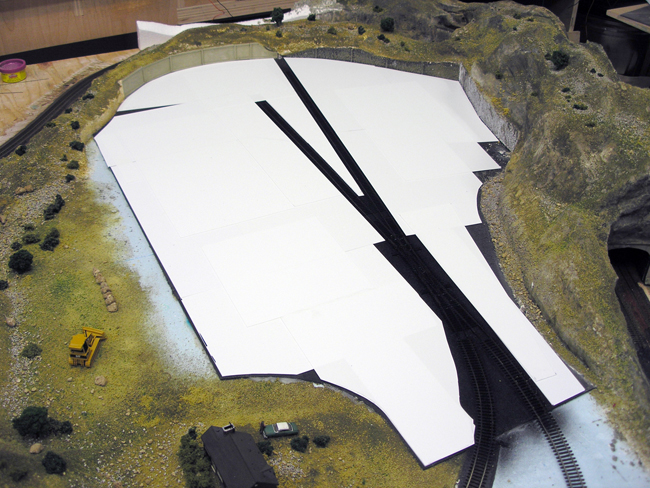
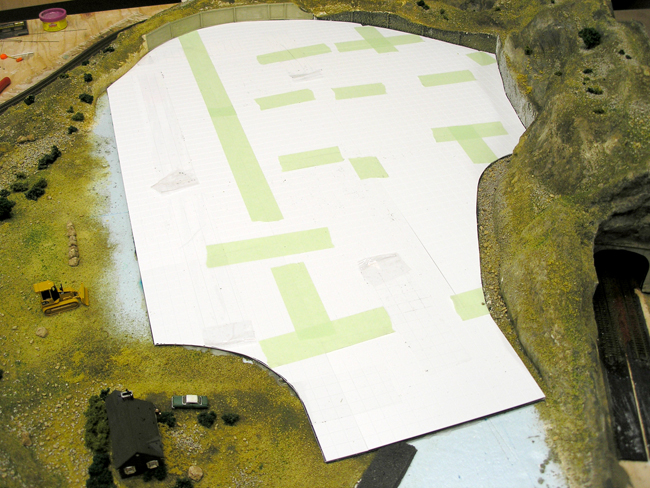
That's the sub-layers of the concrete area in the Industrial Park. Total thickness is .050" so that's just above the tie height. When the .040" top layer goes on that'll leave it .005" below the rail head which will be just fine. Can't do any more here till I have the buildings done or at least enough so that I can put them in place and mark out their shapes on these layers so I can cut relief holes for them to sit down into.
The buildings are taking shape for the industrial park and so it's time I got stuck into finishing the paved area of the park and all the little details that go along with that.
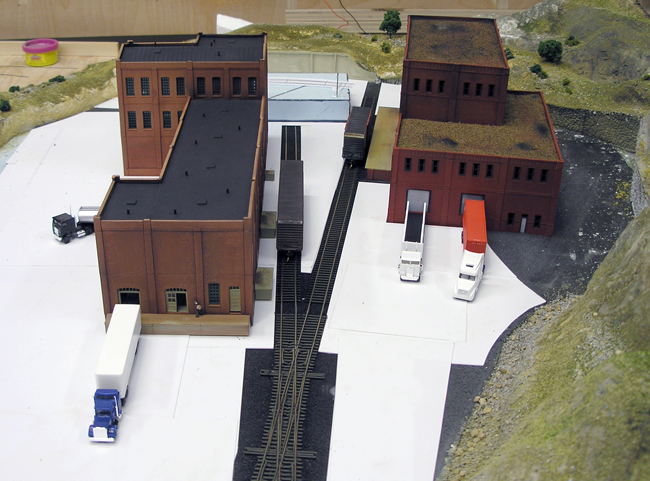
Okay the dairy does need a better dock than the ones that came with the kit. I've got enough left over brick pieces and sheet styrene to build a good one so I'll hack these off and make something more in keeping with the size of the building.
The top layer of paving styrene is glued together so now it's time to give it some primer before I cut the openings for the track and the furniture building. I need to decrease the depth of the "gaps" in the concrete so they're more N-scale and I'll do that by building up a few layers of primer and then sanding that away leaving only the primer in the gaps. Once I get the right depth I'll give it all one last coat of primer and then it's aged concrete plus lots of weathering before I finally glue the sucker down.
Well after sitting around pondering how I was going to get to the helix's heading for Shelf A and C now that I've altered my plans for some of the trackage on Shelf B I decided that I can in fact block half the non-sliding half of the doors leading out of the basement to the back yard. That means the helix's are being moved and that opens up more shelf space for trackage and scenery. So here is what I've come up with:
The rear-most track is the BNSF main that runs along the back of my yard on Shelf B. The double tracks are the BSRC branch line already built on a module and the single line at the front is the BNSF/BSRC joint line also on the module I mentioned that has been built. You can see the turnout that the BSRC branch comes off of.
That's it in the background.
Two curved turnouts bring the dual BSRC lines and the BNSF main into a single main line going up to Shelf C. The second turnout will be 3.5" above the main heading down to Shelf A where they both join the helix's.
Where you see one helix there will in fact be two - one up and one down. Lots of large cliffs in this area. I'm thinking about using a kind of avalanche concrete shelter so the single main heading down to Shelf A can be seen below the main heading up to Shelf C. That might be an interesting scenic feature.
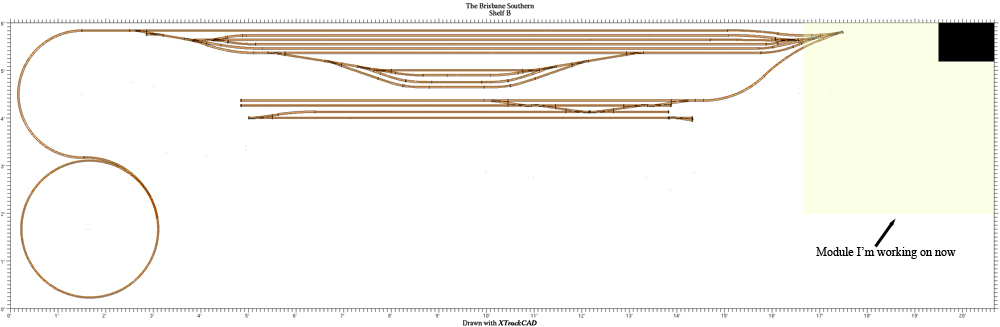
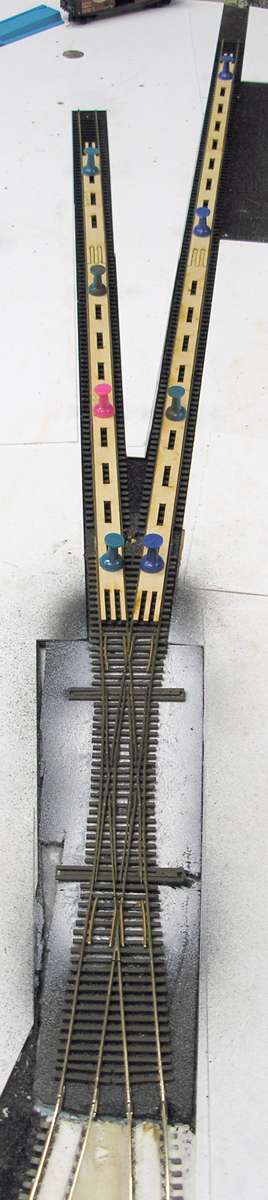
I have a feeling that this will not be how the yard shapes up. I'm sure the service area won't be laid out like this! But at least I know the 3-Way's work for the yard throats. "Where's the lead?" I hear you ask. Well way up high and to the left you see that #6 LH turnout? That might be the lead.
I may well shorten this whole yard, keep it at 1 3/4" elevation and then raise the main up to 2 1/2" when it joins up with the BSRC branch again before entering the tunnel that is the start of the helix going up to Shelf C.
I'm even contemplating another loop for the BSRC branch from one of the double tracks back to the other. Now the upper track would still go on to join up with the BNSF main heading to Shelf C but this change would allow another variant to the routes available for the BSRC locals. Maybe even a scenic passenger train? The loop could pass through the mountains and tunnels.
-
18th March 2011, 11:44 PM #33
Senior Member
- Join Date
- Dec 2008
- Location
- Oshawa, Ont., Canada (I wish I was in Brissie)
- Posts
- 331
Okay I scrapped the track plan above - not all of it of course - and it works a lot better for me now. I shortened the yard - a lot - mostly because I reasoned that Shelf A and C will have the big yards whereas Holland Park is more or less stuck between them and so is merely a transfer yard with the BNSF and catering to smaller shippers wishing to use the BSRC. So a freight house and some container handling will be in order. I fiddled with the service area as well and added a much longer lead track plus some funky crossovers in the yard. Funny thing though, XTrackCAD still won't join areas that I know are quite acceptable both in terms of radius and gradient. I'll worry about that when it comes time to actually build the thing! Wish I could export it and post it here but XTrackCAD is being a pain right now and won't export the file. Maybe tomorrow.
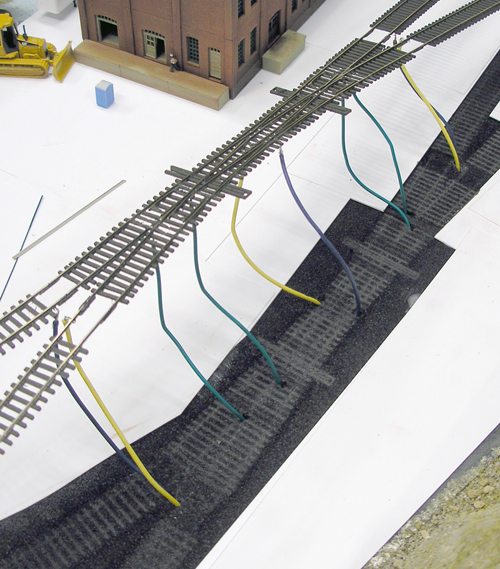
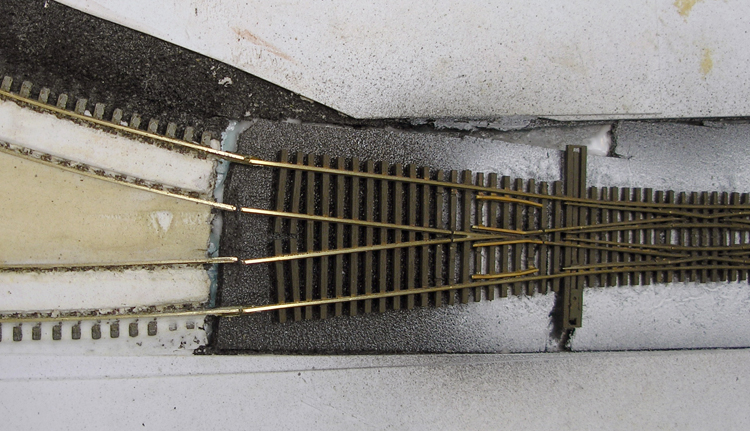
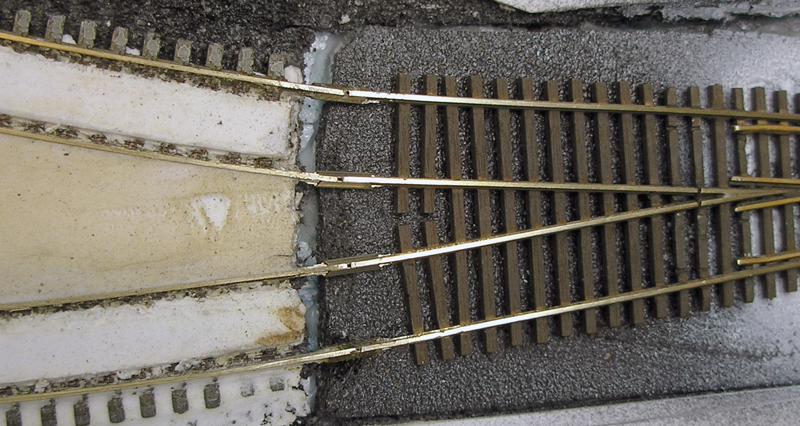
What I have done this evening is finish the wiring for the industrial park sidings. If I hadn't decided to power the slip's frog rails using the Hex Frog Juicer there would be two more feeders here. So this is the "simplified" version of things!
And finally she is down! I think I should a couple more pins..... what do you think? I haven't glued the sidings and spurs down yet because I want the slip firmly in place and then I can insert the SweepSticks for the correct alignment of the c40 flex and pin that down. Then it's on with the styrene for the paving.
That wasn't the only piece of hand laid track I glued down. The first of my curved turnouts has been wired, glued down and I even did some....... ulp!... ballasting! Don't worry about the nylon joiners. They'll disappear once I've air brushed the ties and rails. Then it's out with the paint pens to do some detail work and install the crank and servo. BTW... can you spot the feeders?
-
18th March 2011, 11:46 PM #34
Senior Member
- Join Date
- Dec 2008
- Location
- Oshawa, Ont., Canada (I wish I was in Brissie)
- Posts
- 331
Finally!
The industrial park siding and spurs are connected to the BSRC line. Now I can.....*shudder* ballast that line and finish the scenery on the inside of the curve.
Oh and yes, the solder is there because I soldered the siding together. It's got nylon connectors at the curved turnout and on one line at the slip but it was made with two pieces of flex so I could solder the short piece to the slip on one track and glue it into a nylon joiner on the other without having 3' long pieces of flex hanging off the slip! The whole thing is part of a reversing Y - well an X really - so it has to be isolated from the rest of the block. And because the frog rails are joined for strength and are connected to a HFJ they had to be isolated from the sidings.
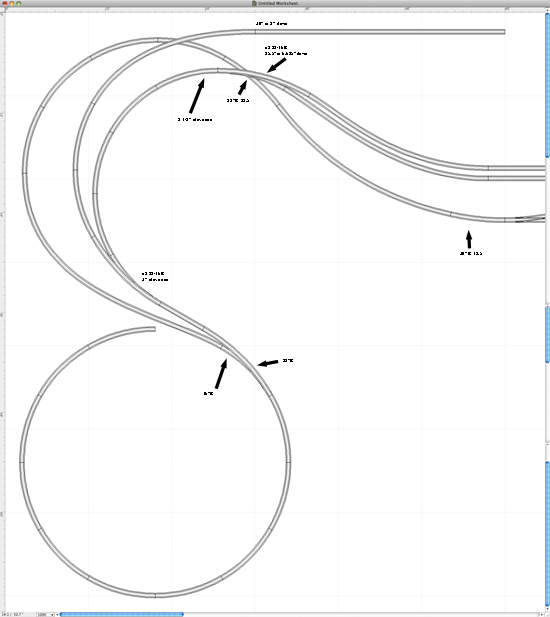
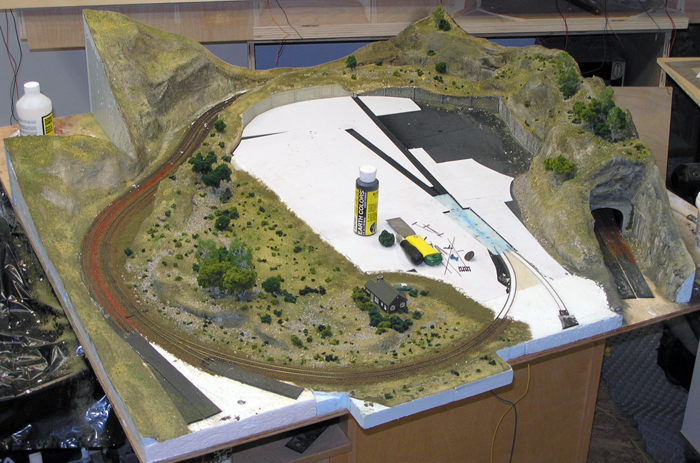
While sitting around waiting for glue and foam putty to dry I got to tinkering in XTrackCAD and came up with this for Shelf A based on three designs I saw elsewhere and liked various aspects of them:

Now there are aspects of this that I'll be cleaning up when laying the track but overall I'm happy with it. EDIT: I've included the helix now and I changed around some of the tracks as well as flipping the turntable. I've removed two of the yard tracks which narrowed the shelf down so there's less likelyhood I'll be bumping it when doing things on the upper two shelves. It also smoothed out the throats but was a nightmare to reconfigure! Still better done now then once I start laying track.
I'll probably be looking for a much smaller station too but for now I put the Union Station in there. I think Amtrak and some BSRC local passenger service will fit in well.
Not that much in the way of industry being served directly here but I could run a spur and siding back to the corner and put something in there.
The city of Brisbane will be along the back wall and the left corner. I'll put some 3D backgrounds in the right rear and along the back wall. I'll also have some city buildings in the front left area but not many. Don't want to damage them leaning across the shelf even though this is going to be at 25"-30" high.
So........ opinions?
-
18th March 2011, 11:52 PM #35
Senior Member
- Join Date
- Dec 2008
- Location
- Oshawa, Ont., Canada (I wish I was in Brissie)
- Posts
- 331
It'll look a lot better once the glue and the foam putty is dry.
-
18th March 2011, 11:54 PM #36
Senior Member
- Join Date
- Dec 2008
- Location
- Oshawa, Ont., Canada (I wish I was in Brissie)
- Posts
- 331
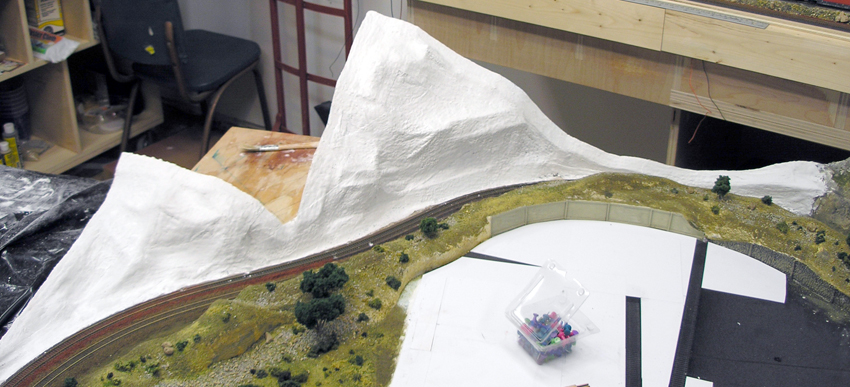
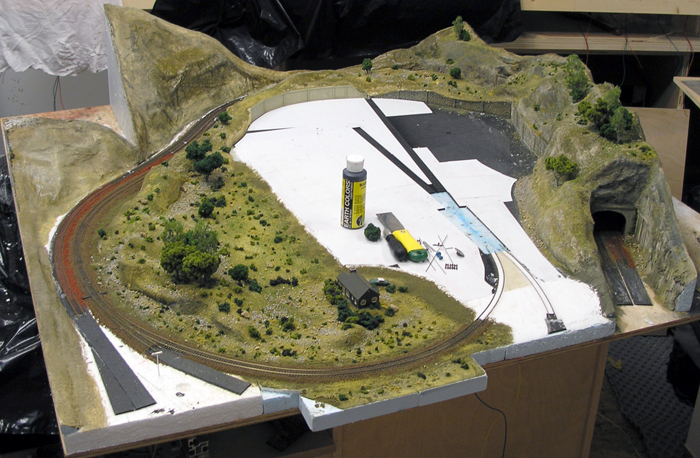
Nearly 2 weeks later and all I'd done to the layout itself was rip out the slipswitch and clean up the roadbed and scenery around where it used to be. Well finally I thought I should get a start on finishing the hills at the end of the layout so I could also finish the ballasting there (yuck). I know some people must have wondered what I use for my scenery and how I throw it all together so I'll document this end of the module properly.
Oh and I know I keep calling this a module - which it is - but of course it's not anything like a N-Trak module or that kind of thing. I just find it easier to get the detail I want by building one piece of the layout at a time in my workshop and then moving it to the basement to be mounted on the framework and joined to the other modules.
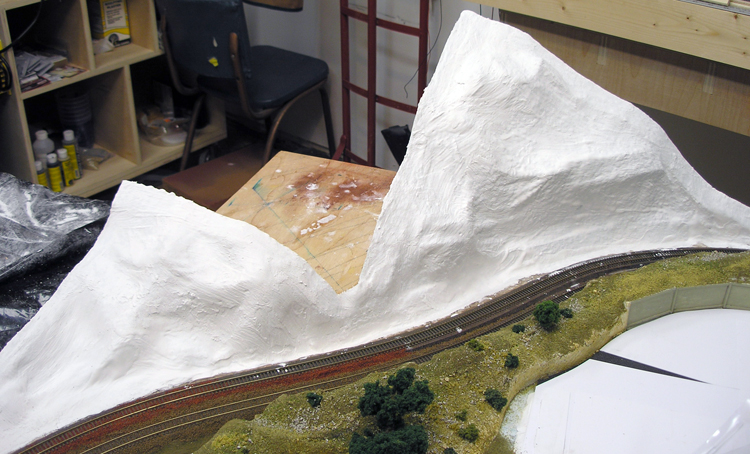
Some more scraps of foam were glued in place. Because the HVAC ducting runs up the corner of the room there is a 10" x 13" area in that back corner that I have to build around. I've actually thought about running tracks through the front corner of the bulkhead in a half tunnel arrangement but I'm too lazy to get into that stuff.
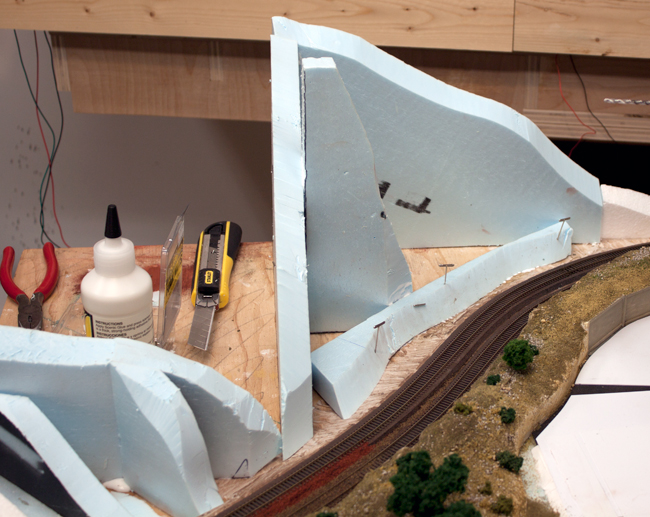
Some of the offcuts from the foam I just installed comes in handy for closer to the tracks. I'll add some more pieces of foam and then balls of newspaper for support and shape and then on goes the plaster cloth.
It's nice to be back building the layout again even though I really do enjoy building turnouts and such.
I was busy last night, early this morning and late this afternoon so here's what I got up to.
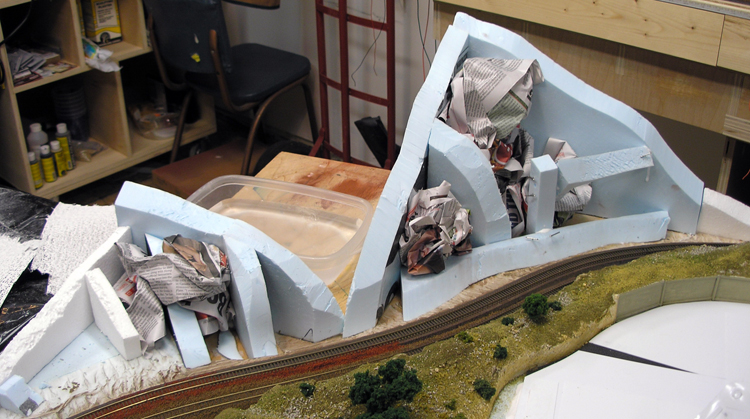
Last night I wadded up some newspaper to fill some voids and provide a little extra support for the plaster cloth.
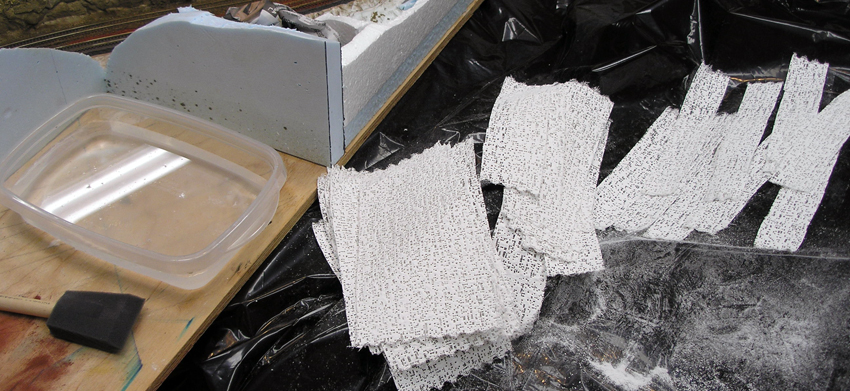
I got my tray ready for the three sizes of cloth I cut from the roll. I use a foam and a small bristle brush to spread the plaster and smooth the edges.
Because the extra foam supports were still drying I only laid out part of the mountains. No use sealing the foam nails inside because they'll rust and spread through the scenery. So I left things like this till the morning.
First thing this morning I pulled all the foam nails, cut a bunch more plaster cloth and wet down the areas where the cloth would overlap the previous evening's efforts. I really don't like this new batch of cloth. Can't remember what brand it is but I'll be going back to WS from now on. This stuff simply doesn't smooth out nearly as well as the WS cloth and the weave is not as easy to hide either.
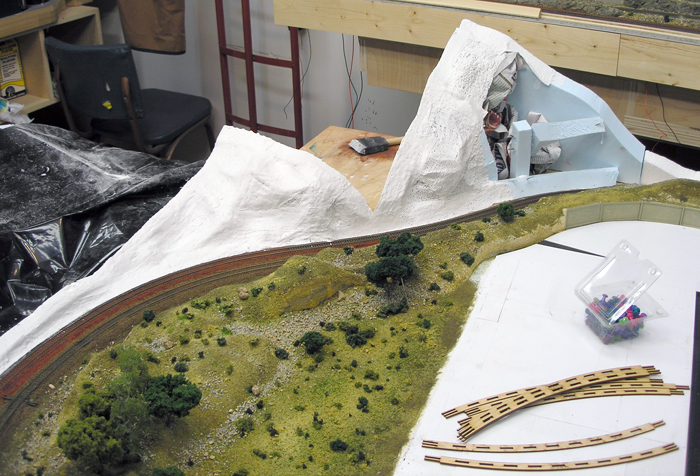
Mixed up some hydrocal at around 50% of it's normal strength and brushed it on all over the mountains and into the gullies beside the tracks. Filled all the pin holes and hid the cloth weave, seams and overlaps nicely.
All told I'd say to get to this point took about an hour including prepping all the items I needed. Fast and furious, that's me!
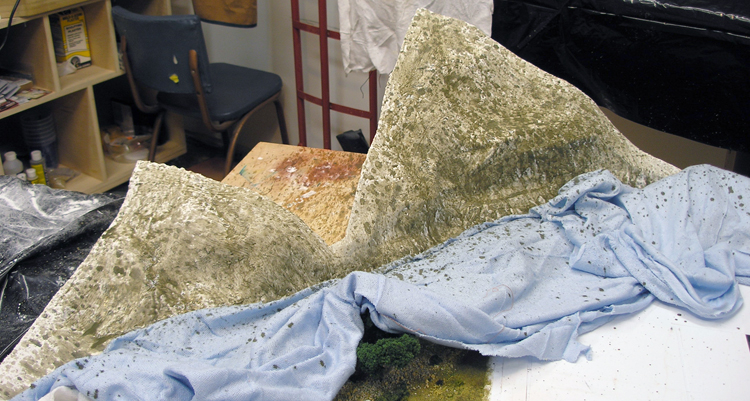
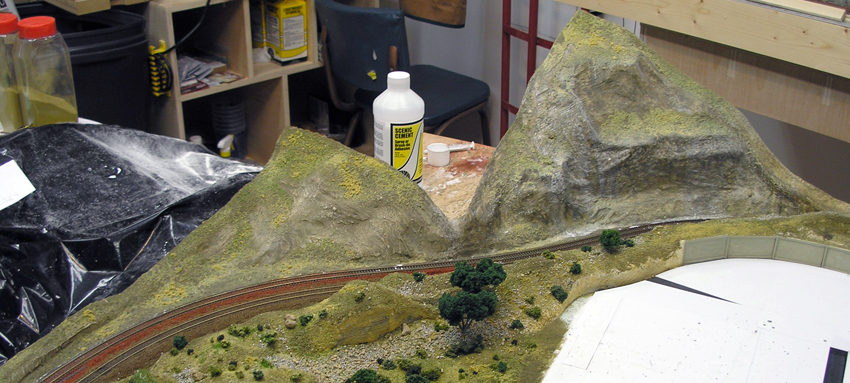
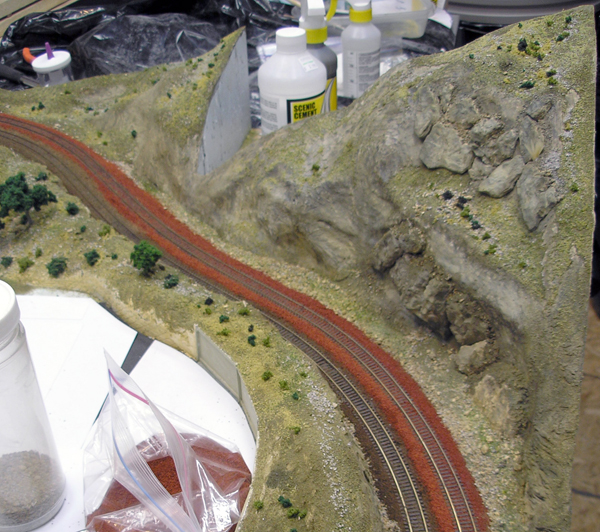
I've told people for a while that my scenicing methods are rough as but some still seem to think I know what I'm doing. Here I've wet everything down from this morning using a large bristle brush and then sprayed a watered down WS Stone Gray with some dish washing soap at random onto the moist plaster. I'm not looking for full or even coverage. Nature isn't consistent in how colours appear.
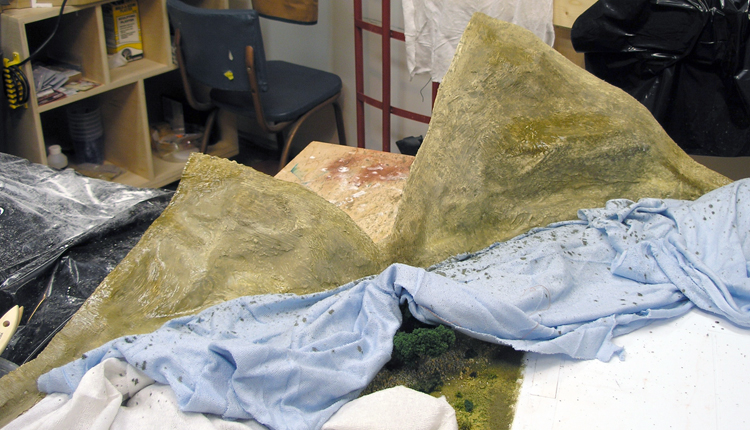
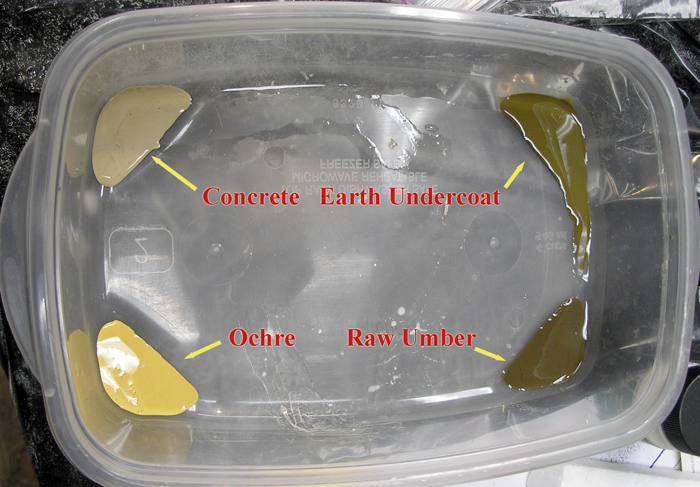
Everything is still pretty wet so I take the tray I used for the plaster cloth and put WS Yellow Ochre, Earth Undercoat, Raw Umber and Concrete in each corner and with a small spray can lid of water I begin applying the colours to the plaster using a small bristle brush. Where the formation is very steep or vertical I go with more of the Ochre and Concrete and apply the Earth and Umber to less steep areas. I try to blend the colours as much as possible but it's not that important AFAIC. NO BLACK yet! At this point if I want to darken or even lighten the scene I can. Once you add black there's no lightening anything.
I've dribbled some black on here mostly along ridge lines and in crevices. I let it run wherever it wants to and then go back over with a dry brush to blend it if it pools.
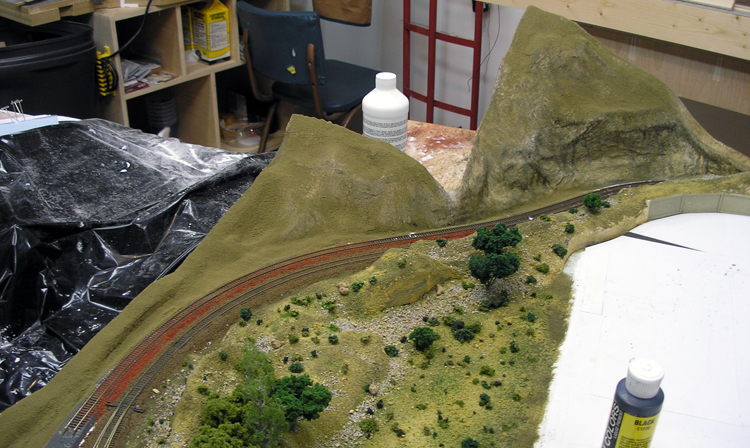
I applied WS scenic cement using that small bristle brush to areas I want the ground cover to attach to. Then I sprinkled on WS Earth foam ground cover.
Next come two different shades of burnt grass foam.
-
18th March 2011, 11:55 PM #37
Senior Member
- Join Date
- Dec 2008
- Location
- Oshawa, Ont., Canada (I wish I was in Brissie)
- Posts
- 331
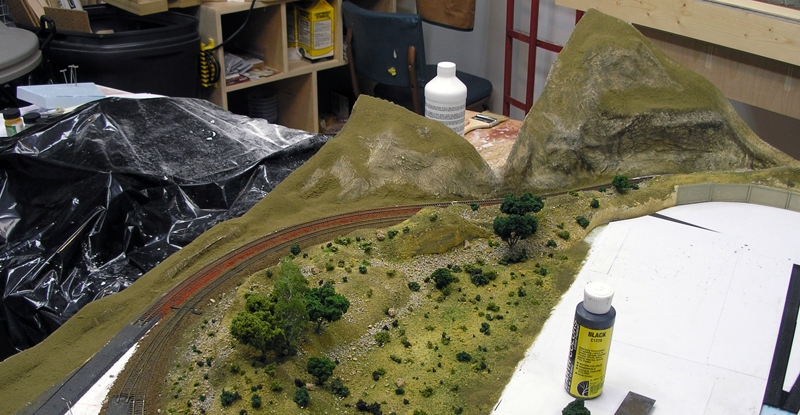
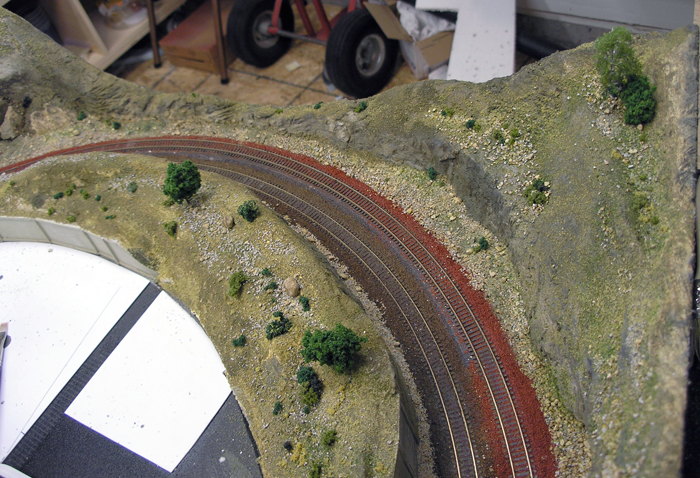
Now some grass mix and medium course foam are sprinkled on. Then I take a larger bristle brush and remove any of the foam that collected on sheer rock faces.
In the back corner you can see how I apply the scenic cement for the ground cover - and also for ballast and shrub clumps. I pour the cement into the cap you see and use an old syringe to draw it up. Then I carefully run along an edge letting the wicking action of the ground foam break the surface tension of the cement. Once it starts to spread it's easy to just keep adding more cement near the edge of the flow so it doesn't wash away the ground foam but saturates it. For the steeper areas I apply lots of cement and let it wash away the ground foam in a "natural" erosion manner.
That blended in pretty well. I still have some foam putty work and painting to do along what will be the far end of the layout on the outside of the double tracks. I only painted it there because I had some colours left over in the tray.
The only thing I don't like about this photo is that bloody hole where my slipswitch should be! I have to finish cleaning it out and getting everything ready for the new one. Till then I'll add some bushes and maybe some trees to the new mountains - oops, I'm all out of trees. Ah well bushes it is for now. Then I can ballast the tracks....... yuck!
-
18th March 2011, 11:56 PM #38
Senior Member
- Join Date
- Dec 2008
- Location
- Oshawa, Ont., Canada (I wish I was in Brissie)
- Posts
- 331
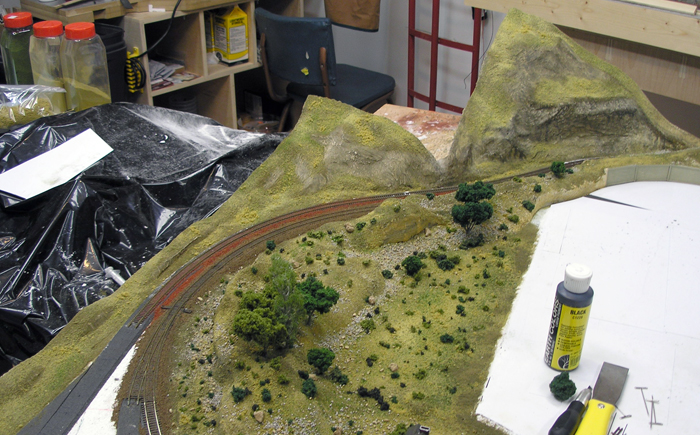
Added some bushes to the slopes. I can't add any cast rocks or foam putty to carve yet because the whole thing is still damp. Foam putty doesn't like water you see.
So what I am doing is preparing to place the 3-Way on the layout. Handy to have one that I can use as the template for the roadbed...... okay it's not really. Next will be drilling the holes for the wiring and the servo wires to the throwbars. By the way, can you see the crank fitted to the curved turnout? Yeah, not unless you look really hard you can't. To think there are people who say these things stand out too much. pfft!
-
18th March 2011, 11:57 PM #39
Senior Member
- Join Date
- Dec 2008
- Location
- Oshawa, Ont., Canada (I wish I was in Brissie)
- Posts
- 331
I had a moment or two today after getting various things ready for the girls first day at school so I decided to add the extra rock to my new mountains, paint the 3-Way and slipswitch and then install said 3-Way and ballast it. So here we go!
I used the first attempt 3-Way to pinpoint the holes for the wiring and get the third leg of the roadbed cut and in place. Handy having it now but I wish I didn't, if you know what I mean.
Oila! I might add some black wash to the new rocks but I'll wait till everything is dry before making that decision. The ballast is still pretty wet too so it'll lighten up a little as that happens. Just a little more detail work to do right at the end of the layout on the rock walls and the mountain scenery will be done for this module. That's when I'll have to get a move on and install the slipswitch and finish the industrial park.
-
19th March 2011, 12:01 AM #40
Senior Member
- Join Date
- Dec 2008
- Location
- Oshawa, Ont., Canada (I wish I was in Brissie)
- Posts
- 331
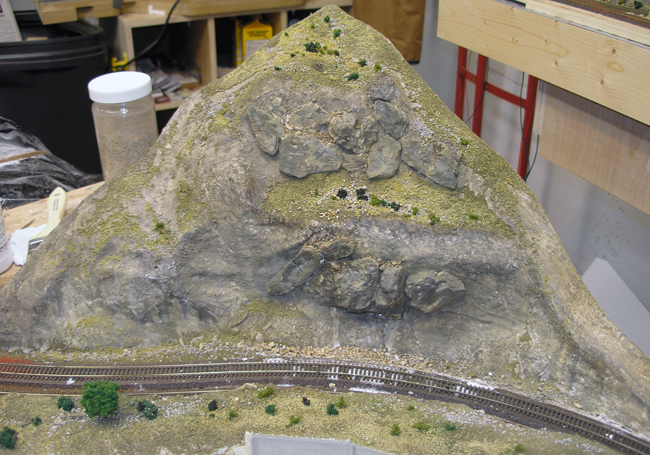
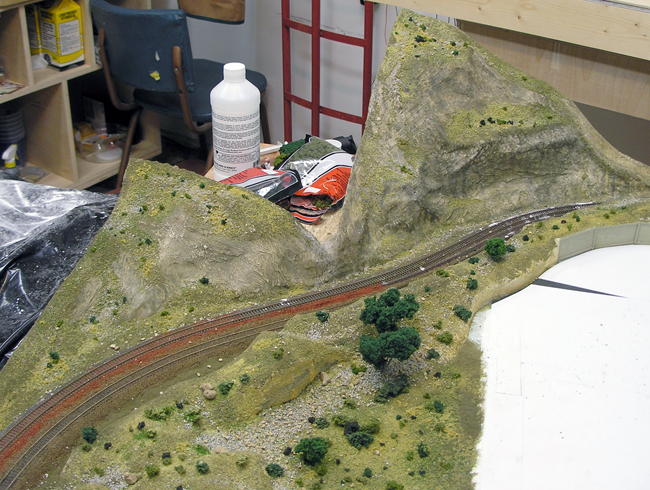
After adding a few more rocks to the larger side of my mountain I coloured it and stepped back to evaluate it. Needs more rocks.
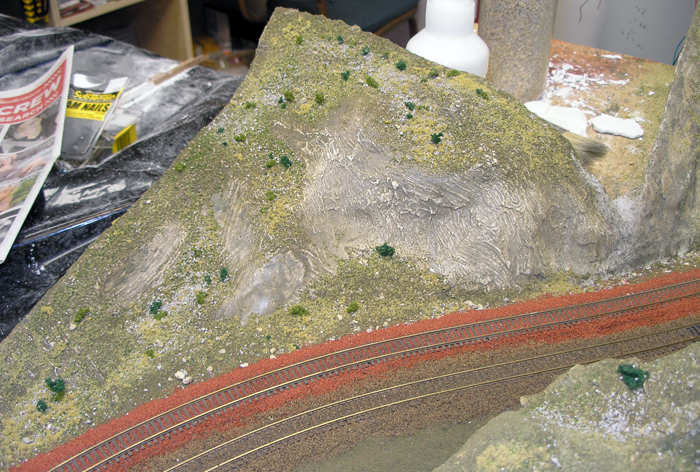
I'm happy with this side of the mountain though. Maybe a little more colour in places but that's about all it needs. The ballasting is done in that area.
Here's the 3-Way up close. Just one hole that needs filling so the ballast won't run through. Other than that you can barely see the crank tubes for the throwbars mostly because they haven't been painted yet.
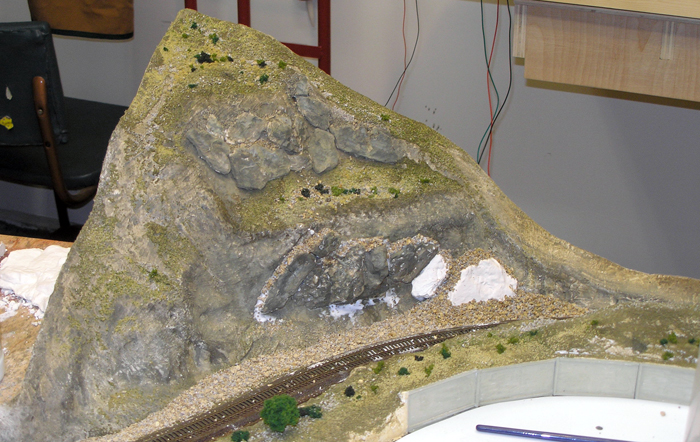
Adding some more hydrocal rocks. I also added a lot more talus. I figure with a mountain this large you're going to have a lot of debris at the base. It hasn't been blended in yet but once it is it'll look fine.
On the left you can see that I've started to blend the new rock and talus into their surroundings. There's still some more to do there. Middle to right of the photo you see the foam putty applied to the low wall. I can't colour this for a few hours because foam putty doesn't like water when it's drying...... although if you time it just right you can get some amazing erosion effects.

I took this shot about 40 minutes later. The middle and outside of the BNSF main is ballasted, the talus has been blended into it's surroundings and I applied a light wash of stone gray to the foam. I also used some earth ground cover on the talus because earth wound also wash down over this stuff.
Next up is the BSRC branch middle and inside to be ballasted. I'll tackle the other sides of those tracks soon enough. I need some time to contemplate them! Tomorrow I'll hit the foam with colour and some ground cover where it seems appropriate.
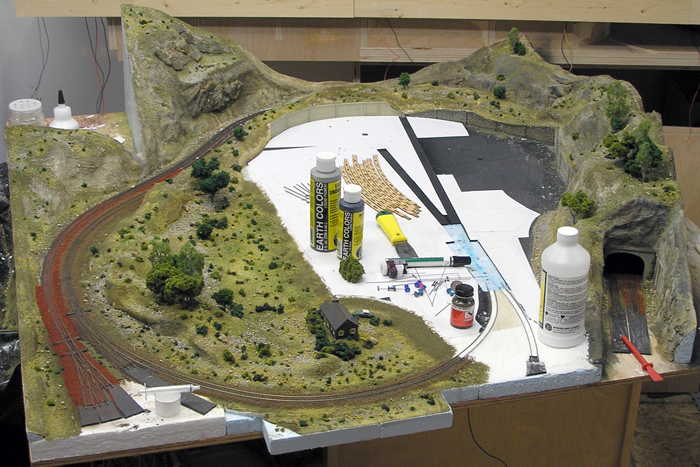
Once that's done there will really be only one area to complete on this module - the industrial park!
-
19th March 2011, 12:02 AM #41
Senior Member
- Join Date
- Dec 2008
- Location
- Oshawa, Ont., Canada (I wish I was in Brissie)
- Posts
- 331
I decided to apply some colour to the foam putty even though it wasn't quite dry yet. Nothing is drying very well at the moment thanks to the weather.
So I got out my tray and after squirting some colours in the corners I sprayed some "wet water" in the middle and went at it with a small bristle brush.
While I was at it I also spread the last of the BSRC ballast and all but the last 2' of the BNSF line ballast.
About 20 minutes after starting here's the foam putty now blended into it's surroundings.
-
19th March 2011, 12:05 AM #42
Senior Member
- Join Date
- Dec 2008
- Location
- Oshawa, Ont., Canada (I wish I was in Brissie)
- Posts
- 331
At long last there's progress!
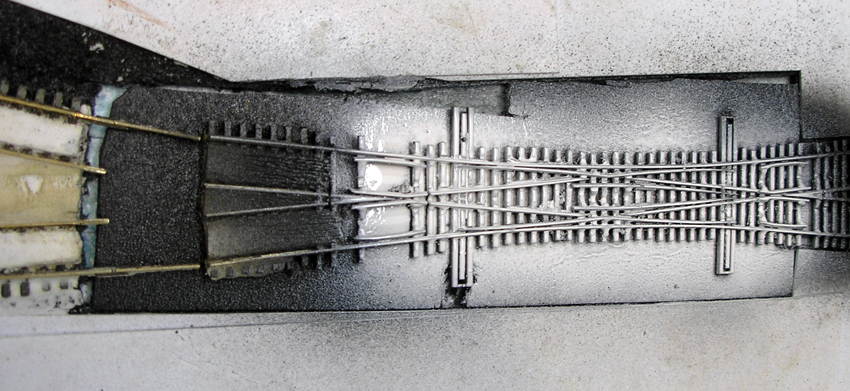
I know this looks really rough as guts and you're probably wondering why I've painted that slipswitch white?
Well that's the old slip that got broken so it's no big deal how rough it gets and besides which it was cut out so the rails match up exactly with the tracks still on the layout so I sprayed the white to show exactly where the new slip goes. That allows me to lay the new slip in place to cut it's rails to match the existing tracks and also to drill the holes for throwbar wires and feeders. Once all of that is done I'll spray a little flat black in there before I glue the slip down.
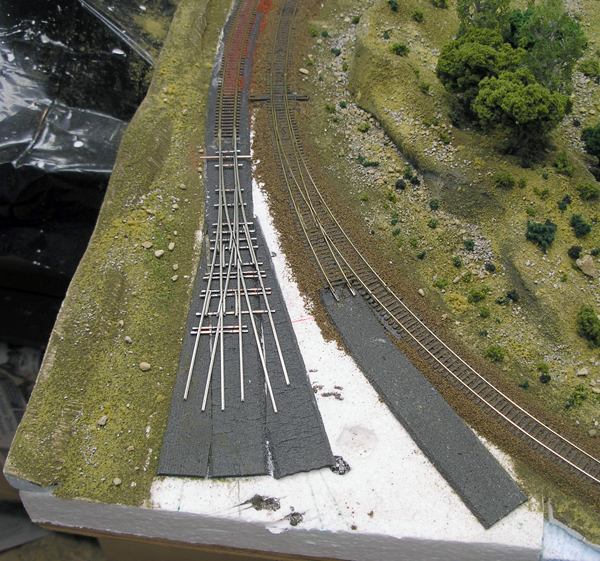
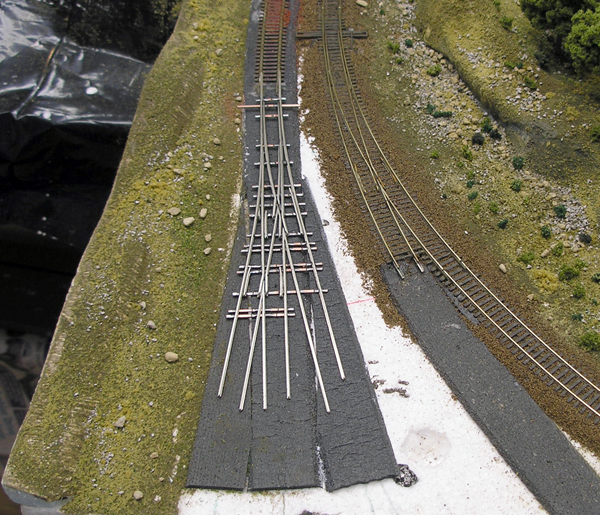
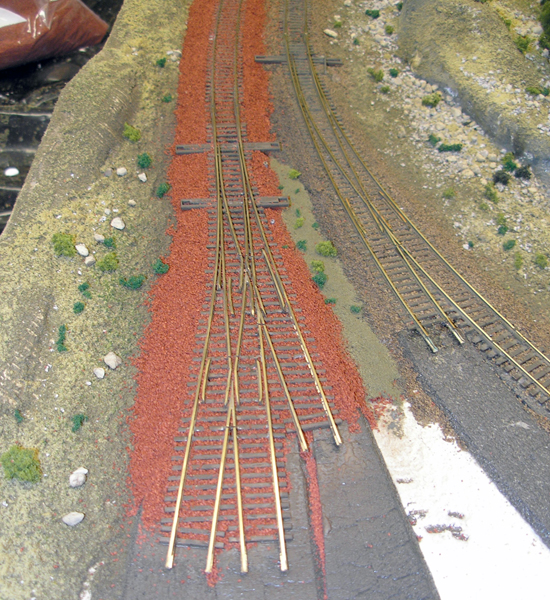
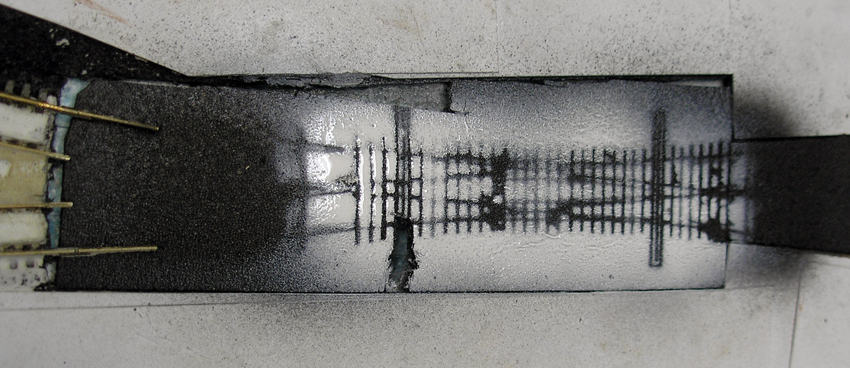
With both ends of the slip's rails cut to length it's time to attach the feeders and prepare to install this puppy.
Just as a handy tip I use a piece of cut off plastic tie - 2 ties to be exact - to determine the length of the cuts at the other end of the slip - and on other handlaid track). I simply trim the ties so they'll sit flush against the wooden ties and then cut the rails to length against the second tie. Neat and square every time.
So time to fire up the iron again and attach those feeders. It feels nice to be working on the layout again.
Trimmed all the rails for an exact fit and made sure I had smooth transitions. Can't see the feeders for the frog rails can you?
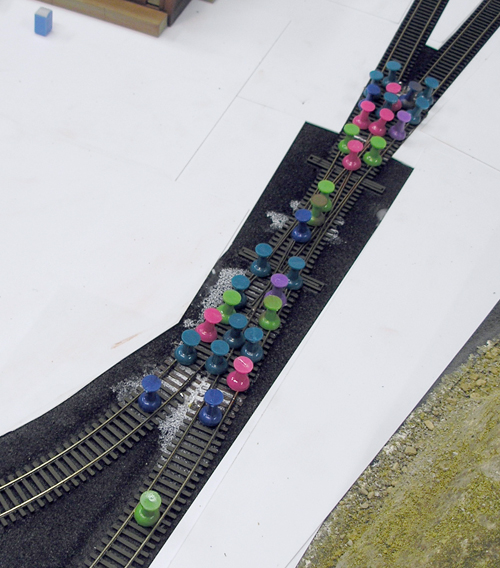
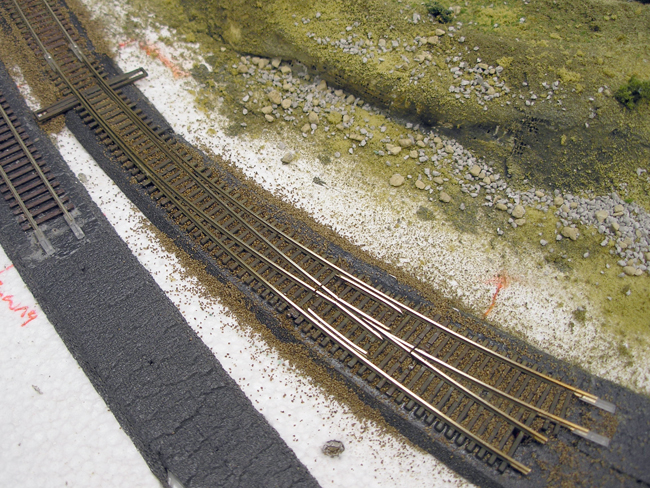
This is a test fit of the entire industrial siding complete with wiring. There are 8 feeders in this shot. I can see one but that's because it's yellow and it does sit fairly high. Love the Fast Tracks SweepSticks!
Now I'll pull all of this out and paint the foam black - not that it'll matter much - and then down it will all go. Once it's down then it'll be time to get out the foam putty again and fill everything in up to the rails and between them. That's one of the reasons why I didn't care if this looked rough for now because there's no ballast to go in, only putty.
-
19th March 2011, 08:45 AM #43
Senior Member
- Join Date
- Dec 2008
- Location
- Oshawa, Ont., Canada (I wish I was in Brissie)
- Posts
- 331
Believe it or not I'm actually doing some work on the layout! Yeah I know hard to accept considering how slack I got there for quite a while.
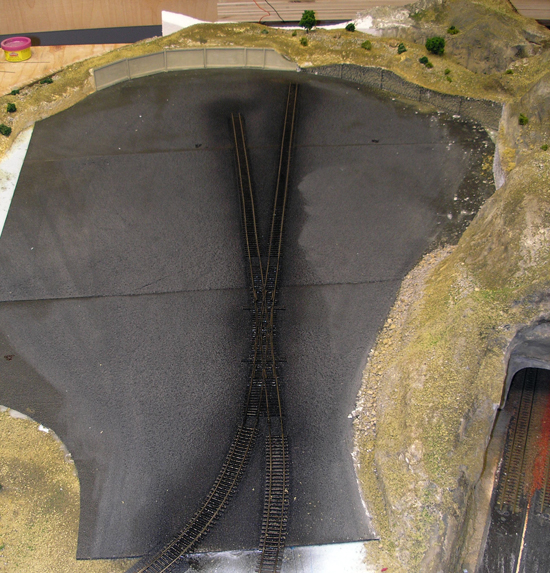
Any way can you spot the magnetic uncouplers? I can spot the one for the dairy on the left siding but I have to admit that even though I know where it is I couldn't spot the right one even when the image was at 200%. Blended in really nice. The black is WS scenery colour that I'm brushing on randomly and will weather even more to make it look like asphalt. The concrete will be blended as well using some rustoleum spray and a mixture of WS concrete and floquil aged concrete all mixed together as best suits the look I'm after. Parking lines, direction arrows and tire marks will come.
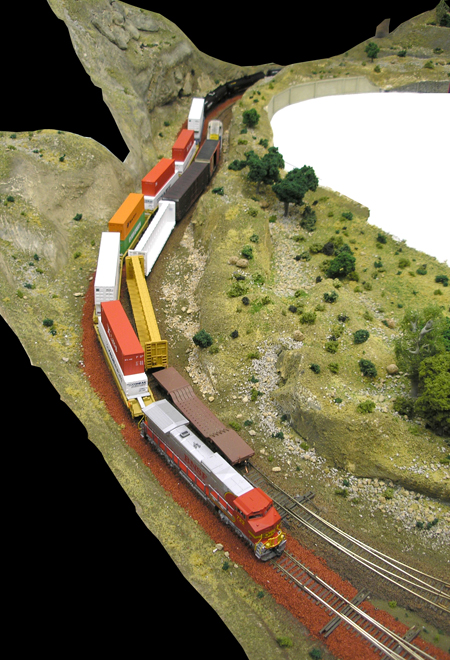
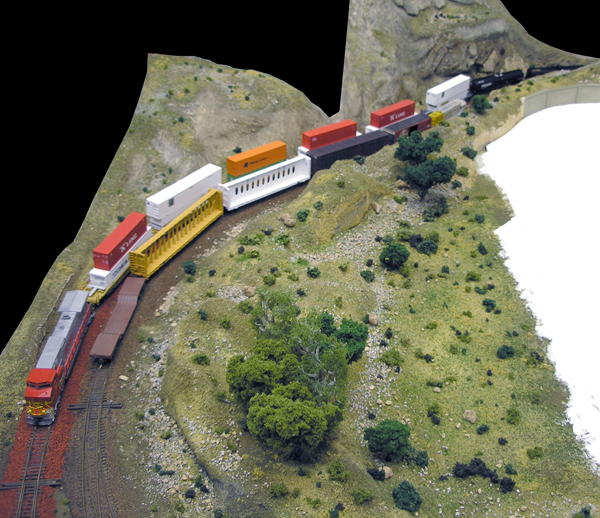
Just a couple of shots of the latest motive power on the Brisbane Southern's tracks. Kato Dash 9 in Warbonnet livery.
Once this section is up on the wall - soon I would hope - there won't be any shots from these angles again.
So that's about where I am now. Because of the weather, family and work commitments and being sick a lot since the girls started school I haven't worked on the layout much except to do little clean up jobs here and there. Mostly I've been scratch building some pieces for the industrial park and painting and weathering locos and rolling stock. Once our family trip to Oz is done and the girls are back to school I can get stuck into finally finishing some more sections and get them all up on the basement wall. That'll mean woodworking! Woo hoo!
-
19th March 2011, 02:01 PM #44
 The Laird
- Join Date
- Jan 2007
- Location
- Katoomba NSW
- Posts
- 4,774
Hi Expat,
I've never really been interested in model trains but i am finding this WIP fascinating.
I've found myself googling some of the terms you use so i can better understand what you are doing.
Amazing work
Watching closely with a new found interest.
-
19th March 2011, 03:39 PM #45
Intermediate Member
- Join Date
- Sep 2007
- Location
- Gold Coast
- Posts
- 37
Beware, once hooked!!!! Originally Posted by NCArcher


 Reply With Quote
Similar Threads
-
Great Southern Failure
By steven in forum NOTHING AT ALL TO DO WITH WOODWORKReplies: 15Last Post: 22nd May 2009, 12:50 AM -
Southern Gentleman
By Barry Hicks in forum WOODIES JOKESReplies: 1Last Post: 29th June 2008, 03:07 PM -
Southern Myrtle Bed
By BobR in forum WOODWORK PICSReplies: 16Last Post: 13th May 2008, 12:08 AM -
Need sharpening help - Southern Brisbane
By jisk in forum SHARPENINGReplies: 42Last Post: 14th August 2007, 06:08 PM
